
Affordable Colour Grading Control Panels
If you’re looking for an affordable colour grading control surface to take your colour grading capabilities up a level, either as an editor, DIT or colorist then this post will give you a few options.
Products featured in this post:
- Tangent Element Control Panels
- Blackmagic Design Mini and Micro Panels
- Palette Gear Customisable Controllers
- Tangent Ripple
- Logitech G13 Programmable Keyboard
- X-Keys
- Midi Grade with Midi Fighter Twister
- Backlit DaVinci Resolve Keyboard
- iPad Apps for Colour Grading
- Avid Artist Color
Latest Update: February 2022

This post is also based on the premise that you’re not going to be spending $29,995/£21,195 on a full Blackmagic Design DaVinci Resolve colour grading control surface or even an (unpriced) bespoke installation of a Filmlight Baselight Blackboard 2 (and the full system and tech support that goes with it) or even the ‘cheaper and more portable’ Baselight Slate, which works well with the streamlined Baselight for Avid, but these are high end interfaces, sitting on top of high end installations.
The aim of this post is to give an overview of some of the most affordable options costing a lot less than these systems and things will get all the more affordable as we head down the page.
If you’re wondering whether you even need a colour grading control surface in the first place, then you probably don’t, but if you want five good reasons why a colour grading control surface can be helpful then this post over on Premiumbeat.com has some helpful considerations, including client perception, speed and efficiency increases and more.
With dedicated knobs, buttons, dials and wheels set to specific functions, muscle memory quickly develops as you learn your panel. Speed isn’t just about jumping to specific commands to alter your image. When grading, it’s helpful to adjust several parameters at once, to see how the image reacts.
Interestingly, there has never been a better time for anyone looking to make use of a colour grading control surface at the ‘affordable’ end of the market. This is largely due to the market forces of a growing demand thanks to many more people having access to cameras shooting flat or LOG profiles and the colour grading software to make these images look good. Essentially, the post ‘Blackmagic Design’ era makes a colour grading control surface no longer the preserve of the ivory tower grading suite elite.
That said, there’s a lot more to a proper colour grading suite than a cool looking control surface, from the properly calibrated monitor, to the media management system tucked away behind the scenes, to the right shade of paint on the walls and correct colour temperature bulbs in your lights and much more besides. Not to mention a colorist with a creative aesthetic and a technical mind who knows what they’re doing to wield it all!
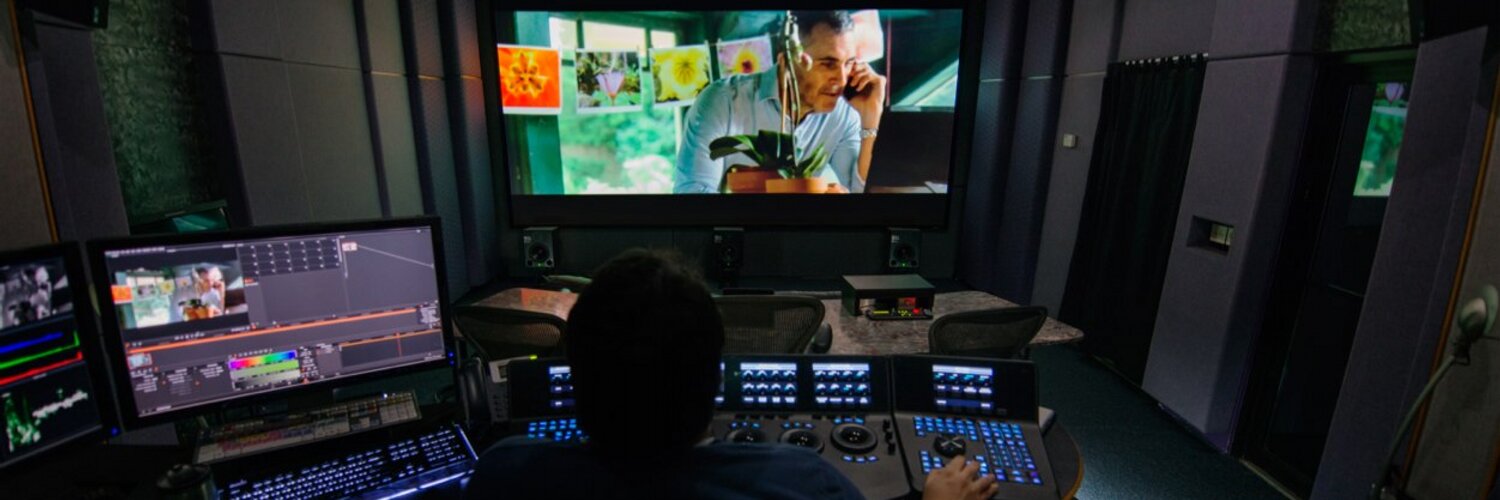
Until the day that you do need a serious colour grading suite, like this one above from colorist Juan Salvo’s The Colour Space in New York, or below, in colorist Alexis Van Hurkman’s home grading suite, then you’ll have to make do with a little less.
DaVinci Resolve 17 Advanced Panel New Keys
November 2020 Update – If you’re are a colorist fortunate enough to be working with the $30k DaVinci Resolve Advanced Panel then UK colorist Darren Mostyn gives a detailed tour of the 240 new and updated key caps that were released along with version 17 of DaVinci Resolve in November 2020.
Learn more about DaVinci Resolve 17 here.
Tangent Wave2 Colour Grading Panel

2018 Update
If you’re looking for an affordable colour grading control panel that works with a whole host of software applications then the Tangent Wave2 is a great option.
It works with apps like DaVinci Resolve, Adobe Premiere Pro and FCPX, along with Assimilate Scratch, Autodesk Flame and more.
At just [amazon_link asins=’B07CCFW6WP’ template=’PriceLink’ store=’jonelwfiledi-20′ marketplace=’US’ link_id=’ec731de1-6a5d-11e8-ac6f-bdd7d7f06429′] or £650 the Tangent Wave2 is really well priced for the level of controls and functionality that you get built in.
It’s also a really compact panel that makes it ideal for DITs or travelling colorists. The text screens update automatically to label each of the controls, depending on which part of an application you’re in. This is also really helpful for junior colorists who haven’t used a panel before.
Another great benefit is the fact that, in many applications, you can use the Tangent Mapper software to customise the control sets to your own preferences.
You can read my in-depth hands-on review here.
Buy the Tangent Wave2 on Amazon Global Stores
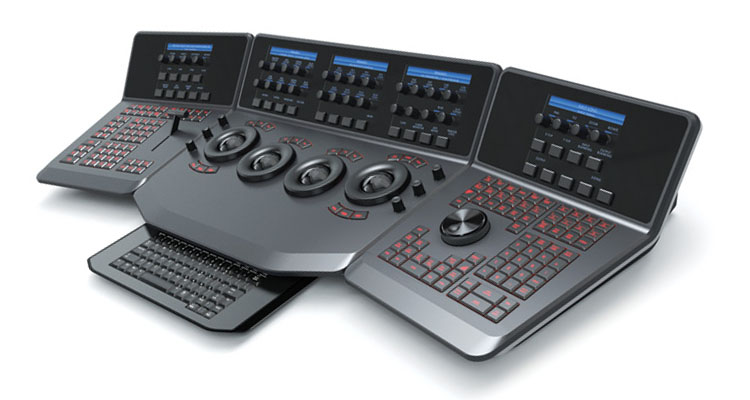
Tangent Element Control Surface
Buy Tangent Element on Amazon Global Stores | On B&H.com | on CVP.com
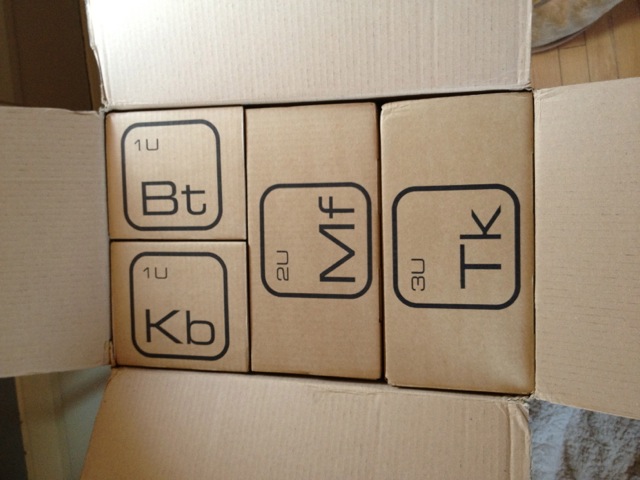
If I had the money today, then the Tangent Element is definitely the control surface I would snap up, and for a number of reasons beyond colour grading. First of all, it’s a uniquely customisable system that can grow with your requirements. Each element within the panel system can work independently from the rest, and you can keep adding extra sections, as you see fit.
There are four parts that you can combine as you’d like, which essential breaks down into a panel for buttons, knobs, track balls and a button panel with a jog shuttle wheel and navigation controls. Each of these costs around $1000, per element, with the element-Tk costing around $1,135/£954 (inc VAT) and the element-Kb costing $850/£714 (inc VAT), although you can buy them as a bundle of a complete set for $3320/£2970.
So these won’t exactly be impulse purchases for most editors grading their own projects, but it is still a very versatile system that could be used, for example, by a DIT to grade on set with just the track balls unit. In fact Tangent even sell custom Pelicase foam inserts, to help you take your Element gear wherever you need to go, and they are a popular choice with a wide range of on-set professionals for this very reason.
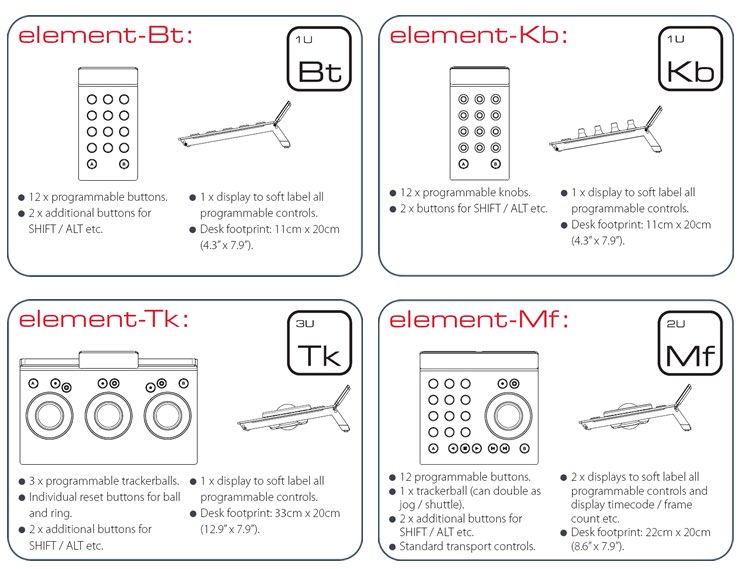
Secondly, you can readily use the panel for applications outside of colour grading, such as Premiere Pro, FCPX and more. As an editor the Element Kb section of the panel looks particularly interesting (see below) as this kind of functionality makes the device deliver a greater return on the investment.
Thanks to the Tangent Hub application you can download and install preset mappings for DaVinci Resolve, FCPX (thanks to Sam Mestman), Premiere Pro, Assimilate Scratch, Speedgrade and Nucoda. If you’re grading in Resolve with these panels then you’ll want to download this official PDF which maps out all of the shortcuts and layers of button presets.
They feel fantastic, the build quality is everything one might want in a surface of any price, and their compact size makes them at home in anybody’s suite while the clever design doesn’t compromise features.
For a good review of these panels from a professional colorist, check out this older blog post by Alexis Van Hurkman, on his impressions of setting up the panels, soon after they first launched. He also makes a very salient point, at the end of his article, concerning why you should definitely attempt to try any control panel before you buy.
Panel touch and feel is subject to very personal preferences. Before buying any panel, I strongly recommend you find a way to actually try it out in person to make sure that it’s your cup of tea. There are many different colour correction control surfaces on the market, and each has its fans and detractors; the only way to really know if a panel will work for you is to try before you buy.
Editor Scott Simmons over on PVC, has a great write up of using the Tangent Element panels from an editor’s point of view, with lots of good observations about the practical reality of having one of these on your desk.
Pros – Excellent feel and great build quality. Modular design means you don’t have to buy all four units. It’s just fun to use when colour grading
Cons – No custom button mapping in DaVinci Resolve or Adobe SpeedGrade. 4 USB connections might mean some desk clutter. It takes some work to move it off of a desk
Buy Tangent Element on Amazon Global Stores | On B&H.com | on CVP.com
USB Hubs for Tangent Element Panels
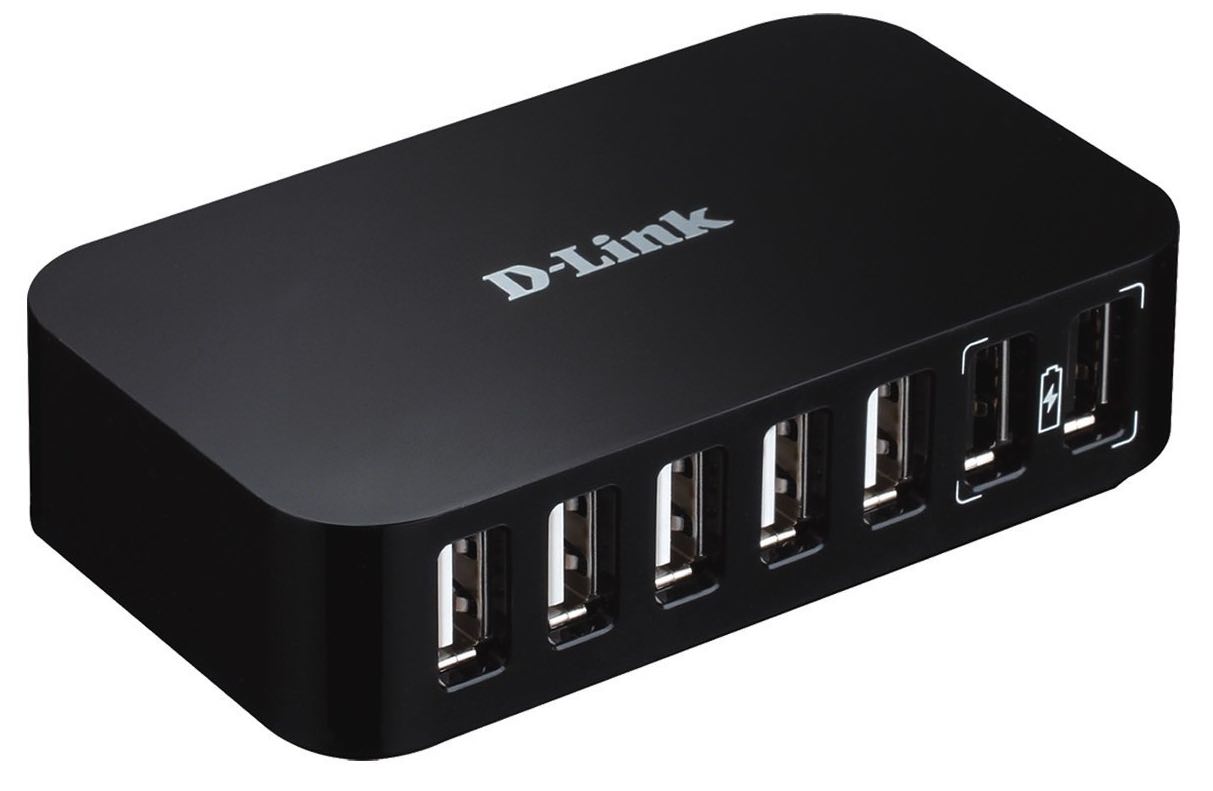
I just wanted to add a quick update to this post for anyone using the full suite of Tangent Element panels and connecting them through a USB hub, to manage the 4 separate USB cables. If you don’t have the correct kind, the panels won’t work through the hub.
Chris Rose from Tangent commented on this thread on the Lift Gamma Gain forums in response to a user question about this exact problem.
[The panels] work fine with a proper USB hub that can deliver 500mA to each USB port on the hub… This means the USB hub must be powered, and if it’s an external power supply it must be able to provide at least 2A for a set of 4 Element panels (500mA x 4 = 2A). Sticking anything else on that same hub (keyboard or mouse etc.) will mean a power supply that can provide greater than 2A.
Chris recommends these 4-port USB 2 hubs from Lindy as well as some power supplies and CAT 5 extenders.
Other users also recommended the D-Link 7-port USB 2.0 powered hub or the Tripp Lite 7-post USB 2.0 Hi-Speed hub.
Using Tangent Element Kb for Editing
This video from filmmaker Rob Tinworth, on controlling his Avid Media Composer with the Element Kb, is really the main impetus I have for wanting to try one of these panel’s out on Premiere Pro. Being able to have fine adjustment control over various sliders and keyframes would be fantastic.
At the end of last year Sam Mestman, who had created an FCPX mapping for the element after meeting the makers at NAB, updated his mapping for a more comprehensive user experience.
Sam Mestman has updated his map for FCP X and now pretty much everything, including the color board, can be controlled from the Element panels. This is an impressive update as it now means the Element panels fully support FCP X. He’s also provided maps for Motion and Logic. This is all included in the new release.
The Mapper has also been improved so that setting up a key press map for any app that doesn’t offer native support of the panels is now much more intuitive.
Tangent Element Control Panel Tutorials
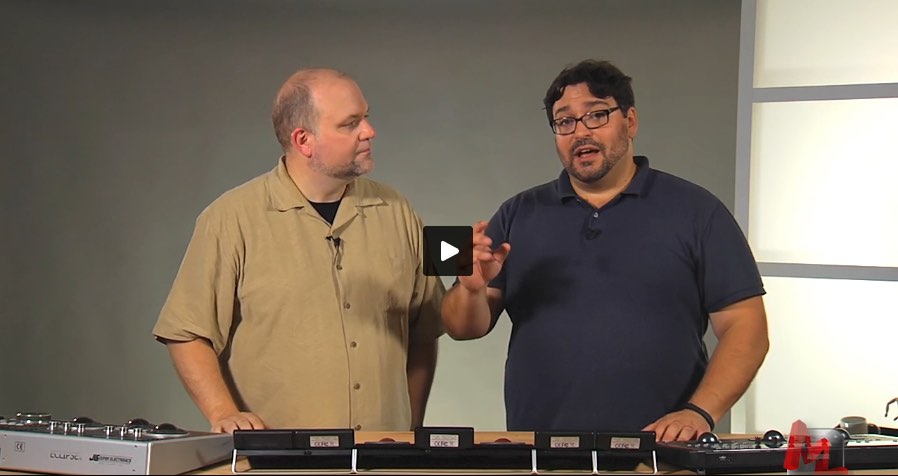
In this Mixing Light freebie you can get an overview of some colour grading control panel options from colorists Robbie Carman and Patrick Inhofer. In further a further video, as paid part of the subscription training site, you can get a lesson on setting up and using the Tangent Element with DaVinci Resolve.
Using only a mouse is like using the tip of one finger on one hand, to do all your colour grading work!
In this much older tutorial/review from when the panel’s first launched, Patrick walks you through his first impressions of the panel, and how the different parts of the panel work in conjunction with each other, in various parts of the much older looking DaVinci Resolve 8.
In this fstopacademy tutorial Den Lennie walks through how to use them with DaVinci Resolve 9 on a 27″ iMac.
Blackmagic Design Mini and Micro Grading Panels

In some welcome news for colorists in 2017, Blackmagic Design, the makers of the $29,995 full-size Advanced Grading Panel, have just released two new, smaller control surfaces at much more affordable prices.
The Mini panel costs $2,049, $2,995 and features three trackballs and rings, precision adjustment knobs and dozens of preset buttons for common gradings tasks in DaVinci Resolve.
The Micro panel costs $819, $995 and is the more portable of the two panels as it is effectively just the bottom half of the Mini. It’s about the same footprint as a medium Wacom Tablet, or the width of a full-size Mac keyboard. (Depending on what’s on your desk for reference!)
I’ve put a detailed post together comparing and contrasting the two panels, along with answers to common questions, reviews from professional colorists and my own review of the Micro panel. I’m hoping to get my hands on the Mini soon too!
Blackmagic Design Mini and Micro Grading Panels Reviewed
The most important thing to know about these panels is that they only work with DaVinci Resolve – and unless someone creates a hack – are likely to stay that way.
So if you are used to using your colour grading control hardware in multiple apps, then these might not be worth the money for your workflow!
In this short video review colorist Josh Petok, who runs the always excellent Colorist Podcast, gives his first impressions of working with the Blackmagic Design Mini.
One really big thing is that you can use the panel to adjust curves, which you don’t have the ability to do on the Tangent Element.
I have more thoughts on Josh’s review, and from other colorists in my more detailed post on these new panels.

So what’s it like to grade on the Micro?
After a couple of weeks of messing around on it, I sort of concluded that it’s great, but it will leave you wanting to buy the Mini!
The build quality is really good and the rings and trackballs have a lovely weight and feel to them, which makes them a joy to use. The buttons deliver enough functionality to make grading quicker and easier, but there’s not quite enough presets on the Micro, to keep your hands away from the keyboard.
Which is, in-part, a design decision. That it’s small enough to fit above your keyboard and is in fact created with editor/colorists in mind too.
The lack of access to other apps in the Blackmagic Design panels, may well put a lot of editors off using them though. I personally most often grade in Premiere, but if I have the time to grade in Resolve I do love using the superior toolset and controls.
If you’re a junior colorist, a DIT or an editor who loves to grade, you won’t be disappointed with what you get for $995. You just might find yourself upgrading to the Mini before you know it!
In my more detailed post in which I review the Micro in depth, you can also get a step-by-step guide to setting it up and a full breakdown of what every single control does.
Palette Gear Professional Controllers
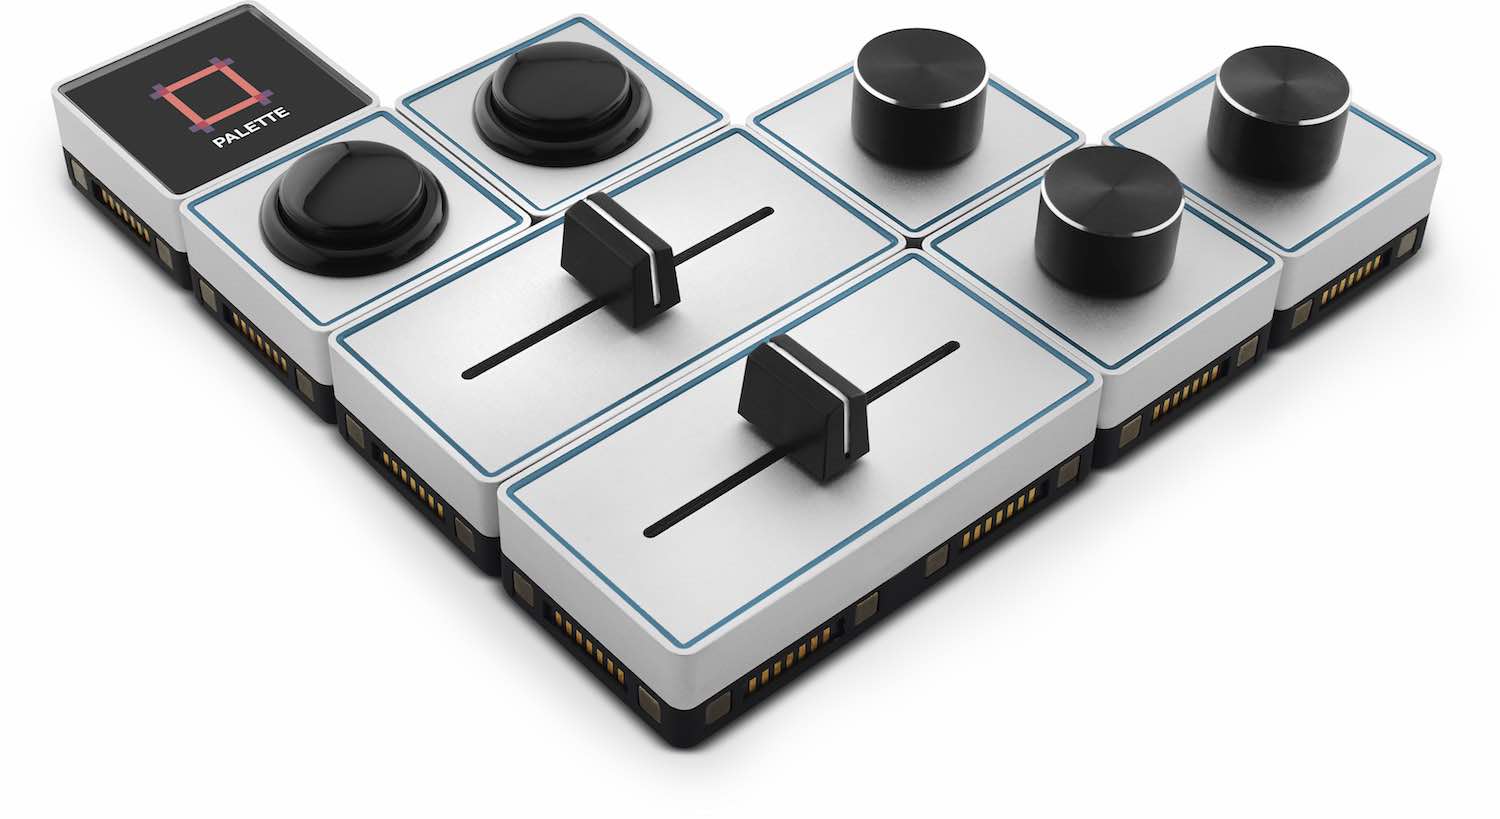
Palette is a really cool looking, customisable creative software interface, that I’ve blogged about before in this post on Editing Keyboards, Mice, Controllers and more.
Up to 18 different elements can be added in one Palette Gear set up, which means that you can build you own custom set up, any way you like. Granted this isn’t inherently designed to replace a colour grading control panel, but as you’ll see from the tutorials and reviews below, there’s nothing to stop you from building one anyway. And who knows, Palette is a young and ambitious company, maybe they’ll add trackballs into the mix one day anyway!
The latest release of the controller app can be found here, which list some of the development progress that’s been made. You can also download pre-made profiles for various applications, created by the growing global Palette community, from Chrome to Photoshop, Lightroom and many more.
The Palette Starter Kit comes with one core (the brain of the system) two buttons, one slider and one dial for $199. Each block costs a further $49 to add to the kit from that point on. The Expert kit, pictured above costs $299. They’ve been swamped by popular demand and should have more units shipping very soon. Currently pre-orders are being taken on the Palette site with estimated shipping dates of July 2016.
UPDATE – JULY 2016 – Palette Gear Review
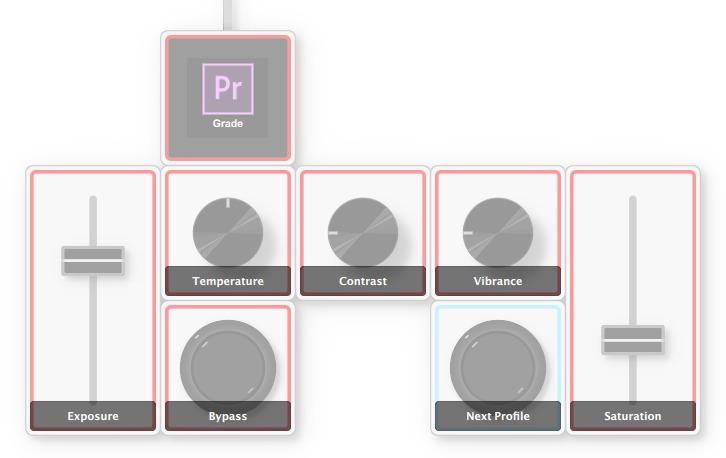
Check out my detailed review for using the Palette Gear Expert kit for editing and colour grading inside Premiere Pro. The post includes tutorials, a step-by-step guide to getting started and four customised profiles to download for Premiere Pro.
Currently the idea I suggest below for DaVinci Resolve isn’t currently possible, but I’m working on it!

My thought with using Palette Gear as a grading interface is based around the fact that I prefer grading with the RGB sliders in DaVinci Resolve and that it would be cool to have sliders set for each one (or 3 dials on the Palette Expert or the element-kb I guess). At Palette’s prices a kit with at least four sliders is going to come to $350, which you could hopefully then map to Resolve’s RGB sliders, for seamless control. The Expert kit could do the same thing with dials for $299.
Palette Gear have been kind enough to ship me a set to review(!), so when that lands in London, I’ll update this post with a link to my write up on using it.
This tutorial demonstrates how you can have multiple profile tabs, per application, effectively multiplying the number of parameters you can control, even with a limited number of buttons, dials and sliders at your disposal. With regards to my Resolve idea, I could have one profile set up for each group of sliders, so I wouldn’t need 12 of them!
This video from randomfrankp is probably the most in-depth review I’ve seen so far of the Palette Gear Expert kit, with a full-run down of the system and a few important (current) downsides including a slight lag and a limitation with the mapping software. Hopefully these can all be fixed in future releases of the mapping/controller applications, as things develop.
In this early tutorial Mikey demonstrates how he likes to use the Palette Gear for Premiere Pro and After Effects with a detailed breakdown of his shortcut set up. Palette for Premiere Pro is currently in beta, and I’m sure greater functionality is in the works.
In this short promo video you can get a visual sense of what’s so attractive about the Palette Gear set up, and the numerous ways in which you can add elements together.
In this short tutorial, again from an early stage in Palette’s development, you can see what is possible inside FCPX.
The New Tangent Ripple
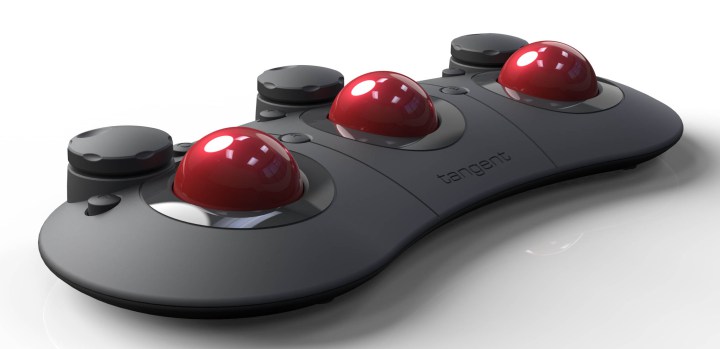
The most recent release of any control surface manufacturer, the Tangent Ripple is squarely aimed at anyone who wants to have colour grading track ball control, in a very portable form factor at a very cheap price of just $350. The Ripple features three track balls, three dials (replacing the rings around most trackballs on other devices), reset buttons and programmable A and B buttons.
My thought is that you might want to combine this with a programmable keyboard (see below) to gain the functionality of ‘the other half’ of a professional panel, which is a shed load of shortcut buttons.
The development of the Ripple is a really exciting step forward for anyone looking to enjoy professional style controls, at a price point that is accessible to anyone. It should be shipping at the end of May and was demoed at NAB 2016.
UPDATE – August 2016 – Check out this whole post reviewing the Tangent Ripple in detail and packed with tutorials on how to use it with FCPX, Adobe Premiere Pro and DaVinci Resolve.
UPDATE – July 2016 – Tangent Ripple Now Shipping
With the Tangent Ripple now shipping for $350 you can pick one up (while stocks last – it’s probably going to be pretty popular) from Amazon.com and other retailers.
Colorist and Youtube tutorial creator Casey Faris presents a balanced review of the Tangent Ripple in this short video. It’s interesting to note that there are currently greater limitations when using the Ripple with DaVinci Resolve than with Premiere Pro. Hopefully that will change in future updates to Resolve.
Tangent have put together a PDF user guide for working with the Ripple here.
In this unboxing video you can take a look what comes in the box. I’m not sure why these kinds of videos are so popular, but they are.

Editor Scott Simmons interviews Tangent product developer Chris Rose at NAB 2016 on the development of the Ripple and the construction mechanics underneath the plastic housing. It’s a good use of 10 minutes of your time. I agree with Scott’s conclusion that “They are going to sell a ton of these things.” In this image from Scott’s post you can get a sense of the size of the Ripple compared to an iPad and a Macbook Pro. In Scott’s interview with Chris, he (Chris) suggests partnering the Ripple with Tangent’s iPad app to add more buttons to your set up.
One of the reasons for the Ripple’s low price is the use of a dial instead of a ring around the trackerball, for adjusting things like luminance. Also the compact and lightweight form factor makes it seem like it will be ideal for editors who aren’t grading all day long and who might also want to re-program the dials and A/B buttons for editing functions like zooming, adjusting volume, moving around on the timeline etc.
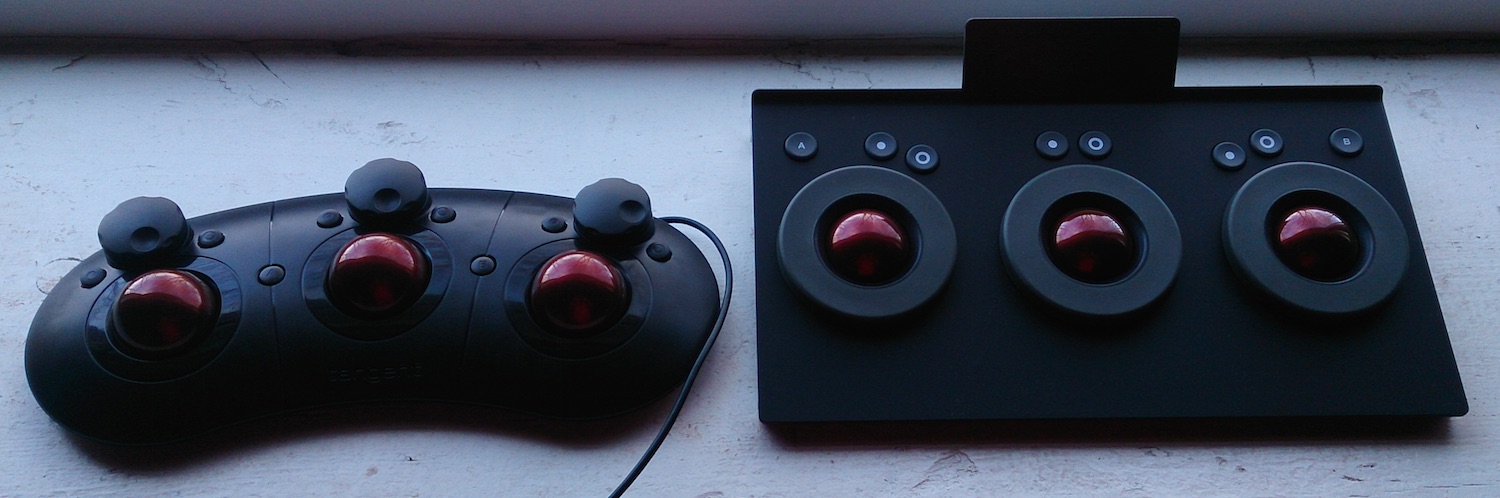
Estonian Colorist Margus Voll shared this photo over on Lift Gamma Gain, comparing the relative sizes of the Ripple to the Tangent element TK panels. Colorist Marc Wielage also shared his thoughts after playing with the Ripple for a week or so.
It’s a good idea to check out the LGG forum, and this post in particular, as I’m sure further colorists will be adding their thoughts and providing more details as time goes on. Marc provided a good number of thoughts on the panel, so check out the full post but here are a couple that jumped out to me:
The trackballs are excellent with very fast response (with the normal response in the control panel). I didn’t expect the trackballs to be nearly this good, so that was a pleasant surprise.
I also think a panel like this would be fantastic for anybody learning color correction, since the control surface is infinitely more flexible than using a mouse for most people. It’d be tough to use for the really intensive longform work because of the need for dedicated knobs for subtle adjustments — but I’m also very aware there are VFX artists and others using software like Lustre with only a mouse and keyboard.
Lastly if you want to dust off your French, Colorist Mathieu Marano takes a look at the Ripple in this short video from the NAB 2016 show floor for Front Créatif de Montréal.
In this video from Rise and Shine films at IBC 2015 you can get a look at the Ripple and it’s interaction with Resolve on a Macbook Pro, as well as a few insights on Tangent’s thinking about product development.
We wanted to make something that gave the essential three tracker balls, and at a low cost. It will be compatible with all the same software as the element.
Buy Tangent Ripple on Amazon.com
Logitech G13 and other programmable controllers

Buy on Amazon.com | Buy on Amazon.co.uk
The Logitech G13 is a programmable one-handed keyboard designed for gamers, but is perfect for post-production professionals too. It gives you 22 programmable keys that can be mapped to any keystroke, system shortcut, function key, macro, keystroke combination, alisas and mouse move you want. Each profile contains three layer sets of mappings, giving you a total of 66 programmable keys, plus the joystick and joypad buttons adding 7 more buttons to map in each set, totalling 87 programmable keys!
You can customise the backlighting colour of each set of keyboard mappings, with three colours per profile, to help you visually keep track of what mapping you are in. Also the LCD display will also toggle through several ‘applets’ which, by default, include profile selection, time and date, countdown/stopwatch, CPU and RAM usage as %, RSS Feed updates and email notifications. You can also save up to 4 Profiles to the internal memory of the G13 to take them with you wherever you go. You can also export and import them via a simple XML too.
I’ve previously blogged about the G13 a couple of times before – specifically in regards to video editing in this post, which guides you through the set up and from which you can download some editor’s keyboard set ups, and more generally in this previous round up of Film Editing Keyboards, Mice, Controllers and more.
If you were to combine a keypad like the G13 with something like the Tangent Ripple you would have a very portable, yet powerful set up allowing for the use of trackballs with one hand and the keyboard shortcuts with the other. It might take a bit of getting used to and a few miles to acquire the muscle memory, but it could be a very affordable set up! The G13 costs about $60/£60, but is frequently on sale on Amazon.
The Logitech G13 also benefits from regular updates and improvements to the mapping app, which some other programmable keyboards don’t seem to enjoy as often.
Buy on Amazon.com | Buy on Amazon.co.uk
Download G13 DaVinci Resolve Profiles
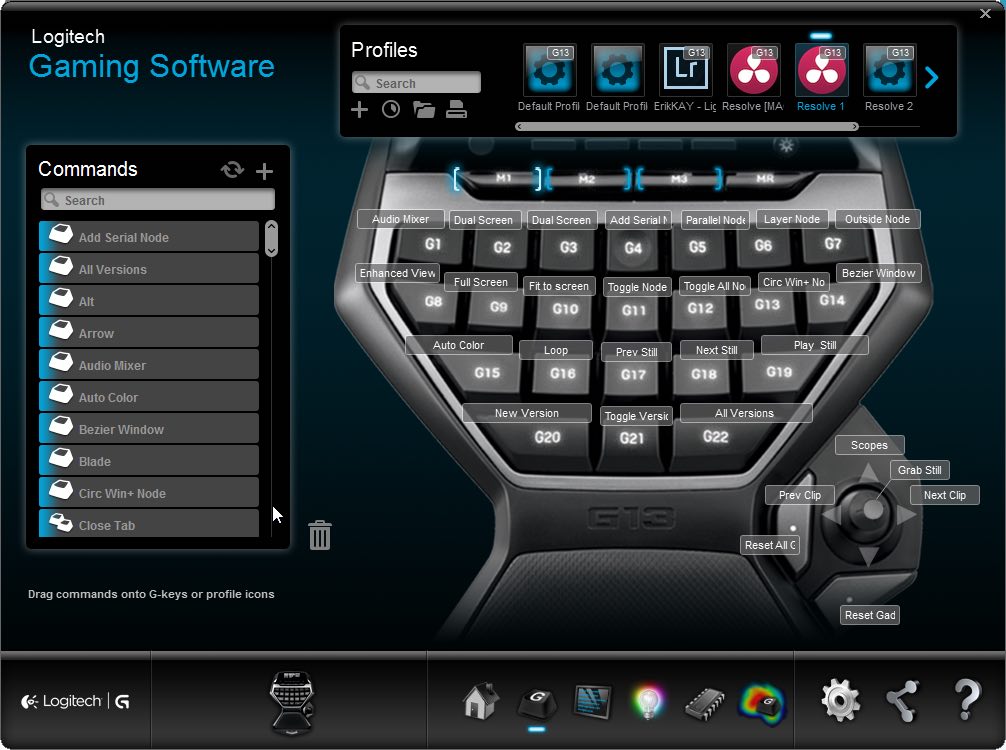
Colorist Will Tejeda kindly sent me his G13 profile for DaVinci Resolve, to share with you all. It’s a little bit of a work in progress, but it comes with three layer sets and some smart mapping of the most frequent functions. Inside the zip file you’ll find an XML file for both Mac and Windows as well as a pdf of the entire mapping and three images (like the one above) give you a visual layout too. Very cool.
Download DaVinci Resolve G13 Mapping Profile (zip)
As a quick aside it’s well worth checking out this previous round up of DaVinci Resolve training, which also includes a quick review of Will’s hour long Editing in DaVinci Resolve Crash Course.
UPDATE: Will has kindly offered the readers of this blog a 40% (!) discount on the price of the course with the code: jonnyelwyn so be sure to add it at the checkout to save some bucks!
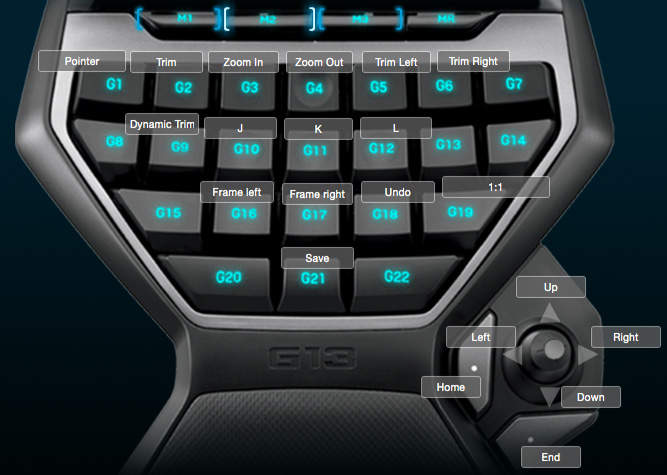
Colorist and photographer Tomasz Huczek also shares his G13 mapping for Resolve over on his blog – Time in Pixels. He’s dedicated one layer set to importing footage to the timeline, one to editing and another to colour grading. This helps to keep things organised and I guess helps you to ensure you’re on the right layer set for the right ‘room’ in Resolve.
The top-left keys G1 & G2 change the editing mode from normal to trim. G5 and G6 trim the current clip to the current position or from the current position. G9 toggles the Dynamic Trim function. G16 & G17 will move the selected edit point left and right by one frame for precise adjustment.
You can download Tomasz’ profile here (direct download) or check it out out in more detail first here.
UPDATE 2017 – How a professional colorist sets up a G13 for DaVinci Resolve

In this free insight from Mixing Light colorist Patrick Inhofer you can watch a step-by-step guide to setting up the Logitech G13 in DaVinci Resolve for the first time.
It’s really interesting to see just how a professional colorist sets ups his mappings to have essential shortcuts at his finger tips.
If you’re considering buying a G13 to use with Resolve this is a must watch!
If you enjoy this free insight, you might want to sign up as a paid member of Mixing Light’s monthly subscription member site, which I’ve previously reviewed here.
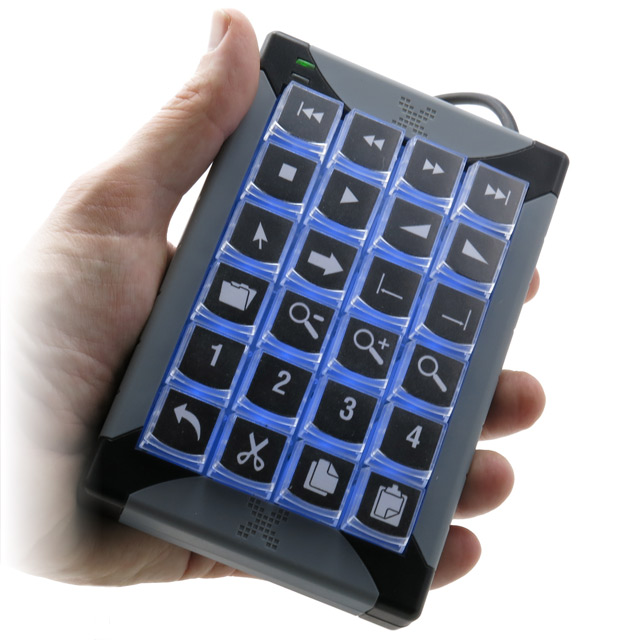
The X-keys from PI Engineering offers a similar solution at a much higher price point, and without any of the cool bells and whistles like customisable backlighting or an LCD display. But it’s a popular choice with some colorists so I thought I’d give it a quick mention too. It’s a USB interface, with blank buttons for which you can print out your own images to go underneath them. You can grab more info on setting them up from the official site, but personally I’d stick with a G13!
For even more info on using an X-keys, you should check out these two Mixing Light.com articles on Setting up the X-Keys as a Control Surface Companion and this follow up article on Optimising the X-Keys for the Tangent Element.
One really important point that the second article makes is that:
Even Blackmagic’s $30,000 control surface can be maddening to use since it’s buttons were optimized for DaVinci Resolve 7—and haven’t changed since the software was released on the Mac! DaVinci Resolve has been neglectful of their control surfaces for 5 years. Yes. They support every brand of control surface that’s developed. But none of the integrations are even close to being optimized with the full-time colorist in mind. Not. EVEN. CLOSE.
Buy on Amazon.com | Buy on Amazon.co.uk
MidiGrade with Midi Fighter Twister
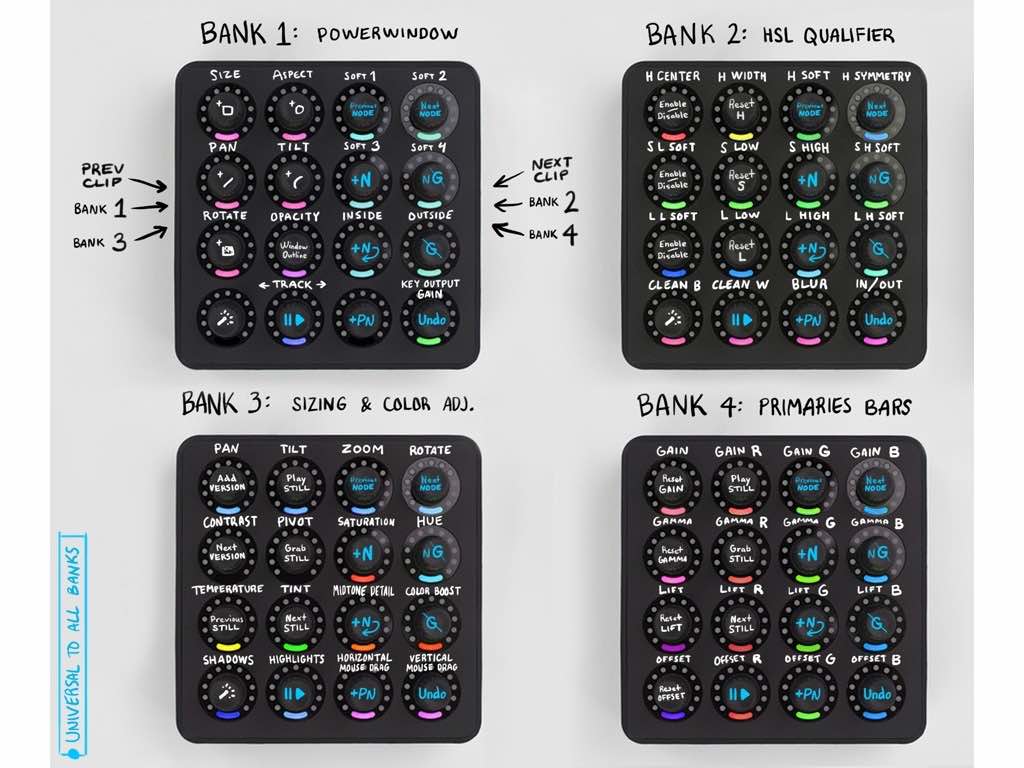
For a more unusual colour grading controller option you can always check out Midi Grade, which makes use of the DJ mixing tool the Midi Fighter Twister, from DJ Tech Tools.
MidiGrade itself is the carefully customised control mapping that sets you up to colour grade in DaVinci Resolve 12.5 using the 16 knobs and 9 buttons of the Fighter Twister.
Through leveraging the power of banks this gives you a total of 96 functions which Midi Grade designer Julius Koivistoinen has painstakingly mapped using Controllermate, from Ordered Bytes.
This video will give you a full run down of all the new features and functionality in Midi Grade 1.2 and a sense of how everything works over all. Currently this is a Mac OS X only system, although Windows support is in development.
To make this system work you’ll need three things:
Total Cost (approx) – $405
DJ Tech Tools, Julius and Ordered bytes were kind enough to send me all three of these components and so at some point I’ll hopefully get the chance to test this out more thoroughly and post a fuller review!
Having just written up my own detailed post on using the Tangent Element Kb (which has 12 knobs and two buttons) to colour grade in Premiere Pro, there is a huge advantage to having a set of knobs at your fingertips to grade with.
The Midi Fighter Twister itself is really well constructed, with a base that is concave which reduces the weight and makes it easier to hold. It’s nice that it also comes in two colours – black and white, if you want to have that choice.
Each knob has a ring of coloured LEDs that light up as you turn them. Each knob is also a button and provides a ‘shift’ ability by turning it whilst holding it down, which further adds to the level of functionality.
In some ways that functionality is greater than the 12 knobs of the Element Kb, although I would take the LED screen over 4 more knobs!
In this video you can see Julius grading with Midi Grade working through 10 different shots in his showreel. This is a good way to see the system in action and get a better sense of it’s functionality.
The main hurdle that I think the Midi Grade system faces is that of knowing what control is mapped to which knob, especially within different banks. (Although you could obviously print out the cheat sheet above)
At over twice the price the Element Kb has a built in LED display to guide you, and even the $350 Tangent Ripple has a software based floating Heads Up Display. Over time I’m sure you would learn the controls from memory but that’s quite some learning curve.
Either way it’s an intriguing system and I’m looking forward to having the time to check it out in more detail.
This page has tons of useful information on Midi Grade including step by step set up instructions, FAQ and supported screen resolutions and more.
You can find out more about the DJ Tech Tools Fighter Twister here and more about Controller Mate, which is a powerful Midi interface mapper, here.
In this video Julius compares and contrasts the Ripple with Midi Grade and concludes that they would make ideal companions for a low-cost grading system.
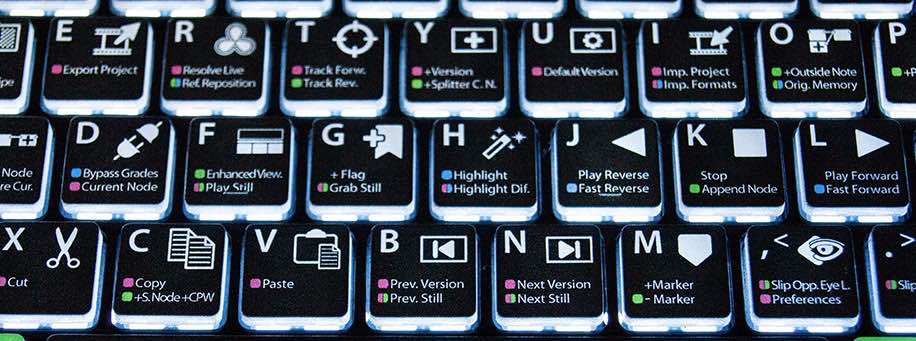
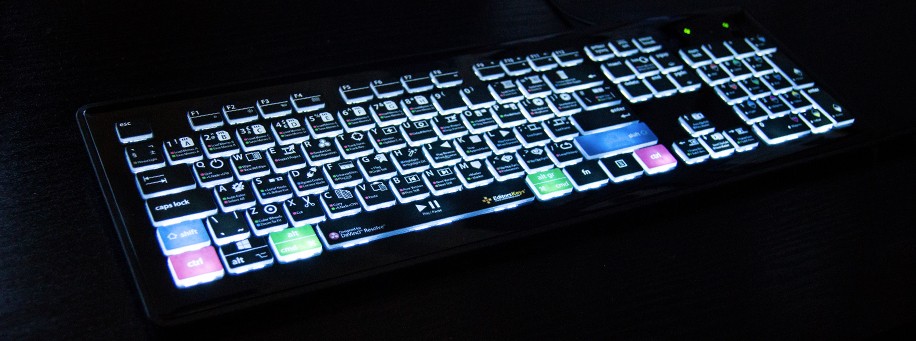
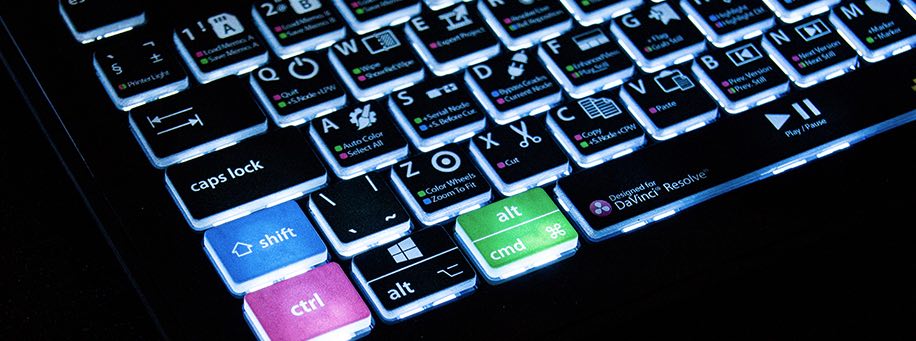
Editor’s Keys DaVinci Resolve Backlit Keyboard Review
Buy on Amazon.com | Buy on Amazon.co.uk
The Editors Keys’ backlit shortcut keyboard for DaVinci Resolve 12 is the world’s first backlit shortcut keyboard that claims to help you edit 40% faster and reduce eye strain. But you don’t want it for those reasons, you want it because it looks cool!
The team at Editors Keys were kind enough to send me a keyboard for the purposes of this review. It’s also the first product I’ve had that was backed by a very successful kick-starter campaign, so it’s nice to experience the results of what ‘the people’ can achieve, when they work together.
A shortcut keyboard like this is a great asset to anyone looking to learn new creative software, not only will you get the work done faster as you learn the keyboard shortcuts instead of rooting around in menu trees, but there’s a whole lot less frustration involved when you can quickly and easily find the right tool for the job.
So if you’re reading this post because you’re looking to find an affordable solution to a better interface between you and your colour grading system, then (if you’re in Resolve) this could be a real help.
The keyboard comes securely and nicely packaged in a sturdy box, which I guess could double as a travel case if you needed to take it with you. The keyboard feels well designed and I quite like the smart glossy finish of the black plastic. It’s possible that some of the keys might have become a little loose in transit, as a couple of them popped off when I first picked it up, but they’re easy enough to re-seat. I’d recommend making sure you flip out the little feet on the back to raise the profile of the keyboard for greater comfort.
The backlit effect is surprisingly enjoyable to work with and the colour of the light feels extremely neutral so I don’t think it would affect a colorist’s perception of their work, which is something I’d noticed a few people questioning in some tweets. You can of course turn it off at any point if you wish with a dedicated button on the keyboard.
Also when working in the dark, the brightness of the light is also very subtle and would almost certainly be dimmer than any light coming off a screen or monitor. So in all these areas Editors Keys have thought through all the practical details.
Set up is easy as the keyboard works straight out of the box on a Windows and Mac system, but on a Mac you’re best off installing Editor’s Keys little ‘Karabiner’ app, to get it set up correctly to ensure “full compatibility including correct positioning of CTRL, ALT and CMD keys and full access to the ‘F’ Key Mac shortcuts.” The keyboard connects via a USB cable, which is of a decent length.
As it’s a hybrid keyboard (Mac or Windows) their are a few places where the shortcuts differ and so the Windows version is above the line, whilst the Mac alternative is below the line. Check out the green alt/cmd key below to see what I mean. This does add a little visual clutter here and there, but it’s only in 3 places!
Pros: The best thing about a shortcut keyboard is obviously how much you can learn in a short space of time, and this is especially true of a powerfully complex piece of software like DaVinci Resolve.
The layout of the shortcuts through a colour coding system helps you to know how each key will act when a different modifier is applied, which really opens up the layers of shortcuts Resolve has to offer. For a simple example, the T key is a shortcut for tracking, on a Mac CMD+T starts track forward and ALT+T initiates track backwards. A handy time-saver for all those power windows.
Another really handy thing is, because it’s a full width keyboard, it includes the number pad, which if you use Printer Lights to create quick balancing corrections in Resolve, helpfully lets you see which key effects which colour. So no more stabbing around with guesswork whilst you memorise the shortcuts.
Another plus is that grading in Resolve becomes even more fun when you’re using this keyboard, simply because it’s so nice to look at!
Cons: I had a couple of small quibbles with the keyboard. The first arose when I plugged it in and realised there were no USB ports on the sides, which is something I’m used to having on a Mac keyboard, primarily for connecting my Wacom Tablet into and for quickly plugging in a USB stick into the system. Obviously this wasn’t a major problem, as my Mac Pro has four USB ports and my USB hub several more, but it would have been a nice addition.
I also seemed to have a slight problem with the space bar double spacing whilst typing this review, but maybe that’s something to do with a system wide preferences setting that was misconfigured. I couldn’t work it out!
Lastly it’s tricky for me not to compare the experience of using the Editors Keys backlit keyboard to a standard Apple keyboard, as that’s what I’ve used for hundreds of hours and typed hundreds of thousands words on.
So the backlit keyboard keys felt a little ‘slippy’ and ‘square’ in comparison, but in time I’m sure this new-ness would disappear and be replaced with comfortable familiarity.
It’s will be interesting to see if/how/when Editors Keys develop these backlit keyboards to include some Mac specific layouts, potentially add some USB ports or come up with something even smarter. They also make backlit shortcut keyboards for a whole host of applications including Premiere Pro, Avid Media Composer, Edius, Sony Vegas, Pro Tools and you can even pre-order a Logic Pro X backlit keyboard.
Each of these keyboards is priced at £99/$129, which might not sound cheap, but you’re buying a bespoke, backlit, keyboard shortcut keyboard, which is a specialist item. As someone who mostly edits and dabbles in Resolve, a keyboard like this is extremely helpful and would pay-off dividends in terms of time saved and skills learned. If you’re a professional colorist you might want to have one of these in your suite just because it looks attractive (client’s love things that glow!) but you won’t benefit as much from learning the shortcuts if you’re working with a dedicated panel because that’s the mapping you’re trying to commit to muscle memory.
Buy on Amazon.com | Buy on Amazon.co.uk
iPad Apps for Colour Grading

Tangent make an iPad app that is the only dedicated colour grading app that I’ve come across so far, and the best part is there’s an entirely free version of it. Tangent’s element-vs (virtual surface) provides iPad version’s of the four element panels and an ideal training tool for anyone wanting to emulate the experience of working with a control surface whilst grading.
The app can even be used in conjunction with any of the element panels you might already own, which is a handy way to expand your set up and a fraction of the cost. It also features multi-touch functionality which means you can use all the controls simultaneously and if you happened to have four iPads lying around you could re-create the full element panel set up in one go.
The only problem with the app is the price, which at £79.99/$99.99 isn’t cheap. But you could argue it’s a heck of a lot cheaper than $3000! That said, the free version is fully functional, but is limited to an hour a day of grading. So either you’ll need to be very fast, or very patient. But given that it is free and easy to set up, there’s no reason not to.
You can download a detailed 16 page PDF manual here, or check the app out in more detail on the official Tangent site.
Buy on App Store | Download Free on App Store

Another iPad app maker worth keeping an eye on is Ctrl+Console, whose apps I’ve previously reviewed in this post on iPad Apps for Film Editors, and I’m hoping it’s only a matter of time until they release one for colour grading specifically.
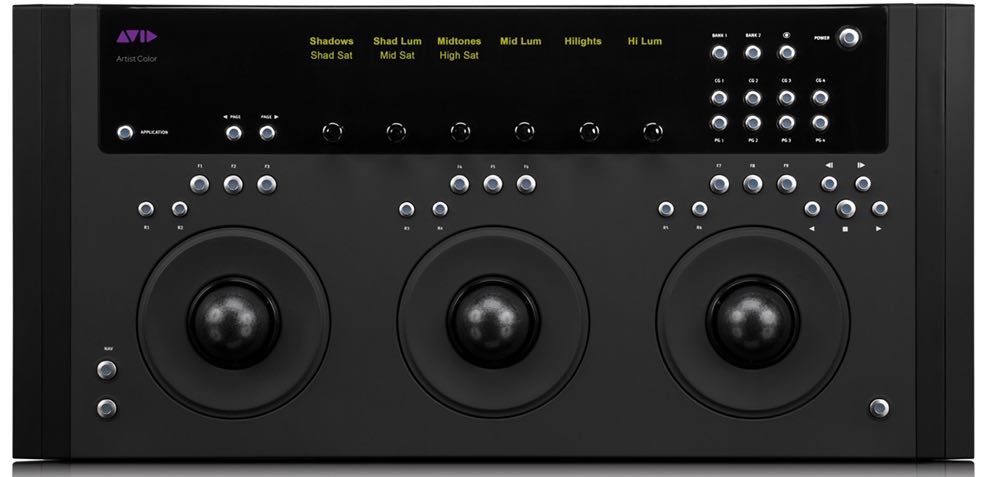
Avid Artist Color All-in-One Control Panel
Buy on Amazon.com | Buy on Amazon.co.uk
The Avid Artist Color control surface originally hit the market (I believe*) back in 2011 and was originally manufactured by Euphonix, before Avid acquired them. *Or at least that’s the last time the User Guide was updated.
The Artist Panel features three track balls with rings around them, just like on the larger panels, as well as six control knobs, a plethora of buttons and an OLED screen letting you know which controls are active.
It seems like some of the buttons are hardwired in, for example the Transport controls on the righthand side, where as some of the soft keys can be customised.
The video review from Carey Dissmore provides a great run down of the product, the build quality and user feel. As an all-in-one, portable colour grading panel that offers rings, knobs, buttons and balls, it’s only real competitor is the Tangent Wave. This mix of portability and functionality is one of the major benefits of buying an Avid Artist panel.
One of the important things to know about the Avid Artist Color connects via Ethernet cable, rather than USB, which means that if you have a recent laptop, you’re going to need some kind of adaptor, although you should be fine with a Mac Pro or iMac.
Even though it’s called the Avid Artist Color, the panel is compatible with a lot of apps and as you can see in this video, still works well with DaVinci Resolve 12.5 under El Capitan. It’s worth reading the note about setting the IP address though in the Youtube comments.
Although the Avid Artist Color still sells brand new for $1499, they seem to have largely held their value well. If you look on Ebay you can find them for somewhere between $749/$900 or more.
Personally, I wouldn’t spring for this panel for several reasons.
Firstly, the ethernet connection seems to be tricky to set up for some users, and will require further dongles or hubs to connect to a modern Mac laptop. Also it’s difficult to discern any viable future for the panel, including software updates, with Avid’s difficult financial position of late. Lastly, it’s a fairly old panel for the money and although it is cheaper than the Tangent Wave, I wouldn’t spring for that panel either.
That said, I’m sure there are legions of professional editors and colorists happily grading away on these panels all around the world!
In this 10 minute video from Doug Hansell, a product designer at Avid, you can get a full run down of the panel, right from the horses mouth. This video focuses on using the panel with Avid and Avid Symphony.
In this video you can another run down of using the panel and it’s features, this time in Red Cine X.
Other Grading Panels
If you want a fuller run-down of some of the other options out there when it comes to colour grading control panels, then this post from Ground Control Color has a pretty complete listing including the Oxygentec Pro Panel, the JL Cooper Eclipse and the Avid Artist Color. In the video above you can get a look at the Oxygentec Pro Panel with colorist Warren Eagles.
If you have anything to add to this post, or any other more unconventional grading options, feel free to add your thoughts in the comments!


[…] the versatility, although if you’re using it to augment an existing control surface, say a Blackmagic or Tangent grading panel, then the 15 buttons of the Stream Deck might be more […]
Hi Jonny, The APC40 and Beatstep controllers modified for Resolve by Glenn Venghaus are awesome! https://posttools.tachyon-consulting.com/davinci-resolve-controllers/apc40-mk2-resolve-edition/?v=c86ee0d9d7ed
Hi Jonny,
I hope you’re well.
I’m currently looking to set up a lowish cost grading facility in M Block, and wondered what your latest thinking is on the Tangent vs Black Magic control surfaces?
Best wishes
Peter Hort
Hi Peter!
Well if you only want your students to be able to grade in DaVinci Resolve then the Mini’s are great. The micro doesn’t quite deliver enough.
Or Tangent will give you multiple apps and an expandable suite.
The only problem will be if BMD decide to edge out other panel makers, but I doubt they will.
Hope that helps a little!
cheers
jonny