
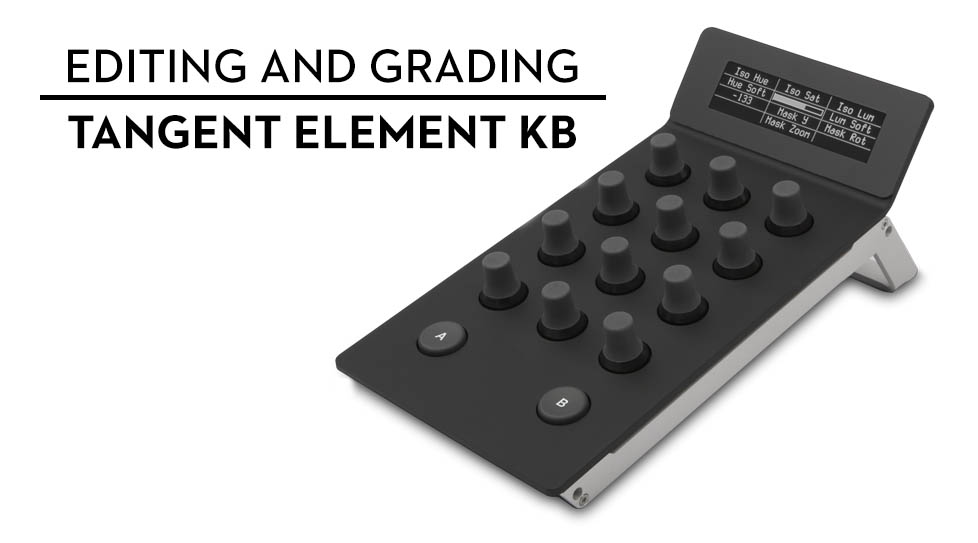
Editing and Grading with the Tangent Element Kb
- How to set up a Tangent Element Kb
- Editing and Grading with an Element Kb in Premiere Pro
- Download Premiere Pro custom Editing control mapping
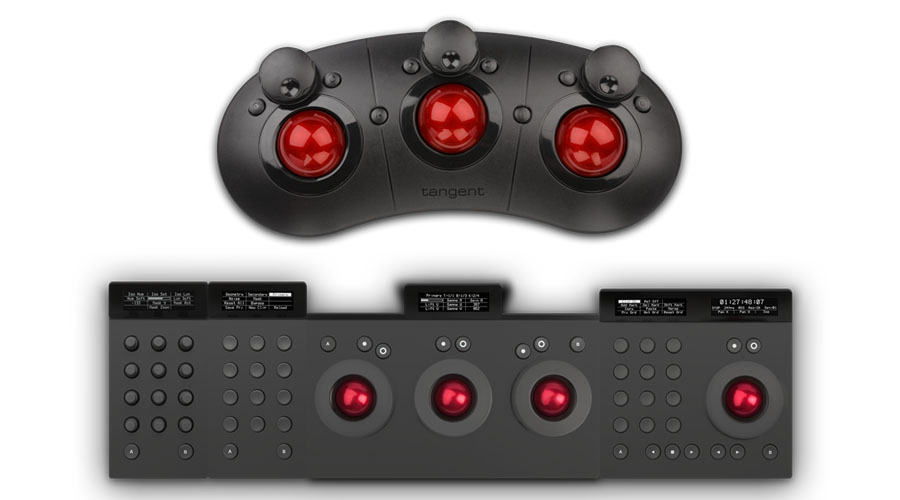
The Tangent Element is a four part modular colour grading control surface which, in total, lists for around $3,495/£2,295 (not including Taxes/VAT). The four panels consist of a trio of trackerballs, a button panel, transport controls with a jog shuttle and a panel consisting of 12 knobs – the Element Kb.
I’ve previously blogged about working with the Tangent Element in my round up of Affordable Colour Grading Control Surfaces and in this older post rounding up Editing Keyboards, Mice Controllers and more.
I’ve also blogged about another Tangent product, the new and very popular Tangent Ripple, in this post, walking through how to use it within multiple NLEs.
In this new post, however, I want to talk about using just one part of the colour grading control surface, the Element Kb to control both editing and colour grading functionality inside of Premiere Pro. Thankfully, Tangent were kind enough to send me an Element Kb for the purposes of this review.
Why is the Tangent Element Kb well suited to this task?
As so many of the controls within the Lumetri panel are sliders which can be adjusted in both directions, a set of twiddly knobs is actually a fantastic way to adjust these in a smooth and tactile manner.
Furthermore the Element Kb also provides far greater functionality and customisation, than is possible with the trackerballs and rings on the Tangent Ripple.
Buy Tangent Element on B&H | Buy Tangent Element on CVP.com | Buy Tangent Element on Amazon Global Stores
Element Kb Quick Specs

The Element Kb is an elegant piece of kit which has been extremely well designed and manufactured by the chaps at Tangent.
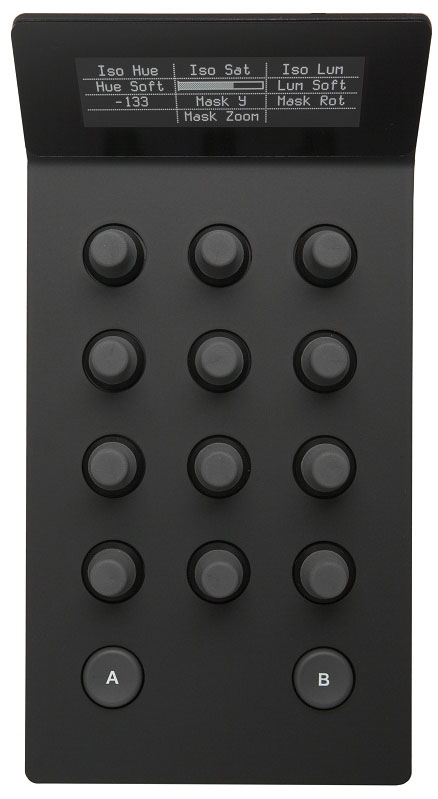
As you can see from the image above the Element Kb has a pretty small foot print on your desk taking up just 20cm/7.9in by 11cm/4.3in, which is a fair bit less than an A-5 piece of paper.
This also makes it a highly portable device as it’s also not very heavy, despite it’s metal construction, weighing in at just under 600g/1.3lbs.
The Element Kb connects to your computer via a single USB cable which is removable (unlike on the Ripple).
Holding it in your hand it feels substantial, well-built but polished enough that you won’t want to chuck it around.
The Element Kb costs £595/$895 (not including VAT/Taxes).
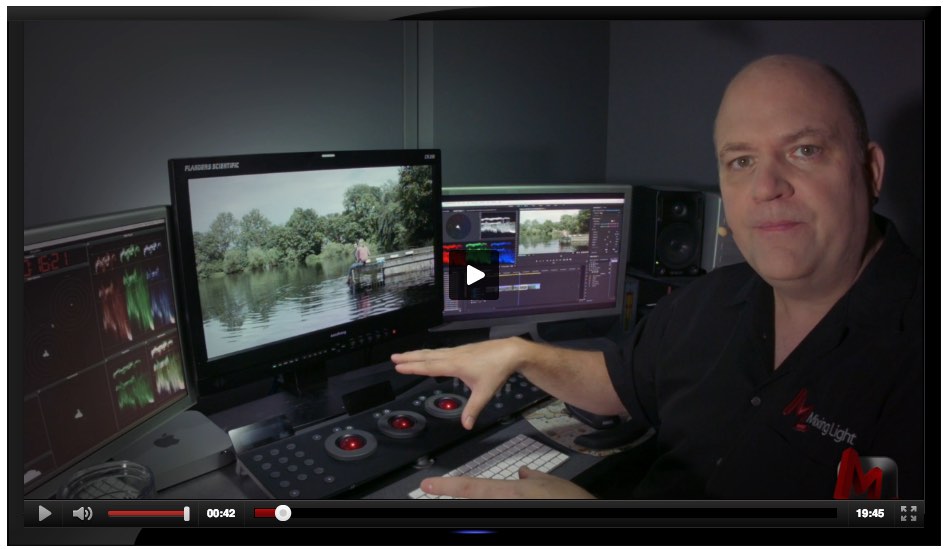
To get a sense of what these panels can do in action, check out this excellent 5 minute freebie from MixingLight.com founder and colorist Patrick Inhofer.
Here you can see just how quickly and powerfully you can colour grade in DaVinci Resolve when using a Tangent Element control surface.
Patrick is obviously using the complete suite of control panels, but it will give you a good idea of just what’s possible, and how effectively a professional colorist uses a surface with both hands simultaneously.
Check out my full review of Patrick’s Advanced Colour Grading training course here.
Tangent Element vs The Ripple
Images not to scale
For the purposes of this article Tangent were kind enough to send me both the new Ripple and the Element Kb. This gave me a chance to check out the relative build quality of each device.
Here are a few thoughts on a quick comparison, which obviously should be between the Element-Tk and the Ripple, but the standard of the entire Element suite will be the same.
(For more detailed information on the Ripple, check out this previous post.)
The most obvious difference, other than the $545/£345 difference in price, is the build quality which that extra cash affords.
The $350/£250 Ripple is designed to be an affordable gateway it the world of dedicated colour grading control surfaces. As such it’s manufactured in a very lightweight plastic.
The £595/$895 Element Kb however feels far more solid, with it’s metal body and rubberised surface, weighing more than the Ripple. Not to mention the nicely crafted LED screen which updates with a 9-character label for each knobs function, depending on your custom mapping.
Here the Ripple, which has no screen to guide you through your mappings, makes use of a software Heads Up Display (HUD), which functions very effectively.
The Element Kb is portable in itself but travelling with a full suite of these controllers would require a decent case like these from Pelican that a lot of DITs and travelling colorists favour.
I happen to have the Pelican iM2500 Storm Carry-on case, which is excellent, and as the name suggests suitable to carry on to a plane. You can also buy custom inserts crafted for the full Element suite and the Pelican 1510 case.
The Ripple is ultra-portable due to it’s compact size and light weight, and ships with a soft draw-string bag for the controller and a second one for the removable trackballs.

In using both of these devices however, a lot of care has gone into the feel of the movement of each interface.
The Element Kb’s knobs have a nice resistance in their turn, which makes it a pleasure to use and somehow makes it feel as expensive as it is. It’s reassuring to know that this attention to detail is not missing from the much more affordable Ripple, and the movement of the trackerballs and rings is very good.
The rings above each track ball on the Ripple feel very smooth and have a similar resistance to the Element. The trackballs themselves, which are about the size of a pool ball, also respond in a precise and accurate manner. As I’ve not had the chance to work with the trackballs on the Element Tk I can’t comment on how they compare.
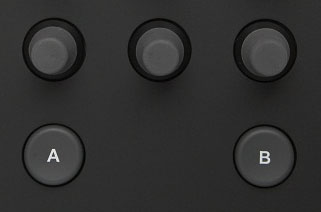
The only part of the Ripple that really belies it’s cheaper construction are the numerous buttons which deliver a clacky-hollow sounding click from the plastic chassis. The Kb’s two buttons have a much smoother, softer sound to them.
It would have been nice if the USB cable on the Ripple was removable like it is on the Kb.
Why am I talking about the feel and build quality so much?
Well, because that’s what you’ll notice the most when you’re working with either of these controllers!
You are touching them all the time, so getting the feel of these things right, will dramatically change how you experience the product. As odd as it sounds, the way it feels to turn a knob can be a joy or a disappointment.
Setting up the Tangent Element Kb
Physically setting up the Tangent Element is incredibly easy.
Simply unbox it and plug it in via the single USB cable (the Kb end is a mini-USB connector). This also provides the power so there’s nothing else to do from a hardware perspective.
The next thing you need to do is download the free Tangent Hub, which you can download under the Application Support tab here.
This results in the following applications being installed. We’re going to focus on the Tangent Mapper.
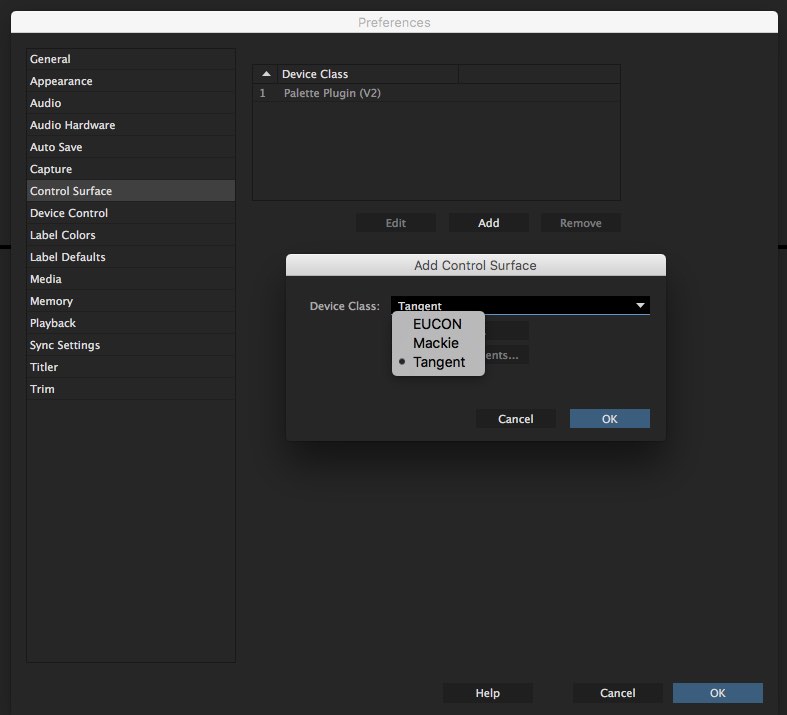
The second thing you’ll need to do is pop into Premiere Pro and add the Tangent devices as a Control Surface.
Go to Premiere Pro CC > Preferences > Control Surface and hit ‘Add’ and select ‘Tangent’. Press OK and you’re done.
Premiere CC 2017 Update – For some reason control surface additions don’t copy across Premiere updates, so you might need to re-do this step if you’ve just updated to CC 2017.
In order to quickly get up and running with the Tangent Element control panels you’ll need to understand a few concepts though when it comes to the free mapping software, the Tangent Mapper.
- The Tangent Mapper is designed to be able to customise all of the Tangent products, so you’ll see a lot of things we won’t need to bother with whilst only using an Element-Kb.
- By default the Mapper software is set to automatically switch mappings to whichever app is in use. (Tangent Mapper – Select Application > Auto-select Application.
- Once inside Premiere Pro the Mapper will also automatically switch mappings depending on which part of the Lumetri panel you are in, or whether you are editing.
- If a video clip is selected in the timelime, or you’re in the Lumetri panel in the Color workspace the controls will switch out of ‘Editing’.
Most of this is really good as it means you don’t have to manually switch between mappings. It also makes the Tangent Mapper a little cluttered to look at.
When you first open up the Tangent Mapper you won’t see anything or be able to customise anything, until the application you want to map to, is also open in the background.
In my case that’s Adobe Premiere Pro. (You’ll need to be running Premiere Pro CC 2015.3 or above.)
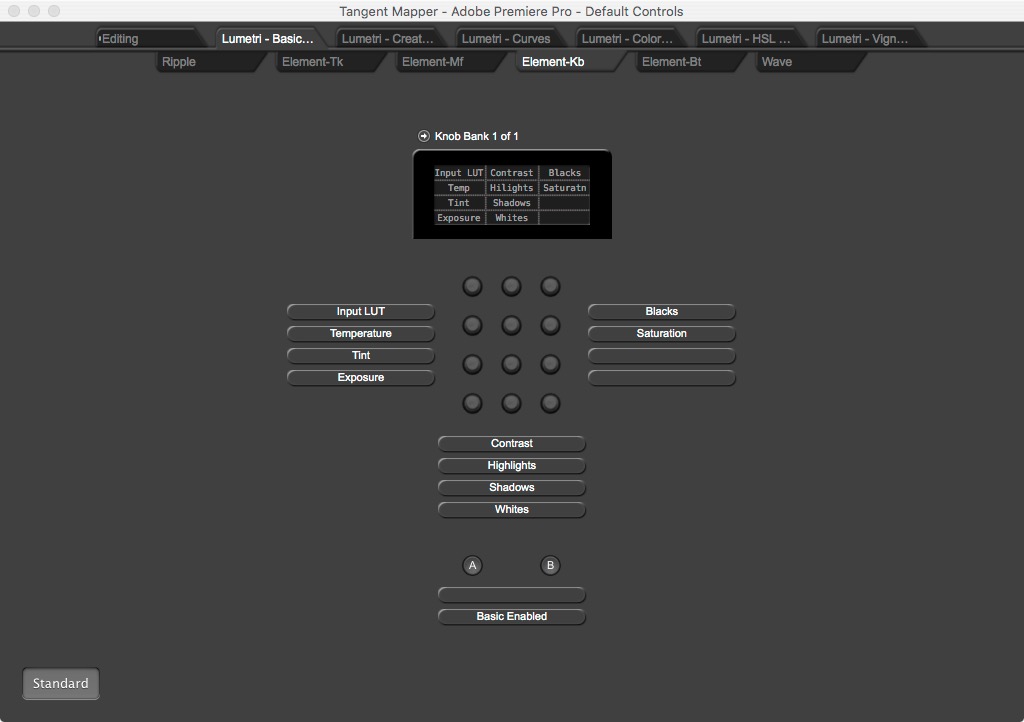
The Tangent Mapper ships with a bunch of default mappings for Premiere Pro, and a few other apps. In this image you can see the default controls that the Element-Kb will use when the Lumetri-Basic controls are active.
If you’re following along in the manual, Tangent calls the top layer of tabs Modes. Meaning whichever part of the NLE that is active. The second layer of tabs are called Banks. These are the controls on the hardware – what each knob/button/ball is doing in that mode.
You can also have two layers on each bank, per mode. These layers are the standard and alternative mappings.
The standard mapping is what each knob will do when you turn it and the alternative mapping is what you’ll get if you turn it whilst holding down a button set to enable alternative mappings. Kind of like a Shift key. Click on the ‘Standard’ button at the far bottom left to switch between these two functions and see what each knob is doing.
You can also set up as many Banks as you like, but you’ll need to map a button to allow you to switch between the banks.
That might sound slightly complicated but it gives you the maximum flexibility to customise things to your liking.
USB Hubs for Tangent Element Panels
I just wanted to add a quick update to this post for anyone using the full suite of Tangent Element panels and connecting them through a USB hub, to manage the 4 separate USB cables. If you don’t have the correct kind, the panels won’t work through the hub.
Chris Rose from Tangent commented on this thread on the Lift Gamma Gain forums in response to a user question about this exact problem.
[The panels] work fine with a proper USB hub that can deliver 500mA to each USB port on the hub… This means the USB hub must be powered, and if it’s an external power supply it must be able to provide at least 2A for a set of 4 Element panels (500mA x 4 = 2A). Sticking anything else on that same hub (keyboard or mouse etc.) will mean a power supply that can provide greater than 2A.
Chris recommends these 4-port USB 2 hubs from Lindy as well as some power supplies and CAT 5 extenders.
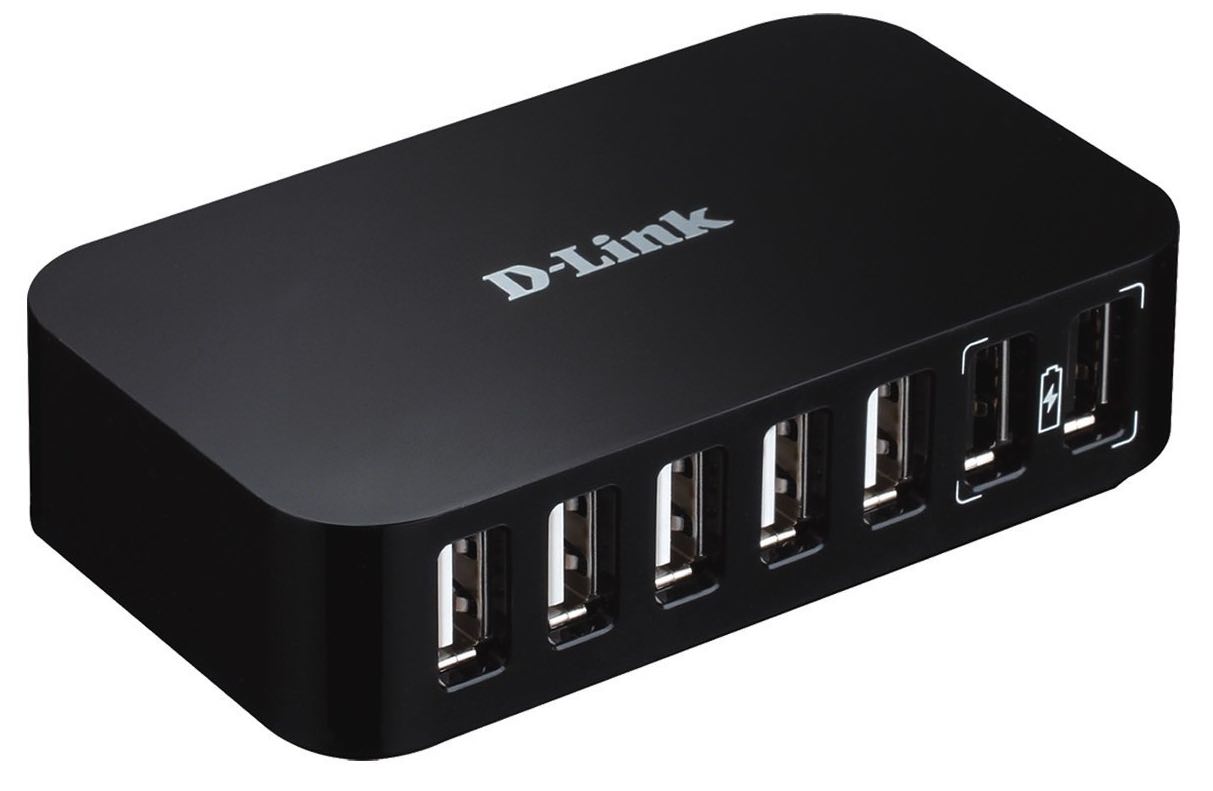
Other users also recommended the D-Link 7-port USB 2.0 powered hub or the Tripp Lite 7-post USB 2.0 Hi-Speed hub.
How to Customise the Tangent Element Mapping
If you want a free video walk through of all of this, that will also educate you on a few crucial things to adjust for a better grading experience, then hop over to MixingLight.com to watch another freebie from Patrick Inhofer.
In under 20 minutes Patrick will guide you through the entire customisation process for working with the full suite of Tangent Element devices in Premiere Pro’s Lumetri panel. This is well worth a watch and covers everything in detail.
I’ll also run through the basics here, before we get into my own custom Editing mapping, but the process is pretty intuitive.
First of all we’ll want to create an entirely new mapping so we don’t modify the default settings.
In the Tangent Mapper go to File > New Control Map. Give it a memorable name.
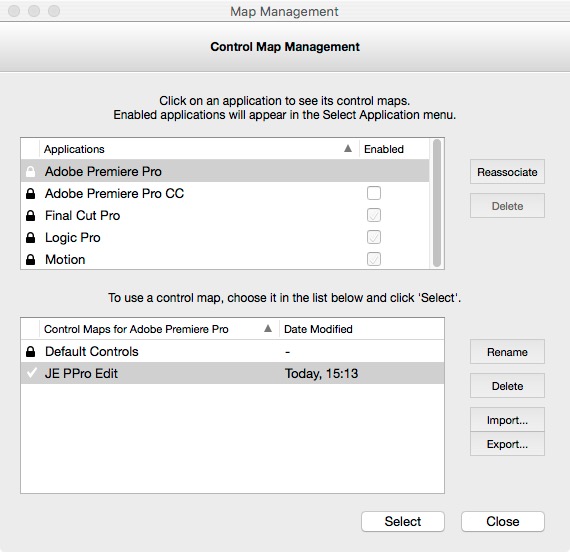
You can manage what map is applied to which application under File > Manage Control Maps. This is also where you can import my custom Edit mapping after downloading it.
As an example of how easy the mapper is to use I would recommend adding the ‘Next Mode’ to the A button on the Element Kb. This will allow you to cycle through each section of the Lumetri panel without having to use the mouse.
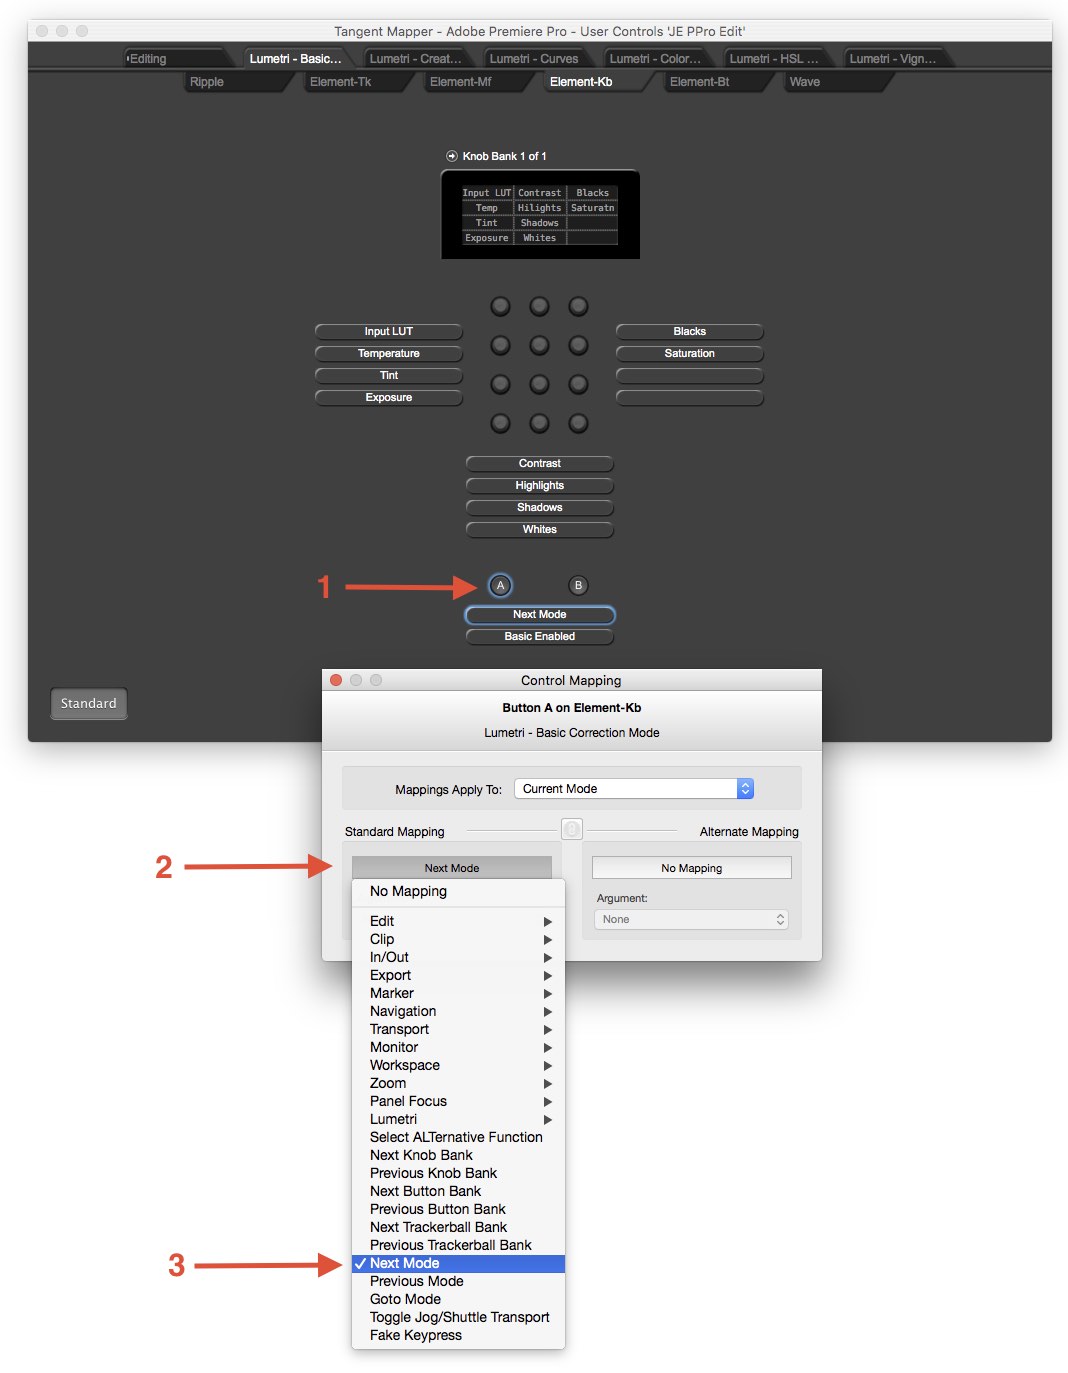
Make sure you’re in the Lumetri Basic mode for the first Element Kb bank and then click on the A button. Click on ‘No Mapping’ button under ‘Standard Mapping’ and choose ‘Next Mode’.
By default this change is only applied to the Current Mode, but you can set it to globally effect every mapping in every mode. But you’re probably better of doing it manually one mode at a time.
A time saving tip is that you don’t need to close the ‘Control Mapping’ window each time. You can just click on a different knob or button and it updates.
One quick aside that will become important later on.
The full list of possible mappings you see in the image above is only available for buttons. When you click on a knob the range of controls you can assign is much more limited.
This is because the Tangent Element is designed as a grading control surface and not an all-round editing controller. But we’ll get around that in a bit!
The other section of the Mapper you’ll want to look into is under File > Control Map Settings. This is where you can adjust the global sensitivity of the response (fine to coarse) of each control.
My personal preference, as Patrick suggests in his video above, is to set the knobs to about 3/4 coarse to fine.
If you leave things on fine you’ll be turning and turning to get a decent result. You can set these differently per knob if you uncheck ‘global’ in the sensitivity control in the Control Mapping section.
By default each knob, when lightly depressed, will reset the value. This can’t be modified.
Editing with a Tangent Element Kb
By default the Element Kb doesn’t have any mappings configured in the editing mode.
This is because lots of these edit controls are assigned to the buttons on the other 3 panels. In particular the Button (Bt) and Multifunction panels (Mf) are doing the heavy lifting.
It would be great if all of the functionality that’s built into the mapper software that’s available for buttons (see 1,2,3 image above) was also available for knobs.
Sadly it’s currently limited to the Lumetri controls, Transport (Jog) and ‘Fake Keypress’. Hopefully this might appear in a later version of the Tangent Hub. But for now, ‘fake keypress’, A.K.A. a keyboard shortcut, is enough to get by.
My inspiration for this post came from this excellent, older video from editor Rob Tinworth, in which he used the Element Kb and Keyboard Maestro to control Avid Media Composer. I wondered if it was possible to do the same in Premiere Pro.
The process became a lot easier for me, thanks for the 2015.3 integration with Adobe Premiere Pro and some bespoke keyboard shortcuts.
In Rob’s video he had to leverage the power of Keyboard Maestro to trigger keyboard shortcuts and mouse clicks to create custom macros for functions like adding keyframes, applying trims and some clever stuff with Baselight for Avid.
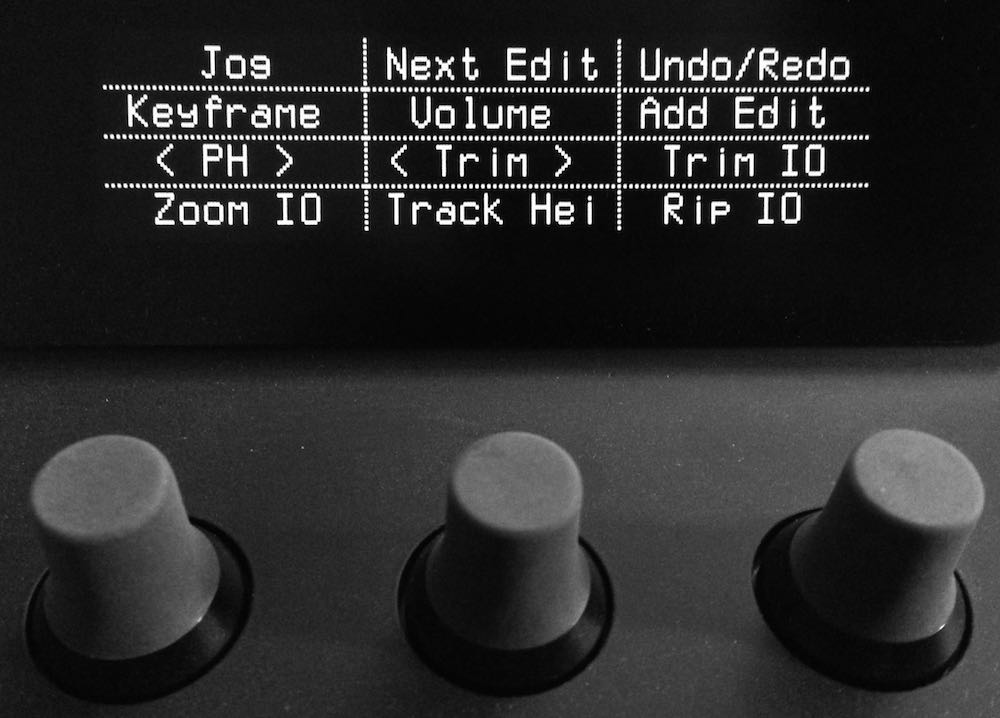
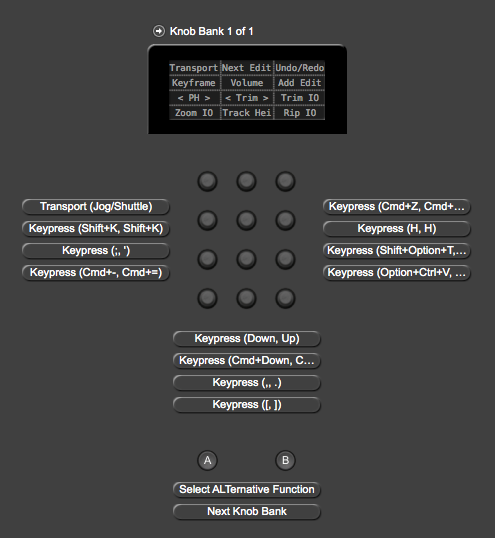
Here you can see my work-in-progress Editing mapping, on the Element Kb’s compact LED display.
You can download my custom editing mapping here.
I’ll quickly run through what I’ve mapped each knob to, as I had to get creative with the names on the 9-character limit for the display, so it might not be 100% obvious.
- Jog – The jog shuttle function is superb, really fluid, really responsive. It’s great.
- Next Edit – Scroll through the edits up and down the timeline.
- Undo/Redo – Turn left for Undo, right for Redo
- Keyframe – Add audio keyframe
- Volume – Adjust the gain on a clip
- Add Edit – At playhead
- < PH > – Trim to playhead < before the playhead, > after the playhead
- < Trim > – Frame by frame trim to clip top (left turn) and tail (right turn)
- Trim IO – Selects previous (left turn) and next (right turn) edit point for Trim
- Zoom IO – Zoom in and out of the timeline
- Track Hei – Adjust the track height, smaller (left turn), larger (right turn)
- Rip IO – Selects next (right turn) and previous (left turn) edit point as Ripple Trim
Click to enlarge
Here is an image for this set up inside the Tangent Mapper, this also shows some of the keyboard shortcuts I’ve used to activate each function.
Each knob can have two controls aside, one to the left turn and one to the right. Sometimes I’ve mapped this to the same function regardless of direction, e.g. Add Edit.
There are a few limitations when it comes to only being able to use keyboard shortcuts in Premiere Pro. For example, it’s not possible to use the knobs to control the faders in the Audio Mixer panel. This would be a really helpful use-case if it somehow becomes possible in the future.
In this short video I took at stab at demonstrating how some of the functionality that I’ve mapped to the Element Kb actually works.
The control panel image in the corner of the screen is just a still, as I didn’t have a way to film the control panel in a reasonable fashion. But hopefully you get the idea!
Quick Tips on Working with the Tangent Mapper
Another request for a future update to the Tangent Mapper is the ability to control any slider in Premiere, whichever slider happens to be selected, with one knob. This is possible with Palette Gear’s mapping interface under General Adjustments > Adjust any Property, so it must be physically possible for Tangent too?
Here are a couple of general tips for creating a smoother experience when working with the Element Kb.
When it comes to the level of sensitivity that you might have cranked up globally for a better colour grading experience, you’ll want to reduce that to medium or closer to fine for these editing controls. Otherwise they’re just a bit too fast to activate which can make controlling them a little tricky!
You can add as many customised controls as you have keyboard shortcuts for as you’d like by adding another bank to the mapping.
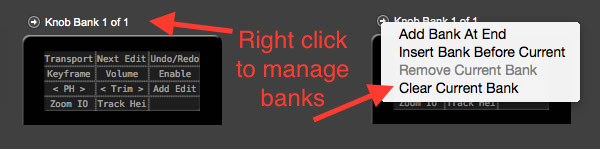
To do this, right click on the small Knob Bank 1 of 1 text, and choose ‘Add Bank At End’, or if you’ve already got several banks, ‘Insert Bank Before Current’. This will give you a fresh set of 16 knobs to customise.
You’ll then want to add Select Alternative Function to one of your two buttons (say A) and Next Knob Bank to the other button (B). You can then also add ‘Previous Knob Bank’ to the Alt function of the B button. In this way you can quickly jump between banks and Alt functions.
In total you would have 32 possible knob mappings per bank.
Colour Grading with a Tangent Element Kb in Premiere Pro
Colour grading with the Element Kb and the Lumetri Colour Panel in Adobe Premiere Pro is far easier than my custom editing set up. Largely because the integration is already all there thanks to Tangent’s hard work.
In the video above you can get a sense of what it’s like to grade in the Lumetri panel when you have an individual control knob for each parameter.
I forgot to include it in the video, but you can adjust as many attributes at the same time as you can physically manage. Probably only one per hand, as you only have two of those.
The Element KB works really well with the Lumetri panel, even without the other parts of the Element set up (i.e. the buttons, tracker balls and transport units). This is because most of the controls in the Lumetri panel are sliders and these are ideal for knobs.
I did add a couple of my own shortcuts.
- To the A button I added a shortcut for to make it allow me to cycle through to the next section of the panel. This is called ‘Next Mode’.
- To the B button I added the ability to By-pass that section/mode of the panel individually.
Click to enlarge
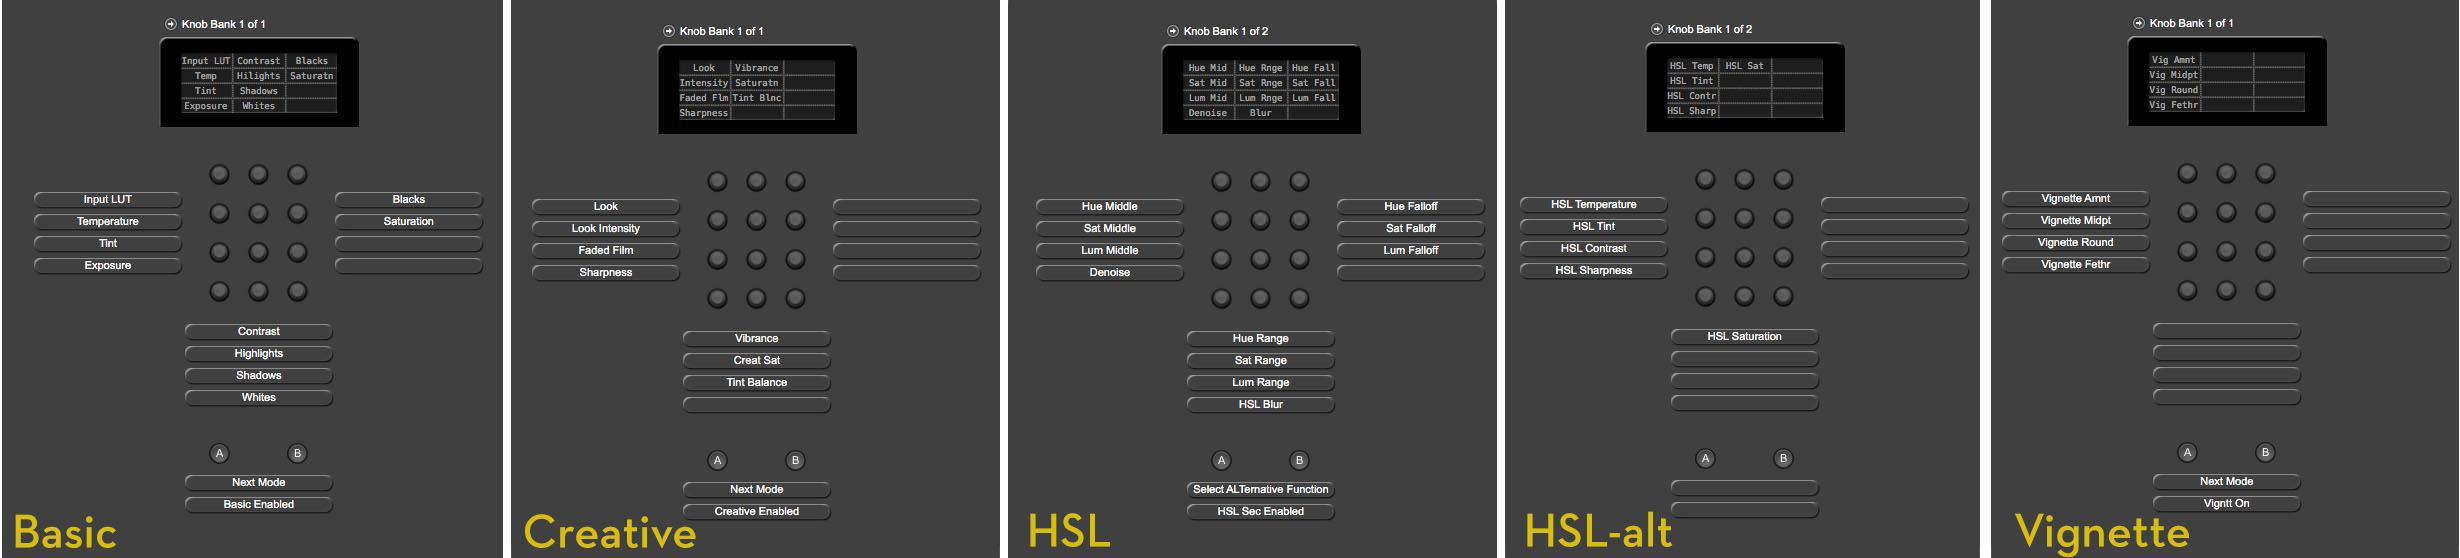
In this image you can see all of the controls available to the Element Kb in each section of the Lumetri panel. (I’ve left off Curves and Color Wheels as these don’t work too well with knobs)
A couple of points worth noting.
If you’re not careful it is quite easy to knock a knob and make an adjustment you didn’t intend to. So just try to avoid being clumsy.
Add the next mode shortcut really helps to keep your hands on the controls and your eyes on the screen, without having to reach for the mouse/stylus to get to the next section.
As with anything the more you use this set up the faster and more intuitive it becomes. At the beginning I was having to look down at the controls a lot more often to make sure I’d grabbed the right knob, but muscle memory builds over time.
Scrolling through a selection of LUTS makes it much easier to navigate them quickly and find one that looks right. I demonstrated this in the video above with the Input LUT (which you should really set camera specifically) but the same would go for the LUT section in the Creative mode.
As previously mentioned with the customised editing controls you’ll want to adjust the coarse/fine balance to your taste, but by default they’re too ‘fine’ so you’ll be turning the knob for ages before you get a significant result.
Helpfully the focus of the control panel switches as you move around the Premiere interface.
So if you’re in the Lumetri panel, the Element Kb will switch to the grading controls. If you’re in the timeline (without a clip selected) it will switch to my custom editing controls. This means you don’t have to manually switch between your custom mappings, which is a huge timesaver.
As a final thought when it comes to colour grading specifically, you could easily expand your grading control surface hardware by adding a Tangent Ripple for your Trackerballs and the Element-VS app on an iPad set to the Element Bt for a greater selection of buttons.
This would be much cheaper than a full suite of Element modules but it wouldn’t feel, or look, as professional! But it should all interact correctly.
Final Thoughts

So in conclusion, was all this experimentation worth it?
Yes and no.
When it comes to colour grading in Premiere Pro, the Tangent Element Kb delivers real benefit when working in the Lumetri Color panel. For a couple of reasons.
First of all, the fact that all of the functionality within Lumetri is mappable to the device, thanks to Tangent’s coding, makes it really easy to get set up and grading. Secondly, because most of these control are sliders – add a bit of this, take away a bit of that – they’re perfectly suited to working with the left/right turn of a knob.
It makes intuitive sense between brain and hands when you’re working in this way. Also the interaction is really smooth, making it a very pleasurable experience.
As for my editing set up in the Element Kb? Yes, you can do some clever things, and the interaction is again very fluid, but it will take quite a bit more editing milage to get used to using it in this way.
The ability to Ripple trim so smoothly does make the edit feel more dynamic, as there’s a lot less stop-start, clicking on things with a mouse etc. But the limitations of the controls don’t make for a second-nature environment, not compared to a keyboard and Wacom tablet.
Who knows? Maybe over time I’ll stick with it and come to change my mind!
Buy Tangent Element on B&H | Buy Tangent Element on CVP.com | Buy Tangent Element on Amazon Global Stores


I’m definitely interested in the Tangent Element Kb Panel after seeing this post. Have you continued to use it for editing or is it just not as useful for you in that way? I don’t do any color grading so it would strictly be for editing and for me.
I do a lot of sound design and FXs and thought maybe it would work well for those situations…
Hey Darren
I tend it use it a lot when I’m grading – just for the speed. But I’ve fallen into the mindset of just using it in that context. It is actually also useful for the sound work stuff, although I’ve recently fallen out of the habit of using it as much.
Most of the time I’m cutting with a wacom and keyboard – as that’s where all my muscle memory is! Old habits, die hard.
It’s a great piece of kit though!
cheers
jonny