
Affordable Colour Grading Panels – Tangent Wave2 Reviewed
- Tangent’s new Wave 2 Colour Grading Panel Review
- Colour Grading Panels Compared
- Using the Wave2 in Premiere Pro and DaVinci Resolve
If you’re looking for an affordable colour grading panel then Tangent Wave has a great range of options that could be just what you’re looking for.
In this post I take a hand’s on look at one of their newest panels, the Wave2, a follow up to their now decade-old original all-in-one Wave panel. I’ll talk about what it’s like to grade on it, how easy it is to set up and what it actually feels like under your fingers, plus compare it to Blackmagic’s similarly priced Micro panel.
Thanks to the team at Tangent for sending me a review unit to take a look at.
I’ve previously reviewed quite a few different panels on this blog which you can check out in more detail in these posts:
- Affordable Colour Grading Control Surfaces
- Colour Grading with the Tangent Ripple
- Blackmagic Design Micro and Mini Panels Reviewed
- Editing and Grading with the Tangent Element Kb
- Using Palette Gear for Editing and Colour Grading

Click to see full size
I’ll quickly layout the landscape of all that Tangent has to offer along side the well known panels from Blackmagic Design.
The major difference between these two manufacturers is that Blackmagic Design’s only work with DaVinci Resolve, where as Tangent’s can drive a whole host of different software including DaVinci Resolve, Adobe Premiere, FCPX, Assimilate Scratch, Autodesk Flame and many others.
This is a current list from least expensive to most expensive*, commensurate with their specs and capabilities:
- Tangent Ripple Price: $332 on B&H.com
- Tangent Wave2 Price: $902 on B&H.com
- Blackmagic Design Micro Price: $1,025 on B&H.com
- Blackmagic Design Mini Price: $3079 on B&H.com
- Tangent Element Full Suite Price: $3,320 on B&H.com
- Tangent Arc Price: $15,000
- Blackmagic Design Advanced Panel Price: $30,805 on B&H.com
*As priced on Amazon or B&H at the time of writing.
There are, of course, many other panels available for colorists to choose from and this previous post walks you through many of them in detail.
Tangent Wave2 Review
Tangent originally demonstrated the all new Wave 2 colour grading control panel at NAB in 2017 as a prototype along side the then code-named Tsunami (now Arc).
At the time I chatted with Tangent co-founder Andy Knox about these new panels, who had this to say about the Wave2:
The inclusion of displays to label the function of the 9 soft knobs and 9 soft buttons on the panel is crucial to allow the panel to perform far more functions than the number of physical controls would otherwise suggest.
A full year later, they were back at NAB 2018 to reveal the final designs, along with a host of improvements based on professional user feedback.
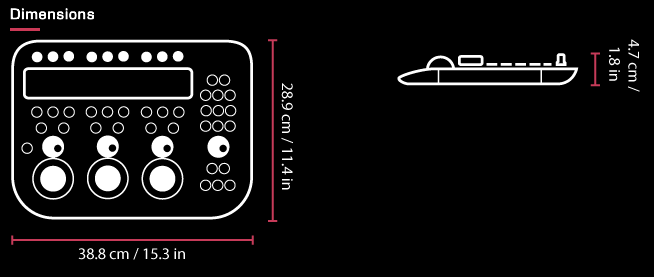
Compared to the original Wave1 design the new Wave2 has a much smaller footprint minimising the amount of desk space you need to use it, and making it much more portable for on-set use.
The Wave1 also used out-dated mechanical pickups, where as the Wave2, Ripple, Elements and Arc all use optical encoders for sustained accurate performance over time.
One of the unique characteristics of the Wave1 was how loud and ‘clacky’ the buttons sounded when pressed, due to the hollow plastic construction.
On the Wave2 the buttons still do have that distinctive ‘clack’ sound, rather than say a quiet rubbery press like on the Elements. Whether it’s as loud or clackey as the Wave1, I don’t know, but it’s still there.
If you’re already set up with an existing Wave panel you can simply swap it out for a Wave2 and all of your software will continue to function correctly as it will simply see it as effectively the same panel.
What do you get?
In the box is the Tangent Wave2 panel packed in some nicely shaped foam inserts, which you could easily keep for packing into something like the Pelican 1495 laptop hard case, and a decent length, 2m USB cable. That’s it, as the panel is USB powered it doesn’t require any power bricks or extra cables.
On lifting the panel out two things might immediately strike you.
The first thing is how light weight it is, due to the sturdy but all plastic build. The other is the track balls falling out onto the floor as you forget that (like the Ripple) they’re not locked in.
Somehow I managed to do this a couple of times whilst lifting and carrying the unit around, or flipping out the fold-out feet under the unit, which help to stop it moving around on your desk and angle it in a more upright direction towards the user.
It would have been nice, as with the Ripple, if Tangent had included a soft carrying case for the balls too, but to be honest you’re best storing the unit in it’s original box or in a portable hard case like the one from Pelican. Anyway, it’s not a big deal at all, but just something to be aware of.
The footprint is almost identical to my trusty Wacom Pro Medium tablet (version 4), which made it really easy for me to pop on to my (somewhat) crowded desk when I needed it, on top of the Wacom tablet.
Holding the Wave2 in one hand and my 15″ Macbook Pro in the other, you can really feel how light it is when compared to something I’m very familiar carrying around with me, so there’s no reason not to take it with you on the go.
Setting Up the Wave2 panel
Setting up the panel for use with either DaVinci Resolve or Adobe Premiere Pro is very straight forward and detailed in these older Wave1 set up guides:
- Download Tangent Wave2 Adobe Premiere Set Up Guide
- Download Tangent Wave2 DaVinci Resolve Set Up Guide
It’s identical to the process of setting up a Ripple panel, which I’ve described in great detail in this previous post. So jump over there to learn how to set up a Tangent panel in FCPX, Resolve or Premiere and then come back here to keep reading.
The process is pretty much plug and play after setting a preference or two.
If you’re using FCPX it’s well worth downloading the free Commandpost.io plugin which now includes native support for all of Tangent’s panels. Read the helpful user guide here too.
It’s worth noting that due to limitations on Blackmagic Design’s side, the panel can only use Resolve’s default layout and can’t be customised to your own preferences.
I had the Wave2 plugged into my OWC Thunderbolt 2 Dock and it seemed to work just fine throughout my testing. I also had it directly connected to my 2013 Mac Pro. The final note of the Tangent Resolve user guide (above) makes clear that if you do connect the Wave2 via a hub it must be a powered hub that can deliver at least 500mA to connected devices.
Wave2 Colour Grading Controls
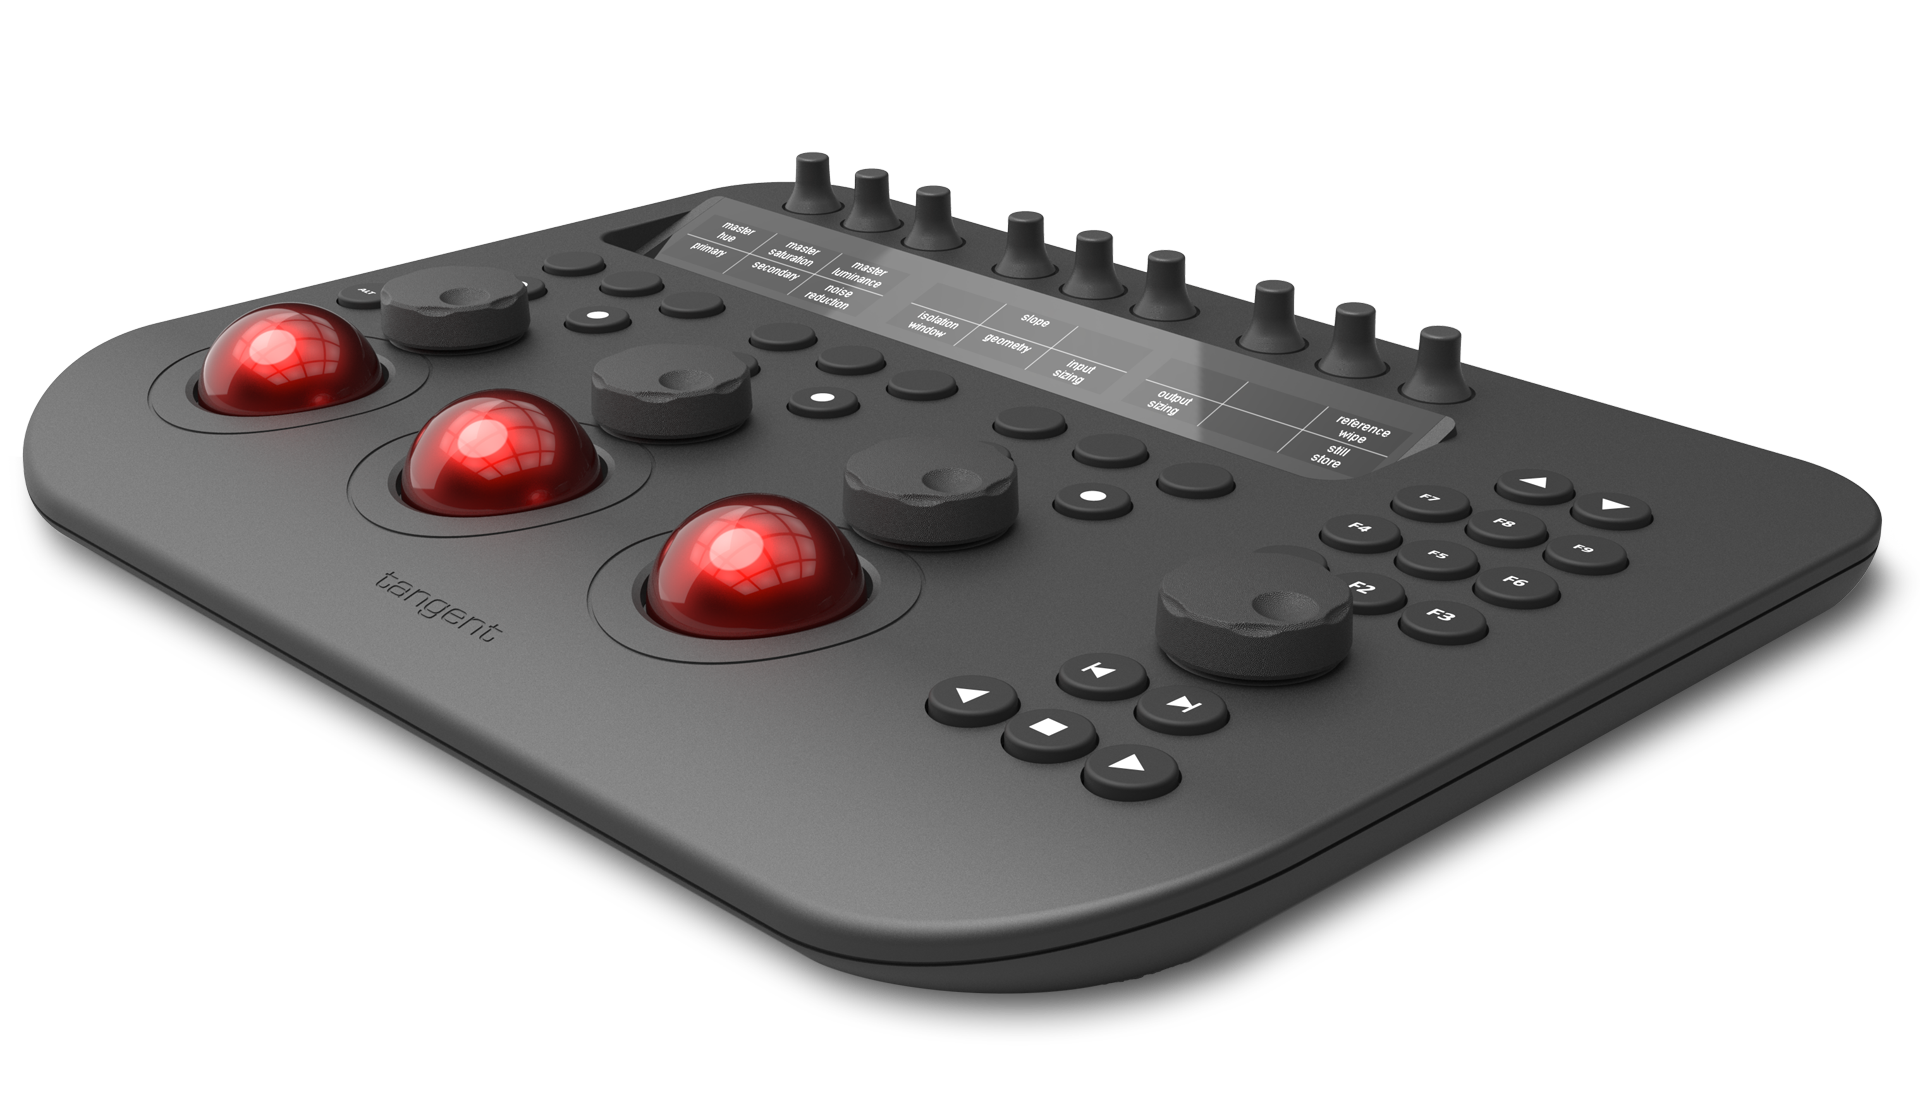
As you can see the Tangent Wave2 packs a lot of control and functionality into a small space. The Tangent site lists the full controls as:
- 3x Programmable trackerballs with Master dials
- Individual reset buttons for ball and dial
- 2x Additional buttons for SHIFT / ALT etc.
- 9x Programmable buttons
- 9x Programmable knobs with integral push button resets
- 3x Displays to label programmable knobs and buttons
- 9x Programmable function buttons
- Standard transport controls with jog dial
What you can do with these buttons and knobs varies from application to application, but a few things remain consistent.
The dials above the three red tracker balls work as the ‘rings’ which are traditionally around the outside of the balls.
These correspond to your Lift, Gamma, Gain controls (A.K.A. Shadows, Mids, Highlights) and your three correlated colour wheels. Above each of these are dedicated reset buttons for the ‘rings’ and balls. (Circle icons)
These are the same trackballs and rings as on the Ripple, and have the same smooth traction and accuracy. Comparing them to the build quality of the BMD Micro panel, I seem to remember the trackerballs having a smoother feeling to them but given how much more the Wave2 delivers of the Micro, I’m not complaining too much. To meet the same price point compromises have to be made some where!
The knobs are the same high quality ones as on the Element Kb and feel great to work with. Based on the default settings in Premiere Pro you’ll likely want to increase their sensitivity, so it require less turns for bigger adjustments, or create a larger/smaller movement set under the ALT functionality. Pressing a knob resets it’s associated parameter.
Speaking of the ALT functionality, pressing this reveals a secondary layer set of controls for each button and knob etc, which really helps to extend the number of controls the panel can work with. In Premiere some of these defaults include shortcuts for copy, paste, paste attributes, or full-screen display.
Having these is really handy although in Premiere Pro you might want to add a button for ‘by-pass grade’ to the top layer set of controls, instead of having to press two buttons at once. Well, if you use it as often as I do anyway!
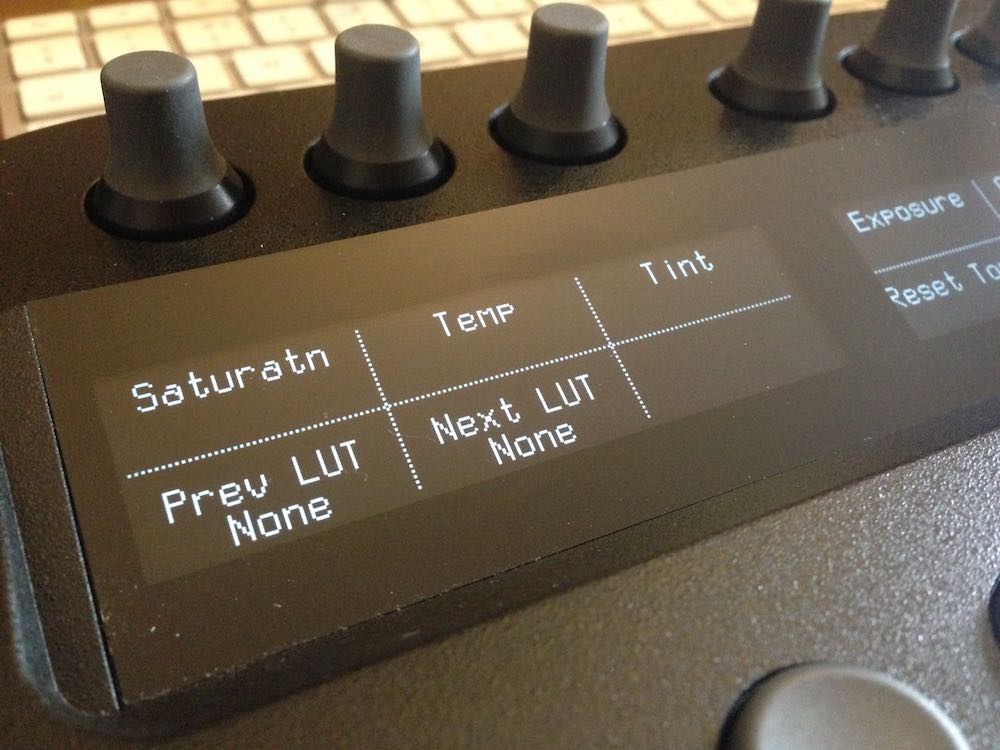
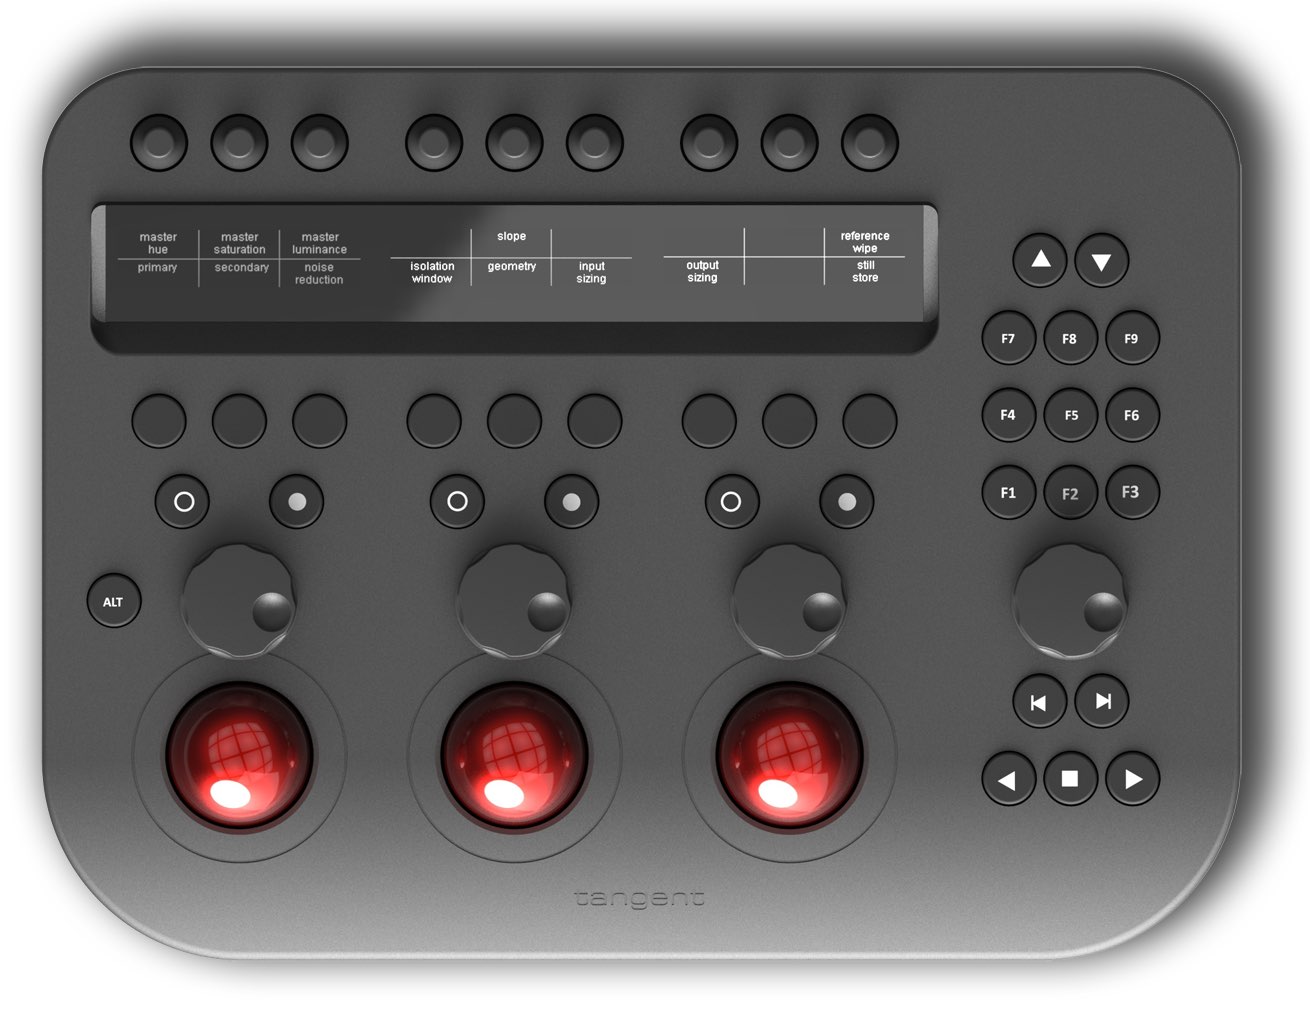
The addition of the display is a huge leg up over the BMD Micro panel, and really makes the money you invest in this panel pay off dividends.
This digital text display updates to label each of the controls above (knobs) and below it (buttons) depending on what part or mode of the current application you’re in.
In this image you can see that the display can fit in two lines of text with (I think) a nine character limit per line. This leads to some creative abbreviations but all in all it’s exceptionally clear what each control does.
So if it’s not obvious, having a screen is brilliant and makes life much easier when using the panel, especially if you’re not used to using one.
Although working with controls that aren’t labelled is possible, you’re relying solely on the memory of the operator to press the correct button, and when that fails you end up wasting time looking up what each button does again. Over time this productivity drag is likely to diminish, but it’s still a drag.
This is also why I like grading with the Element Kb in Adobe Premiere over using the Ripple or other ‘unlabelled’ devices. This is also why Tangent created the floating HUD for Ripple users.
For the Wave2 user, the only challenge then is to remember what the 1-9 Function Keys and the ‘Previous/Next’ arrows (above the function keys) are set to. If you’re learning the panel, keeping a print out list might be handy!
Lastly, having the Transport controls is also an excellent addition for quickly jumping to the next clip, or scrubbing through a clip or sequence with the jog shuttle dial.
It’s also worth mentioning that the Wave2 panel has two fold out feet, to help angle the panel towards you which improves the ergonomics a bit.
Also everything feels easily within reach when resting your wrists on the front of the panel, so other than reaching up a little to adjust a knob or two you’re not flailing around the place searching for a control.
If Tangent had gone with rings instead of dials, it would have also freed up a bit more space on the panel to maybe have given you a bit more ‘wrist-rest-room’ at the front, whilst maintaining it’s compact footprint.
Customising the Controls

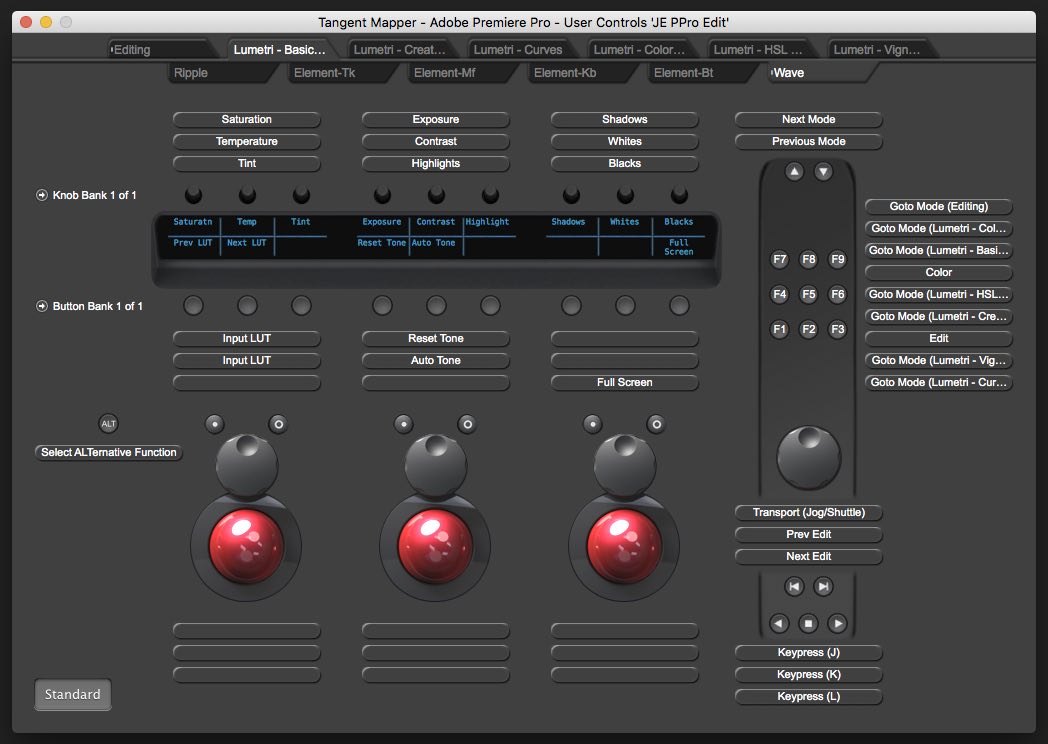
The Wave2 picked up my editing set up, which I had originally created for working with the Element Kb in Premiere Pro, through customising the layout in the easy to use Tangent Mapper application.
I’ve described how to customise your layouts in a lot of detail in that previous post so jump here for the steps required.
Colour Grading in Premiere Pro with the Wave2
Working in Adobe Premiere Pro with the Wave2 was a lot of fun. Using a control panel just makes the process of colour grading a project much more intuitive and engaging.
Instead of developing muscle cramp moving individual sliders around one at a time, you can use both hands to control at least two parameters at the same time. It also helps keep your eyes on the image instead of the control sliders, which is much better way to grade.
The Wave2 updates to whatever section of the Lumetri panel is active when you’re in the Color workspace and has controls for almost all the parameters.
The control mapping is fully customisable so you can set things up how you’d like. As I mentioned before you might want to make use of some of the empty buttons in most of the Lumetri menus to add ‘by-pass grade’ to a top level button.
The Adobe Premiere Pro Customisation Guide is worth a read for a solid introduction to using the panel with Premiere including what all of the controls do.
In the default mapping the F1-9 keys perform the following functions, but you could probably remap these to more useful commands and just hammer on the Up/Down arrows to move section.
- Lumetri – Basic
- Lumetri – Creative
- Lumetri – Curves
- Lumetri – Colour Wheels
- Lumetri – HSL Secondary
- Lumetri – Vignette
- Editing Workspace
- Color Workspace
- Edit Mode
One of the first things that you might want to adjust in the Tangent Mapper is the level of sensitivity of the knobs so that it takes less turns to make substantial adjustments. For my tastes it was a little too taxing in it’s original setting.
I did experience a few weird glitches whilst using the panel in Premiere Pro. For example, I’d press the (really useful) Full Screen button and most of the time it would instantly leap to a full screen view of the image. Sometimes it would do nothing and then a minute later it would respond.
It’s possible that connecting through my USB hub was causing the problems, but I didn’t do any scientific testing to root out the problem!
Being able to quickly move the Wave2 onto my desk, plug in a single cable and get grading in Premiere Pro is a great thing. If you’re an editor doing a lot of your own grading then the Wave2 could be the most useful, affordable panel you can buy.
Colour Grading in DaVinci Resolve with the Wave2 Panel

My experience of colour grading in DaVinci Resolve 15 (beta 3) with the Tangent Wave2 was both a joyful and frustrating one.
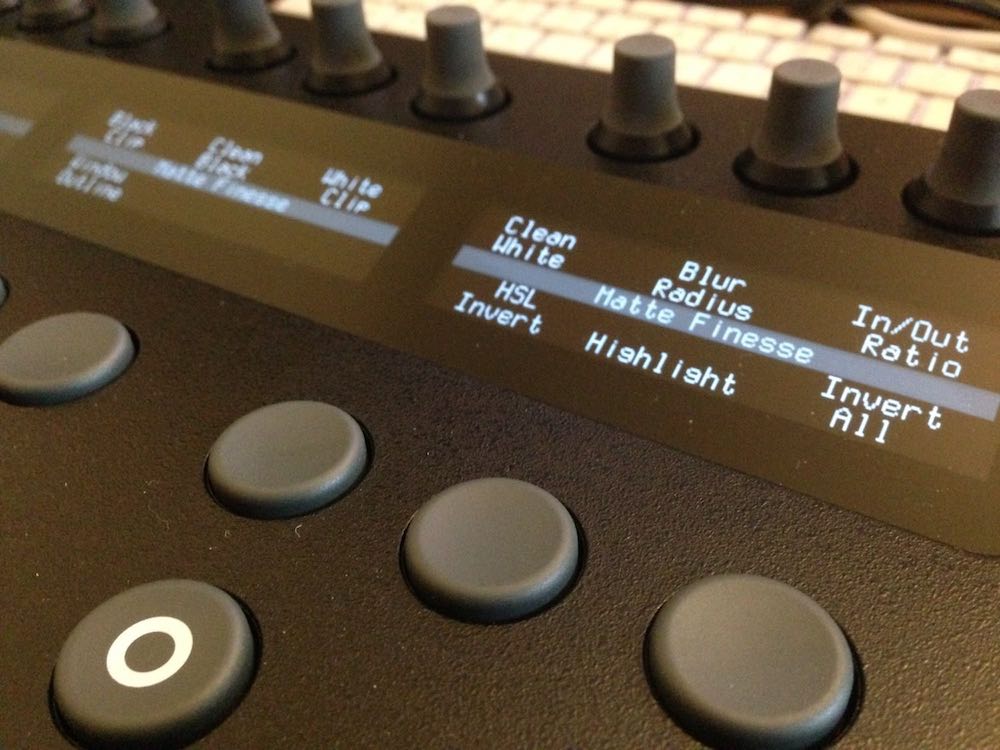
The frustrating part is that the User Interface (UI) doesn’t update as you move through the different sections of the control menu. This means you might be displaying controls for the Qualifiers on the Wave2 but the Resolve interface is still on another element such as curves or Power Windows.
This is particularly problematic because the Wave2 control set for Resolve is much deeper than that of Premiere Pro. If you flick through the 18 different menus in the Tangent Wave2 Resolve Set Up Guide, you’ll get a sense of what I mean.
There are even dedicated mappings for working in stereoscopic 3D.
This disconnect between the panel and the interface can lead to a decent amount of confusion between where you’ve moved to on the panel, and where that same section of the Resolve UI is located.
It’s also well worth reading the guide to learn some useful things such as the fact that the Transport controls will give you Previous Clip / Next Clip but with ALT (on the Wave2) selected give you First Frame / Last Frame.
Or that pressing the two up/down arrows together will jump you to the Master Menu for the 9 buttons and knobs.
Or that the F1-F9 buttons provide the following controls:
- Start Dynamic
- Mark
- Base Memory (+ALT Base Memory Reset)
- Grab Still
- Play Still
- Step Node <
- Undo
- Redo (+ALT Add Parallel node)
- Step Node > (+ALT Add Serial node)
Working with the panel is great fun though – this is the joyful part – adding and customising a Power Window with the panel’s controls is much more intuitive and fluid than grabbing control points with a mouse of pen.
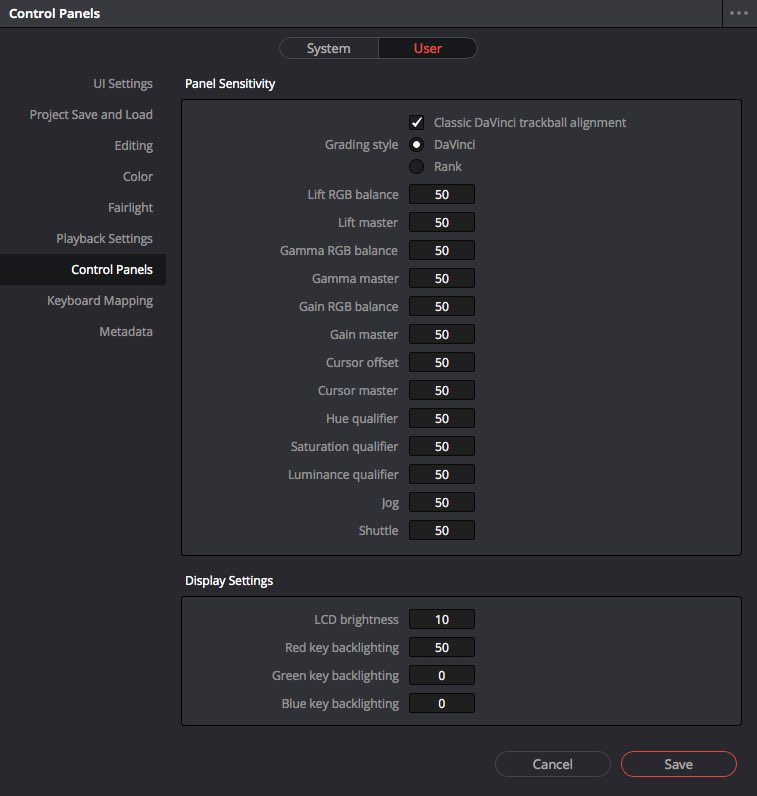
By default the rate of adjustment was noticeably stronger in Resolve than Premiere Pro and so if you want to adjust these settings to suit your personal tastes you can do so under:
DaVinci Resolve > Preferences > User > Control Panels
Overall the experience is a good one, with a very fast and responsive relationship between your hands and the image on screen.
Even though you can’t customise the mapping there are a lot of controls at your finger tips.
If Blackmagic Design did allowed a tighter integration with third party panels that would be a great help for multi-app colorists and editors, but there’s also the inherent possibility that less people might buy BMD panels…
Final Thoughts on Wave2 Control Panel
As an editor who colour grades most of my own work, often in the video editing software I’m cutting in (rather than round-tripping to Resolve, for example) the Tangent Wave2 is the first full panel that I’ve used that has felt like a sensible addition to my hardware arsenal.
The feature set of controls is wide enough to accommodate everything I need to achieve, whilst the compact form factor means that it won’t swamp my desk when it’s in use (or the cupboard when it’s not).
At $950/£650 the panel is affordably priced and given how much it can do, feels about right given the ‘cheapness’ of it’s plastic casing, from an aesthetic point of view.
The Tangent Wave2 is also great value compared to what you get for same money with the Blackmagic Design Micro, both in terms of controls and customisability. Having a dedicated display which updates is a massive reason to consider this panel over others.
Plus the fact that you can use it with a wide variety of post production applications which makes it a far more versatile piece of kit.
Compared to the Micro it’s also truly portable, weighing far less than the 5 Kg that the BMD Micro weighs. So it’s lightweight, compact design is a real benefit.
It would have been nice to see rings on the panel, rather than dials, for the colour wheel controls, but presumably this would have increased the price point, or differentiated it less between Tangent’s fully-fledged Element Suite, which does have rings.
To conclude: if I was going to spend close to $950/£650 on a colour grading panel, I would spend it on the Tangent Wave2.


Noce review, I may get one. Regarding fcpx 10.4 color : I have a Kensigton trackball with a rotary dial. Is there any way to mapnthe wave2 wheels to LGG wheels and the Kensington to Master wheel in Fcpx? Kind regards , Soren
Hi Soren
I’m afraid I don’t know the answer to your question as I’m not sure you can use multiple devices at the same time like that. Plus you need the coded integration between the device and the software. It’s possible that something like commandpost.io – and FCPX toolkit might help, or have the answer!
Excelente artículo. Gracias por la información. Saludos desde Chile.
I’m debating if I should just slowly buy into the element or go for the wave 2, other than price, how do they compare if not all units can be purchased at once? Also which are the most useful units? Thank you!
Hey Bill
Each section of the Element suite costs about the same as the Tangent Wave2. I have personally only used the Element Kb – which was REALLY useful for grading in Premiere, even on it’s own. BUT given that to get much of the same functionality from the Element you’d be in for 4/times the price, I would recommend trying the Wave2 first. As it has a bit of everything on it.
Depending on your context (full time colorist, editor/grader, enthusiast etc.) then different considerations will apply.
You could try renting a Tangent Wave2 for a project to see if it meets your needs before you take the plunge?
As for the most useful Element units I would say things that aren’t replicated by the keyboard (so not the buttons or transport controls) – which is the knobs panel (Kb) and the wheels and dials (Tk)
Hope that helps a little.
Its a big help thank you…can you combine say a wave 2 and element kb?
Andy from Tangent says:
It depends on the application whether you can combine the Wave2 and Element-Kb panel. If the application in question supports the Tangent Mapper then the answer is yes – you can add the Kb panel in the mapper and assign controls in the usual way. However if the Mapper is not supported (e.g. Resolve or SCRATCH) then it’s unlikely that they can both be used at the same time.
Hey Jonny! would you recommend this panel over the BMD micro panel?
If you want to use apps other than DaVinci Resolve, need a lighter more portable device and want more bang for your buck. It is a cheaper build quality but that’s where the compromise is. But right now, essentially yes.
Thanks Jonny!
Thank you Jonny.
Hi,
You said, “This means you might be displaying controls for the Qualifiers on the Wave2 but the Resolve interface is still on another element such as curves or Power Windows.” How do you get the panel to be on the same interface element as the Resolve interface?
Thank you,
Bob
I think this is due to limitations with the Resolve ‘API’ for third-party panels. This is probably an encouragement for you to buy one of BMD’s own panels, where everything works seamlessly.
It ‘should’ work, but BMD don’t seem to want it to, so it doesn’t. Not much Tangent can do.
So do you have to use your mouse to match up the element on your computer’s interface element to the element on the Wave 2 panel?
Thank you and sorry to belabor this but I have a two hour project coming up and I want to buy the Wave 2 panel because it gives me control of power windows unlike the BM Micro panel.
Bob
Basically yes. That was my experience but now I want to double check I wasn’t doing something wrong!
So I’ve just double checked and basically I would describe it as a sync issue. In that the panel and the interface don’t automatically stay in sync.
That said, you can use controls on the panel to navigate to the correct toolset and pressing those buttons will update the Resolve UI.
But if you use the mouse to move around in Resolve the panel won’t update to show the correct tools so you’ll need to do that yourself.