
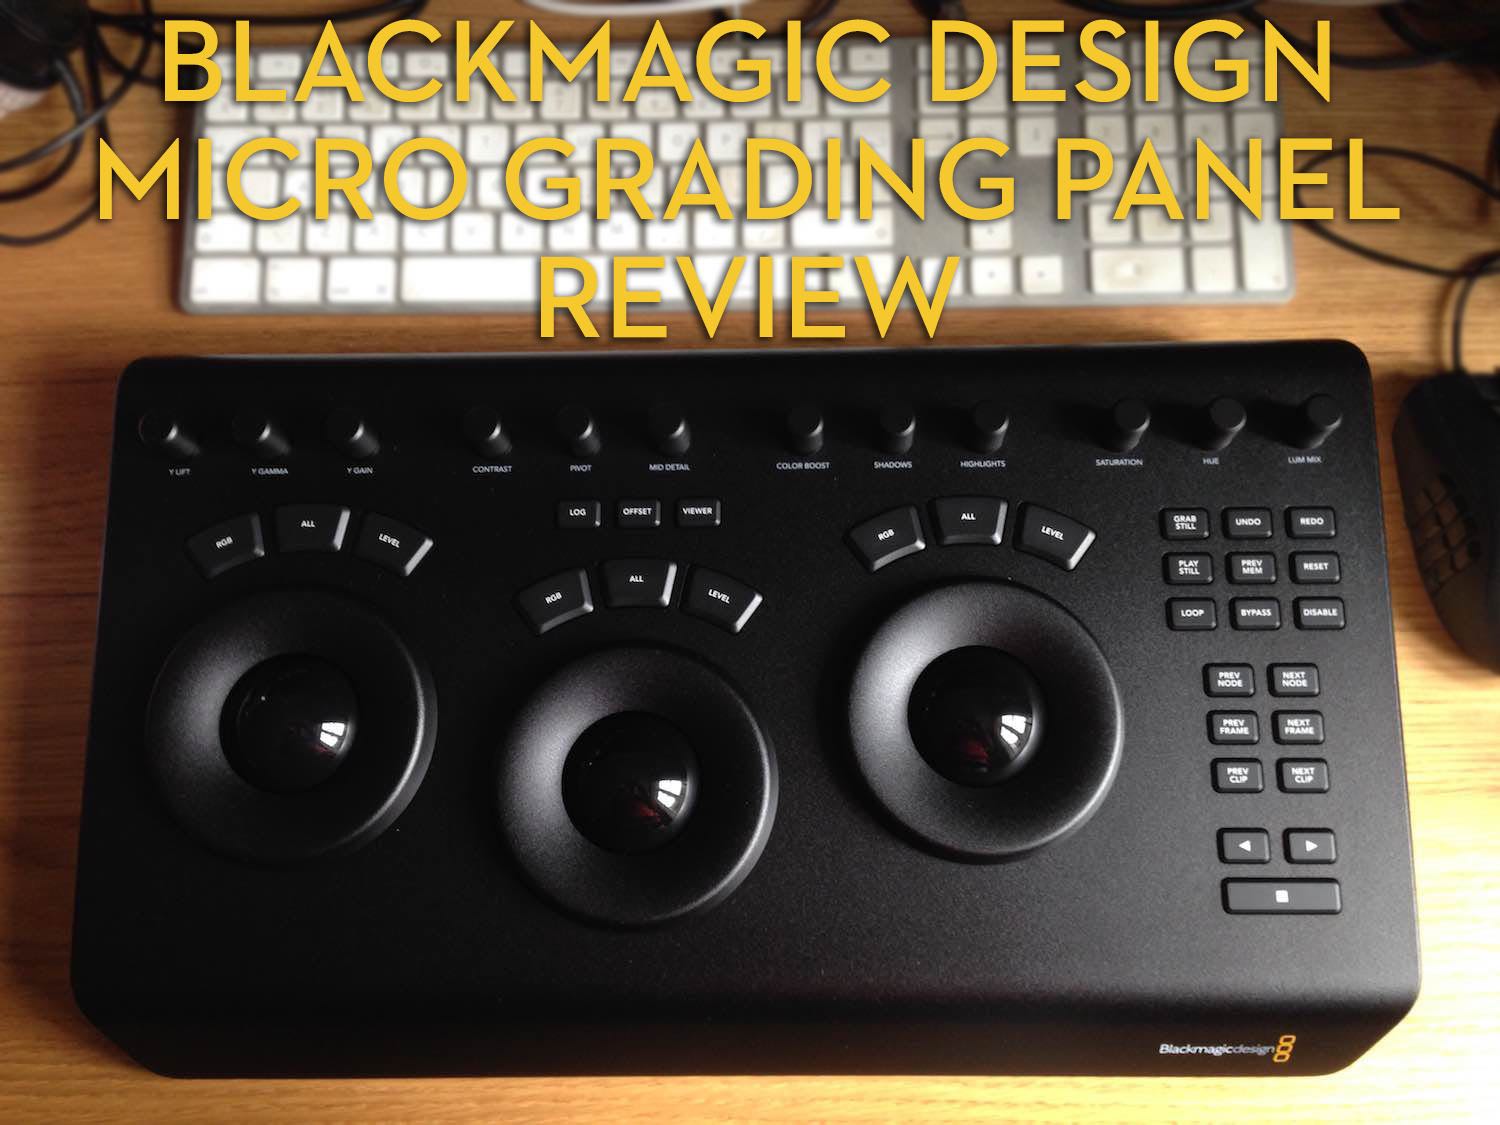
Micro & Mini Colour Grading Panels Review
- The Ultimate Guide to Blackmagic Design’s Mini and Micro Grading Panels
- My in-depth review of the Micro Grading Panel
- Common Questions Answered for Blackmagic Design’s new colour grading panels
Whenever Blackmagic Design releases a new product people get excited.
The release of two new affordable colour grading panels is no exception, and the Blackmagic Design Mini and Micro panels will help bring professional level tools into the hands of many more colorists, editors and DITs.
I’ve written pretty extensively on a wide range of colour grading panels before, check out this post which provides a run down of most of the current options available today at a range of prices from $30,000 to $350.
As well as in some detail such as this post on Tangent’s Ripple or using the Element KB for editing and grading.
When the good people at Blackmagic Design got in touch to see if I wanted to review the Micro panel, I was delighted to give it a whirl for two whole weeks.
In this post you’ll get to hear what I thought of it. If you want to jump to that now, just click here.
For the rest of the post I’ve split things into the following sections
- Questions and Answers
- Blackmagic Design Mini Panel Breakdown
- Blackmagic Design Micro Panel Review
Colour Grading Panel Questions and Answers

Size comparison between Tangent Ripple and BMD Micro Grading Panel
The market for affordable colour grading panels is definitely expanding, and the release of Tangent’s $350 Ripple grading panel opened the door for a lot more people to experience what it’s like to work with a tactile grading interface.
The Ripple delivers on some of the same physical concepts as much more expensive devices. With these new panels from Blackmagic Design however, you’re getting to experience almost the exact same user interface and components as the more expensive versions.
For both companies, Blackmagic Design and Tangent, they’ve positioned their products at price points far enough apart so as not to cannibalise themselves.
So $350 for the Ripple vs $3320 for the full Tangent Element suite, or $995 and $2995 vs $29,995 for the full DaVinci Resolve Colour Grading panel.
What will these two new panels do to the market?
My two cents are that Tangent might sell less Ripple’s as people upgrade to the build quality and performance of the Micro panel, but they may well sell more Element Suites because all of BMD’s panels only work with DaVinci Resolve.
So if you’re working in multiple apps you might want to steer clear of Resolve’s panels entirely and spend roughly that same $3000+ on the Tangent Element panels, if you want to get in the game at a serious level.
This also begs the question of who are these panels for?
In my mind the Micro panel is perfect for editors, DITs and junior colorists who don’t want to spend a fortune but do want to have a professional level panel. It can’t do ‘everything’ but it can do more than enough for most.
You’ll have to decide for your own workflow if the shackle to Resolve makes the bang worth the buck.
The Mini is a really interesting panel which both at it’s price point and it’s design is aimed, I reckon, at DITs who are doing a lot of detailed colour grading work on set and professional colorists who might want a smaller set up for their home grading suite without sacrificing too much of the functionality they’re used to in a ‘full suite’.
I’m also intrigued by the future of the Mini, those two 5 inch screens can’t possibly be limited to showing just the GUI of the controls (can they?), and I’m hoping that we’ll see updates to the software that bring scopes or images to them. Maybe.
Out of the two panels it’s definitely the one with a more interesting development future. See the next question for more on this!
Are there customisable controls?
To be clear, I don't mean user customizable. I mean the upper controls are dynamically remapped depending on your mode.
— Alexis Van Hurkman (@hurkman) March 3, 2017
No, there are no user customisable controls (at this time).
On the Mini, the eight upper control knobs (below the screen) change depending on the mode that you’re in and you use the soft keys above the screen to navigate through the menus.
Another interesting feature of the Mini are the FX and USER buttons which the manual explains as:
- Fx – Control of the Resolve FX plugins from this palette will be available here in future releases.
- User – User configured menus will be available here in future releases.
So there are obviously plans for custom control sets and future updates to the software to bring greater functionality to the Mini panel. In many ways this makes it a more interesting purchase than the Micro, if you can afford it!
What software do the panels work with?
The Blackmagic Design Mini, Micro and full sized Advanced panels only work with DaVinci Resolve. To use either of these two new panels with DaVinci Resolve you will need to update to version 12.5.5.
Tangent and other manufacturers hardware works with numerous editing applications as well as DaVinci Resolve.
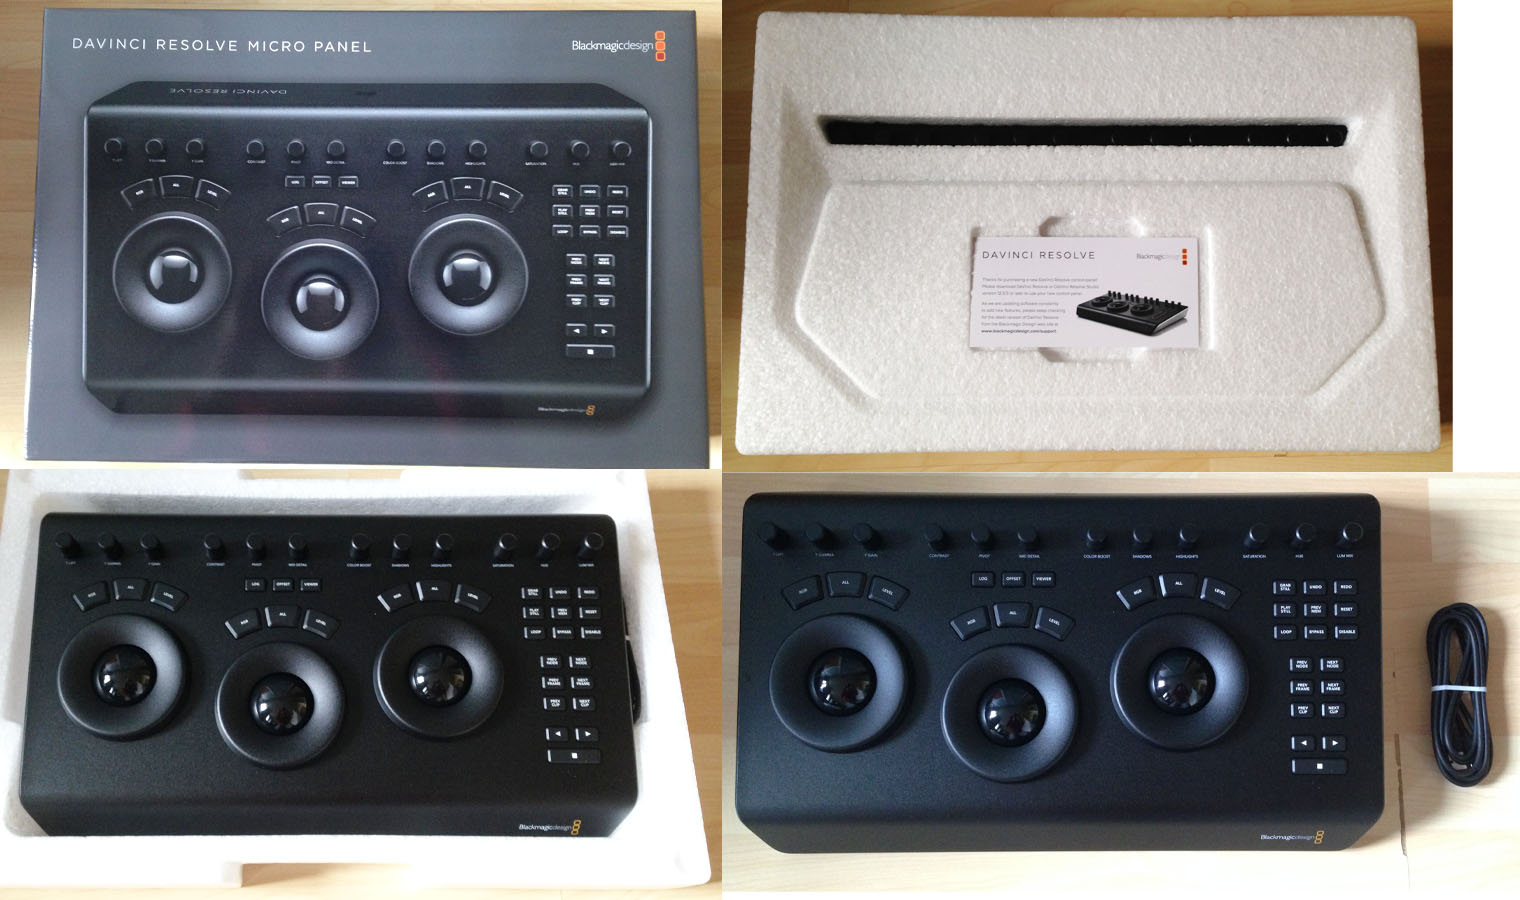
Unboxing the Micro Grading Panel
Are these panels portable?
Sort of.
The Mini is designed to be rack mounted and even has bolts in the bottom of the panel to keep it locked in place on a cart, or a table top. The Micro is smaller and could be carried around, although having held it, it’s not the kind of thing you’re going to be lugging to a coffee shop to grade on your laptop, no matter how much the press images try to sell that!
If you were to take the Micro out with you, you’d definitely want some kind of hard case for it, or at a push, just put it back in the box it ships in, which does include a handle.
The Tangent Ripple’s lightweight plastic design makes it the kind of thing you can throw into a laptop bag, without too much concern, for true portability.
Blackmagic Design Mini Colour Grading Panel
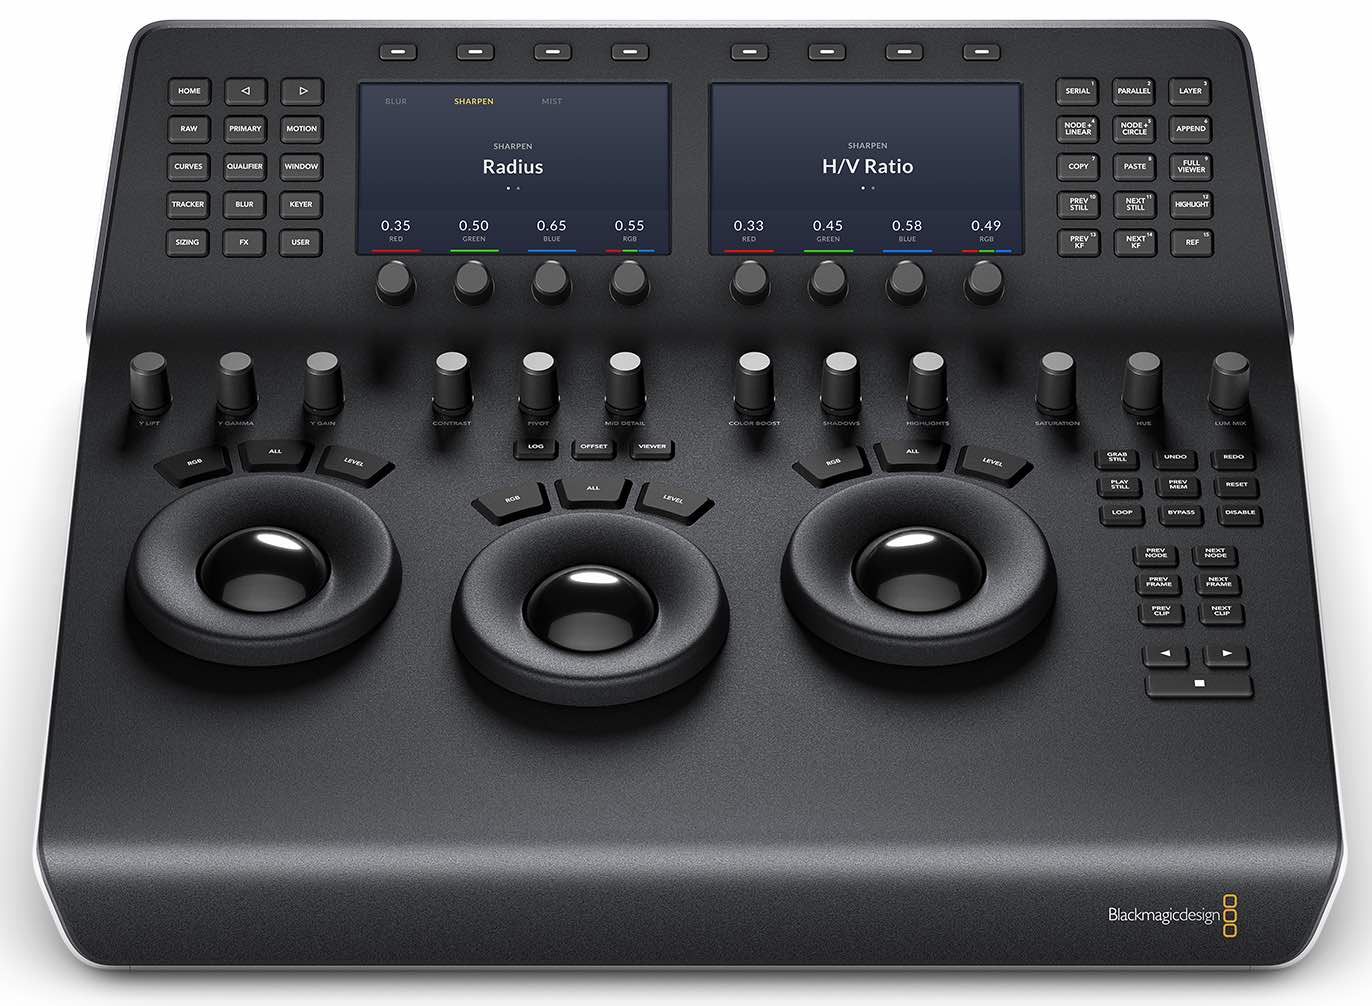
The Blackmagic Design Mini colour grading panel is the older brother to the Micro panel (below) and the ‘child’ of the full sized ‘Advanced’ grading panel.
It costs a princely, though not unaffordable $2,995 and in addition to the functionality provided by the Micro it features 30 preset buttons, in two groups of 15 on either side of the panel, to give you quick access to the numerous areas within Resolve and one button execution of common tasks, such as SERIAL which adds a serial node, or toggling on the Highlight key with HIGHLIGHT.
APPEND: Often when navigating around the Node editor and making correction trims, the colorist decides he/she needs an additional node for more correction. Using the Append Node key will always add a Serial node to the very end of the node graph, regardless of which node in the graph is the current node. – Resolve User Manual
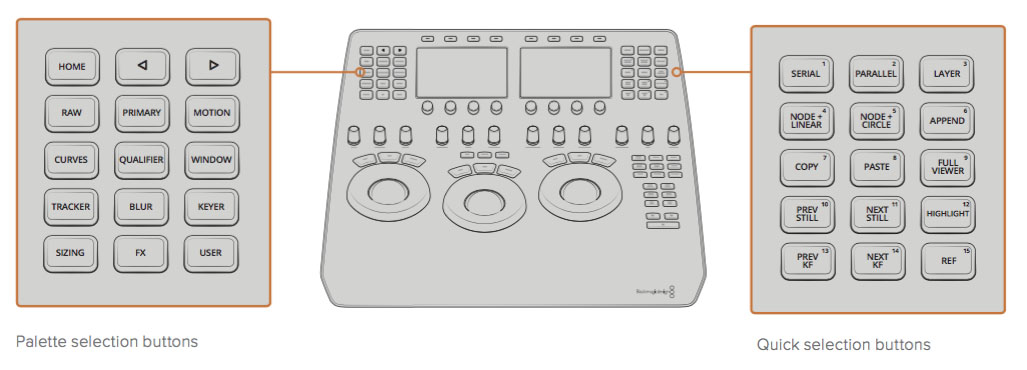
Some of these buttons combine tasks such as ‘NODE+CIRCLE’ which adds a new node and simultaneously adds a circular power window, which is an obvious timesaver!
It’s interesting to note that the 15 buttons on the righthand side also have numbers on them, which makes you wonder whether these will be customisable in the future, with these numbers used as a reference?
If you’re a colorist looking to set yourself up for freelance work at home, or a smaller post house that doesn’t have a dedicated full size grading suite, then the Mini is a fantastic option.
It’s more compact than something like the Element and through the new menu system on the LCD screens overs access to the depths of Resolve’s feature rich tool palette, offering a huge amount of tactile control over your images. (Please see Christophe’s comment for more on this! I’ve update the post to fix an error.)
Unless you’re an editor who is also a colorist, it’s unlikely that the extra $2000 is worth it compared to what you get with the Micro, for simple “editorial grading”. Unless you’re an editor with deep pockets and a thirst for gadgets that is!
The size and weight of the panel make it unlikely that you’ll have it consistently set up in an offline edit suite scenario, but it would be interesting to see if the extra depth on the panel makes it more comfortable to use, when you factor in wrist support.
The Mini panel also features backlit keys, which also illuminate when selected, which is also more useful in a ‘proper’ grading suite with controlled lighting, so you can see what’s going on.
Unlike the Micro which is powered by a single USB-C cable, the Mini has several power options including AC power from a wall or on-set power supply, or through the Ethernet cable, which is a bonus for facilities.

Image from VanHurkman.com
For an excellent hands-0n review of the Mini panel check out colorist, author and filmmaker Alexis Van Hurkman’s post on his personal blog here.
Alexis provides a detailed and insightful understanding of how the panel works as a whole and insights on some of the specific functionality too.
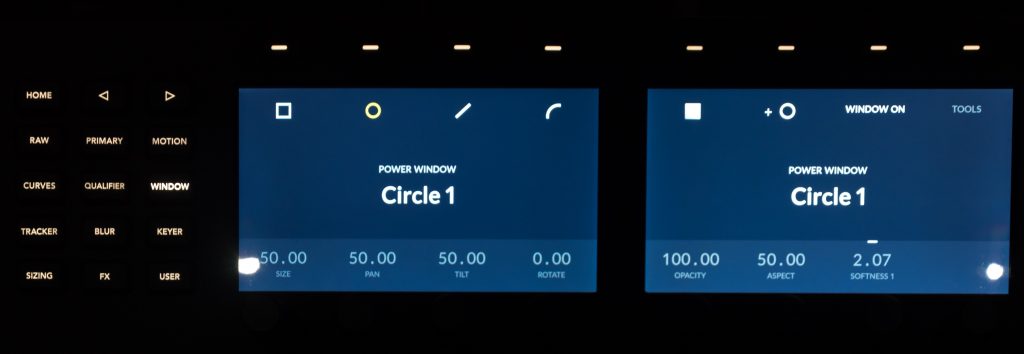
There were a couple of bits that caught my eye was his breakdown of the new page system on the Mini’s LCD screens and the explanation of the ‘Offset’ button in the middle of both the Mini and Micro panels.
Any palette (accessed via the grid of buttons to the left of the displays) that have multiple pages of controls display dots under the page label text, with the number of dots showing how many pages are available.
You then use the Left and Right arrow buttons to access each page. It’s logical, it’s quick, and it feels very straightforward.
Additionally, some palettes with different modes of operation expose each mode as a button at the top of the screen. So, it’s really fast to jump to the curve, qualifier mode, or sizing mode you want to use.
If you’re considering buying one of these panels, it’s an excellent starting point to get up to speed and learn a few things from a professional working colorist.
UPDATE – Colorist Josh Petok on the Mini
In this short video review colorist Josh Petok, who runs the always excellent Colorist Podcast, gives his first impressions of working with the Blackmagic Design Mini.
One really big thing is that you can use the panel to adjust curves, which you don’t have the ability to do on the Tangent Element.
One of the things that will help working colorists decide whether the Mini is a good panel for them, is the list of things that don’t (yet) work on the panel (in case you were wondering) and some of the things that may take a little getting used to when moving from another panel, like the Tangent Element.
This really helps bring some balance to more positive reviews, although in the end Josh concludes that he did really like the panel:
Overall the wheels and trackballs are really worth the price of admission. If you only got the micro panel for that reason, I think you’re getting a great deal.
Check out Josh’s work on his portfolio site here, or the Colorist Podcast here.
UPDATE – Mixing Light Mini Panel Review
You can control your shapes and windows using the LCD screens. Another productivity boost that is intuitive to use. (Image from MixingLight.com)
Colorist and trainer Robbie Carman, one of the three founders of colorist training subscription site MixingLight.com, posted a very detailed review of the Mini panel in this free insight.
Normally this kind of content sits behind the Mixing Light paywall so it’s worth checking out not only because it’s free, but because it also gives you a taste of the kind of content that is delivered every month.
Part of what is really brilliant about the post is that Robbie lists out, with pictures, what every section of the LCD Menu system displays, which you can even download as a zipped file (Direct Download).
If you’re considering buying one of the Mini panels and you already own the Tangent Element Suite, Robbie still reckons it’s worth the money:
I love having curves on the panel. This is probably my favourite feature on the Mini, and for me it is worth the entire price of admission.
Several times throughout the review Robbie highlights where functions that are now at your finger tips are otherwise buried in sub-menus on the Elements. The whole review is well worth a read, so check it out here.
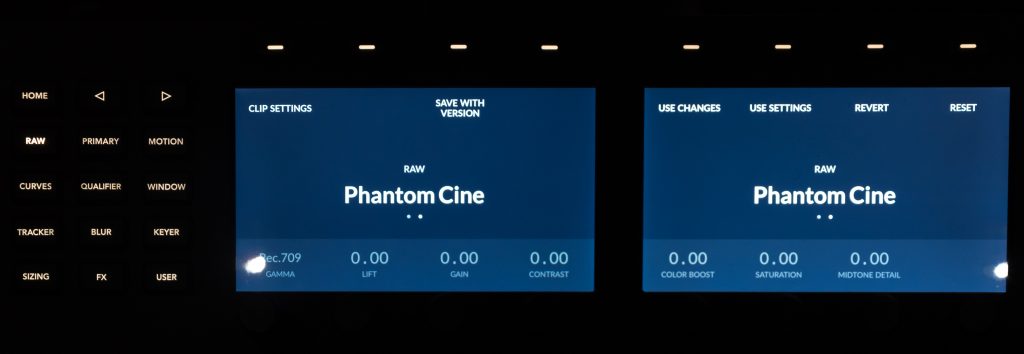
Camera RAW settings are also adjustable from the LCD screens. (Image from MixingLight.com)
Buy the Mini Colour Grading Control Panel on Amazon Global Stores
UPDATE – Ideas for Improvements
Editor Brady Bretzel from PostPerspective.com also got to try out a Mini panel for a couple of weeks and shares his impressions of it in this post. I’ve pulled out a couple of things that stood out to me.
Something I really loved when working with the Mini Panel was adding points on a curve and adjusting those individual points. This is one of the best features of the Mini Panel, in my opinion. Little shortcuts like adding a node + circle window in one key press are great features.
It’s always interesting to hear which features other people ‘loved’ and those that they felt could do with some improvement. Brady also linked to two other resources where professional colorists are creating their own ‘wish-lists’ of features they hope Blackmagic Design will add next.
To see what some pros think needs to be changed and/or altered troll over to the holy grail of color correction forums: Lift Gamma Gain. You’ll even notice some Blackmagic folks sniffing around answering questions and hinting at what is coming in some updates. In addition, Blackmagic has their own forum where an interesting post popped up titled DaVinci Mini Panel Suggestion Box. This is another great post to hang around.
UPDATE – DaVinci Resolve Mini Panel Control Surface Crash Course
Colorist Denver Riddle of Colour Grading Central delivers at really well produced 14 minute crash course/review on working with the Mini panel in Resolve.
It’s a great video review that lets you see Denver’s hands on the control surface throughout his colour grading process as well as the graded image and the Resolve UI.
This is probably the best ‘hands-on’ video there is, especially as you see pretty much every button, knob and ring in action. You also get to see how these controls are used to grade three shots in context, rather than ‘this is what it does’.
Aside from all of the text reviews I’ve previously linked to, this video really helps you to get a feel for how the menu system works to draw out the functionality of Resolve and how a colorist can use this wide range of tools to produce great looking images.
It’s pretty impressive that Denver only uses the control surface throughout the entire video!
Blackmagic Design Micro Colour Grading Panel Reviewed
- My Review of the Blackmagic Design Micro Panel
- Setting up and customising
- Full control list break down
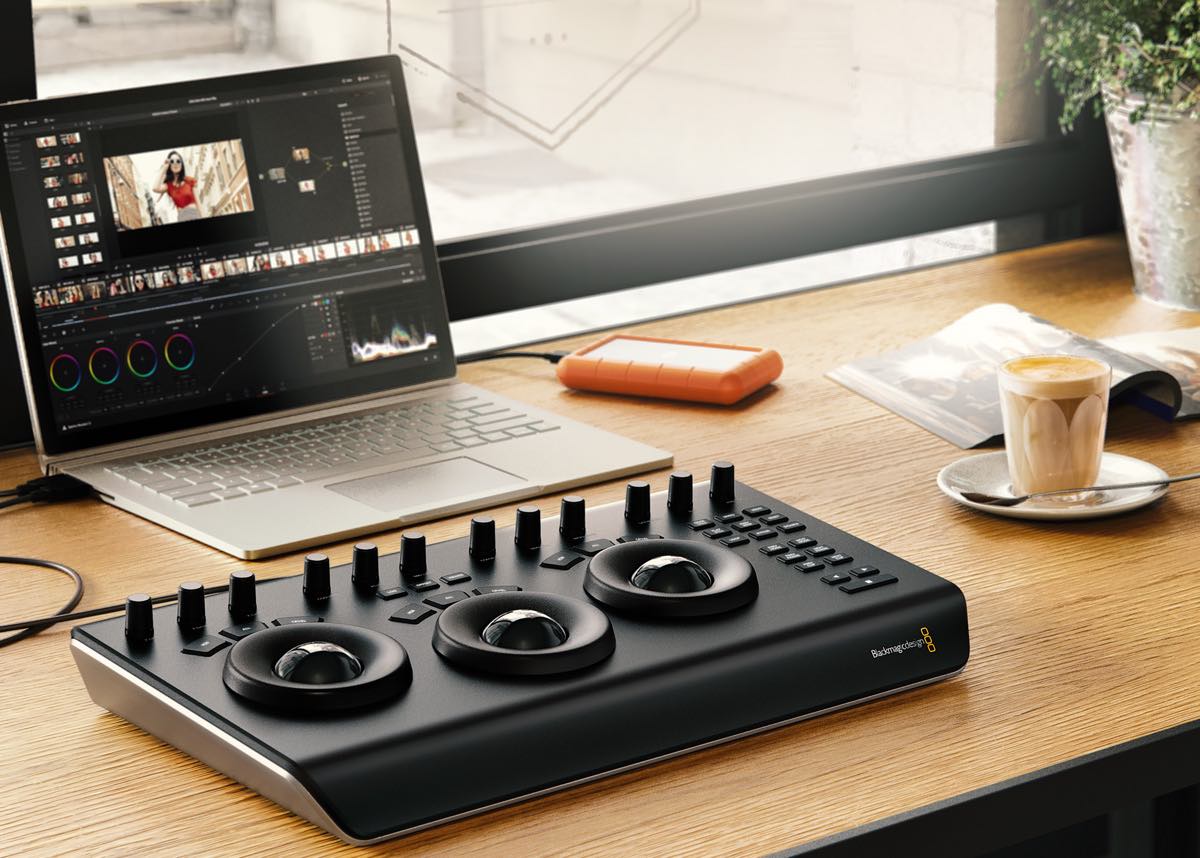
At just $995 the Blackmagic Design Micro Grading Panel is their most affordable control surface to date.
It’s sold as a ‘portable’ control surface, and at 5KG, you can carry it about but it’s not exactly backpack ready. If you are looking to take it places, then you’ll either want a flight case from someone like Pelican, or make sure you keep the packaging it comes with to take it places safely.
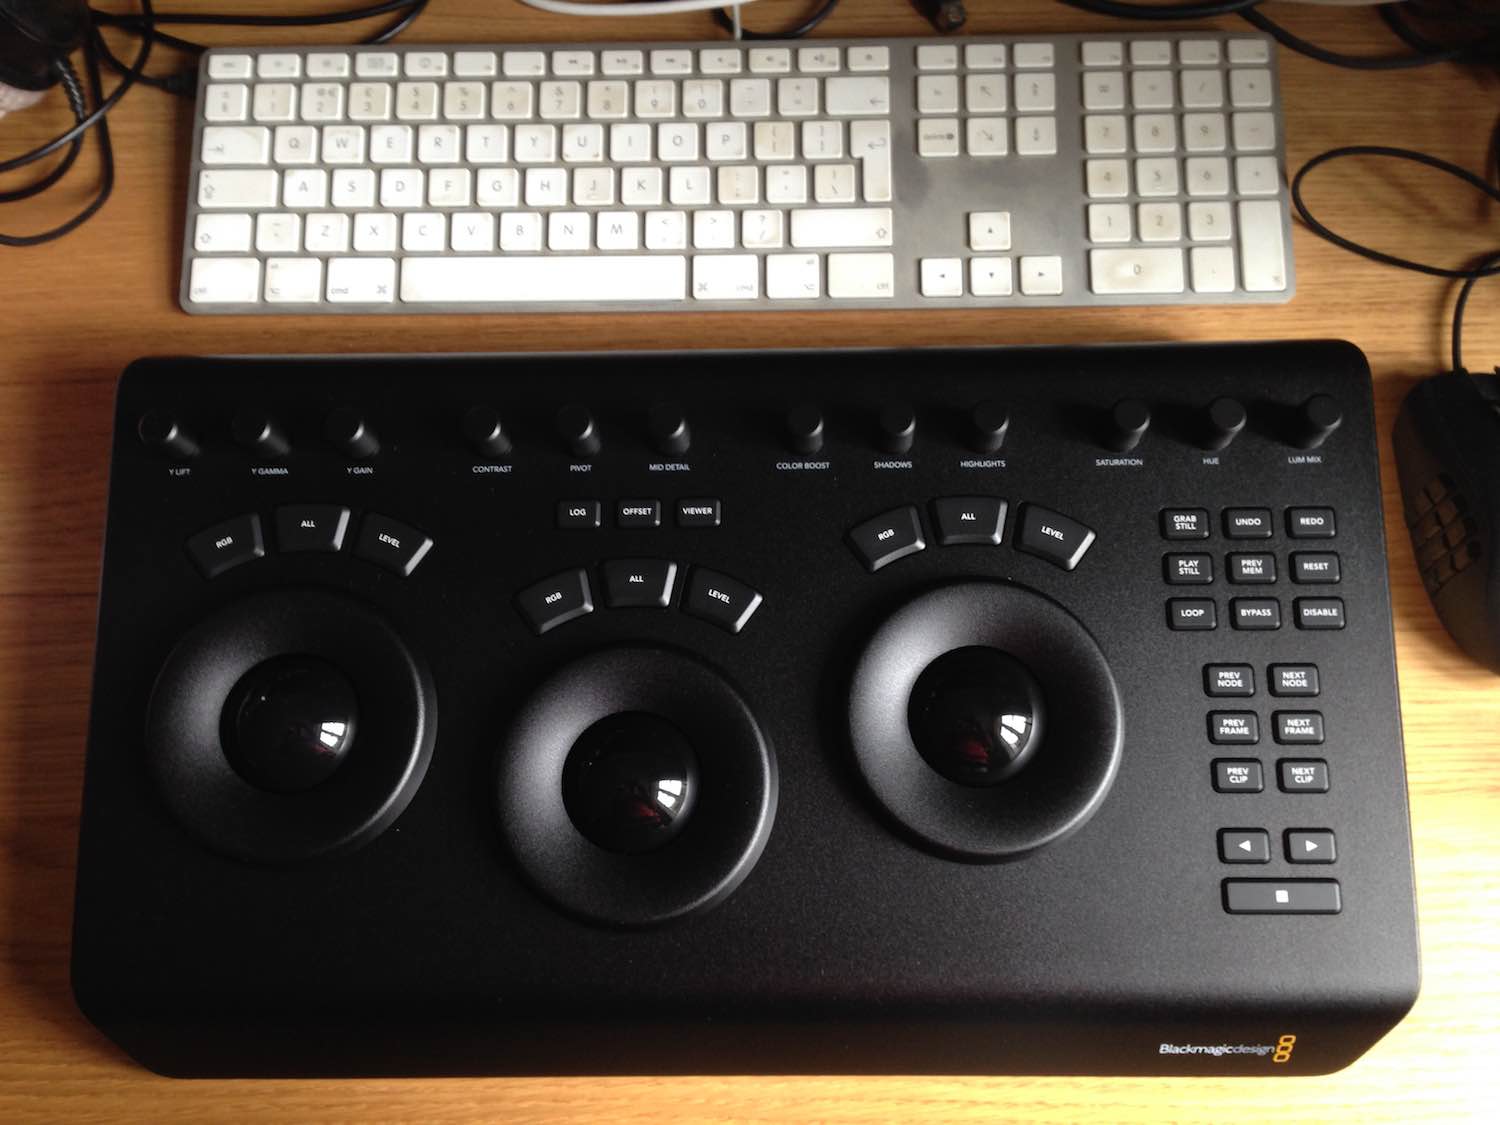
As you can see in the photo (2 below), the footprint of the Micro panel is about the same width as a full size Mac keyboard and roughly the same area as a Medium Intuos Wacom tablet. That’s what normally sits in front of my keyboard.
The official product spec is that it’s 16 inches wide, 9 inches deep and 6 inches tall. The official weight is also 10.9 pounds.
This makes it a pretty compact device, and it’s high quality galvanised aluminium build makes it feel extremely durable.
The Micro panel is powered by the single USB-C cable, which means it can also be powered by a laptop, which does dramatically improve the potential for portability.
As for Blackmagic Design’s claim that it’s intended to sit above or below your keyboard to serve editors who like to grade and edit at the same time. Well, maybe.
I work with a Wacom tablet in front of my keyboard and so the Micro had to go to the side. Personally I don’t colour grade as I edit, unless the particular shot is so badly out of place with the rest of the scene that it makes viewing it distracting.
You don’t want to ‘paint the trim on at tear down’ as they say.
Personally I prefer to grade the whole project in one go, as this helps me focus on the images, rather than building scenes.
In that regard, the fact that the Micro only works with Resolve isn’t too big of deal as I can always round trip from Premiere if I need to and this is what I’m likely to do for any detailed colour work.
But if I’m in a hurry, that roundtrip won’t happen and so I’ll end up grading in my NLE without the benefit of a control surface. Or actually, in my case I’ll use my Tangent Element KB.
Maybe it’s all part of Blackmagic’s ploy to get more editors to cut in Resolve!
Now you can grade in a coffee shop, by a window.
What does it feel like?
Unlike the Tangent Ripple which has removable/fall-out trackballs about the size of a snooker ball, the trackballs on the new BMD grading panels appear to be a tiny bit larger and herald the same design and construction as those found on the full size Advanced panel.
Although these trackballs are actually slightly smaller than those on the Advanced panel itself, which helped to make the new panels thinner. The balls can also be removed for cleaning purposes.
They have a nice weight to them when you move them, and after increasing their sensitivity a little (see customising the panel below) provide precise and instant control over the image.
Of everything on the panel, I really loved the fluid motion of the contrast rings that sit around each of the trackballs.
These rings are vastly superior to the dials on the Tangent Ripple and it’s just much nicer to have both contrast and RGB controls under your fingers without moving your hands around on the panel.
All in all, the balls and rings feel great to work with and they’re a very comfortable size for your hands to rest on.
The buttons have a nice rubberised finished to them, which means don’t have that plastic ‘clack’ sound to them, like you find on other panels. To me this is an improvement and a removal of a distraction.
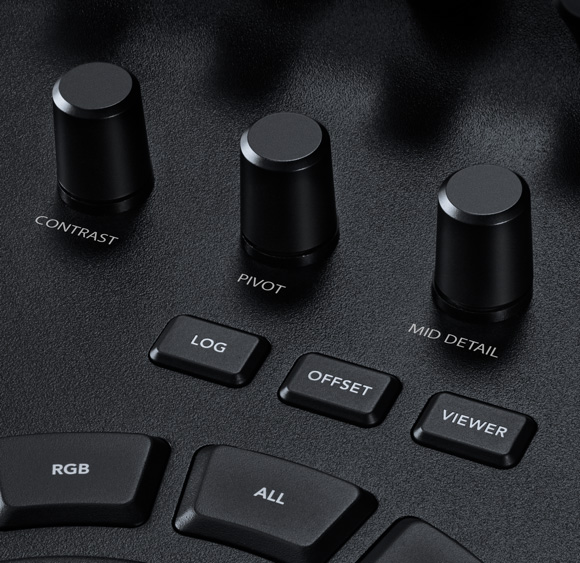
They still provide plenty of positive feedback when pressed. They’re also all backlit and the LOG, OFFSET and VIEWER buttons illuminate when active.
The whole panel feels really well designed and the buttons and knobs are all well within easy reach.
The metal knobs are really lovely to work with and provide a very precise turn, which makes fine tuning your grade a breeze. Each knob can be reset by depressing it.
In short, it’s a really lovely piece of kit that’s been thoughtfully designed, impeccably built and is a joy to use!

So what’s it actually like to grade with?
It’s great, although it just made me want to try the Mini.
Unsurprisingly, being presented with easy access to a tool means you’re more likely to use it. It’s for this reason that the selection of tools which adorn the top row of knobs are really well chosen.
Tools like Colour Boost and Mid Detail are really useful and rather than being buried somewhere in Resolve intensely rich feature set, they’re instantly at your finger tips.
This is one of the reasons why working with the Micro makes me want to try out the larger Mini panel, with it’s more diverse control set.
With the Micro, as soon as you have to move your hands off the control surface, say to add a node with the keyboard (ALT+S), then you feel a little disconnected from what you’re doing.
It is also slower than being able to slide your hand slightly over and hit ‘Add Serial Node’ as you can on the larger Mini grading panel.
There are more than enough controls to get your grading done with great contentment on the Micro panel, but once you’ve had a taste of a control surface, it’s harder to live in a half-way house, reaching to the keyboard all the time. But then again the extra $2000 might help quash those appetites for more!
If you’re coming to these panels and Resolve for the first time, then it helps to understand that it’s a YRGB system with unique controls over just the Luma, separate from the Red, Green and Blue channels. This means you can adjust the contrast of your image without effecting the saturation.
In my test grading project I ended up using the Y Lift, Gamma and Gain knobs a lot more than I expected. It’s also great that contrast and Pivot are front and centre too.
I’m also not as used to working with the trackballs for adjusting the colour balance, and I think I’d maybe benefit from the mindset of three knobs to adjust for RGB on the Mini panel too.
That said, the central benefit to working with a colour grading control surface of any kind is being able to keep your eyes on the images and your hands on the controls and the Micro certainly makes that an enjoyable process.
The Viewer button is especially useful for jumping to a full-screen display of your image for evaluation and the undo/redo and reset controls got a lot of use too.
The only button that seemed a little odd to me was the Previous Memory button, ‘add node’ would have maybe been more practical?
Final Thoughts
In conclusion, my frequent comparisons to the Tangent Ripple are probably a bit unfair.
That’s a device that’s been specifically designed to hit the lowest price point possible, to make it as accessible to as many people as possible. It’s a great tool for anyone looking to start to use a control surface.
More appropriate would be a comparison to the Tangent Element TK, which is more expensive then the Micro and yet only provides controls for the trackballs and rings. But I’ve not had a chance to work with one of those so I can’t offer a personal perspective on that.
All that said, the Micro grading panel is a lovely piece of kit that will make your DaVinci Resolve colour grading experience far more enjoyable and certainly faster too.
The lack of access to other apps in the Blackmagic Design panels, may well put a lot of editors off using them though. I personally most often grade in Premiere, but if I have the time to grade in Resolve I do love using the superior toolset and controls.
If you’re a junior colorist, a DIT or an editor who loves to grade, you won’t be disappointed with what you get for $995. You just might find yourself upgrading to the Mini before you know it!
Buy the Micro Grading Panel on Amazon Global Stores
I really need to clean my keyboard!
UPDATED – Dado Valentic Micro Panel Review
Colorist and trainer Dado Valentic shares his thoughts on the Micro panel in this short video. As a working colorist and trainer it’s interesting to hear his take on these new panels compared to the full featured Advanced panel.
At the end of the video Dado mentions that he’s planning on replacing the Tangent Element TK panels they had in their DIT carts with the new Micro panels.
Hat Tip to Andy Wild for the video find, which he included in his post on the new panels, given from an engineer’s perspective.
At the end of his post, Andy raises an interesting question about the future of the Advanced panel, which if it ever happened, would I’m sure be a welcome move for many professional colorists!
The price of the new panels does bring a light onto the current cost of the Advance Panel, surely this should be reduced if they can build good quality units for sub £1000 and £2500 then perhaps the Advance should be half its current price (button differences aside) which is £25,000?
Setting Up the Blackmagic Design Micro Panel
It takes about 60 seconds to get the Micro grading panel set up and running.
There aren’t any separate drives to download and install, it’s just plug and play. Although you do need to be running the latest version of DaVinci Resolve (12.5.5)
- Unbox the panel
- Plug in the single USB to USB-C cable
- Start Resolve (version 12.5.5) and set the Control Panel Preference
- Restart Resolve
- Done
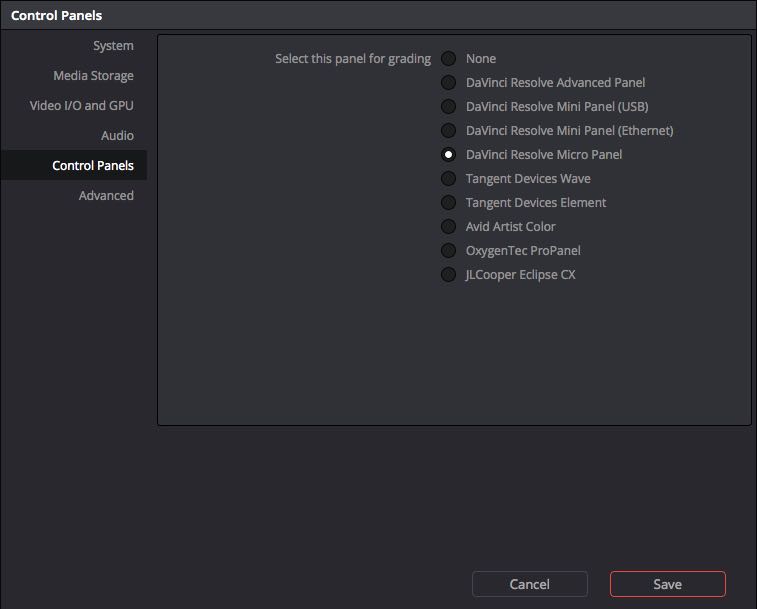
To set up a colour grading panel so that the app recognises it’s presence, on a Mac go to:
DaVinci Resolve > Preferences > Control Panels
and select the model you need. You’ll need to restart Resolve for this change to take effect, but then you’re all set.
Customising the Micro Grading Panel
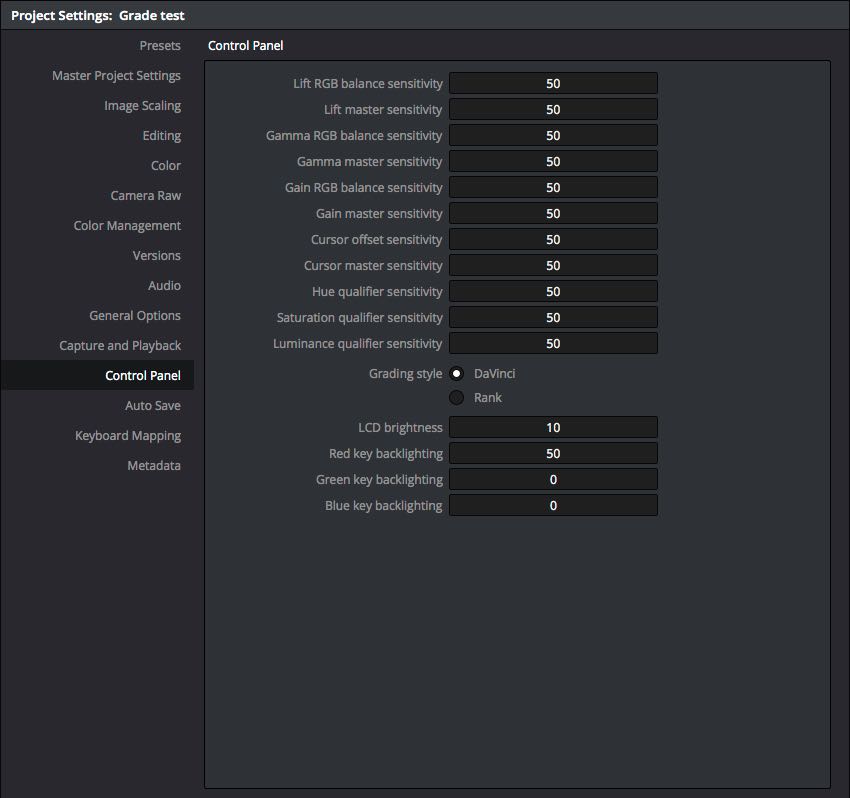
You can customise the sensitivity of the controls on the panel in the Project Settings menu. Click on the cog icon at the far bottom right of Resolve to access the following screen.
Check out page 94 and following of the user manual for a full breakdown of what each of these do. I’ll highlight a couple of things.
To me the default settings of the three Lift, Gamma and Gain RGB balance controls are a little slow. These adjust the sensitivity of the trackballs and how quickly they make a large adjustment on the colour wheels.
At around 75 these felt a bit more fluid to me, although the GUI update on Resolve seemed a little sluggish for these on my 2013 Mac Pro. The actual colour adjustment to the image was instantaneous though.
Turning the knobs didn’t feel like you had to crank them round and round to gain any ground, so you could leave these as they are, or possibly adjust them up a smidge.
The settings for the LCD brightness and backlighting colours don’t apply to the Micro panel. You’ll want to leave the ‘Grading style’ set to DaVinci too.
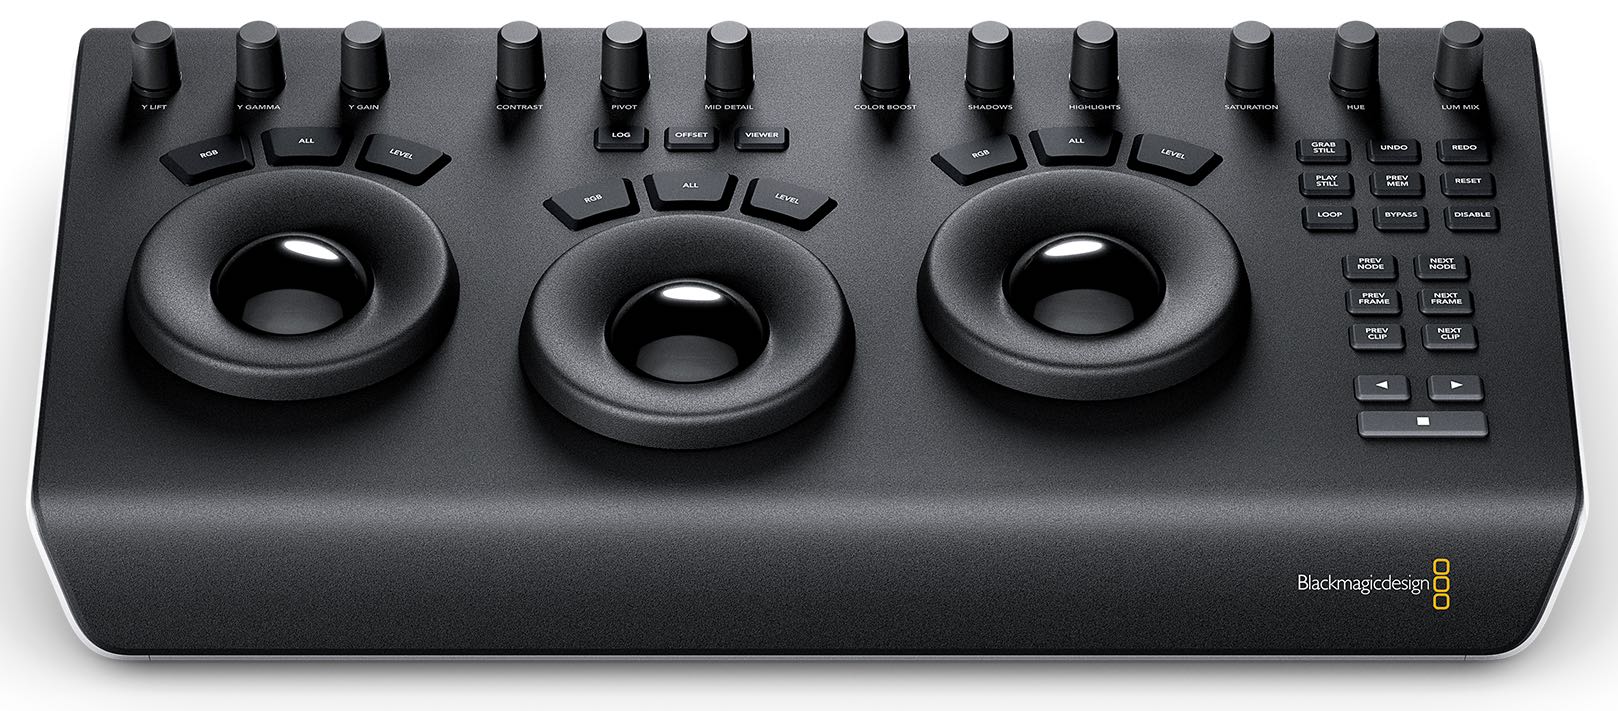
Blackmagic Design Micro Grading Panel Controls
In case you’re looking at all the controls and wondering what they do, here is a full run down from the superb User Manual in chapter 47, page 1039. The default mode of the panel sets the trackballs to Lift, Gamma and Gain.
- LOG – Toggle LOG mode on/off wherein the trackballs control Lowlights, Mid-tones and Highlights.
- Offset – Toggle OFFSET on/off
- Viewer – Fullscreen playback of the image
The manual (p.1038) provides a helpful insight on working with OFFSET toggled on, and how that changes the functionality of the trackballs.
You can also select the OFFSET button whether in PRIMARY or LOG modes. This is a toggle operation and when selected the left hand side ring surrounding the trackball controls the color temperature of the image, the center trackball ring the color tint and the right hand side trackball controls the image offset balance and master exposure with the ring.
By rotating the trackball the colorist can alter the balance between the red, green and blue levels of the image. Using the vectorscope as a rough guide, moving the trackball towards the three thirty clock position adds more blue while reducing the red and green.
The control ring surrounding these trackballs provides a master amplitude control of the associated trackball.
The three larger buttons above each of the trackballs and rings are reset buttons.
- RGB – Resets the RGB balance
- All – Resets both RGB and Luma Level
- Level – Resets the Luma only
The 12 high precision knobs across the top of the panel have the following controls, and each knob can be depressed to reset the individual control.
- Y Lift – Adjust the blacks in the Luma channel only
- Y Gamma – Adjust the mid-tones contrast in the Luma channel only
- Y Gain – Adjust the highlights in the Luma channel only
- Contrast – Increase/Decrease contrast
- Pivot – “Changes the center of tonality about which dark and bright parts of the image are stretched or narrowed during a contrast adjustment.“
- Midtone Detail – “Increases the contrast of regions of the image with high edge detail to increase or decrease the perception of image sharpness and definition or when lowered regions of the image with low amounts of detail are softened while areas of high detail are left untouched. Great for softening facial features and popular for beauty shots.”
- Colour Boost – Similar to the ‘vibrance’ control in Adobe’s Lumetri colour panel. Allows you to raise or lower the saturation of areas of low saturation.
- Shadow – Lighten or darken shadow detail only, without affecting the midtones.
- Highlight – Lighten or dark the highlight detail only, without affecting the midtones.
- Saturation – Increase overall saturation.
- Hue Rotation – “Rotate all hues of the image, around the full perimeter of the colour wheel.“
- Luminance Mix – “Control the balance between YRGB contrast adjustments made using the Master Wheels or ganged Custom curves, and Y-only adjustments to contrast made using the Y channel Lift/Gamma/Gain controls of the Primaries palette or the unganged Luma curve.“
Control buttons
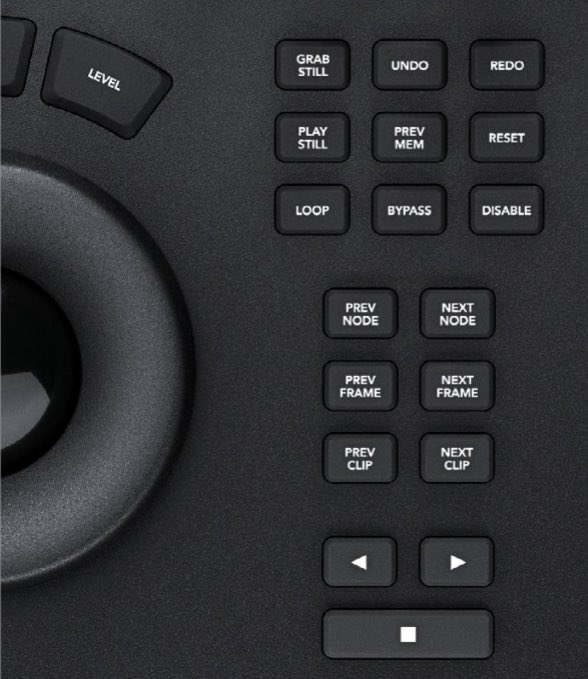
These are mostly self explanatory but the Bypass button toggles the ‘node graph bypass mode’ and Disable toggles the current node on/off.
At the bottom of the button set are the transport controls, which the manual helpfully articulates as:
- Left Arrow: Select this key to play the clip/timeline in reverse.
- Stop: You guessed it. This stops the playback.
- Right Arrow: The forward key will play the clip/timeline forward.


Yeah. I might have jumped the gun a bit in my excitement over the new panel 😉
Well you did a great job illustrating excitement and the requirement for customisation!
It’s been on my wish list for several years now. After seeing the implementation of Chalk for the Baselight Slate, I was quite impressed. The process of figuring out what and where you want your functions can be time consuming, but worth it in the end. I can also see the advantage of having buttons not change and be exactly where you expect them to be, especially when you’re freelance jumping from place to place.
Hopefully they will end up with some kind of blend of the two. I know I much prefer the wide customisation of keyboard shortcuts in my NLE, instead of a very narrow restriction. Time will tell!
Johny, there are some rumors that micro panel doesn’t interact with GUI, so if you push the Log buton for example, Resolve’s user interface remains on the main page. Is it true?
Hey Misha, Now that you mention it, I can’t for the life of me remember if that’s the case. I’ve had to send the review unit back now, so I can’t double check. Maybe someone reading this with a Micro can chime in?
I’ll also email Blackmagic to check.
According to BMD it does update the GUI
Great! Thank you!
I have the Mini and it does update when going into Log mode. I don’t see why the Micro would not (same base and probably same software inside).
However, when you’re tweaking a knob to change a parameter from page 2 of the primary (like midtowns details), the UI does not update and stays on page 1 (and thus you can’t see the numbers). That’s the same if you’re on page 2, and touch the Saturation knob, the UI does not update to page 1 and you have to mouse click if you want to see page 1 numbers.
Fortunately BMD is listening feedback and will address this so the UI will update page 1/2 whether the knob in touched.
Great roundup Jonny!
One little thing about the Mini though. We read: “It’s more compact than something like the Element, and although arguably doesn’t feature as many controls, it still offers a huge amount of tactile control over your images.”
As an owner of the Mini playing with it since a few days, I’m not sure of that. You can for example invert a window/mask on the Mini (not on the Element as far as I know). Also, the Mini has points to control curves (0%, 20%, 40%, 60% and 100%), R/G/B or ALL (via the knobs under the monitors), which gives real precision and a tactile feel over the image. Not too mention in Raw/Clip page, knobs give you access to every RAW parameter you can imagine.
Truth is I can’t fully compare it to a full Element kit as I never owned one, but I would not say for sure that the Mini “arguably doesn’t feature as many controls as the Elements”. I’m not trying to argue here Jonny, just my feedback for readers’ sake. 😉
And again, nice work!
-Christophe
Hey Christophe
Nice that you own the mini! Looking forward to your in-depth thoughts on it, on Mixing light! 🙂
When I said that it had more controls, I guess I was thinking about it in terms of knobs, buttons etc. And that these are customisable.
But given, as you say, the new menu system on the Mini – that actually does deliver a huge amount of control over the deep Resolve feature set.
I will update the post to clarify that!
Thanks for taking the time to comment and keep up the great work on Mixing Light!
My pleasure Jonny, anytime! Robbie is in charge of the review from what he said, but I’ll be pleased to add my thoughts. And thank you for the kind words. 🙂
“The Blackmagic Design Mini, Micro and full sized Advanced panels only work with DaVinci Resolve.”
So not particularly great for DITs then.
Hey Richard
Yes and no. I know a few dits who use resolve on set and for transcoding. But also it’s golden handcuff to resolve means many will stay with elements.
I’ve also used Resolve for super low budget DIT work, but when buying kit I like to make sure it has as much value as possible which means it has to complement multiple workflows. And if the majority of my work doesn’t revolve around colour grading on Resolve then a $1,000 seems like a bit of a waste.
But anyway thanks for the review. I’ll definitely look at these panels if ever I move into more grading focused work.
Hey Richard
No I totally agree with you, that it might not be best for DITs unless they are running a Resolve centric workflow. Hopefully people will see your comments here though to balance things out!
Thanks for taking the time to check out the blog and comment!
Jonny