Are XenceLabs pen tablets any good? How do they compare to devices from Wacom or Huion? Are Quick Keys useful for video editors? And why should you use a pen and tablet as a video editor anyway?
All these questions and more will be answered in this detailed review of the Xencelabs Medium Tablet Bundle, which includes the compact but powerful Quick Keys peripheral.
As a video editor who has used a Wacom Intuos 4 Medium Pro tablet almost every day for over 12 years, I was extremely curious to see how the Xencelabs Medium Tablet would hold up in comparison, and whether it would replace my beloved tablet entirely.
Read on to find out!
TLDR
- Tablets are better than mice for preventing RSI
- Xencelabs Medium tablet is lightweight, compact, and comfortable
- Wireless battery life is excellent at 16 hours of constant use
- Xencelabs Medium tablets are cheaper than Wacom but more expensive than Huion
- Xence has thought of everything except for one crucial element!
- Quick Keys buttons and dials add useful macros and shortcuts
- Download my free Premiere Pro Quick Keys Preset Profile
Thanks to Xencelabs for sending me a Medium Tablet bundle for the purposes of this review.
Xencelabs is pronounced “Sense-Labs” rather than “eX-ence-labs”
Why Video Editors Should Use Pen & Tablets Not a Mouse
If you were to ask me why I don’t use a mouse for video editing, I would tell you it is because I value having a healthy and functional body to use for a long and expansive creative career.
Many years ago, when I did all of my editing with a mouse, I started to get tingly pains in my right hand after a few hours of work. I’d try to stop and stretch out my muscles but it would never really take the pain away. At this point, I started to worry I was getting RSI or Repetitive Strain Injury.
After I watched the video above from animator Kenny Roy and the stories of blown-out wrists and feet from early Pixar Animators, I was convinced a tablet was the way to go.
I originally bought a Wacom Medium Pro tablet in 2012, and until I swapped it out for the Xencelabs Medium Tablet for the purposes of this review, I have used it almost every day since.
The pain went away and has never come back. Unless I use a mouse in a client edit suite and forget to bring the smaller tablet I keep in my freelancer video editor’s toolkit.
All that to say, I’m a huge proponent of video editing with a pen and tablet.
Benefits of Using a Tablet
- Better ergonomics through moving a much larger muscle group – your arm and shoulders, compared to the tiny muscles in your wrist – which aren’t designed for the kind of movements a mouse requires.
- Work Faster – Using a tablet is faster and more fluid as you just click where you’re looking rather than dragging a mouse around to get the pointer to the correct spot.
- Easier Editing – Holding a pen makes it quicker and easier to adjust masks, windows, trims etc.
- Have more Fun – Maybe it’s the lack of pain, but I find using a tablet is just more fun and intuitive than using a mouse when doing creative work!
If you want more details on why I love to edit with a tablet, what the best mouse is for video editing (if you insist on using one!) and what it’s like to video edit with a pen-display tablet check out these previous posts:
- Why I love to Edit with a Tablet
- The Best Mouse for Video Editing
- Video Editing with a Wacom Cintiq
- Video Editing with a Huion Kamvas Pro 16 Plus (4K)
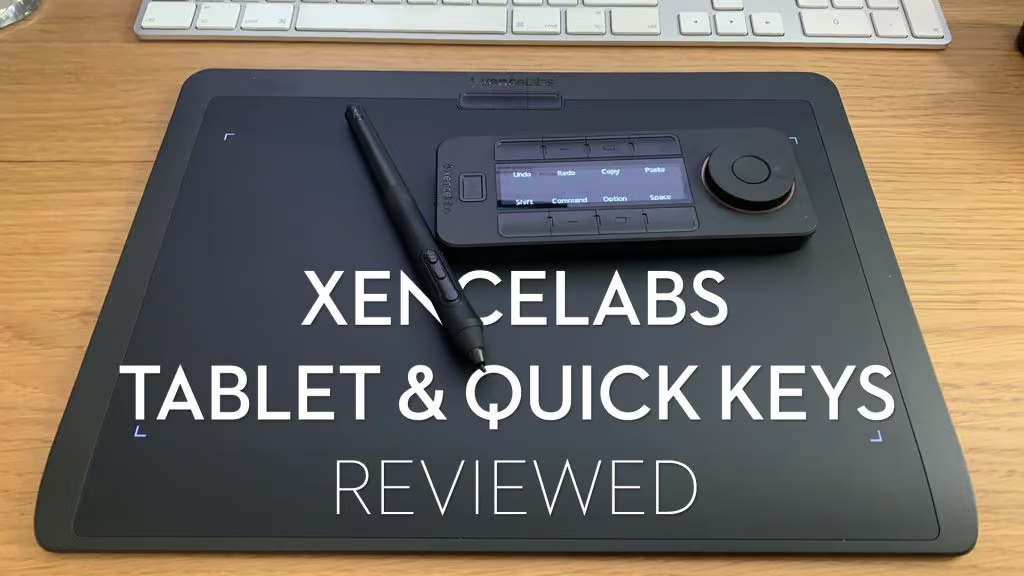
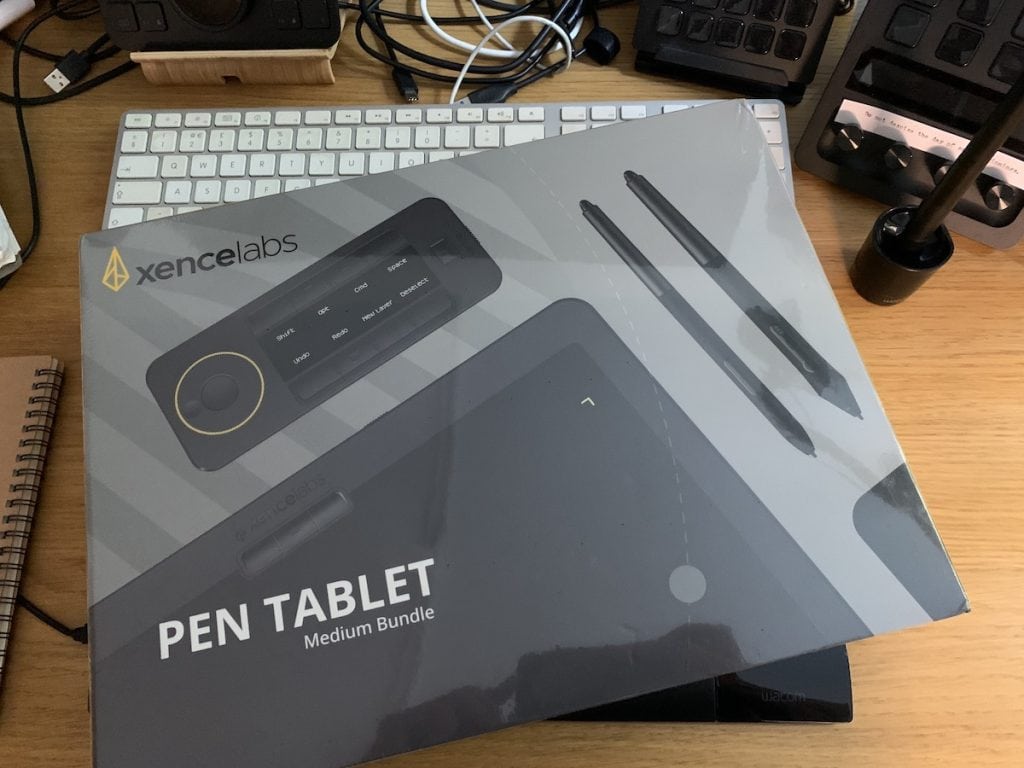
Xencelabs Medium Tablet Bundle with Quick Keys Review
Buy on Amazon Global Stores | Buy on Xencelabs.com
While Xencelabs makes both pen and tablet and display tablets, in my own testing, I’ve always returned to the comforts of a regular ol’ pen and tablet as the workhorse of my edit suite.
I’d heard good things about Xencelabs, a company founded by ex-Wacom employees and was keen to see for myself how they stack up against my trusty, if aging, Wacom Intuos 4.
Here are my thoughts on using an Xencelabs Medium Tablet for video editing and everything else I do after a few weeks of constant use.
What do you get?
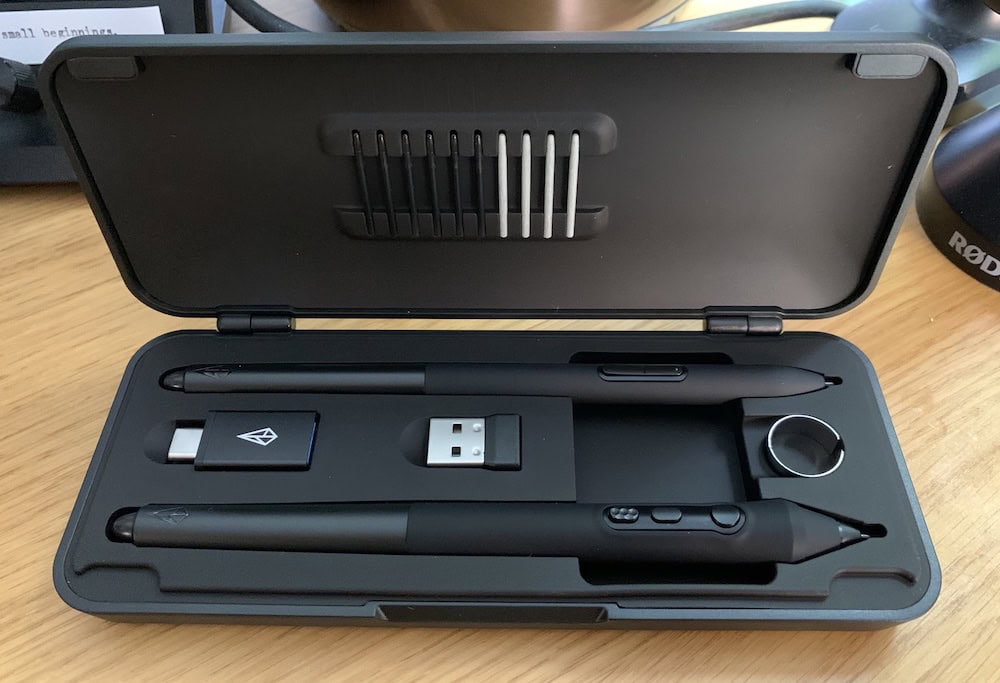
USB-C to A adaptor, 10x Nibs, Nib Extractor, Sturdy travel case.
The Xencelabs Medium Tablet Bundle with Quick Keys comes with almost every single thing you could hope for:
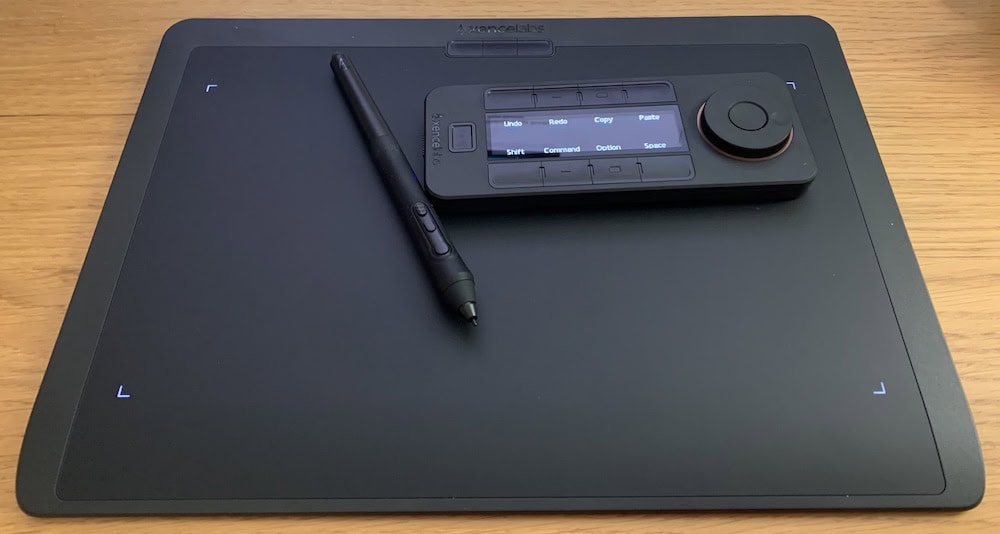
- Tablet with three shortcut buttons (Wired / Wireless connection)
- Quick Keys
- Two pens – Thicker 3 Button Pen and Thin Pen with 2 buttons
- Set of 10 nibs (6x standard, 4x felt)
- Pen Travel case
- Two charging/data cables – USB-C & USB-A
- Two-fingered artist glove
- Tablet Travel bag
TIP – If you ever need to buy more pens for your tablet, the V2 pens are for the newer display tablets only, so you can stick with the original models.
Xencelabs Medium Tablet Basic Stats
| Model Number | BPH1212W-A |
| Dimensions (W x H x D) | 12.6 x 9.16 x 0.3 in / 320.5 x 232.5 x 8 mm |
| Active Area Size (16:9) | 10.33 x 5.8 in / 262.4 x 147.4 mm |
| Weight | 710.5 g / 1.57 lbs (approx) |
| Hours per charge | 16 hours (2.5 hours charging time) |
| Ports | USB-C |
| Connectivity | Wireless or USB |
How to set up Xencelabs Tablet with Dual Monitors

Installing the Xencelabs Medium Tablet is very straightforward. Connect the tablet to your computer (Windows, Mac, and Linux are all supported) with one of the wired connection cables, and then install the driver and configuration app.
(I actually did this the wrong way around and installed the driver before connecting the tablet, which meant I had to restart my laptop to get it to work – just an FYI if you do the same thing! – Update – This is actually just a Mac installation issue.)
Once you’re fully installed, you can switch to the wireless USB-A dongle if you prefer. The really nice thing about this is that both the tablet and the Quick Keys can use the same dongle, so you don’t need to eat up two ports — unless you need to charge them at the same time.
But the battery life of each is quite different (16 hours for the tablet vs 50 hours for the Quick Keys), so this shouldn’t happen very often.
Dual Display Setup
Next, set up your tablet to map to your displays as you like. I’m currently working with dual displays, my laptop connecting to my LG 32UQ85R 32″ 4K monitor, so I’ve mapped the full tablet area to fit across both displays, as you can see in the screenshot above.
This feels more fluid and natural to me, with half* of the tablet surface area mapped to each screen so I can easily sweep between them, rather than the alternative of mapping the full tablet to each display’s resolution and then hitting ‘switch display’ to jump back and forth.
*With the respective difference in screen size, it’s more like 1/3 and 2/3rds.
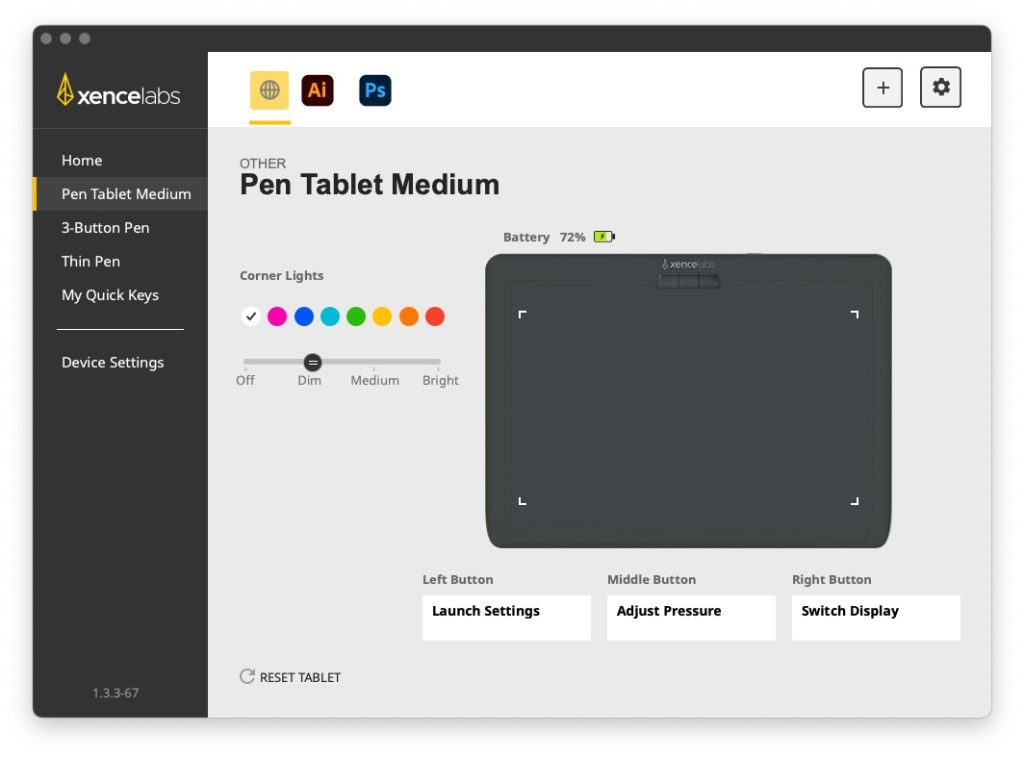
Programmable buttons – Xencelabs Tablet
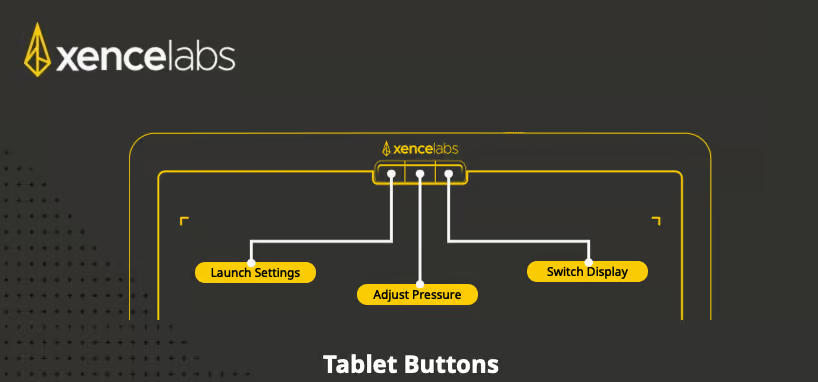
The Xencelabs Tablets have three programmable buttons on them, with the defaults being:
Launch Settings | Adjust Pressure | Switch Display
So far I’ve left these at the default configuration, but I can see that I could easily change ‘adjust pressure and switch display’ to something more useful.
On my previous Wacom tablet I had programmed one of the buttons to fire my ‘Pancake Timeline’ macro, and I’ll probably end up doing the same thing here.
TIP – If you use Pancake editing timelines (one or more timelines stacked on top of each other), copy and paste between them in a millisecond with this macro CMD+C, SHIFT+3, CMD+V, SHIFT+3 for Premiere Pro.
Perfect for making selects string outs!
Programmable buttons – Xencelabs 3 Button Pen
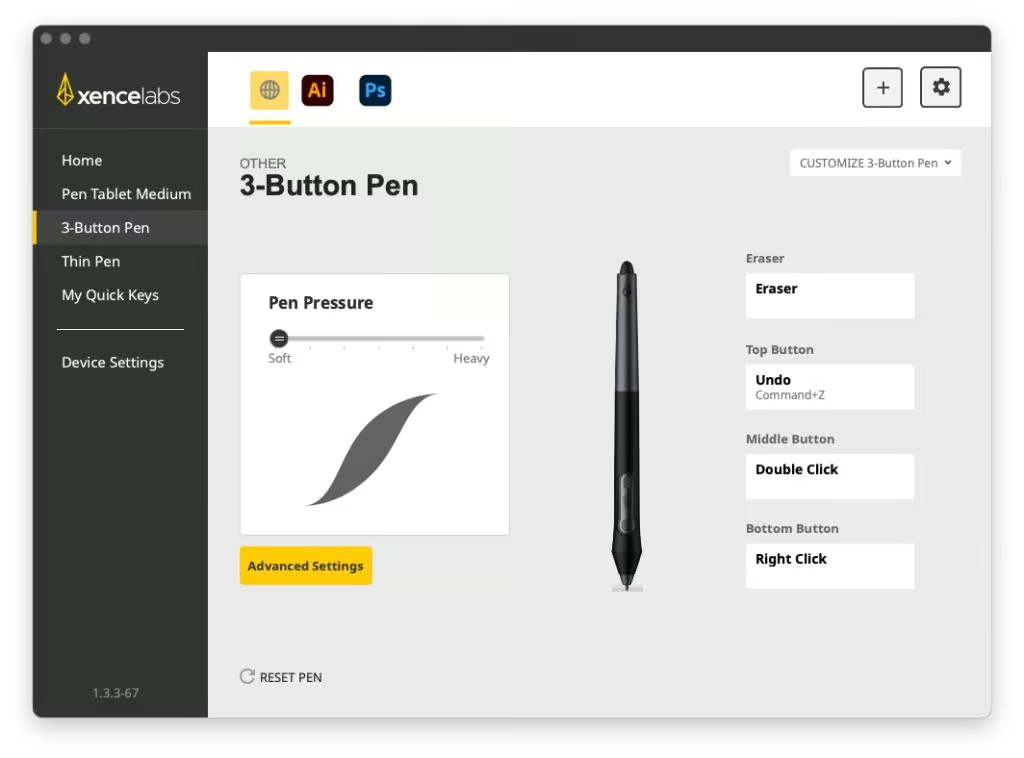
Of the two pens that come in the bundle, I preferred the feel of the thicker pen, which also has an extra button compared to the thin pen. It is lightweight and very comfortable to use, and I’ve configured the buttons to give me instant access to Undo, Double Click, and Right Click.
These might even have been the defaults! But they can also be configured per-application so you can always have the shortcut you need at hand.
Xencelabs Medium Tablet Initial Impressions
So, what is it like to actually work with the Xencelabs Medium Tablet?
Pretty excellent, to be honest.
Unboxing the bundle is a nice experience with all of the packaging and shipping materials nicely designed. The look and feel of all of the items in the box are of a premium build quality that I expect to last.
Look and Feel
The tablet has a compact footprint, so it doesn’t feel like a desk hog, and the 8mm thick profile feels nice and thin, whilst still giving you enough wrist support to be ergonomically comfortable when working on it for long hours.
The surface of the tablet is delightfully smooth and makes gliding your hand across it a pleasing experience, while the different texture of the bezel lets you intuit if you’re reaching the edge of the tablet, without looking down.
Part of my reasoning for choosing the thicker of the two pens was that it would provide a bigger item to hold so it wouldn’t feel like I was pinching my hand together too much. This is probably just a repercussion of having used a thicker Wacom pen for so many years, though, and I will give the thinner pen a try at some point!
Video Editing With The Xencelabs Medium Tablet
Video editing for many hours at a time, is a fluid and enjoyable experience with the Xencelabs medium tablet, the size and feel of the surface feels about right for the screen distances and I didn’t have the feeling of shuttling around a crampted surface the way I sometimes do with the more portable ‘small’ sized tablet I use on the road.
The Xence pen and tablet didn’t have an difficulty placing or moving keyframes, adjusting curves or trimming the edges of clips, nor scrubbing on parameter values – all of which can sometimes be a bit of a fiddle or ‘laggy’ in Adobe Premiere.
After either a full day of editing or typing (with my arms draped across the tablet to reach my keyboard) I’ve not thought of anything I would change about the Xencelabs tablet in terms of how it works, feels or fits into the ecosystem of my edit suite.
Things I really like, plus a few minor niggles
I didn’t think that having the option of a Wireless connection would matter that much to me as my desk is already littered with cables, but it was actually both visually and mentally pleasing to have one less black line across my desk.
While I was very impressed by the battery life, which seemed to last for way more than the 16 hours that the spec sheet details (or maybe I just don’t work that hard?!), relying on a wireless connection also meant that I regularly forgot to charge it.
The main way I would discover it was running out of battery was that the overall performance would decline and I’d find myself clicking or re-clicking on things until I checked the battery level to discover it was at 5%.
Speaking of the wireless connection, I was really glad the wireless dongle works in the USB port at the underside of my Mac keyboard, as this keeps a crucial port free on my dock, and the Xencelabs dongle supports both the tablet and the Quick Keys at the same time.
That said, if you need to charge them both at the same time, you will need two free ports, but their battery lives are quite different (16 hours vs 50 hours), so they shouldn’t often overlap in that way.
It’s also worth paying attention to the colour of the active area lights – which you can also customised to your own preference of colour and brightness level – as these do change to indicate that the battery is running low.
Although, because I’m always looking at the screen I tend not to notice these have changed until it’s too late!
The One Critical Thing Missing!
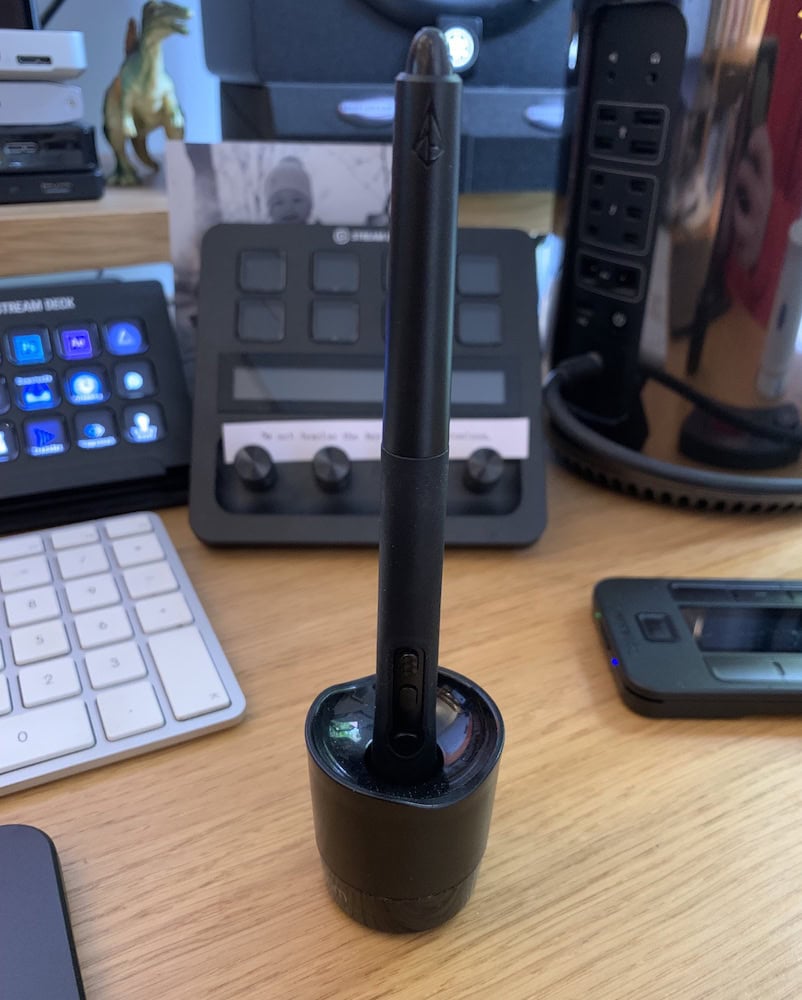
There is one small thing that is completely missing from the Xencelabs bundle and that is a place to put the pen when you’re not using it.
Sure you could just drop it on your desk somewhere, let it mingle among the other black pens and hope you don’t accidently draw across your tablet with a sharpie. But it is annoying if it gets misplaced or covered up by other edit suite junk.
Everything should have a home and the pen holder is the home of the pen.
My previous Wacom tablet came with the little pen holder pictured above (that also doubles as an extra nib storage container as the base unscrews) which fits the Xence pens perfectly.
It seems like a slight oversight on Xence’s part not to include something, given how many other bits and bobs – gloves, carry cases, etc. are included in the bundle, but maybe I’m just too precious about having somewhere to store my pen and everyone else is fine to leave it lying around somewhere!
You can buy spare pen holders on Amazon and Ebay for a few bucks, or I guess you could 3D print your own contraption, should you wish.
Price Comparison – Wacom Vs Huion Vs Xencelabs
How does the Xencelabs Medium tablet compare on price to Wacom and Huion?
The Xencelabs Medium Bundle with the Quick Keys sells on Amazon for around $329/£289, while the tablet without the Quick Keys costs $221/£249
A Wacom Intuos Pro Medium costs $373/£249 and doesn’t come with anything like the Quick Keys, but it does support multi-touch gestures. The non-pro medium tablet is half-price right now in the US at $98 or £114 in the UK.
Huion has a bewildering array of tablets in their line up so I’m not 100% sure what the correct ‘Pro’ item to compare would be, but the Inspiroy 2 Medium sells for only $79.99/£79.99.
Final Thoughts
Having used a Wacom tablet for an incredibly long time, I was slightly nervous to be changing to a different tablet, but I had no reason to be. The Xencelabs Medium is a brilliant tablet that feels great to use for hours at a time.
Almost everything you need is included in the bundle and the tablet is thin and light enough to easily slip into a laptop bag to take with you, and it even comes with a travel case.
I’m hoping that the build quality of the Xence tablet will be similar to that of the Wacom, which after 12 year of daily use was still in great condition, although it was starting to fall behind on driver/OS support – which had led to a few annoying problems.
All in all, I’m really impressed by Xencelabs products and would highly recommend you consider the Medium Bundle if you’re making the switch to a pen and tablet solution – which I would strongly urge you do it, to ensure the long-term health and sustainability of your creative career!
Xencelabs Problems and Solutions
Here are a few tips and pointers for working with the Xencelabs tablet if you face a few of the same ‘how-to’ issues I did.
Switch on Order Matters – The order in which you turn on your devices seems to matter. I found that the tablet has to be powered on and connected before switching on/connecting my secondary display, in order for the tablet drive to see both screens.
How to Wake a sleeping Tablet – If you can’t get the tablet or Quick Keys to respond once they’ve gone to sleep or you’ve turned off computer for a time, when on wireless mode you need to slide the power switches on the back of the Quick Keys or Tablet to wake them up. Give them a few seconds to connect and you should be good to go.
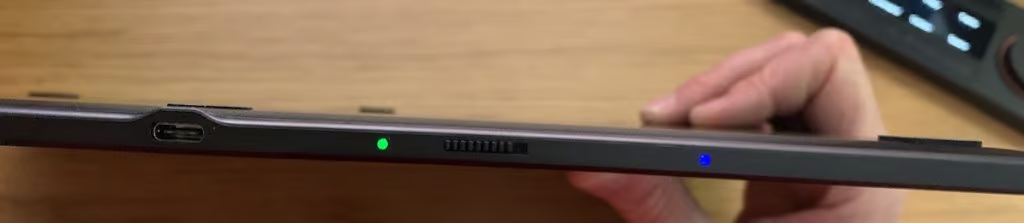
Charging Colours – There are lights on the back of the tablet, which make them hard to see without peering over, but also keep them discretely tucked away, which indicate whether the tablet is low on battery, charging or full charged.
- Solid Amber = Low battery
- ‘Breathing’ Green = Charging
- Solid Green = Charged
Wireless Connectivity Colours – Similarly the Wireless connection indicator displays three different states:
- Solid Blue = Connected Wirelessly
- ‘Breathing’ Blue = Wired Connection
- Blinking Blue = Trying to Connect
Video Editing with Xencelabs Quick Keys

Buy on Amazon Global Stores | Buy on Xencelabs.com
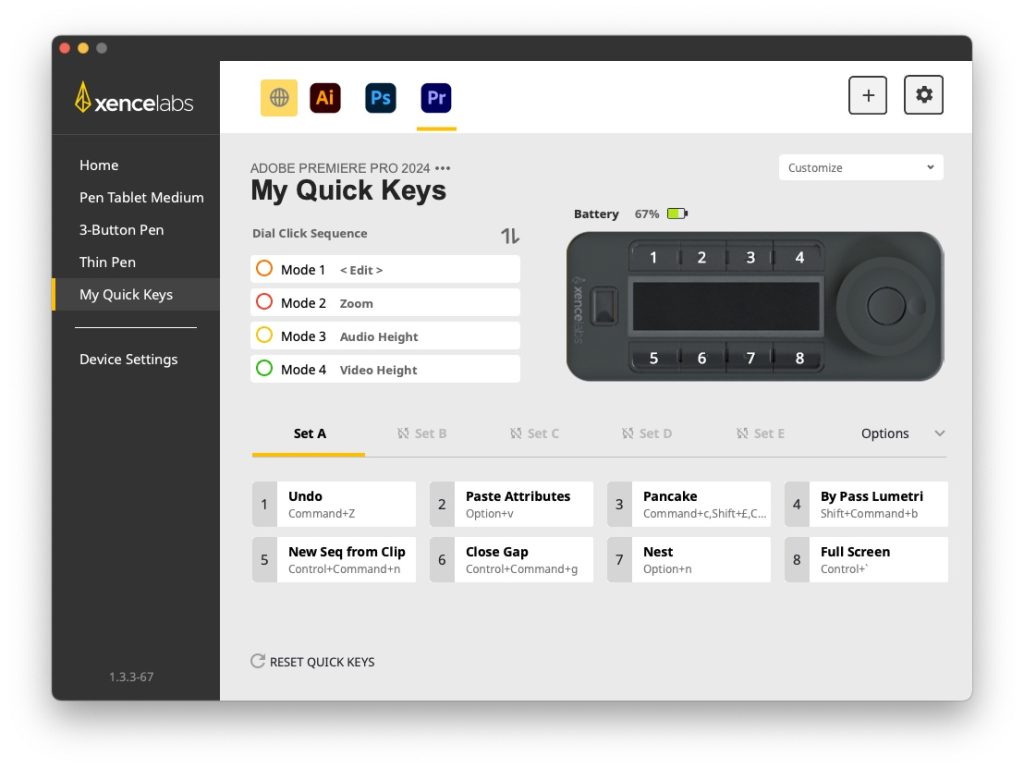
The Xencelabs Quick Keys is an eight-button + scroll wheel shortcut peripheral, replete with an OLED screen. This allows you to set 40 shortcuts per application, with a dedicated button for moving quickly through the 5 different sets.
The dial offers 4 different modes per application, with its centre button cycling through the modes. The dial also has a sensitivity control when setting up each mode, which can help you with how quickly the shortcut is repeated.
The battery life is impressive for such a small and lightweight device at 50 hours, taking only 90 minutes to full re-charge – via a USB cable.
It connects wirelessly over Bluetooth, although you’ll need to use the USB cable for the initial setup.
Best of all, you don’t need to have an Xencelabs tablet to make it work; it functions quite happily as a stand-alone device!
Xencelabs Quick Keys Review
In many ways, the Quick Keys is best suited to anyone using a pen and display tablet, as having keyboard shortcuts to hand often requires a more complicated physical setup.
How do you balance having access to the keyboard while working at an easel-style display with a pen? The Quick Keys can help with that and is compact enough not to get in the way, even when lying on the surface of the screen, or attached to the side.
That said, if there is anyone who loves shortcuts and customisable buttons, it’s editors. The huge success and ubiquity of the Stream Deck and Stream Deck + are a testament to this.
Being able to map combinations of keys that would otherwise require a balletic finger-dance across your keyboard into one press is a huge timesaver, especially if, like me, there are just some shortcuts you can’t seem to memorise but still need to access fairly frequently.
Having already set up a Stream Deck or two, I tested out the Quick Keys by mapping some of my shortcuts to the buttons and dial.
This was simple enough to do and the configuration app is easy to use. As Xencelabs doesn’t have a pre-built preset that ships with the Quick Keys for Adobe Premiere Pro, you can download mine here.
DOWNLOAD XENCELABS QUICK KEYS PRESET FOR ADOBE PREMIERE PRO
Due to limitations with the Xencelabs software this preset will only work on Mac OS.
Tip – See All Sets – In the configuration window, click Options > See All Sets to quickly view and edit each of the 40 shortcuts in one window. This really helps with organising shortcuts by theme across your sets.
The Xencelabs Quick Keys is a sleek-looking, compact peripheral that would look right at home on any editor’s desk. So from a design and feel front, it’s excellent. Plus the non-slip rubber underside means it doesn’t slide much, no matter how hard you jab at it.
Having access to 40 button sets with labels that update as you switch applications and through button sets means that you don’t need to memorise anything and that you always know where you are.
You can also colour code your sets via the eight preset colours that the LED ring light on the dial offers. This also has its own brightness control, including off, if you’re in a really dark room and don’t want any distracting glows. But it’s pretty subdued either way.
The dial rotates very smoothly but doesn’t have any real resistance to it – in the way that something like the Blackmagic Design Speed Editor jog wheel does, but that’s a much bigger beast and designed with an old-school jog wheel feel in mind.
That said, it feels nice and light and quick to respond.
One problem that I encountered is that Trim (shortcut , and . or shift+, or shift+.) did not work well for me on the dial at all, with it being very laggy. I would spin the dial, hoping for a smooth trimming experience, and then wait for it to keep executing the command over and over before catching up to what I was trying to do.
Maybe this is an issue with my system on a performance level or the speed sensitivity, I’m not sure. The other shortcuts executed flawlessly.
Another minor annoyance was that I couldn’t find a way to lay out the 24-character button name limit in such a way as to space things nicely over two lines so that it looks right on the OLED display. There wasn’t an obvious way to add a line return in the middle of the name.
Update – All you need to do to split the shortcut name over two lines on an Xence Quick Keys is to add a $ sign with no spaces between the words you want to split.
For example, Paste$Attributes would show as
Paste
Attributes
Tip – Change Orientation – You can change the orientation of your Quick Keys under Customise > Set Quick Keys Orientation
If I didn’t already have three other peripherals on my desk that do similar things to the Quick Keys (Loupedeck, Stream Deck, and Stream Deck+), I think I would be far more enamored with it.
It is a great assistant to anyone working with a tablet giving you instant access to powerful macros and time-saving shortcuts. You can open other applications, jump to the desktop, leverage every kind of mouse click – including a ‘click lock’ that allows you to drag and select, plus a ton of other navigation controls.
It doesn’t feel as fully fleshed out as something like the Stream Deck with its gif-capable LED-screen buttons and eco-system of micro-applications, but it’s not trying to be that kind of device.
As a productivity booster for someone with no existing shortcut peripherals, it’s a genuine win!