
Using a Stream Deck for Video Editing
- How to set up an Elgato Stream Deck for Video Editing and Colour Grading
- Download my custom Stream Deck layouts
- Creating custom scripts and macros for the Elgato Stream Deck
Latest Update – September 2021
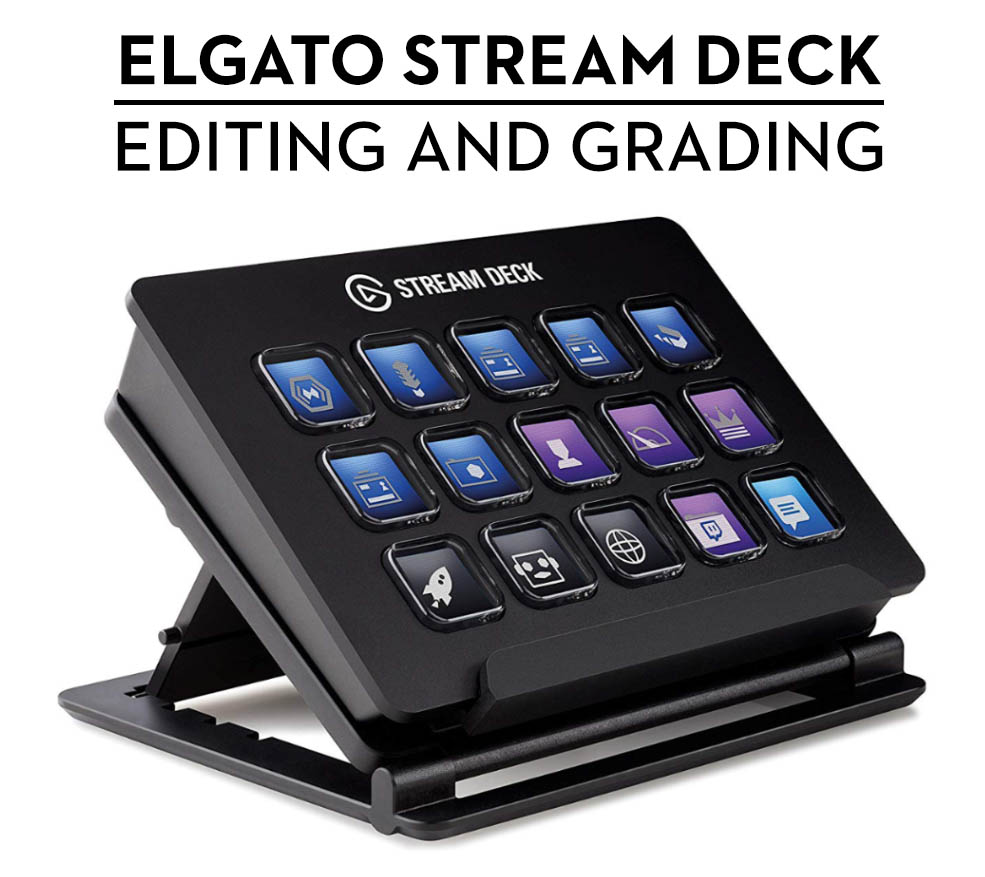
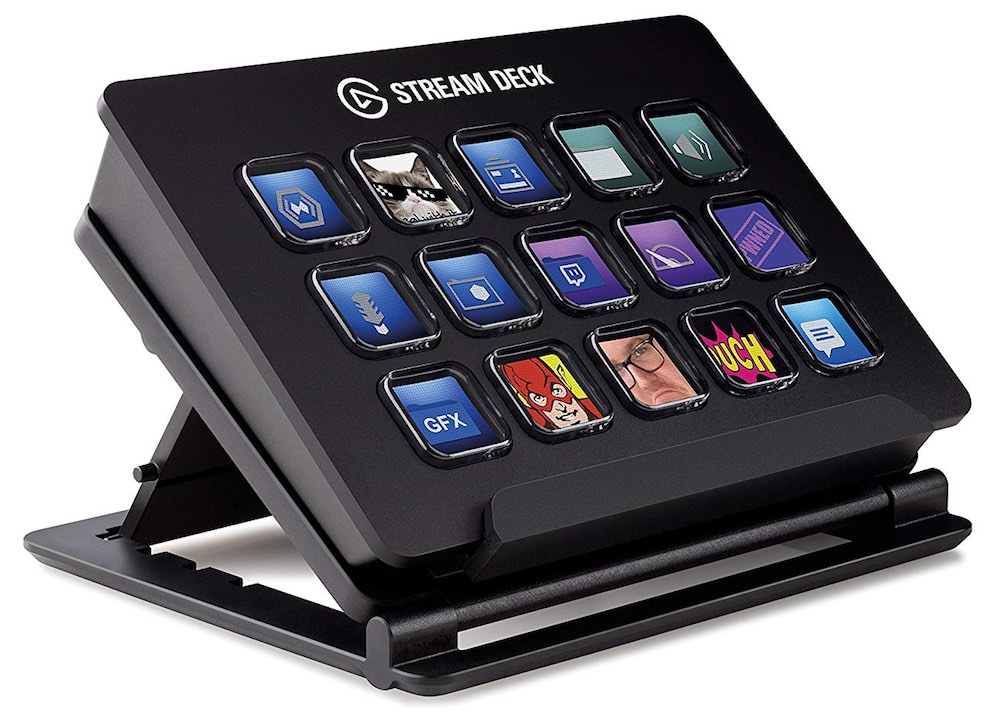
The Elgato Stream Deck is a unique 15 button controller, originally designed for ‘Streamers and Twitchers’ (hence the name) to switch cameras, add graphics or launch apps all at the press of a button. What makes the Stream Deck unique is that each of the buttons is it’s own LCD screen (72 x 72 pixels) which means that it can display whatever you want it to, whenever you want to.
To my mind the Elgato Stream Deck has many of the attributes that could make it an (almost) perfect film editing device.
This brings us on to five things that I think make for a ‘perfect’ editing controller.
I’ve reviewed quite a few controllers, interfaces and devices in my time running this blog. Personal favourites include the Logitech G-13, the Tangent Element Kb, the Razer Naga Chroma and the Palette Gear Expert.
These are all excellent in certain circumstances and with specific workflows, which, by the way, are as varied as the editors who create them.
There is no one perfect workflow, no one perfect controller.

But if I were to build a new controller designed for film editing from scratch it would need to take the following things into consideration, and it would have to be beat the default process of using a keyboard and mouse/tablet.
- The button/interface tells you what it does
- The button/interface updates with a change of context
- The controller can do more than a keyboard shortcut can (think scripts/macros)
- The interface is ergonomic/tactile enough to enhance the experience (think dials/sliders or others)
- The controller is easy to set up and customise
Most of the time, most people are working with a keyboard and pointing device.
Over time they’ve (hopefully!) memorised numerous keyboard shortcuts that speed up their work in different software applications and different parts of the same software. This combination of a huge range of keys (and modifiers) and the person’s memory is tough to beat for speed and efficiency.
Also once my hands are on the keyboard, I don’t really want to move them to another device unless doing so saves me time in total. With all the shortcuts I’ve memorised I’m very fast at editing, so moving to press a different button, turn a dial or adjust a slider needs to be a net positive!
But the benefit of using a controller that does fulfil these criteria is that you don’t need to memorise a whole bunch of shortcuts, as the buttons will tell you what they will do, and they will update as you work in different software. You can also set up macros that will perform repetitive tasks in a fraction of the time that doing so manually would require.
And with something that’s not just a button press, you’ve added a new dimension to the interactive experience.

The Tangent Element Kb fits many of these criteria.
The set of 15 dials deliver a tactile interface that can adjust multiple settings at once and the LCD screen at the top updates to tell you what each dial does in that context. It’s also easy to set up and customise and can do more than a keyboard/mouse can.
So when working with the multitude of sliders in the Lumetri Control panel it’s really fast and efficient way of working and earns that small but precious desk space because it makes colour grading faster and more enjoyable.
You can check out my full review of the Tangent Element Kb in this post.
When we consider the Stream Deck through the lens of these criteria it scores very highly.
The LCD display keys mean that each button tells you what it does and can update with both a change of context and button state (their are toggle switches that tell you if something is on or off). It’s also very easy and intuitive to set up and customise.
Now there are two current ‘downsides’ to the Stream Deck in reference to my perfect-controller-criteria; one that can be fixed and one that doesn’t matter too much.
The first is the lack of native macro support.
To be a clear a macro (in it’s simplest form) is a string of keyboard shortcuts that fire one after another. So for example my Pancake Timeline Macro is four keyboard shortcuts combined into one button press.
At the minute if you want to do this using a Stream Deck you need to use a third party app like AutoHotKey (free for Windows) or Keyboard Maestro (paid for Mac) or Karabiner (free for Mac) to build simple, and highly complex, macros.
As far as I know this could fairly easily be fixed with a software update to allow macros to be used. Further on down the post I’ll share some links to some tutorials on creating fairly complex scripts to enhance what the Stream Deck can do today.
Looking at Elgato’s release notes for their Stream Deck software they’ve updated it 20 times in about a year and a half, so here’s hoping!
UPDATE – I WAS WRONG ABOUT MACROS!
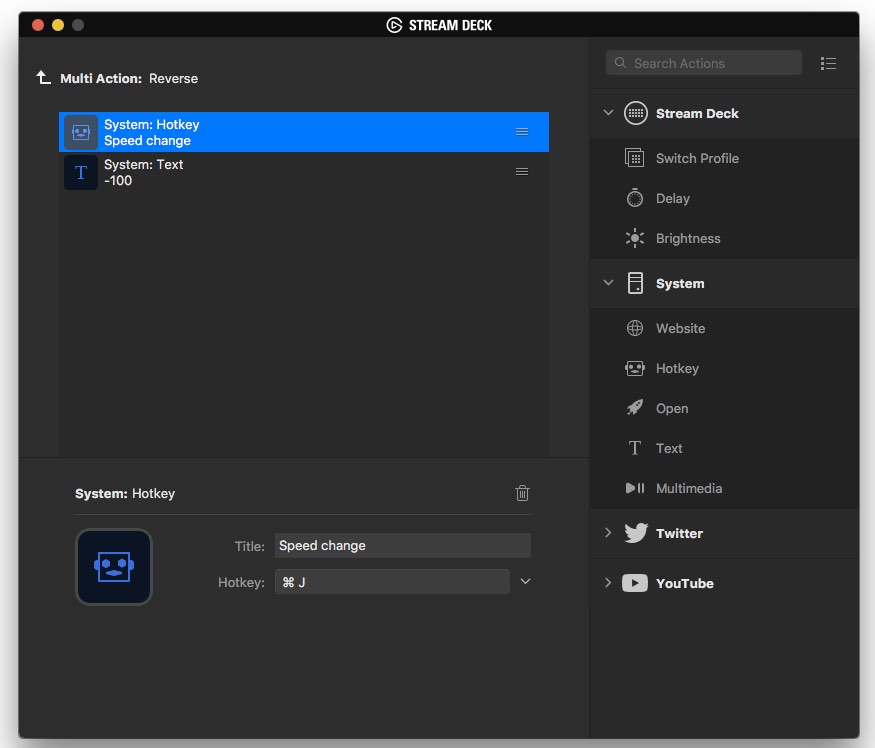
OK, part way through writing this review I discovered the Multi-Action button (as of software update 3.1) within the Stream Deck actions list (I had mostly had it toggled closed). This allows you to connect several different functions into a chain and therefore create a macro, natively!
For example, this enabled me to set up an ‘Open Chrome Downloads’ shortcut (Open: Chrome, HotKey: SHIFT+CMD+J) and a Reverse Speed shortcut for Premiere Pro (HotKey: CMD+J, Text: -100).
Although we’ll see later on that more complex scripting is possible with the party apps I mentioned, maybe the Stream Deck is the perfect editing controller after all!
Update 2020 – Editor Marc Bach got in touch to let me know that you can further extend the macro capabilities of the Stream Deck through a Keyboard Maestro plugin, which allows you to “create macros and assign them to Stream Deck buttons natively. The macros can have if/then, loops, image recognition and other stuff that makes it really powerful. So you can assign “Stablize” in Resolve to a button, for example.“

The second ‘negative’ is the fact that it’s just a set of 15 buttons.
While something like the Palette Gear can be configured to use sliders, dials and buttons to develop bespoke interfaces, the Stream Deck is just buttons. But this is not a big deal, as this is what it’s designed to be and while the Palette Gear has that tactile benefit, you still have to memorise what each thing does.
Also due to it’s compact form factor (118 x 84 x 21 mm) the Stream Deck really doesn’t take up a lot of space and can be used effectively, even in the most cramped of edit suite set ups. At under 200g it’s light weight and portable too.
Having read other’s reviews the other negatives would be the integrated USB connection, which means you can’t replace the cable, (though you can use a short USB extension cable) also for some the choice of ‘only’ 15 buttons feels too few – especially for colorists who want a dedicated button for almost every control – which is why those full-size DaVinci Resolve control panels are so massive. As a result of this some other reviewers suggest getting a 60-80 button X-Keys custom keypad instead.
To my way of thinking the X-Keys are not a good option as you have to cut out paper labels for each key to know what they are assigned to and therefore they can’t update with a change of context, and so it’s just another keypad.
Personally, I like the compact nature of the Stream Deck, the ability to create responsive custom profiles per app and to create ‘folders’ of commands within those profiles, means that there are effectively an infinite number of buttons, as long as you don’t mind navigating through layer sets. Or you can actually run several Stream Decks together in order to have a greater number of buttons.
One last thing, more a feature request than a ‘con’, is that it would be great if somehow the Stream Deck could recognise, and automatically switch profiles, depending on which section of an app you were in. For example, auto switching between an Edit page profile and Color page profile in DaVinci Resolve whenever you switched pages.
So to summarise, with a quick software update to enable macros, and the addition of a replaceable USB cable, the Elgato Stream Deck could be the perfect editing controller.
The Elgato Stream Deck costs around $149 right now on Amazon.com but is available on most Amazon Global Stores.
UPDATE June 2019 – 32 button Stream Deck XL
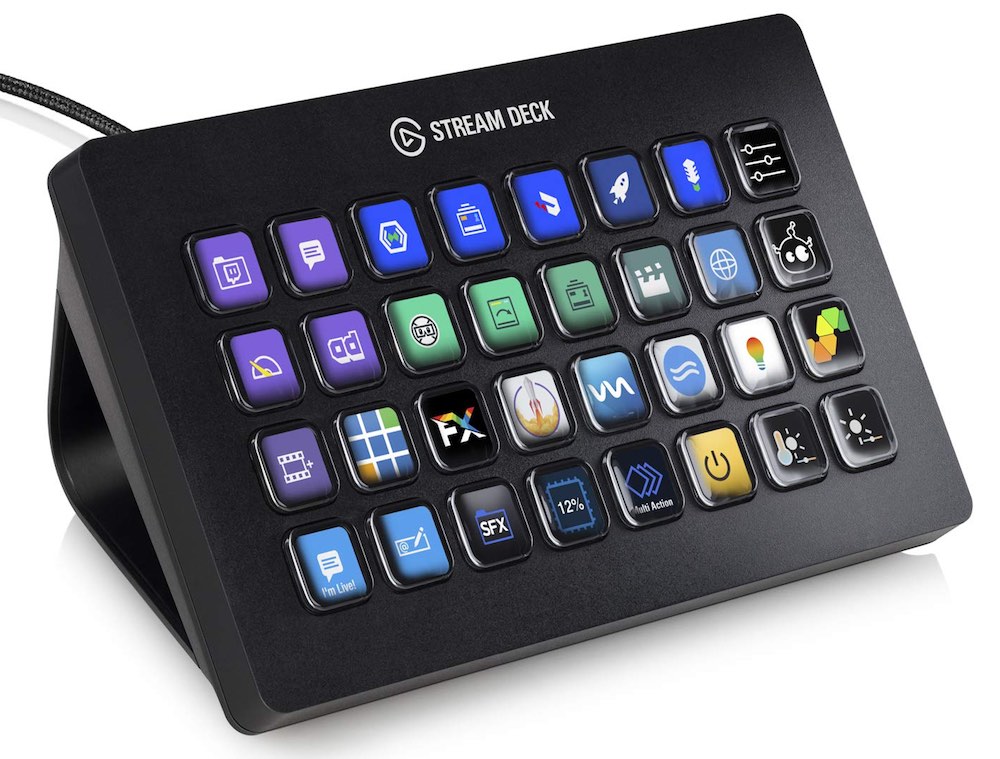
Elgato have just released the Stream Deck XL, a larger 32 button controller which also now features a detachable/replaceable USB cable, meaning that the XL could be the perfect editing controller after all!
It also comes with a larger magnetic, non-slip stand, which improves on the plastic and somewhat slippy stands on the previous models.
Other than that it’s pretty much the same, but if 15 buttons meant you were creating a lot of layer sets, then this could be the answer.
Interestingly, Elgato have also released the Stream Deck Mobile, which turns your iPhone into a portable Stream Deck controller, including ‘haptic’ feedback on button presses. This does however come with a monthly or annual subscription, so I’ll be sticking to the real deal.
The Stream Deck XL costs about $220 on Amazon.com, saving you $70 off the price of buying two 15 button Stream Decks and combining them together.
How to set up a Stream Deck for the first time
Setting up a Stream Deck is incredibly easy. You simply download the Mac or Windows software, and plug in the Stream Deck via USB 2.0 directly to your computer or laptop and you’re away.
The manual says that you shouldn’t connect it via a USB hub, but it worked just fine for me through my USB-C hub for my MacBook Pro.
When you first open the box you’ll likely be surprised by just how small it is, but it feels well constructed and the buttons have a nice slick feel to them. My only qualm with the design is how big the bezel is, it feels like the top-plate could have been trimmed a bit.
The middle key also has a little bump on it so you can navigate your way around the interface by touch if you need to. The only niggle with this is that the notch refracts the image underneath a little bit, depending on your viewing angle.
All that’s said, it’s basically incredibly easy to set up and comes in a nice, compact form factor.
The three minute quick start guide video (above) will take you through the basic operations.
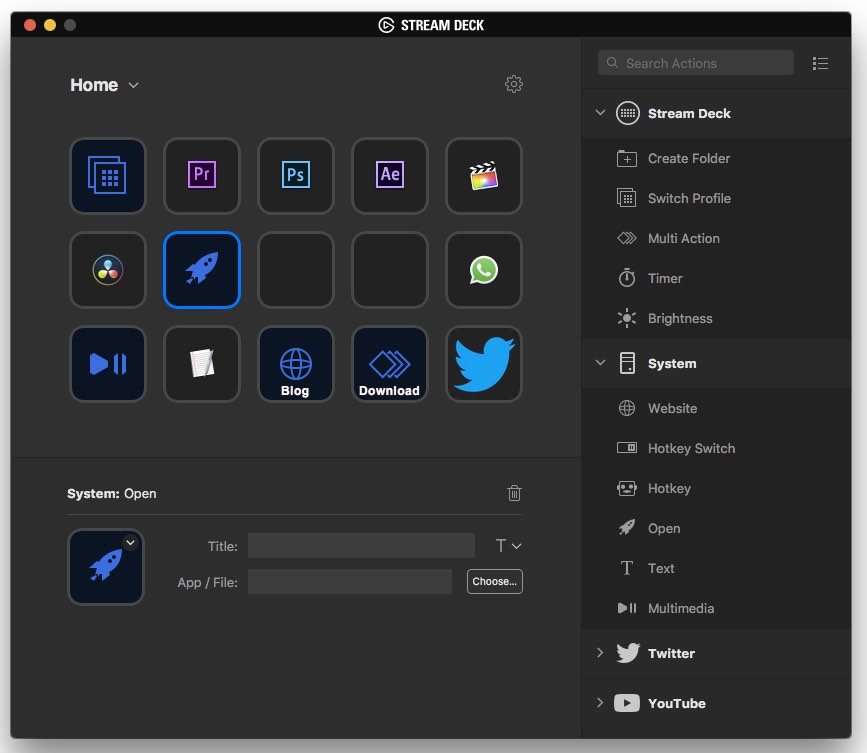
My ‘home’ screen on the Stream Deck features some app launching shortcuts, a couple of URL linked buttons and a handy multi-media Play/Pause button.
Customising a button is as simple as dragging an action from the righthand side to a button placement and then configuring it’s settings in the lower portion of the screen.
You can use Photoshop to create you own custom key icons (with 72 x 72 pixel images) or use their online Key Creator tool here. As of version 3.0 you can now drag and drop icons from the Key Creator tool directly into the icon well of the Stream Deck customisation tool, to update your button image. (See the video above.)
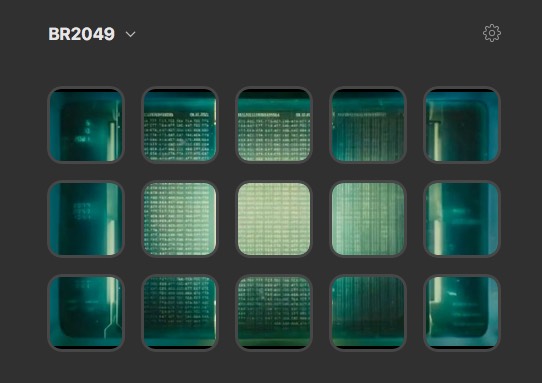
The Wallpaper section of the Key Creator allows you to create a grid of 15 keys from one image, like this one from a key prop in one of my favourite films of 2017. I’ll share a couple of these to download in the next section of this post. 880 x 512 px seems to be a good size.
You can then add a top layer icon (within Photoshop) to these background keys to create a geeky/slick looking custom key set up.
This short video will demonstrate how to add alpha layers to your images in photoshop, and in this case create your own custom animated RGB gifs.
The Profiles and custom keys are stored in the Elgato software on your computer, and not on the device itself, which means that you’ll need to transfer the profiles if you want to be able to use the same Stream Deck on different computers.
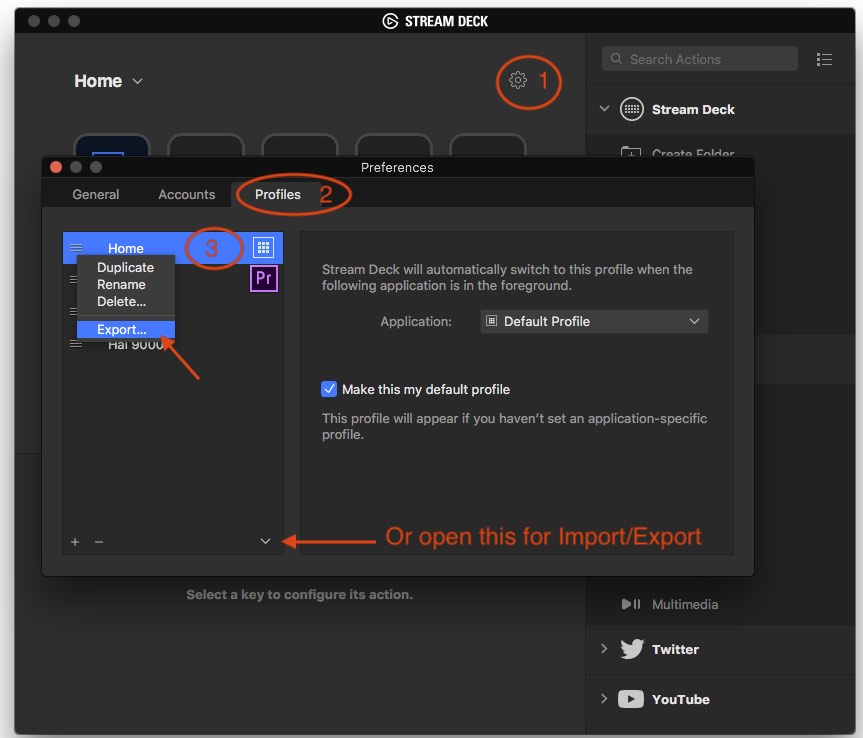
To export a profile you need to go to Settings > Profiles > Right Click on the Profile and choose > Export
If you want to share your Stream Deck Profile with others there’s a growing subreddit here.
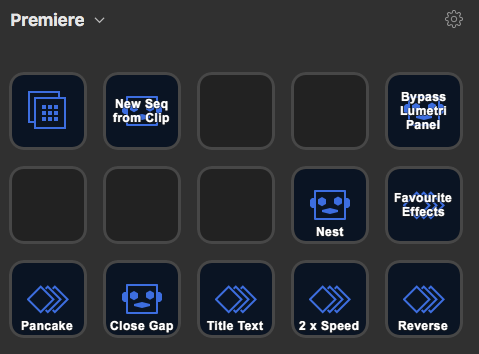
You can download some custom profiles I’ve created for Premiere Pro and DaVinci Resolve in the next section of this post!
In this short video you get a look at the Stream Deck Mini, which has only 6 keys, but also more helpfully for our purposes a quick guide on how to set up multiple profiles as ‘pages’ of keys.
Essentially all you need to do is set up one key as the ‘Next Profile’ button to cycle through your layer sets, I’ve set mine to always be in the top left corner.
I wouldn’t recommend getting the Mini over the bigger 15 key Stream Deck as you’ll be doing a lot of pagination to store a sufficient number of shortcuts to be useful. But who knows, maybe Elgato will make a bigger version with something like 30 keys one day?
Elgato updates the software with new features on a regular basis. Version 3.0 (the latest at the time of writing in 3.3), saw a re-vamp to the UI and some really useful improvements to customising the keys, and fun stuff like Gif support.
This short video will give you a sense of what’s possible.
Just to say you can copy and paste your custom keys inside the Elgato app if you want to save time replicating keys.
Also if you’ve set a ‘default profile’ you might want to turn it off if you’re switching backwards and forwards between the Elgato app and your creative software, while setting up your custom profiles, so that you don’t have to keep bouncing back to that default profile all the time within the Elgato app. It saves a few clicks!
This nice looking custom 3D printed sled/wrist rest/horizontal stand for the Stream Deck can be downloaded for free from ThingVerse.com
Recently 3D printed this dual Stream Deck mount to go along side my @Blackmagic_News mini panel. pic.twitter.com/GE4wmBuWZw
— Jason Bowdach (@JBowdacious) April 2, 2020
This dual Stream Deck mount is also available to download for free from ThingVerse.com.
Custom Stream Deck Profiles for Adobe Premiere and DaVinci Resolve
As part of this review, and in setting up the Stream Deck for my own day-to-day editing tasks, I’ve created several different profiles that you can download and use on your own Stream Deck too, if you like.
My aim with my the profiles was (as much as possible) to do things that I can’t do with a straight keyboard shortcut – or things I’ve not been doing with a keyboard shortcut. The goal is to use maximise time-saving functions that are otherwise cumbersome to perform.
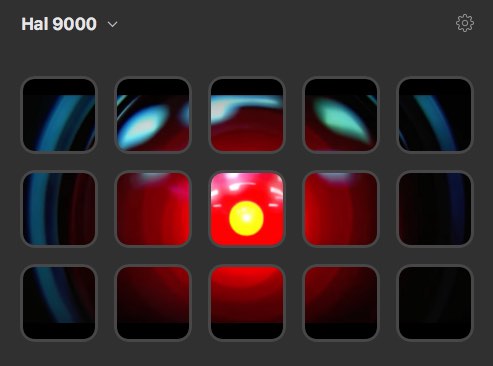
That and making some fun looking film related screens! Personally, I find it rather comforting to have Hal 9000 looking back at me.
I’ve bundled my set ups into one download which includes:
- Adobe Premiere Pro
- DaVinci Resolve
- Hal 9000 + editable key images
- Blade Runner 2049 – DNA/Moviola machine + editable key images
Click here to download my Elgato Stream Deck Custom Profiles
The top left key is always ‘Next Profile’ in my custom key set ups and I’ve left a little Easter Egg in each of the film profiles too.
To use these profiles on your own machine you may well need to update some of the keyboard shortcuts per app, that the key’s fire to whatever you’ve set them to in your own app. For example in my Premiere profile I’ve set ‘Close Gap’ to CTRL+CMD+G.
A handy multi-action button to have on your ‘Home’ screen is to open your downloads queue. I’ve set mine up in Chrome with two commands. Open:Chrome, HotKey: SHIFT+CMD+J.
I’m still in the process of evolving my Adobe Premiere Pro Stream Deck profile, which is why I haven’t gotten around to creating nice looking images for it, the way I have for DaVinci Resolve.
I wish there was a way to apply a specific effect with a keyboard shortcut, that way I could hit ‘Warp Stabilizer’ on my Stream Deck and the macro would fetch the effect and apply it to the selected clip. Alas, I’ve had to resort to opening my ‘Favourites’ preset folder, in one press and click and dragging on the effect I want.
The Text Title button is also a bit experimental at the minute. The purpose of it is to speed up my logging process.
When I’m making selects from an interview I usually add text titles above each portion of a clip with some key words about the content underneath, and add those key words in the name of the Text title and in the text title itself, as on-screen text.
Usually I would press CTRL+T to create a new Title, type out the keywords, hit CMD + A, CMD+C, Enter (to copy the text and create the title) and then click into the title (with the text tool selected) and hit CMD+V to paste the text.
Without scripting some mouse clicks – which would be tricky as the window always seems to appear in different places – I can’t create a macro to achieve all of this in one go, but I can get about half way there.
I’ve set it up to to create a new title give me 5 seconds to type and then select, copy and create the title. Then I have to do the clicks and paste.
What’s tricky is if you’re still typing when the 5 seconds are up, you might override the CMD+A selection and lose your text. So, it’s a work in progress and it may not last!
The Bypass Lumetri Panel button, when you keep it held down, will temporarily by-pass all Lumetri effects on your selected clip for a quick before/after reference. But you need to have the Lumetri Color Panel selected for it to work.
My pancake macro, automates moving selections from one timeline to the next at the press of a button. You can read all about that in this post I wrote for Rocketstock.com, as well as get the gist of how it works from the video above.
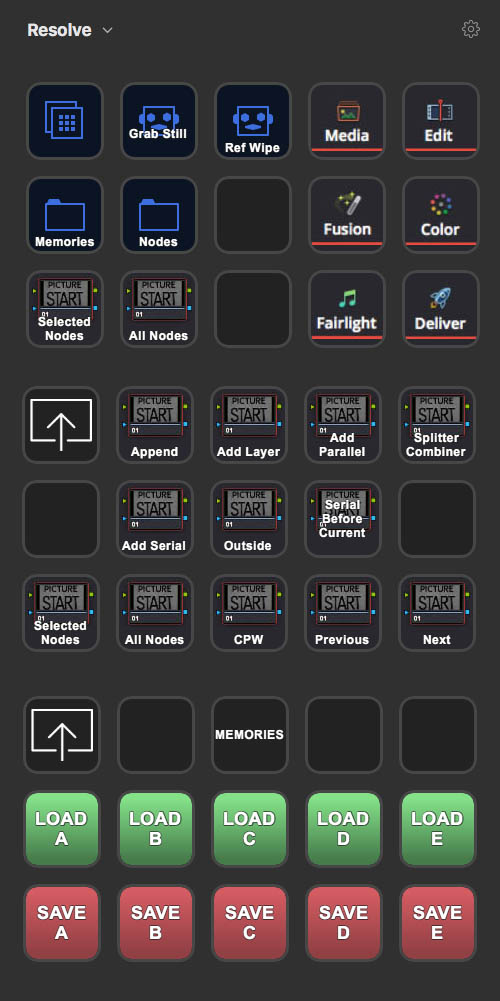
One great idea I’ve borrowed from the Mixing Light colorists (see below) is to take a screenshot of the part of the user interface that’s being used to create the button icon, for some strong visual cues. This really helps you to marry up what you’re pressing with the end result within the app.
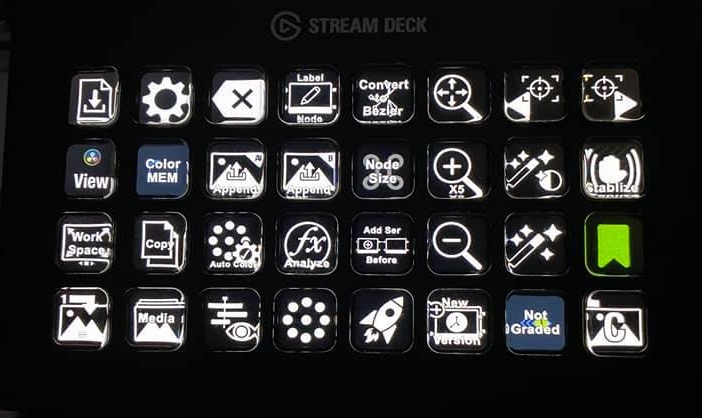
UPDATE – Download 800 Stream Deck Icons for DaVinci Resolve
Todd from SideShowFX.net got in touch to share his 800 strong icon pack for DaVinci Resolve editors and colorists using an Elgato Stream Deck in their suite set up.
There are two versions available – a free 127 icon Essential Collection and the paid for Complete Collection which features 800 individual icons for the Stream Deck.
The Complete Collection is currently half price at just $14.99, which works out to less than 2 cents an icon!
This low-resolution watermarked PDF showcases just what those 800 icons are.
Each icon is 350 x 350 pixel resolution and comes in 2 sets, Full Color and an identical set grey on transparency so you can customize your own colors. This grey set, when imported directly to Stream Deck is ideal for lighting controlled environments such as colorist suites.
This nicely animated promo will take you through whats on offer, and I’ve written more about these icons in this post on DaVinci Resolve Tools and Productivity Hacks.
Using an Elgato Stream Deck with FCPX
For more ideas on using the Elgato Stream Deck in your post workflow check out this comment from IChopThingsUp4Money on the /r/editors reddit, which has some great ideas for FCPX and DaVinci Resolve.
In FCPX
I have multiple folders for specific things. For example, I have a speed folder that has dedicated buttons for Automatic Speed, Custom Speed, Freeze Frame, Normal Speed, Frame Blending, Optical Flow, and reset.
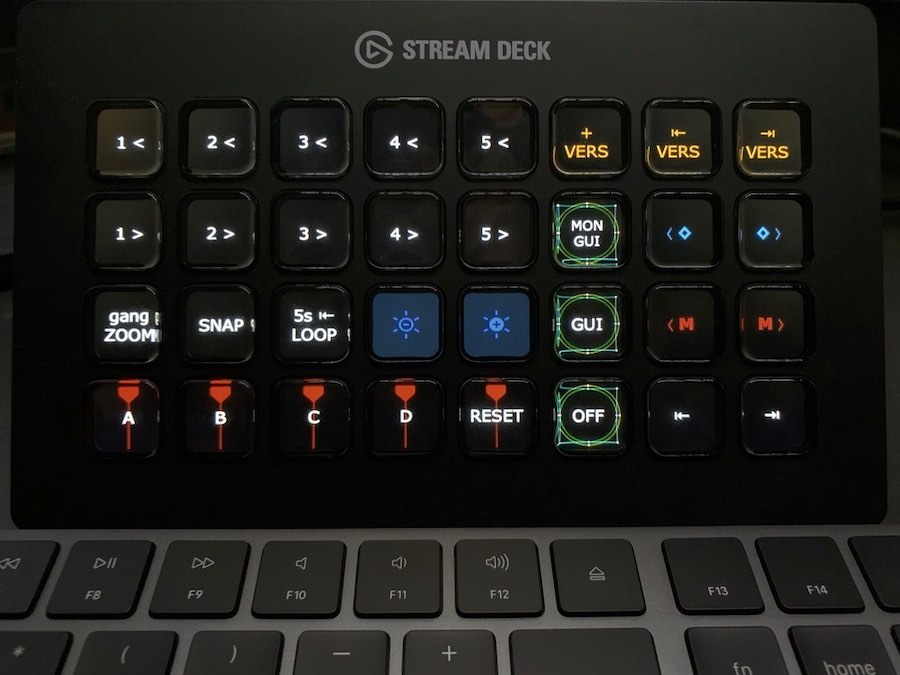
In DaVinci Resolve
There are folders for navigating and selecting curves (plus master reset), folder for keying, folder for windows (including inverting each window and a master reset), a folder for adding and navigating keyframes, a key to toggle scopes, C/A mode, handles, loop toggle, grab still, previous still, next still, and a folder for splits screens/wipes.
It’s worth noting that if you’re using FCPX and a Stream Deck, CommandPost actions are supported on the device.
One idea that I ran out of time for, was to replicate on the Stream Deck, the additional shortcuts that FCPX editor Thomas Grove Carter adds to the default FCPX keyboard set up.
You can check those out here and make your own Profile if you like.
Avid Media Composer Profiles for the Elgato Stream Deck
If you’re an Avid Media Composer editor, hopefully these profiles from Jason Bowdach will set you off in the right direction.
Colorists Using an Elgato Stream Deck with DaVinci Resolve
Colorist Joey D’Anna has shared the most insights I can find from a professional colorist using a Stream Deck as part of their suite set up. He has written up quite a bit of his process on MixingLight.com, a colorist community and training subscription site, which is accessible as of a paid subscription (or week long free trial).
Getting to know the Elgato Stream Deck Part 2, Membership only on MixingLight.com
In this article Joey demonstrates how to use AutoHot Key to set up and run scripts for performing much more complex automation tasks, such as ‘show current clip with handles’ which is triggered by two automated mouse-clicks. He also provides 3 downloadable scripts for you to adjust to your own machine.
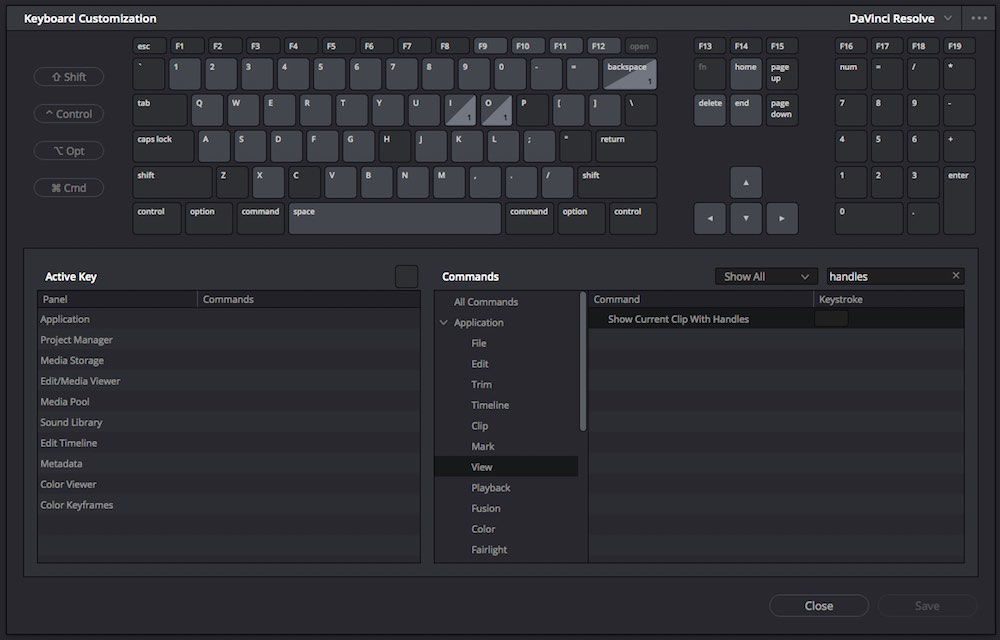
Since Blackmagic Design updated DaVinci Resolve to version 15.2, a huge number of (previously inaccessible) actions can now have shortcuts added to them. So for example, View > Show Clips with Handles can now be accessed by a shortcut command, making it easier to add to a Stream Deck profile, without AutoHotKey scripts.
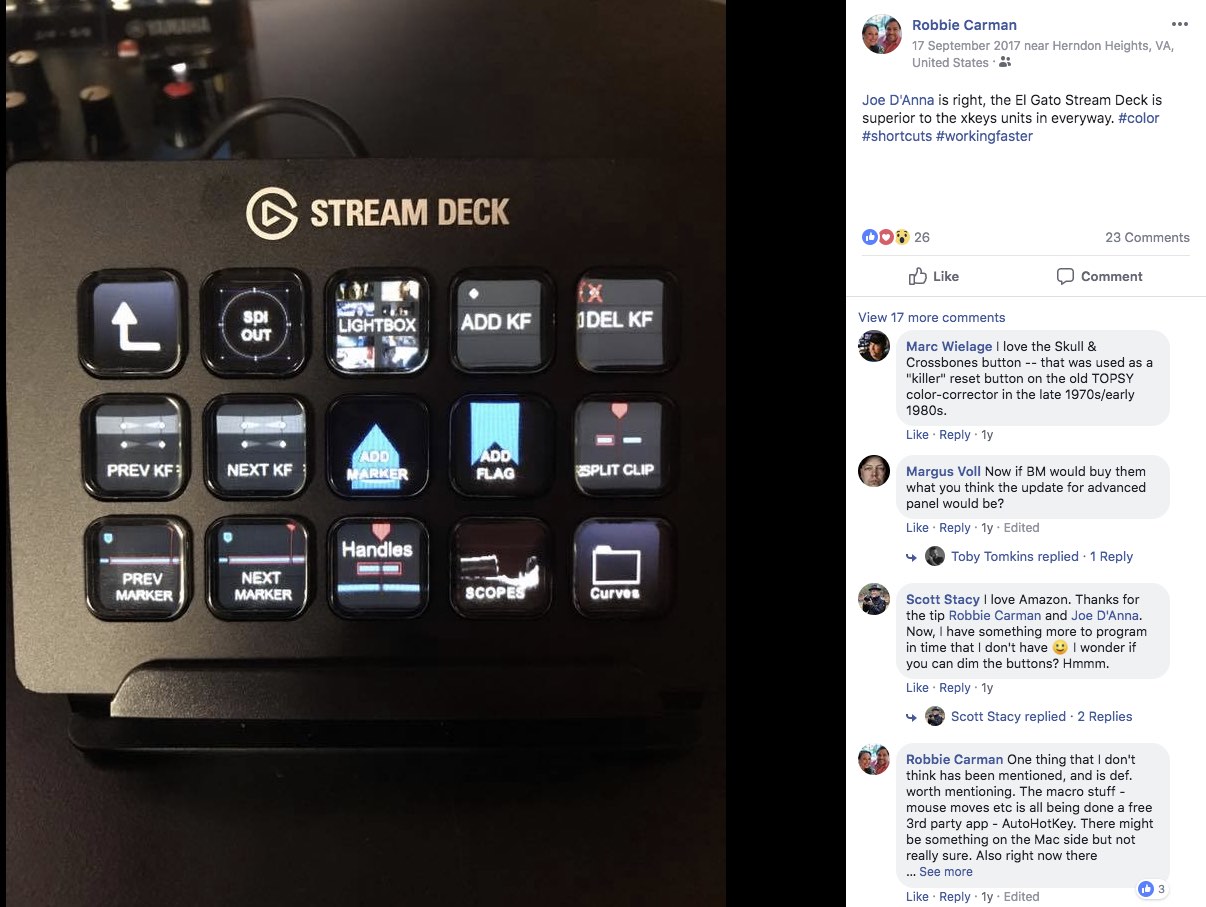
Colorist and Mixing Light co-founder, Robbie Carman, also shares his thoughts on setting up a Stream Deck in ‘Part One’ which you can read for free here:
Getting to know the Elgato Stream Deck Part 1, free on MixingLight.com
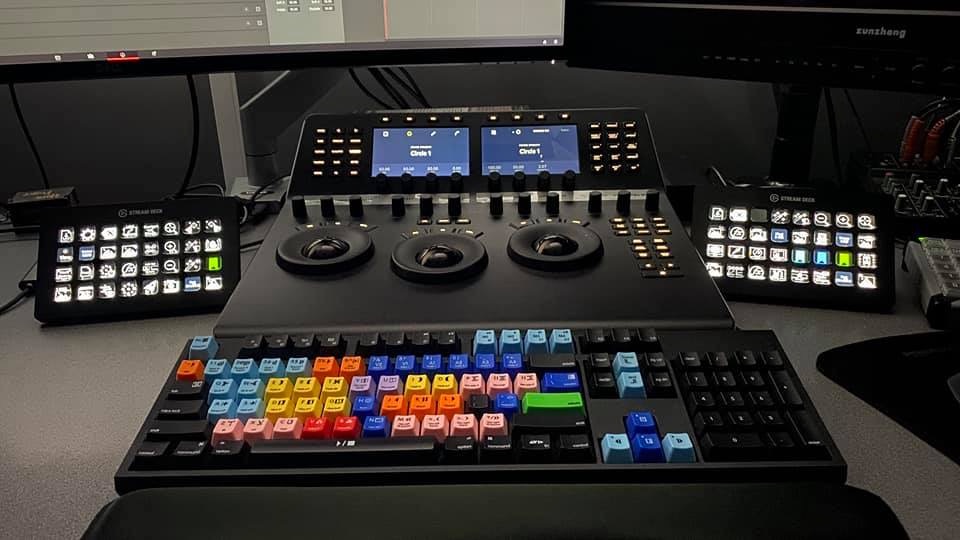
In the following Tweets, Joey shares some of his custom Stream Deck set up for DaVinci Resolve, and ways in which it can augment something like the Blackmagic Design Micro panel, which has some really nice track balls and rings, but relatively few buttons.
And read the thread…
More DaVinci Resolve Stream Deck Set Ups for Colorists
Nicolas Horne and Tal Yoram shared these quick snaps of their Stream Deck set ups in response to this Facebook post.
They’re also using Keyboard Maestro to enhance their macro actions.
Running Scripts and Macros on a Stream Deck
Lastly if you want to get in-depth and geeked out with your Stream Deck scrips and macros, then this video from Taran Van Hemert of Linus Tech Tips is what you want.
Taran does share all of his AutoHotKey scripts on his GitHub page. While we are talking about Taran be sure to check out this breakdown of his 4 hour (yes) editing tutorial here.
In this video Taran demonstrates how he uses a DIY 87-macro keyboard to edit most of the videos on the Linus Tech Tips YouTube channel.
Stu Maschwitz of ProLost.com (and Red Giant!) has shared some of his own macros for After Effects that he used whilst making his recent short film Tank.
He actually used an iPad app called Quadro (that is now dead), to create a custom control surface for After Effects, including using macros.
An iPad app is a very viable option in place of something like the Stream Deck, when it comes to designing your own custom interface for your creative software. Although it’s interesting that Stu hasn’t sought to replicate Quadro on his iPad but has instead (enjoyable) transferred to the Stream Deck.
This much older (probably in need of an update!) post showcases some of the iPad apps that have blazed just such a trail.


hope maybe someone can help, media composer not recgnoized: got the stream deck xl, created profile ( chose the avid media composer.exe) but no shortcut i assign to it works (Ver 2020.8) any advice?
Marvelous, thank for the sharing 🙂 Jérôme
Absolutely fantatic writeup, thanks for sharing that profile and summary – will come in use for us and some colleagues alike – we recently made a basic profile for adobe audition if anyone is interested – the more profiles we can all share the better and swifter our editing workflows can be 🙂
https://drive.google.com/file/d/1a3UMLeLYQyVE99x_faf1Iu8RTRiVqBj3/