
How to Record a Zoom Meeting in High Quality for Video Editing
If you need to record a Zoom meeting, Google Meet, or any other video call in as high quality as possible in order to video edit it later, there are a few important things you need to know to get the best possible results.
But if you don’t want to read this whole 2500 word article and just want a one-click solution use Riverside instead.
Why it’s good: Riverside records each person’s audio and video directly to their computer for the best possible quality that isn’t effected by internet connection quality or stability. It’s very easy for technologically nervous participants to use and quickly delivers editors individual video and audio files to edit freely.
It is (literally) the best solution I know of for recording video calls to create edited videos and podcasts. Having researched and tried all of the other previous solutions in this article, it really is the right way to do this.
It’s what I use and what I try to persuade my clients to use too!
Keep reading if you want to know why or just jump to Riverside and try it yourself with 2 hours of free recording.
** EXCLUSIVE RIVERSIDE DISCOUNT CODE **
Save 20% on any Riverside membership plan with the discount code: jonnyelwyn
The rest of this in-depth article will give you four different ways to record a Zoom Meeting depending on your needs and some helpful resources on how to look your best in the recording too.
TLDR: Four Ways to Record a Zoom Meeting
- Record the call using Riverside for the absolute best possible results (Best option!)
- Record the Zoom Meeting in high quality with individual video/audio sources (2nd best!)
- Record the Zoom Meeting with screen capture software (better quality, not as editable)
- Recording the Zoom Meeting inside Zoom itself (easy but very low quality results)
Before we dive in, it’s worth stating from the start that there are a couple of much better ways to get a high quality recording of your call than to use Zoom’s own ‘Record Meeting’ function.
This is because, by default, Zoom records the video at a low quality, low resolution 640 x 360 pixel video file, with both video/audio streams baked into one file. This is not good.
1. The Best Way…
The best way to record a Zoom meeting for later editing is therefore to by-pass Zoom all together by recording in Riverside instead. You get high quality results because there is no internet drop out. All the files are saved locally and uploaded to Riverside’s servers during and after the call, so even if the participants computer dies the files are still safe.
2. The Next Best Way…
The next best way to record a Zoom meeting for later editing (without using Riverside) is to by-pass Zoom all together by recording the audio and video feed from each camera locally and just using Zoom to talk to each other, but not as actual media. (Option 2 below)
3. The Backup Plan…
Another is to use a screen recording program like ScreenFlow, to record the meeting, instead of relying on the output from Zoom’s in-built recording feature. This will allow you to capture your screen at its native (much higher) resolution instead of being limited by Zoom’s own recording functionality. (Option 3 below)
4. The Worst Way…
If for whatever reason you do choose to record your Zoom Meeting with Zoom’s internal Recording Meeting functionality, be sure to check out the best settings and preferences I share below, to get the best possible results with this method. (Option 4 below)
How to Look Better on a Zoom Interview

Before we get into the 3 different ways to record a Zoom Meeting it’s critical to say that any time you spend on getting better lighting, cleaner sound and nicer framing will dramatically improve the look of your Zoom recording – regardless of which technical recording option you choose.
If you read nothing else in this post, definitely check out the excellent creative and technical ideas in this post from Michael Cioni of Frame.io, which I talk about in more detail lower down in the post. This will help you to look and sound better on camera and deliver higher quality results.
If you need free video editing software to edit your Zoom interview, for Mac or PC and that’s easy to use for a novice, do check out this post on Free Video Editing Software for Beginners.
Zoom Security and Privacy Concerns – It’s worth noting that if you’re using Zoom you should be aware of the security concerns that have been raised about it, although hopefully the recent public scrutiny will result in major improvements.
How to Enable High Fidelity Audio in Zoom Recordings
As of September 1st, the Windows and Mac OS Zoom client allows you to enable high quality audio in your Zoom meeting, which should make using interview audio from these calls a much more pleasant experience. You will need to turn it on though. H/T @MichaelKammes.
This option in Advanced Audio enhances “Original Audio” mode, allowing for disabling echo cancellation & post-processing, while raising audio codec quality to 48Khz, 96Kbps mono/192kbps stereo for professional audio transmission in music education and performance applications. Professional audio interface, microphone, and headphones required.
1. The Best Way to Record a Zoom Interview in High Quality for Video Editing
Riverside is a browser-based remote recording studio. You can use it for either 1-to-1 video or audio interviews for things like podcasts or run a live-streamed call that can be viewed by thousands of people but can also be edited down seamlessly later on.
Riverside works by recording each participants audio and video feeds to their local computer and then uploading them to your account.
This is where the magic happens for editors like me.
Imagine getting to work with pristine individual audio and video feeds instead of trying to work around internet drop out, glitchy audio or baked in cross-talk. This is well worth every penny!
Riverside also saves a ‘back up’ recording of the call with all of the audio and video feeds baked together (much like Zoom does) which is available immediately. Depending on your settings, and participants local internet connection, the files might need to finish uploading after the call.
Riverside also makes this easy to manage, all you have to do is leave the browser window open, or send clients a link after the fact to reinstate the upload. It’s really nicely designed and almost bullet-proof for even the most technologically inept.
A Couple of Caveats
The only caveat to making Riverside work is that everyone needs to be using Google’s Chrome browser. This shouldn’t be a problem in that it is free and widely available cross-platform, but it’s just something to be aware of.
The administrator/host of the call can monitor that each participants feed is working correctly before the call starts, monitoring their audio levels and their upload percentage. If these stats aren’t available sometimes using a non-Chrome browser is the problem.
The second thing is that Riverside requires a monthly subscription, which is only $19/month for 5 hours of recording time, but as someone who needs to do this kind of thing intermittently it would be great if you could also just buy a bunch of minutes in a pay-as-you-go fashion – even if they worked out to be more expensive that the subscription ‘minutes’.
Tips and Tricks for Recording Video Interviews with Riverside
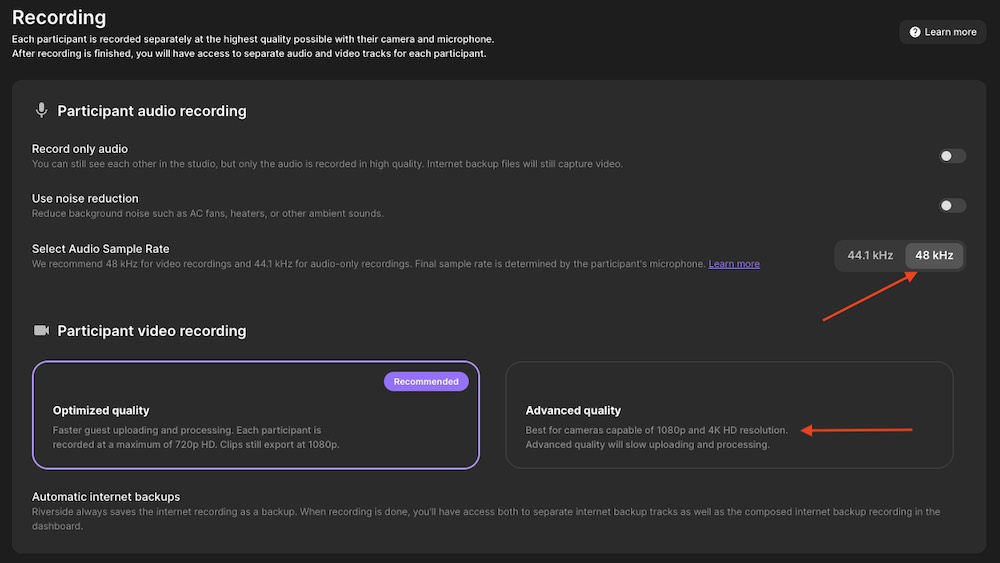
Change this setting! – One of the most important settings to change from the start is to toggle your Audio Sample Rate to 48 KHz instead of 44.1 KHz. This is the most common sample rate for video projects and helps to keep everything in sync. It is also better quality.
Up to UHD Recording – If your participants have access to 1080p or 4K cameras then be sure to turn on Advanced Quality in the settings tab and toggle between 1080p or UHD.
CFR Vs VFR – Although it’s super useful that someone can connect to the video call via the mobile app, it’s worth knowing that these files will be recorded in a Variable Frame Rate (VFR), while everything that’s web based will be recorded in a more suitable Constant Frame Rate (CFR).
Using a CFR makes syncing up other sources and assets much easier, so if you have mobile files in the mix you might want to convert them to CFR before editing.
Screen sharing – Any participant on the call can share their screen and this be recorded as an isolated HD video stream. This means it is recorded separately from the participants web cameras, so the screen sharing isn’t baked into their final videos, which still allows you full editorial control.
Helpfully you can still download a synced video version of the screen share, which will line up with the other recordings perfectly, and just contains black video when the screen sharing is turned off.
All of this happens automatically when someone starts sharing their screen through Riverside.
Free Transcripts – All of your Riverside recordings can be transcribed for free and for all tracks, simply by clicking on the three dots in the top right of the recordings page and choosing ‘Generate transcription for all tracks’.
You can test out Riverside’s transcription engine, or just create free transcripts from previous audio and video files, by throwing them into their free transcription web tool here!
Timeline Ready – If you’re an Adobe Premiere Pro user you can even download a Project file with a new timeline of all your assets synced up and ready to go. Hit the Export button and choose Export to Premiere Pro.
** EXCLUSIVE RIVERSIDE DISCOUNT CODE **
Save 20% on any Riverside membership plan all year with the discount code: jonnyelwyn
Update – Generated AI-Powered Notes from any Riverside Recording
One thing I’ve been doing lately is having any meeting, video call or conversation I want to be able to make notes on, inside Riverside. This way I can take Riversides’s auto-generated transcript of the call and use it as a source file for Chat-GPT or Claude.ai to use.
I can then do things like; generate summaries, task-lists, timestamps, topic lists, feedback on my questions and much more.
Here’s the full workflow – and it can all be free!
2. The Next Best Way to Record a Zoom Interview in High Quality for Video Editing
I’ve actually been asking people who are on Mac to record locally via QuickTime so I can get a ProRes file when set to maximum, though you hit the same resolution cap depending on the camera being used. They just send me the ProRes file afterwards.
So far we haven’t had any issue running it in parallel with Zoom as the camera and mic feeds go to both the Zoom call and QuickTime.
And I record the Zoom call on my end as a backup and reference track. – Kevin Barry
Kevin Barry shared a great idea with me on Facebook, where he gets interview participants to use QuickTime media player to record their FaceTime camera input locally and save the file out as a Pro Res .mov to preserve as much quality as possible.
After using Riverside – which does all this work for you and isn’t reliant upon participants doing this correctly – this is the next best way to record a Zoom meeting for later editing because you will still have a clean recording of either end of the call, in the best possible quality, rather than a single lower quality file with both sides baked in.
It also means that the recording is not going to be affected by internet drop-out, buffering or visual and auditory glitches.
It does however rely on participants setting things correctly, not forgetting to save the file at the end and finding a way to upload (a potentially large) file efficiently. All of these considerations and potential problems, make Riverside a simple and effective solution.
How to Record Your Webcam in Pro Res Video, Saved Locally with QuickTime on a Mac
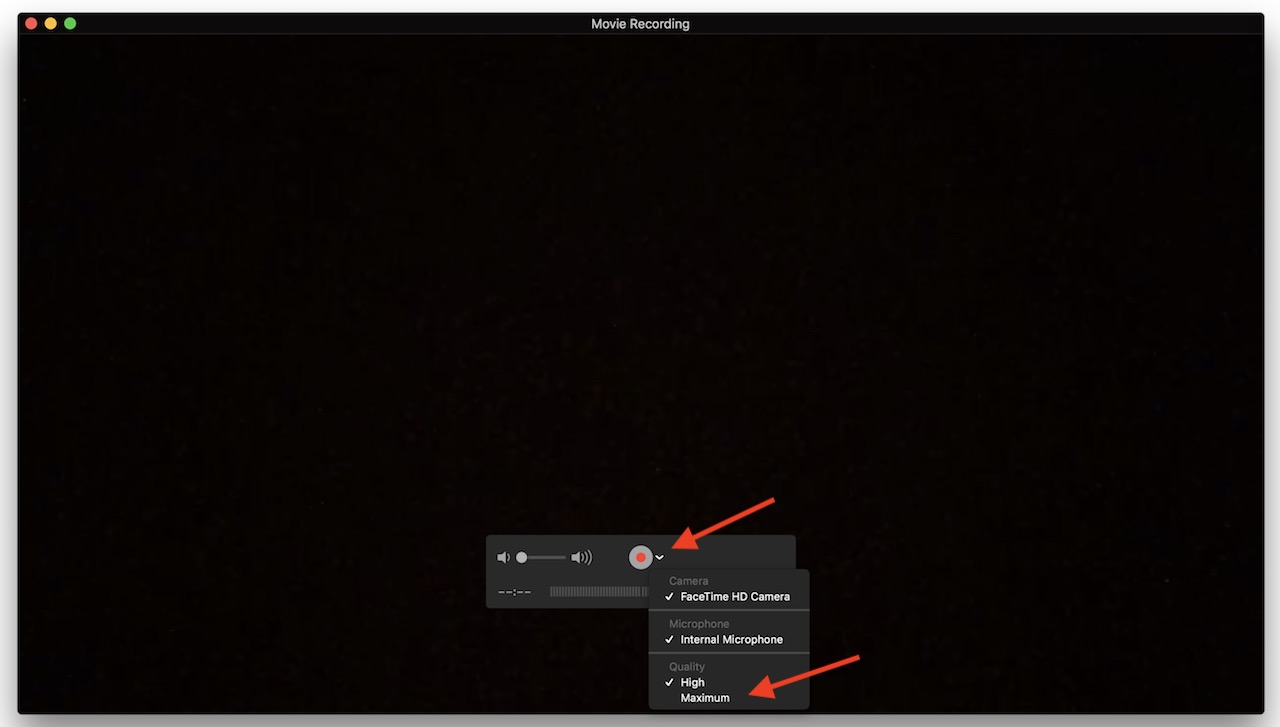
To do this, you simply open QuickTime Player, choose File > New Movie Recording.
Click on the drop-down arrow to the right of the Record button and choose the camera and microphone you want to use and change the Quality setting to Maximum.
Maximum will record a 1280 x 720, 30fps Pro Res 422 .mov file
High will record a 1280 x 720 30 fps H.264 .mov file at 7.8 Mbit/s (approx)
At the end make sure you save the file!
Windows Users: As Luis mentions in the comments, if you’re running a PC with either Windows or Linux (or Mac OS!) you might want to check out OBS Studio (Open Broadcaster Software) for a free option.
It’s what all the cool streaming kids use these days, although it might not be quite as simple to set up as the QuickTime tip.
Recording Podcast Interviews via Zoom – Obviously you can do the same thing for recoding podcast interviews conducted over Zoom, using Quicktime but just choose “New Audio Recording”.
You’ll both want to be wearing headphones to ensure there is no audio bleed into your microphone from your computer speakers. This will give you the best results.
3. Record a Zoom Meeting with Screen Capture Software
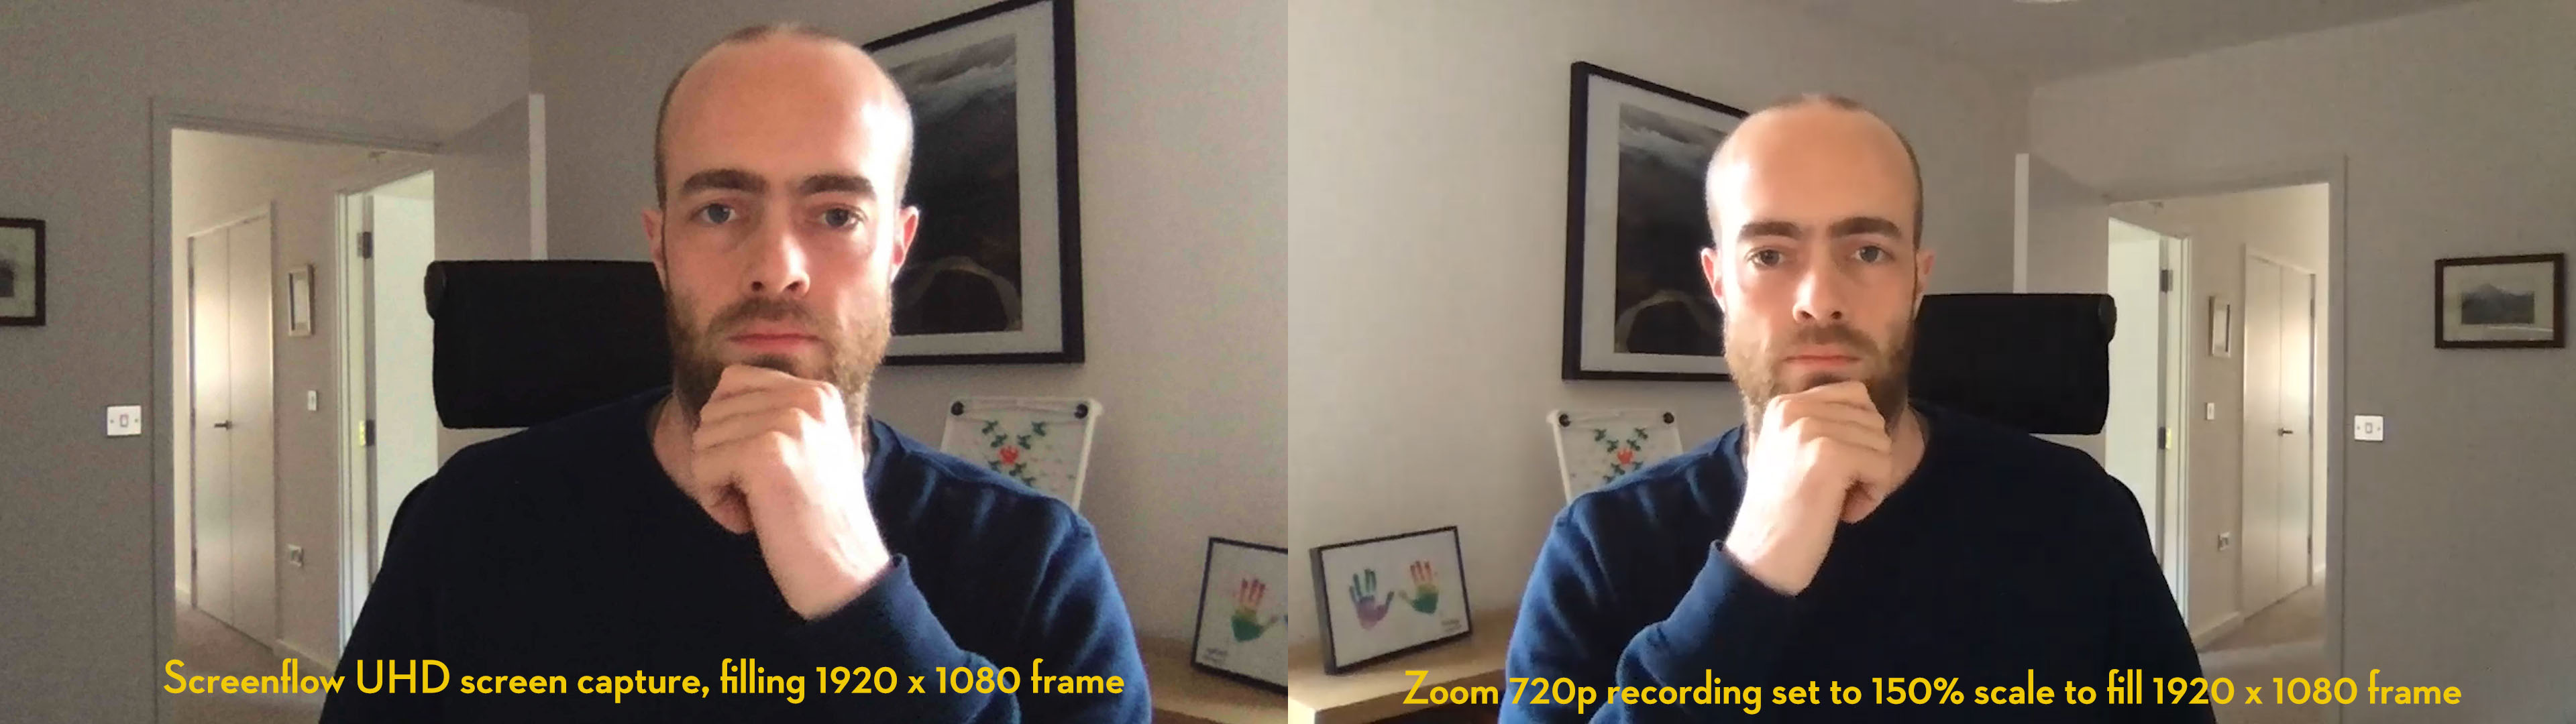
In the image above I’ve recorded myself in both Zoom and Screenflow (Mac only) and then taken the clips into the editing software Adobe Premiere Pro to fill an 1920 x 1080 HD frame size.
You can see that I forgot to toggle-off ‘Mirror my video’ in the Zoom video preferences so it has horizontally flipped the image, but the Screenflow recording is crisper and has more detail but it’s noisier in the shadows than Zoom.
Make of this very unscientific comparison what you will!
One benefit of recording in Screenflow is that you can have two separate audio recordings for yourself (into your computer’s microphone) and the other person on the call (computer audio) which makes editing the clean audio of either side much easier.
If you’re on Windows 10 you can use the in-built screen recording functionality, although I’ve no idea of the quality as I’m only on Mac.
Note: As Denis Leyton points out “When recording a Zoom call on ScreenFlow, you must go to Zoom settings and on Output select: “Telestream Audiocapture”, otherwise ScreenFlow won’t record the computer’s audio…”
Here is a quick guide to using Screenflow 8, but this works exactly the same for the latest version of Screenflow.
How to set up a Zoom Interview Home Studio
This isn’t about Zoom specifically but Erik Naso demonstrated how he lit his TV reporter wife for NBC7 at home. If you’re going to broadcast from home – do it right!
If one of the participants on your call is using an iPhone then getting them to record a regular video clip, through the back/photo camera will give you the best looking results.
Then get them to set up a second device for the actual Zoom call as close as possible to the iPhone eye-line, and make sure they’re wearing headphones so that the iPhone only records their speech.
Michael Cioni of Frame.io shares his high-end set up in this detailed blog post, which he’s used for recording himself at home for pieces to camera for Frame.io’s excellent remote collaboration video series.
But what if you don’t want to use the ZOOM link and you don’t have access to an additional mirrorless or SLR camera?
The best solution is using something that we all have: a smart phone.
First, I recommend downloading a third party video recording tool that offers more manual control. There are lots of them out there for Android and iOs, so feel free to experiment and research.
I prefer Filmic Pro, which is $15. With Filmic pro I can set my resolution to 4K, my frame rate to 24, and I can connect my Rode Lav directly into the phone.
The very end of this blog post shares some excellent tips for getting better looking results even if you’re just shooting with an iPhone or a laptop. It is well worth a read!
4. The Best Settings for Recording a Zoom Meeting
If you do choose to use Zoom’s in-built, and pretty effective, recording feature here’s what you’ll need to do to get the best looking and sounding results.
You’ll need to toggle on a few different settings in the Zoom desktop app preferences to get set up correctly, which I’ll describe below.
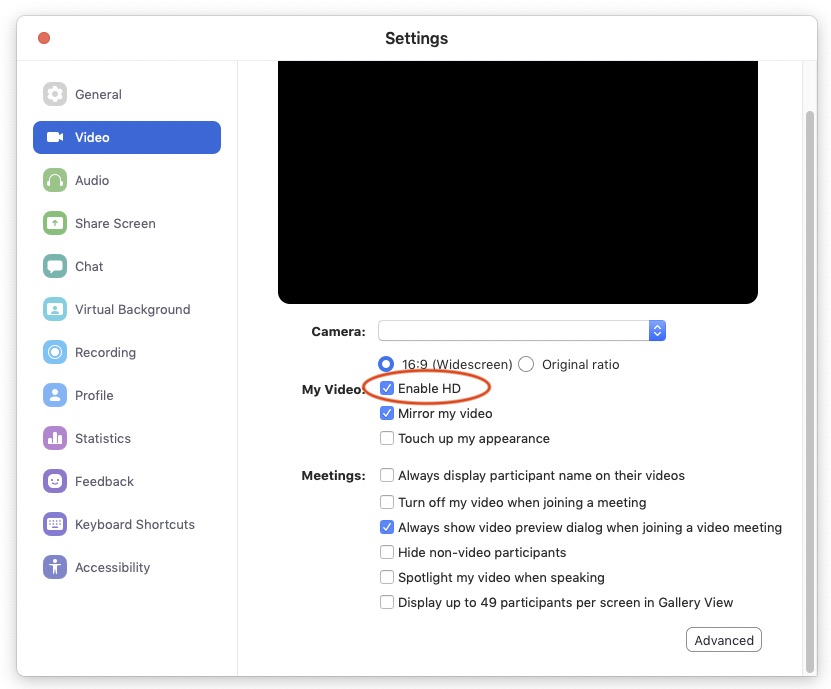
Preferences > Video
- Enable HD
- Choose camera (for external camera feed)
- 16:9 widescreen aspect ratio
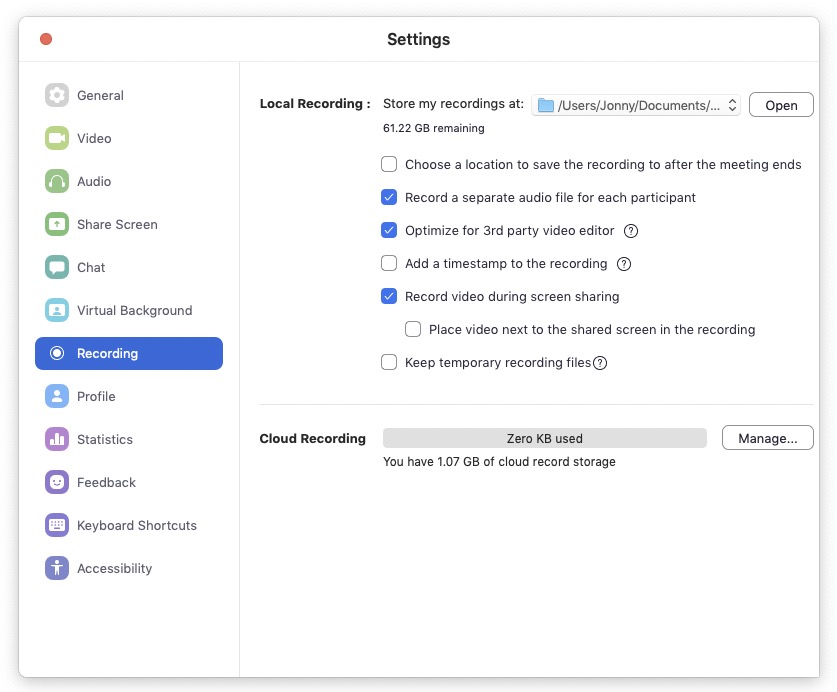
Preferences > Recording
- Optimise for third party video editor
- Record separate audio file for each participant
- Record video during screen sharing
Within Zoom, to record a meeting you simply press Record > Record on this Computer in the on-screen controls. Be sure you have permission from everyone on the call to do so.
You can also record in several different ‘modes’ including active speaker mode where only the speaker is shown, gallery mode (which might work well for 2 person interviews) or bigger meetings and various shared screen modes which include either a large or small thumbnail of the speaker or a smaller gallery view on the side. This support article will show you what each of these look like.
You should know that by default the recording resolution is set to 640 x 360 at 25 frames per second and although you can store up to 1GB of footage directly in the cloud, you are strongly encouraged by Zoom to record to your local drive.
By this Zoom mean the built in hard drive on your computer, not an external drive or other cloud location such as Google Drive or Dropbox.
By default on a Mac and PC Zoom stores your recording files in the current user’s document’s directory: /Users/Jonny/Documents/Zoom
Zoom Audio Processing
To get the best sounding audio you should record a separate audio file per participant, which you can toggle on in the Zoom preferences here.
This creates two different audio tracks in the Local recordings folder, which you can then sync up later in your video editing software.
You should also be aware of some settings in the Audio preferences which will effect the quality of the recording.
Automatically adjust microphone volume will attempt to normalise your sound level, lifting up quiet speech and reducing the loud. Depending on how well it does this, you might want to uncheck it.
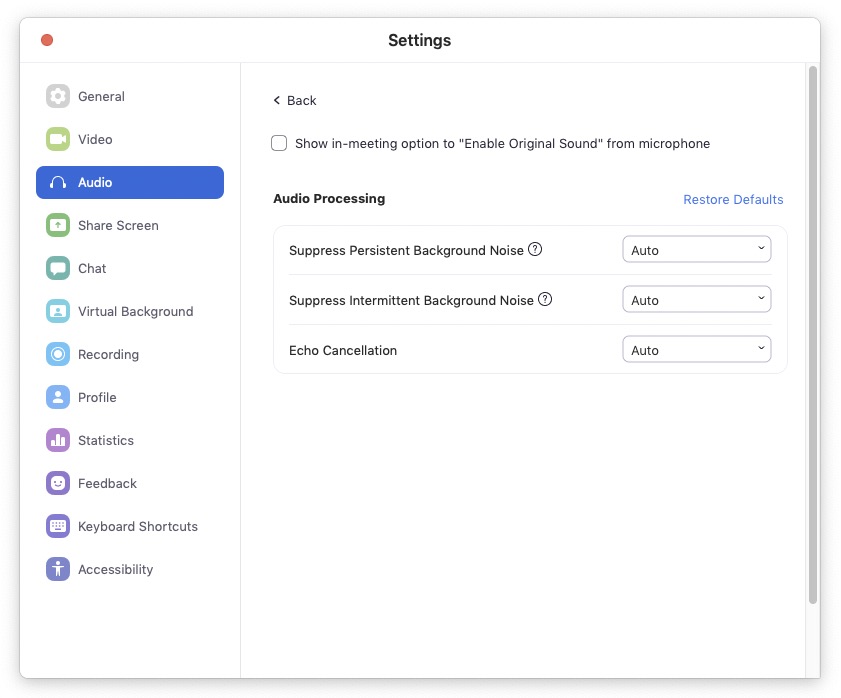
Under the Advanced tab you’ll also also find Zoom’s built in audio processing including background noise suppression and echo cancellation. You can choose how aggressive these are, or disable them entirely.
You can read the official Zoom recording guide here.
Zoom HD Video Recording Resolution
The recording resolution Zoom can deliver is dictated in part by the resolution of the camera doing the recording. I’m not sure if this is just the camera on the host recording computer, or the lowest resolution camera being used by any participant in the meeting.
On most iPhones that’s 720p for the front-facing ‘selfie’ camera and it’s the same MacBook Pros and iMacs.
If you have multiple camera’s attached to your computer you can select which one is used for the call in the Zoom Video preferences.
Either way you’ll want to test your set up to ensure you get the results you need.
Obviously if you can use a better resolution camera, such as the main ‘back’ camera on an iPhone you’ll get better looking images.
As far as I know, the best quality resolution that Zoom can record is 1280 x 720p ‘HD’, without 1920 x 1080 being switched on by Zoom support directly.
You will need to enable HD for your calls in the preferences to make sure you aren’t recording at the default 640 x 360 and have a Pro or superior Zoom account.
According to Jon Barrett in the comments section below, this 720p quality only works if there are only just two people on the call.
Full high definition video, 1080p, is limited availability. Business or Enterprise plans who would like to be considered for this feature can submit a request to Zoom Support.
In Webinars, for attendees to have 720p or 1080p feeds, it needs to be enabled by Zoom Support. All other prerequisites for 720p or 1080p still must be met as well.
As far as I know, the Group HD functionality would be a pre-requisite for being able to record in 1080p HD and that requires you to fulfil the criteria listed here.
But from what I’ve read online, some people are still having problems ensuring this on long calls. Although it’s hard to know what other mitigating factors there might be with their troubles!
Lastly, you should also toggle on ‘Optimise for third party editor’ in the Recording preferences.
Zoom says this will generate an .mp4 file that’s better suited to being edited, but the default file is also an .mp4, so maybe there’s some other things going on too.
Just a note to say you might want to toggle off ‘Mirror my video’ if you don’t want it to be horizontally flipped. Zoom adds this to counteract any flipping your camera might do itself.
Frame.io Zoom “Integration”
If you set your Zoom recording folder to be a Frame.io Watch Folder, you could have the recording automatically uploaded to a project for review, or so a client or producer can send you the file for editing.


Hi Jonny, hope this doesn’t seem like too ‘Newb’ a question:
I make 5-10 min. Videos for posting on YouTube. The only reason I open a 1-person Zoom meeting to make the recordings is because I love my Zoom virtual backgrounds (I have a green screen.) I host international Zoom meetings with upwards of 100 participants every weekend, and have collected over 40 great backgrounds, including several motion backgrounds, that make me look like I’m sitting in a beautiful live nature setting.
If I could have those backgrounds behind me in a higher res recording through another video recording program (QuickTime, etc.) I’d skip Zoom and it’s crummy resolution altogether. But I don’t know my way around other (not-too-expensive) programs that I can record while sitting in front of my iMac and my Logitech 4K Pro webcam. Any advice is greatly appreciated, thanks!
Hi Teja
Newb questions are always, always welcome!
Given that you have a green screen it should be “pretty easy” to do what you want to do at a much better resolution and with free software.
Take a look at OBS (https://obsproject.com/download) and this tutorial from Elgato on how to replace the green screen with your background of choice… https://www.youtube.com/watch?v=8faHiVALNqE
All inside of OBS and all ‘live’…
Hi! Very eager to record video with Quicktime instead of with Zoom BUT when I select Maximum, I do not get a 30 fps file, I get a 15 fps file. Any thoughts why?
Thanks for the helpful article. regarding high quality QT movie recordings (settings on Max), while zooming – has anyone encountered an issue where the QT recording quality is downscaled, because zoom is also running?
Hi Cara
Thanks for checking out the blog, can you explain what you mean by downscaled? From what to what? The QT will only capture at the full resolution of the in-built Mac Facetime camera (which is 720 x 1280 pixels) unless you’re using an external webcam (i think?) – it’s locked to the incoming source video feed size/resolution.
Jonny
Seems that Zoom had abandoned HD recording capability even for licensees. I guess it must be done locally, or by a third party application.
Hi Gene, Have you seen any announcement about Zoom abandoning HD recording capability? I just interviewed someone (for 40 mins — not sure if length matters) and got the 640X360 size file, though I had HD video selected. The last time I did this, back in December, some of my recordings were 1280X730, and others were 640X360, but there was no way to predict in advance what I’d get. I should probably start using QT to record as this is really not working.
When making a recording that includes several participants, the HIGHEST resolution I can record on Zoom is 320×200 with a low frame rate (looks like between 10-15 fps).
From scouring Zoom’s site it seems that even with Pro or better you can only get 1280x720p if there are only 2 people on the call. Bummer for me as I’m recording a Zoom play so I’ve been using the QT Player hack as both our actors are on MacBooks. We also record the video on our Windows machines using the Game Bar, which works a treat. Both of them require you to start Zoom and then start the recording.
It may be a newer addition, but Zoom now lets you choose to record a separate audio track for each participant; that’s a big help.
Thanks for checking out the blog and for sharing your tips Jon! Super helpful.
Hi, and thanks for this post. I’ve referred to it many times. I shoot and edit interviews and a lot of work is moving online. It’s a little sad, honestly, but we all have to get used to this new world… I have tried to convince interviewees to set up their iPhone or to let me send them a camera to film themselves, but many of the people I’m interviewing don’t want to deal with it. All I can do is film them from my end during a zoom call. I have basically only tried recording via Zoom, and that works some of the time, giving me a decent HD image if I set the recording setting to record HD. HOWEVER: it doesn’t always work. Sometimes, even if I’ve set the recording setting to HD, I still end up with a low resolution video. I have googled this and found other people with the same problem/question, but haven’t figured out how to ensure I get an HD video yet. Do you have any advice? I want to ask Zoom customer support, but as I don’t have Pro, I can only talk to a bot. Which is mega annoying. I’m not averse to paying for Pro if I think I’ll get an answer to this question, but I’m afraid I’ll pay $150 just to talk to someone who won’t have an answer. And I don’t need Pro for anything else. Thanks in advance!
Hey Basia
I could be wrong but it was my understanding that by default Zoom recordings are 640 x 360 and that both sides of the conversation have to have web-cams with at least 720p resolution (e.g. a Mac facetime camera). I don’t think the Pro side of things should make a difference, but again I could be wrong. As I state in the article I think to get 1080 HD you need to request this is activated on Zoom’s side.
This site seems to have some good info about your question around paying for Pro for HD – although inconclusive!
https://www.filmkraft.tv/post/record-zoom-meetings
Resolution: According to Zoom you should get 720P with a Free or Pro Account, and 1080P with Business or Enterprise. However, we were only able to record 1280 x 720 resolution on several occasions with our Pro account. The rest of the time our recordings were at 640 x 360 pixels, which is a big problem.
We contacted Zoom about the resolution issue. They reminded us to set the application to full-screen mode and to make sure that the sender has a webcam and internet connection that was capable of sending 720P footage.
We followed these steps, but the result was still only 640×360.
Thank you! It’s helpful to know that even people with Pro accounts who are able to ask Zoom for help still had problems. And that it’s not that I’m doing something wrong from my end. I guess I’ll just call the low resolution results “texture”? It would be great if Zoom could work on this — giving us a clear answer to why we end up with a 640X360 file, giving a warning if the resolution is not going to be HD even when the user selects HD recording, etc.
Hi there
Thank you very much for writing this post. Very helpful.
I’m sure you clearly explained but just can’t seem to get my head around this – can I host a zoom meeting on my iPhone 12, and record myself on my iPhone at same time, not in zoom? So video recording at same time as zoom meeting.
Thank you!
Hi Daniella, thanks for checking out the blog. The post doesn’t cover your use case of hosting and recording a Zoom meeting on an iPhone… but depending on your iPhone and the iOS you’re running you could try screen-recording on your iPhone whilst hosting the Zoom meeting with the built in iPhone screen-recording feature. It might also be possible to use the regular recording feature in Zoom itself to record the meeting as normal.
https://www.theverge.com/2020/4/15/21219299/record-screen-how-to-video-iphone-apple-instagram-tiktok
what are the Screenflow/Mac audio preferences to record ZOOM audio from a (someone else’s) webinar?
i recorded one and no audio, only video, with telestream driver set on Mac, do I have to also set the output on Zoom to be telestream also instead of Mac speakers?
thanks JT
Hi JT, thanks for checking out the blog. On my version of ScreenFlow (7.3) I’m pretty sure I just have to tick ‘Record Computer Audio’ (in the New Recording window) to capture any audio from the computer.
From memory I had to install a driver to do this (I think??) I didn’t have to set anything on Zoom though. Although if you have notifications etc from other apps chiming in during the recording these would be picked up too.
But according to this thread, you do need to set the Speaker in Zoom to Telestream Audio Capture, so that Screenflow “hears it”.
https://telestreamforum.forumbee.com/t/362dfk?r=63bq79
Hi thanks so much for the wonderful information. I’m trying to record the video feed from Zoom to external device such as a video camera or a DVR. Can you tell me if you now how to do it? and what would I need?
Thanks
Hey Luis, I’m not 100% how you would do this, it might be easier to screen-capture the meeting instead. You would likely need some kind of IO box otherwise but I’m not sure how you would even ‘send’ zoom to it.
Or you can try to do the Quicktime trick (or OBS on Windows) to record each camera’s feed, sync them with the in-Zoom recording and re-create the zoom meeting in post?
Sorry if that’s not much help! Jonny
Thanks a lot for the quicktime tip! Has already helped me tremendously. It’s easy to tell people how to do it so they can send me files later.
Now I wish there was an equally easy option for Windows…
You might use OBS Studio as well, it’s free, runs on Win, Mac and Linux and it’s full of advance options for high quality video https://obsproject.com/es/download
Recording using Quicktime on a Mac works really well. The simultaneous use of the webcam for both recording myself and being on the Zoom call is perfect.
I’m trying to make it work for Windows and running into problems. It seems like only one or the other is allowed. Any advice?