
Video Editing with a Huion Kamvas Pro 16 Plus (4K)
In this sponsored post I take a look at what its like to use the Huion Kamvas Pro 16 Plus (4K) for video editing, why it’s a great idea to combine it with the versatile KD100 custom keypad and dial, walk through how to set up and customise both of these devices and compare the Huion Kamvas Pro 16 Plus (4K) to the Wacom Cintiq Pro 16.
Having used Wacom’s Intuos Pro tablets for years, and being entirely convinced that every editor should ditch their mouse in favour the vastly more ergonomic and career enhancing pen and tablet combination, I was really interested to see how Huion’s more affordable pen displays compare.
I have to say, I was nicely surprised by the ways in which they surpassed my experience of Wacom’s tablets, and, with their competitive pricing, I hope more creative professionals can have access to them given the ergonomic benefits and the fact that they make editing more fun!
Before we dive in, it’s quickly worth clarifying the slight differences between the Huion Kamvas Pro 16 Plus (4K) and the Huion Kamvas Pro 16 (4K).
| Huion Kamvas Pro 16 Plus (4K) | Huion Kamvas Pro 16 (4K) |
|---|---|
| Colour: Dark Grey | Colour: Silvery Frost |
| Contrast Ratio: 1200:1 | Contrast Ratio: 1000:1 |
| Gamut: 145% sRGB (Quantum Dots) | Gamut: 120% sRGB |
| Price: $899 (USD) | Price: $829 (USD) |
All other aspects of the two pen display’s specifications are otherwise identical. As you can see there’s not a huge difference between them but the differences aren’t insignificant given that they mostly relate to the quality of the image.
I haven’t seen the Pro and the Pro Plus side by side so I can’t attest to how great a difference it makes, but, given that the price difference is only $70, you may as well go for the Plus version. In for a penny, in for a pound.
Huion also make the Kamvas and Kamvas Pro series of pen display tablets in quite a few different sizes.
The Kamvas Pro series features 12, 13, 15, 22, 24 inch displays. While the Kamvas series includes 12, 13, 16, 20 and 22 inch displays.
Huion Kamvas Pro 16 Plus 4K – What’s in the box?
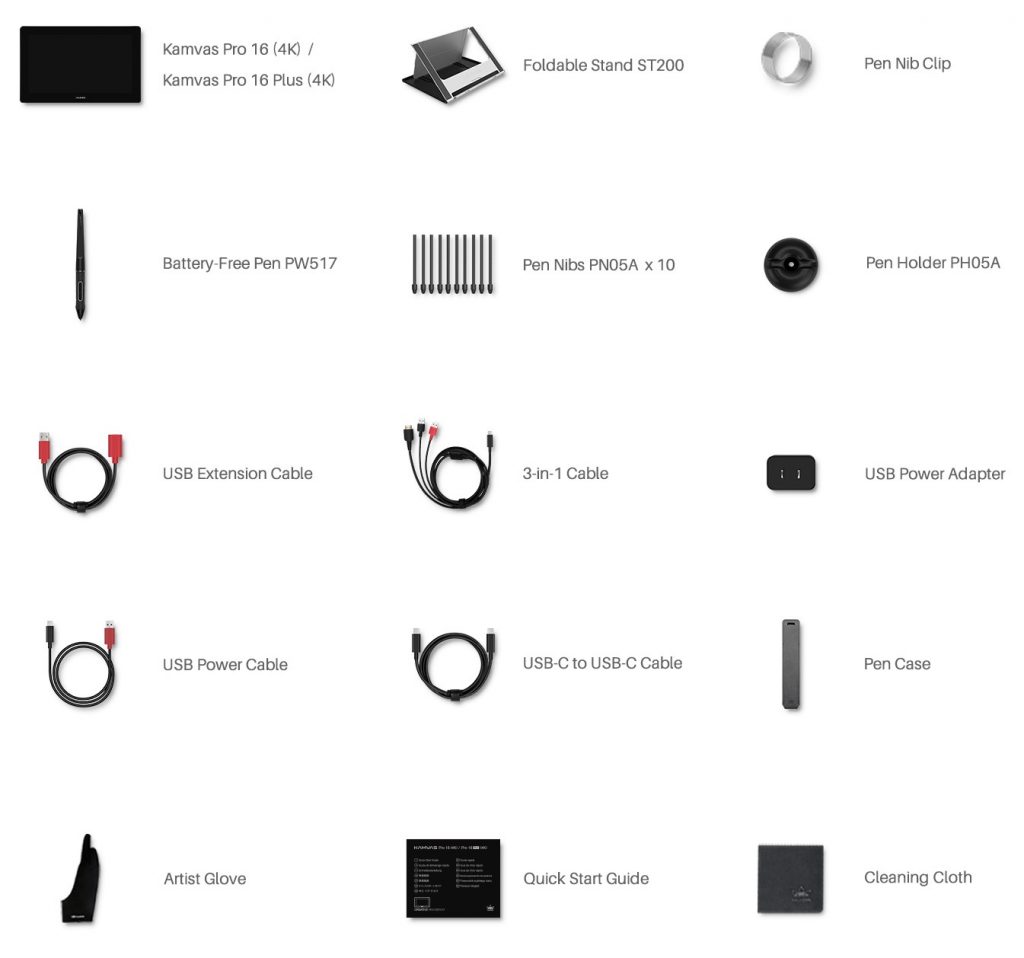
The Kamvas Pro 16 comes with a fair amount of accessories included in the box, here’s a quick list of what you get:
- Kamvas Pro 16 Plus (4K)
- PW517 Pen (Batteries not required)
- Foldable stand
- USB-C to USB-C cable (1m)
- USB-C Power cable
- 3-in-1 cable (Power, HDMI, USB)
- USB Extension cable (for the power)
- USB Power Adapter (choose your region at checkout)
- Pen nib removal clip
- 10 x spare pen nibs
- Desktop pen holder
- Pen case
- Artists 2-digit glove
Here’s some initial impressions and why each part is useful.
The USB-C to USB-C cable is a good length and allows you to connect to most modern laptops as well as Android mobile devices.
One USB-C cable should be sufficient to both power and transfer the visual data from your device to the tablet, although the Huion website cautions that “Because the voltage required for 4K resolution is very large, you may need to connect the power cable when using the USB-C to USB-C cable.“
Helpfully the power cables are all tagged with a red label to separate them from their data counterparts.
The 3-in-1 cable is really useful, with a 1 metre reach until the splitter and about 40 cm’s of cable for the triumvirate HDMI, USB (data) and USB power cables.
It’s a good thing Huion included the 1.2m USB extension cable for the power supply because you’ll likely need the extra length to reach the wall, while you might not need as much cable to connect the tablet to your computer, depending on your specific set up.
Both cables have a sturdy rubberised coating on them which makes them feel like they’ll last and survive any knocks and snags. If you do lose them you can buy replacements for a few bucks on the Huion site.
The addition of the 2-digit glove and the pen case are nice touches, as usually these might be extra. The glove will fit either a left or right-handed artist and helps the back of your hand to glide more smoothly on the surface of the tablet.
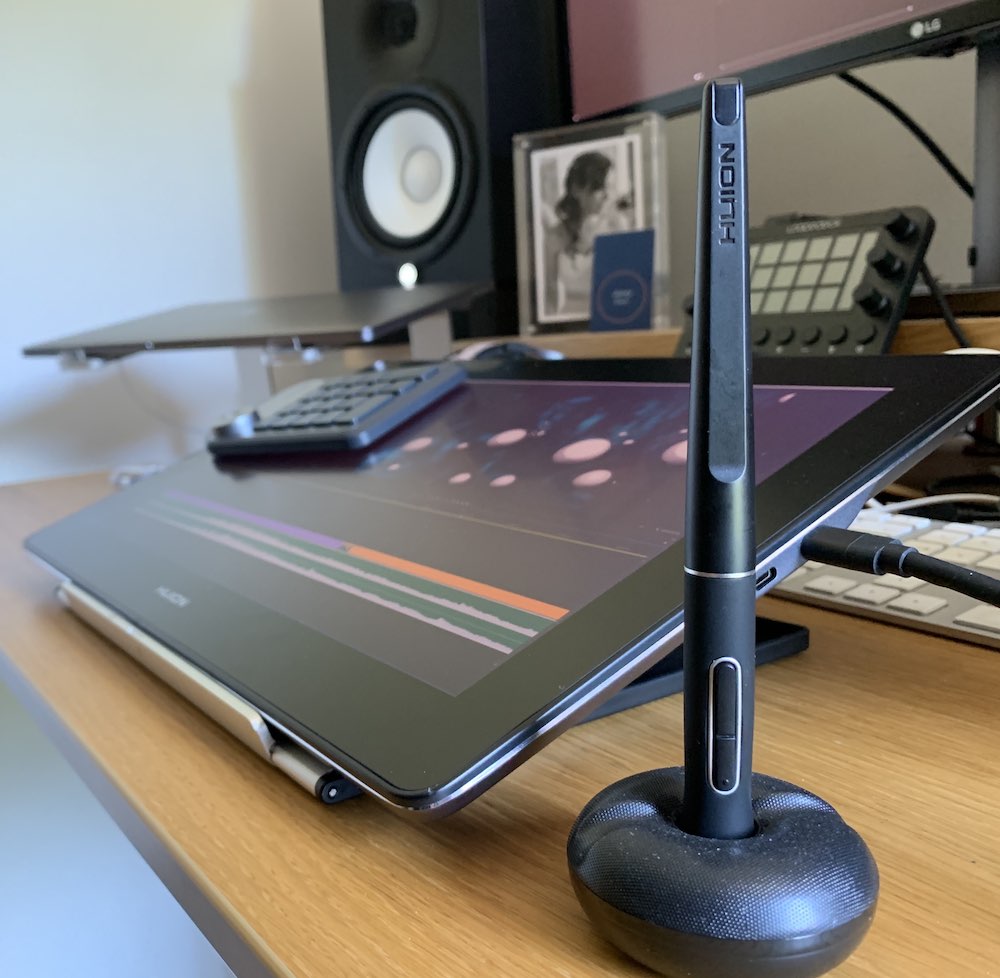
The spare pen nibs and removal clip are stored in the base of the doughnut shaped desktop pen holder, which has a nice textured design, although it’s not as compact or weighted as my Wacom Intuos Pro pen holder.
The pen itself is also much lighter and slightly more plastic-y feeling than the Wacom pen, but once you’re actually working away, I didn’t notice any difference. The rubberised grip delivers a comfortable and secure surface and rocker switch provides two useful extra buttons.
All in all, the build quality and design of the tablet and pen (the two most important parts!) is excellent and Huion seem to have carefully thought through how to deliver a complete package any creative artist will appreciate.
Huion KD100 Mini KeyDial – What do you get?
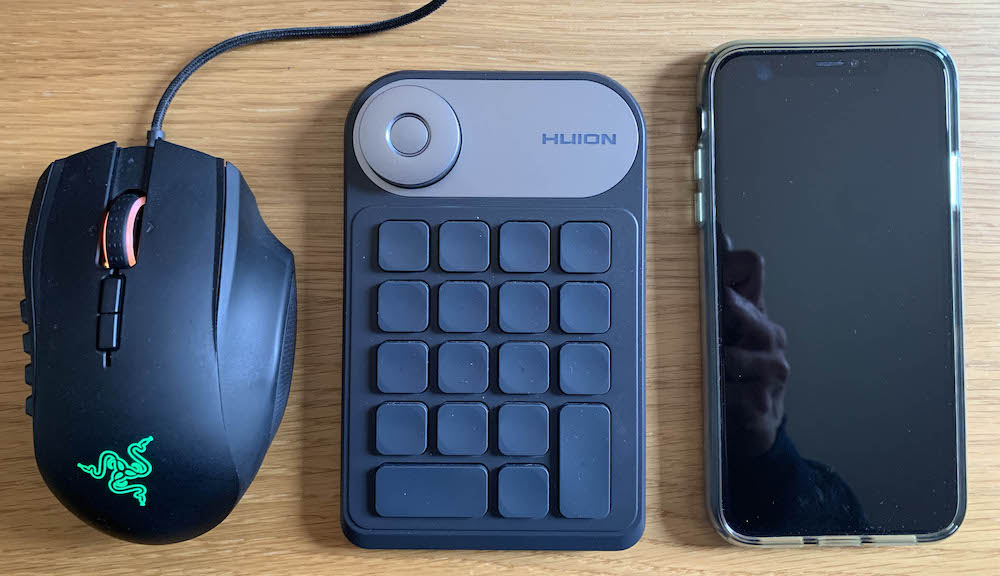
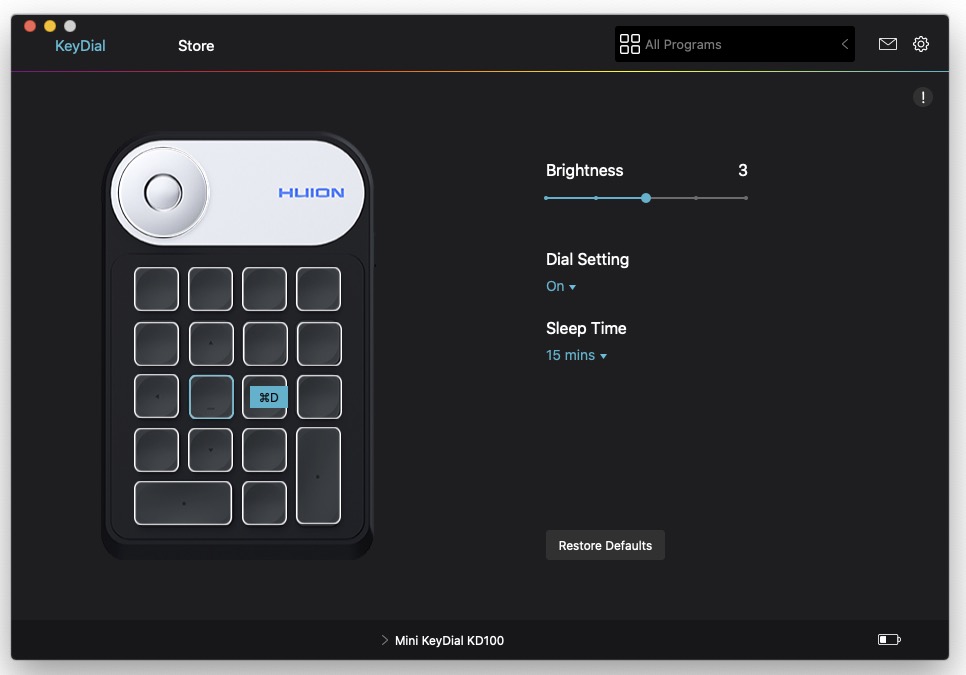
The new Huion KD100 is a great little device which features a blank set of customisable chiclet keys and a built in dial.
It is incredibly light in your hand, weighing only 115g. The internal battery should last for around 100 hours of use but you can charge it in about 2–4 hours with the supplied USB to USB-C cable.
There’s also a really handy (and very little) wireless USB dongle which should let you connect from anywhere within a 5-10 meter range.
If you’re on Window 10 you’re especially lucky as you can use the “Windows Radial Controller Protocol to enable radial menu and custom app experiences…” On a Mac you can customise the functionality of the dial in 3 different ways, using the centre button to toggle between them.
The buttons have a fairly short travel, reminiscent of Apple keyboard keys, and a satisfying press to them. The dial has an audible and tactile click to it when you rotate it which is a little loud for my taste, but helps you get a sense of the distance you’re moving it.
There is also a very small power button on the side opposite the dial and the four rubberised feet underneath provide a firm grip to whatever surface it’s sitting on, including the Kamvas Pro, even when it’s sitting up at an angle in the stand.
It is worth noting that you don’t need a Huion tablet to make use of the KD100. If you own another tablet, or no tablet at all, but fancy a one-handed portable wireless keypad and dial that you can customise with your own shortcuts, then the KD100 is for you.
For $49.99 the KD100 seems reasonably priced compared to other wireless keypads, especially when you consider the inclusion of the dial and its ability to be completely customised and trigger custom shortcuts.
Setting Up the Kamvas Pro 16 Plus (4K) for Video Editing
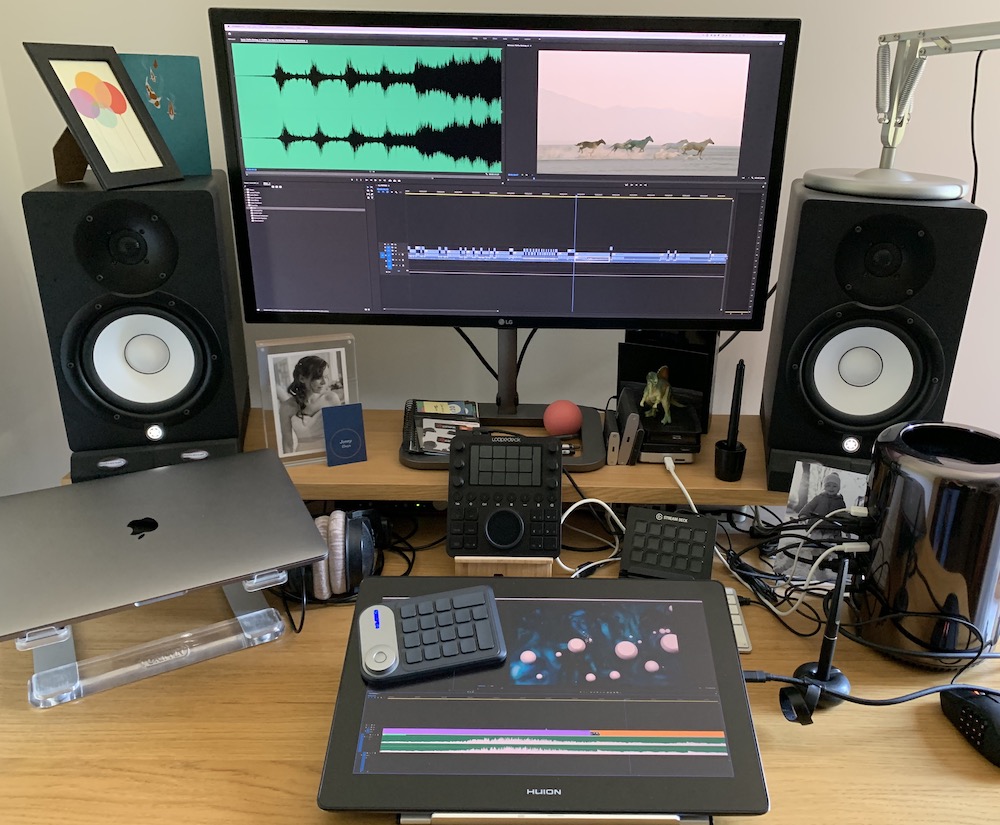
I was testing the Kamvas Pro 16 Plus in my home edit suite, which features a 2013 Mac Pro, LG 31MU97Z 31″ 4K computer monitor and Yamaha HS7 Studio Monitors.
The LG computer monitor connects via Mini-Display port into one of the Thunderbolt busses and the Kamvas Pro 16 Plus into the HDMI port.
Setting up the tablet is very easy: plug it all in, install the driver, customise the settings.
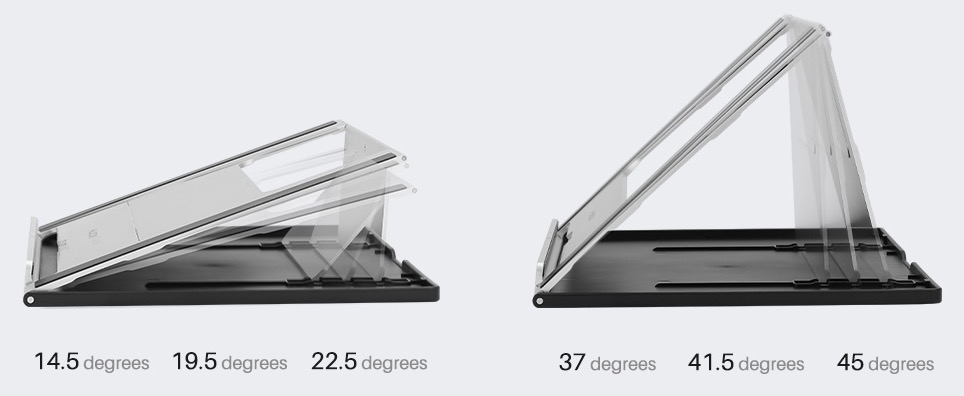
Once unboxed set the stand to the angle and height that you feel most comfortable with. The stand is pretty sturdy and you’d be hard pushed to make it slip.
Although the three different angle slot adjustments don’t make a huge amount of difference between themselves, travelling only 7 degrees, you can extended the height of the lift quite substantially.
I had mine set to the flattest angle at 14.5 degrees which allowed me to reach over the tablet to my full-sized keyboard behind it and generally set things at a more comfortable angle for my tastes.
Neither the Huion Kamvas Pro 16 nor the Wacom Cintiq Pro 16 can be connected via a VESA mount to an adjustable arm, which would allow you to position it wherever you like, but the Huion stand gives you a greater amount of flexibility compared to the Cintiq’s two little fold out legs.
You’ll need to connect both power and data in some way, either through the two USB-C cables or, as in my case, the 3-in-1 cable with the HDMI and USB connections.
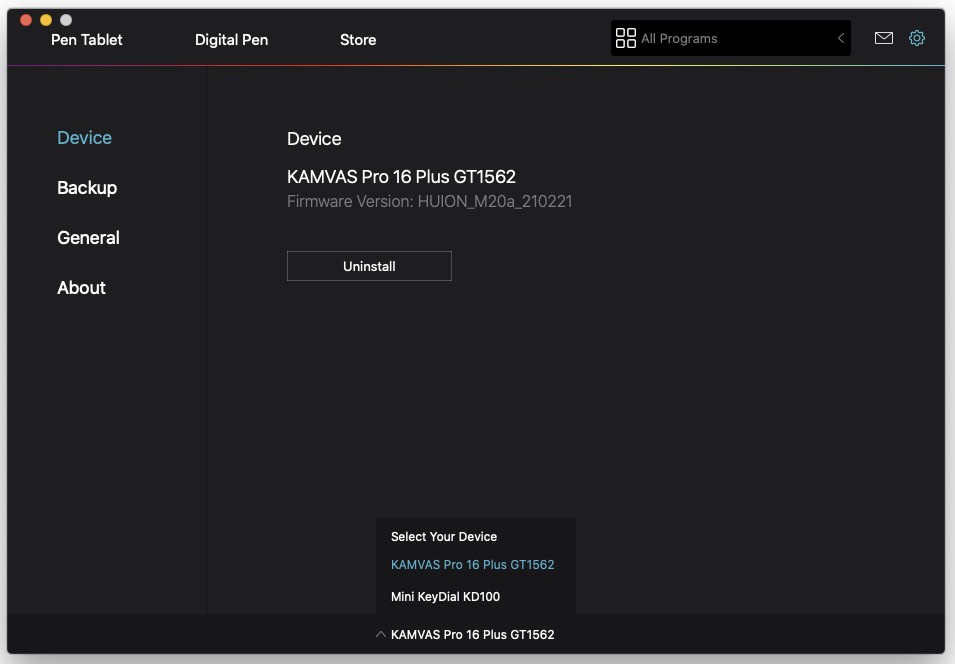
Download the driver for both Mac and PC from Huion. If you also have the KD100 you won’t need to download the driver twice.
You’ll be able to switch between customising any and all connected Huion devices via the little ^ menu at the bottom of the ‘driver’ app.
To run the app just find the ‘HuionTablet’ app in your Mac Applications folder.
Once installed you’ll make all of your customisations through the ‘driver’ software, which is pretty straightforward to use.
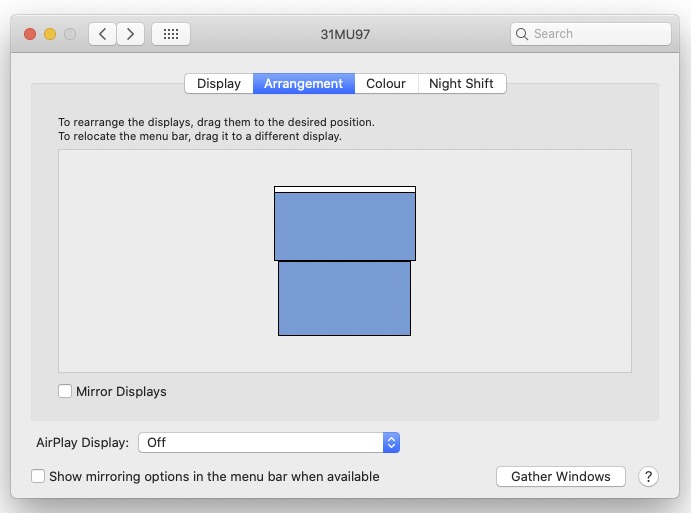
On my Mac I also set up my screen arrangement in the OS system preferences to replicate the physical layout, turning off mirror displays.
You can use the Kamvas as both a pen display and as a tablet, meaning that you can use it to move around on dual screen set up, regardless of which screen you’re on.
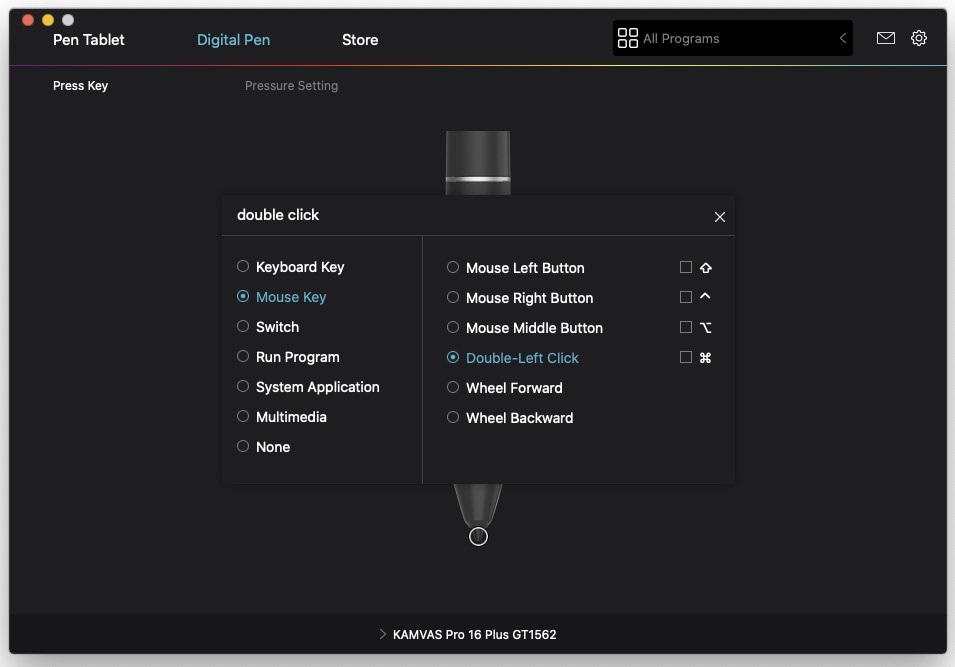
You’ll want to set up a shortcut to toggle between displays, which I set up as the ‘Back’ button on the Pen, with Mouse Right Click as the ‘Forward’ button.
This also provides a handy ability to teleport items from one screen to the other. Just click on the window you want to move and hit your display toggle shortcut to move it from one screen to the next.
The Huion app gives you the option to customise both the KD100 keys and the Kamvas Pen buttons in the following ways:
Individual keyboard keystrokes and modifier combinations (e.g. SHIFT+Z) but not multi-stroke macros such as CMD+C, SHIFT+3, CMD+V, SHIFT+3 – which as it happens is my pancake timeline macro for Premiere Pro.
Mouse keys: Left, Right, Middle, Left Double Click and Wheel forward/back.
Run programs from a system path.
System Application shortcuts such as (on a Mac):
- Sleep
- Lock Screen
- Show/Hide Desktop
- Mission Control
- Launch Pad
- Finder Search
Multimedia shortcuts: Next/Previous track, Play/pause, mute and Volume Up/Down.
Settings Preview: brings up a full-screen preview of your customisations.
Setting Up Your NLE for Two Displays
Setting up Adobe Premiere Pro to Work with Two Displays
Setting up Premiere Pro to work with two displays is very easy although there are a few helpful things to know.
First of all, if you just want to be able to use one display for a full-screen video playback, go to:
Premiere Pro > Preferences > Playback… and toggle on ‘Enable Mercury Transmit’ and then tick the check box for the monitor you want to use for full-screen playback.
When you hit play in your timeline the image should appear in full-screen on your selected display.
However, if you want to use both displays, including the Kamvas for the user interface then you just need to drag the specific windows to where ever you want them on each display.

Click on the three line ‘burger’ menu next to any window name and choose ‘Undock Panel’ and then drag or display-toggle-teleport the window to your preferred location.
Once you’ve got everything as you’d like it, save your current layout via: Window > Workspaces > Save as New Workspace
This layout should then appear in the top centre of the Premiere Pro interface alongside the default ‘Editing’ ‘Graphics’ workspaces.
If you want to be able to have a video preview window on your main display and the Kamvas you could either toggle this via the playback preference above or open what Premiere calls a Reference Monitor to effectively have a second Program monitor.
By toggling on the ‘Gang to Program Monitor‘ button, the two screens will stay in sync and display the same image from your timeline.
One thing to be aware of is that if you want to be able to draw masks, work with text etc. with your pen on the image then you need to have the Program Monitor on your Kamvas and the Reference Monitor on your computer monitor. This is because controls for masks etc. don’t show up in the Reference Monitor window.
How to Set up Final Cut Pro to Work with Two Displays

Setting up Final Cut Pro X to work with multiple displays is also just as easy, but you don’t have the customisability that you do with Premiere Pro.
In the top right corner of the FCPX interface is a small ‘two monitor’ button which needs to be on (blue) to enable one of the three options seen in the image above.
Choosing one of these three options will put that element on the secondary display but you can’t customise what panel goes where like you can with Premiere Pro. But you can get the timeline on the Kamvas, which is the main thing.
Larry Jordan has a great article about using two monitors in FCPX, with examples of what is one each of the screens in all three scenarios.
Setting up DaVinci Resolve 17 to Work with Two Displays

In DaVinci Resolve Studio (v16+) you can now have both full-screen playback on a second monitor (without the previous requirement for Blackmagic Design hardware) and work in a dual-monitor workspace layout.
As with FCPX there are a few restrictions but a greater degree of customisability. All the details are on page 55 of the v17 manual but essentially you first need to set which display is to be considered your primary display and then:
For full-screen playback go to Workspace > Video Clean Feed > Display 1 / Display 2 and choose your preferred display.
Dual-screen interfaces, as we’d need for working with the Kamvas Pro are available for the Media, Edit, Colour, Fairlight and Fusion pages (but not Cut and Deliver) and you can invert what is on each display by switching the Primary Display setting.
I found that on different pages I wanted different tools and panels on the Kamvas, so I had to keep switching which one was considered the primary display as I changed pages.
You need to turn on ‘Dual Screen’ under the submenu pictured above. There is also an option in that sub-menu for ‘Full Screen Timeline’ which will just put a massive timeline on the primary display.
Certain elements such as the Media Pool, Video Scopes and Audio Mixer can all be undocked, repositioned and scaled as you’d like too. You can save your custom workspaces under:
Workspace > Layout Presets > Save Layout as Preset
Customising the KD100 Keypad for Video Editing
Customising the 18 keys of the Huion Mini KeyDial KD100 is a relatively painless experience, although it will likely take a little bit of trial and error to land on your perfect set up.
The first thing to decide is how you want to hold it.
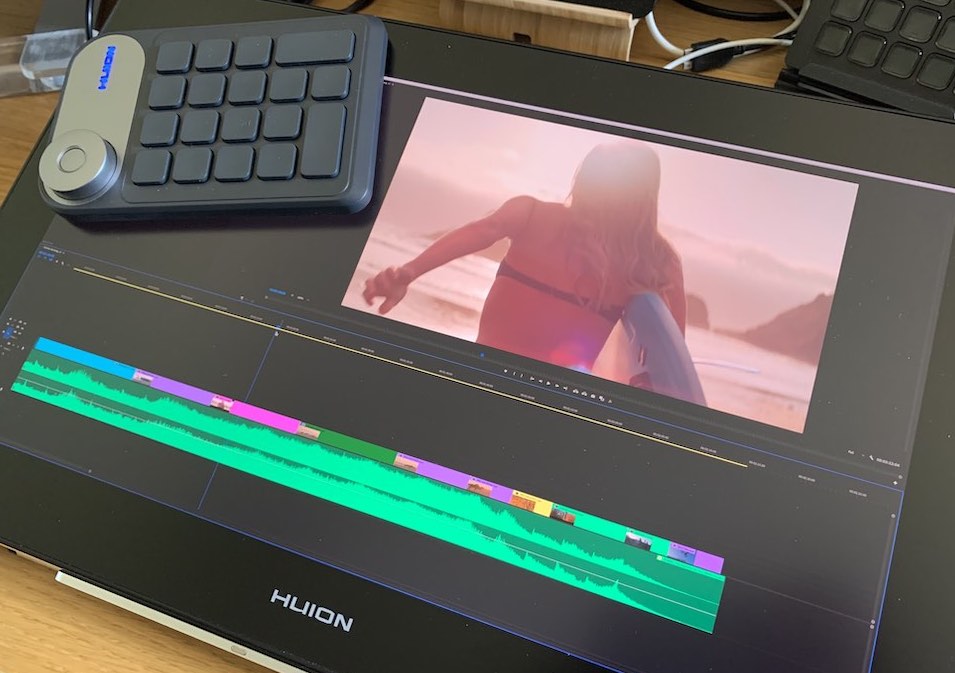
I decided I’d like to replicate my most used keyboard shortcuts | H | J | K |L | / | layout and settled on using the KD100 horizontally with the dial at the bottom left corner.
This gave me a comfortable single handed position, with my fingers resting on the second row of keys and my thumb on the larger key at the (horizontal) bottom right.
Hopefully it’s obvious but you can use the KD100 with either your left or right hand.
The KD100 comes with some default shortcuts already set up for the ‘All Programs’ mode, which you can easily override.
To customise the KD100 first select a program you’d like to use the layout in under the ‘All Programs’ drop down menu in the top right of the UI.
When you’re in that software the KD100 will automatically switch to that custom layout.
Next select a key you’d like to re-assign and choose from the menu of options:
- Keyboard Key
- Mouse Key
- Run Program
- System Application
- Multimedia
- Settings Preview
- None
Other than keeping a key for the Settings Preview action, all of my KD100 buttons were assigned to keyboard shortcuts.
As far as I can tell your custom layouts are saved to your computer, as there’s no on-board storage on the KD100, which means that you’ll need to re-create these if you switch computers.
The only feedback as to how the KD100 is doing is to be gleaned by observing the colour of the light under the Huion text:
- Blue light: Working
- Flashing red light: Low battery
- Red light: Charging
- Green light: Charged
- Flashing Blue light: Standby
- Light off: Off state
Suggestions for Improvements
The KD100 is super easy to use and set up, but the software could do with a few small user interface improvements.
The first thing is that you can’t rotate the image of the KD100 in the software, to better relate to how you’ve chosen to use it. Given that Huion intends for you to use it anyway you’d like, it would make it much faster to customise if you could replicate this physicality on screen.
Another slight annoyance is that when you’re setting up your layout in the Huion software you can’t see what is assigned to every key at once. This means you have to hover your pointer over each key individually and try to remember what’s assigned to the other 17 keys!
One major feature that is currently lacking with the KD100 is the ability to construct macros, which would trigger a sequence of shortcuts with a single button press. Hopefully this ability will be added in later updates to the software.
Similarly it would be handy if you could hold down one key while pressing another. This would allow you to have single modifier keys assigned to a button and single key presses assigned to another and extrapolate a greater number of shortcuts from the keypad.
For example, having CMD | Alt | V | C assigned with multiple button presses would allow you to trigger 6 commands (C, V, CMD+C, CMD+V, ALT+V, ALT+C) from 4 keys.
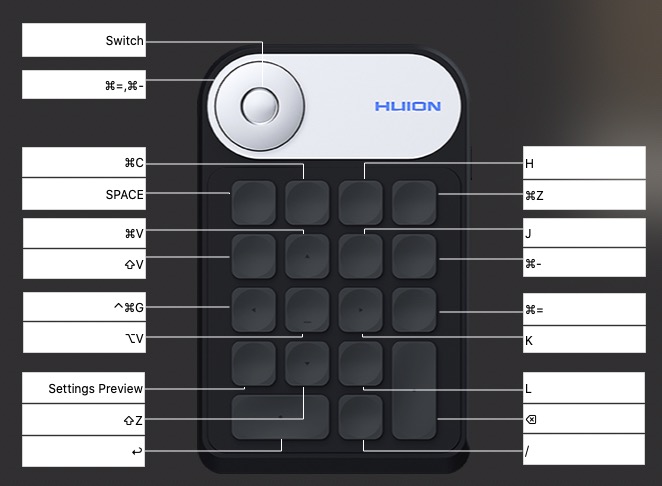
Here is my own custom KD100 layout for video editing in Adobe Premiere Pro, which I’ll briefly explain, although some of these shortcuts are custom assignments in my own Premiere keyboard shortcut Profile.
Also imagine it rotated horizontally with the dial at the bottom left – I would rotate the image above but it then makes it tricky to read the text! (see the photo in the section below)
I duplicated Zoom in and out on the keys and the dial because sometimes I would more naturally just lift a finger up a row to press this, but it also seemed like a handy thing to have on the dial.
Dial (Forward and Back)
- CMD+–/CMD+= = Zoom In/Out
- Up Arrow / Down Arrow = Scroll up and down the timeline via cut points
- [ / ] = Scale audio track height larger and smaller
Top row, left to right
- CMD+Z = Undo
- CMD+– = Zoom Out
- CMD+= = Zoom in
- Backspace = Delete (Big Key)
Second Row (L – R)
- H = Add Edit
- J = Play in Reverse
- K = Play/Pause
- L = Play forward
- / = Ripple Delete
Third Row (L – R)
- CMD+C = Copy
- CMD+V = Paste
- ALT+V = Paste Attributes
- SHIFT+Z = Zoom to entire Sequence
- Return = Return (Big Key)
Fourth Row (L – R)
- Spacebar = Play
- SHIFT+V = Paste Insert
- CTRL+CMD+G = Close Gaps
- Settings Preview
If you have a KD100 and you’re using it for video editing or other post-production apps do let me know and I’ll update this post with your custom setup suggestions!
Kamvas Pro 16 Plus (4K) Pen Display – An Editor’s Review
Now that we’ve gotten the lay of the land when it comes to setting up a pen display, what’s it actually like to edit video with the Huion Kamvas Pro 16 Plus (4K)?
Much like working with the Wacom Cintiq Pro there’s a lot to get used to – but this is just the nature of the beast when it comes to changing your regular workflow to something new, there’s always a little transition pain to overcome.
The Kamvas Pro 16 Plus (4K) has a great looking screen and when working with nice looking images, like those in the video near the top of this post it is a real joy. You definitely feel like you’re in more tactile, hands-on control of your edit.
The build quality of the Kamvas is great, with a sleek polished design. The adjustable stand made it comfortable to work with and the whole thing is just about light weight enough that you could slide it into a backpack if you needed to, but really it’s more of a desktop item.
The quality of the 4K screen is strong, with plenty of sharp details, high contrast and vibrant colours. Things only get a bit smudgy if you press your face too close to the screen when leaning down to work on it – but try to maintain some decent posture!
One thing that I didn’t have the opportunity to test out is actually colour calibrating the screen. The default profile wasn’t massively different to my LG 4K monitor but they weren’t the same.
From a specification perspective the Kamvas Pro 16 Plus (4K) has a wider colour gamut capability than the Wacom Cintiq Pro (145% of sRGB vs about 90% of Adobe RGB). The Kamvas also has a higher contrast ratio of 1200:1 vs 1000:1.
The Huion Tablet app has a calibration feature, but this is to adjust the placement of the mouse pointer relative to the pen nib which will vary ever so slightly, depending on your angle of view etc. and sometimes they can become separated making precision impossible.
I found I did need to run this to fix this very issue but it worked out perfectly and then the pointer and nib were in sync.
One of the ways in which the Kamvas far surpassed the Wacom Cintiq Pro was when it came to it’s absolutely silent running. The Wacom has two fans on the back to keep the 4K screen cooled, which makes it quite noisy at times and a reasonable hindrance to getting detailed sound work done, where as the Kamvas for utterly silent from start to finish.
I have to say I was very impressed by the combination of the the KD100 Mini KeyDial and the Kamvas Pro 16. It’s a great little device, super lightweight and easy to use. The dial is really handy and there are just about enough keys to sit and happily chew your way through making selects.
It definitely doesn’t replace a full-sized keyboard and one of my main issues with working on any kind of pen display is that it takes your hands off the keyboard – which is the source of pretty much all my speed as an editor!
That said, it’s great that Huion have addressed the need for keyboard shortcuts along side their tablets and pen displays by creating the KD100. It will be interesting to see where they take things next. I hope some of the software updates that I’ve suggested might find their way into development, as this would make it all the more useful!
One area that I sometimes struggled with was a lag between my actions and the display updating, I’m talking milliseconds but a noticeable delay when you’re used to an instantaneous response.
But I’m pretty sure this is likely to be due to my 2013 Mac Pro struggling to run two 4K displays at the same time, more than it is an issue with the Kamvas itself.
Another issue I had while working in Adobe Premiere Pro was that audio keyframes would not function correctly at all. Every time I clicked on the volume bar to add one, it would be added but a second click to adjust it would simply remove the keyframe.
Strangely enough everything worked fine when adding and adjusting mask control points on a video clip. I’m not sure why this would be.
Overall conclusions
Overall I was impressed by the quality and experience of using the Huion Kamvas Pro 16 Plus (4K), especially given the strength of the images it can display on its 3840 x 2160 resolution screen and the inaudible operating sound.
The adjustable stand also gives it a greater range of ergonomic working positions, which is critical if you’re going to be spending many hours a day on it.
That said, all the editors I know who are using a pen display on a daily basis to edit films and TV shows are working on the much larger 32″ versions of these types of devices, mounted on adjustable VESA arm supports.
And maybe this larger scale changes it into a transformational experience but I can’t escape the fact that I am many times more efficient leveraging all my keyboard shortcuts on a full-size keyboard across from a flat tablet, than I am looking down to a pen-display screen.
But if you’re keen to give this kind of set up a go, then you won’t be disappointed by the quality and price of the Huion Kamvas Pro series.
Check out the Huion Kamvas Pro 16 Plus (4K) for yourself on Huion.com


I’m currently stuck in deciding between the Wacom Cintiq 16 and the Huion Kamvas Pro 16.
How does the parallax compare between the Wacom Cintiq 16 and the Huion Kamvas Pro 16? Based on what I’ve read ( https://pctechtest.com/wacom-cintiq-16-vs-huion-kamvas-pro-16 ), it looks like there’s a slight bit more on the Huion.
would you mind telling me which one you think takes the edge?
Thanks in advance!
I sold on both of the devices so unfortunately I can’t do a side by side comparison. From memory they are both great screens, but potentially I would lean towards to Huion.
BUT I’ve not seen the latest Wacom in person yet.
Thanks for sharing!
I don’t have a Huion Kamvas Pro 16 drawing tablet but a XP-Pen Artist Pro 16 graphic display, I will have a try with it for video editing!