
Video Editing with a Wacom Cintiq
- How Hollywood Editors Edit with Wacom Cintiq Pro
- How to use a Wacom Cintiq Pro for Video Editing
- A Complete Guide to Setting up a Wacom Cintiq Pro
This post is designed to be a helpful guide for anyone looking to learn how to use a Wacom Cintiq for film and video editing, showing you how to set it up correctly, and get the best out of it with some useful tips and tricks.
The inspiration for using a Wacom Cintiq for film editing, and so this post, came from Hollywood film editor Edward Alan Bell, who cut the Hunger Games trilogy, The Amazing Spider-Man, Red Sparrow and 500 Days of Summer to name just a few of his films.
Alan was kind enough to talk through his personal set up, share his custom settings and offer a wealth of exceptional advice on this unique workflow, and the business of film editing too.
Even if you never plan of using a Cintiq in this way, his interview is still a very valuable read, so don’t miss out!
As you’ll see this article is a guide to setting up a Wacom Cintiq for video editing, a detailed technical conversation with a professional editor and a product review based on my own experiences.
To jump to specific sections just click these in-page links:
- Using a Wacom Cintiq for Film Editing – A Hollywood Editor’s Guide
- How to Set up a Wacom Cintiq for Video Editing
- Using a Wacom Cintiq Pro 16 for Video Editing
Before we dive in, huge thanks to Wacom for supplying me with a Wacom Cintiq Pro 16″ for the purposes of this review.
A massive thank you also goes to Speedscriber for once again, giving me access to their excellent transcription service for my interview with Alan, which I’ve used for all my previous interviews and you can read more about here.
Alan had actually been generous enough to record our interview with a great service called DialPad that both records and transcribes the call, which did a solid job of the transcription.
But when I came to edit our interview and check it against the audio recording, I was sorely missing the speed, ease and efficiency of Speedscriber for the editing process. Given how many hours Speedscriber saved me while editing the nearly 8000 words of our original conversation, I can’t recommend it enough!
Also all of the on-screen images in my edit suite photos and the trailer for this post on YouTube are from one of my favourite stock video sites, Artgrid.io. If you sign up yourself, you can get two months extra for free with this special link.
Learn more about Artgrid.io and how it compares to other high-end royalty free video stock sites in this detailed post.
Why You Should Use a Wacom Tablet for Video Editing
I’ve been a freelance video editor for my whole career, which is now heading into it’s fifteenth year. I started off with a laptop and a regular mouse but after a few years of working I started to develop tingling pain in my wrist and fingers of my mouse hand.
Sometimes it would get so bad I’d have to stop what I was doing to take a break and try to stretch out my muscles to get rid of the pain, although that didn’t really work.
Finally I started looking into getting a Wacom tablet, although they seemed like a pricey solution at the time. But when I saw this video from animator Kenny Roy, I was totally convinced that the long-term future of my career depended on taking responsibility for the health of my body, now. I couldn’t afford not to invest in my future.
Since then, I’ve been a long-time user and advocate for editing with a Wacom Intuos Pro medium tablet, for vastly improved ergonomics, increased speed, dexterity and efficiency and, frankly, it’s just more fun.
The main ergonomic benefit to using a pen and tablet is that it relies on moving a much larger muscle grouping – your arm and shoulders, compared to the tiny muscles in your wrist – which aren’t really designed for the kind of movements a mouse requires.
All of this means that you won’t wear them out with repetitive movements holding something like a pen, compared to manoeuvring something like a mouse. (Watch the video for an insane story from Pixar on this!)
Today, I never edit with a mouse, but if you insist on using one, check out this post on ergonomic and macro-enabling mice to make the experience worth your while.
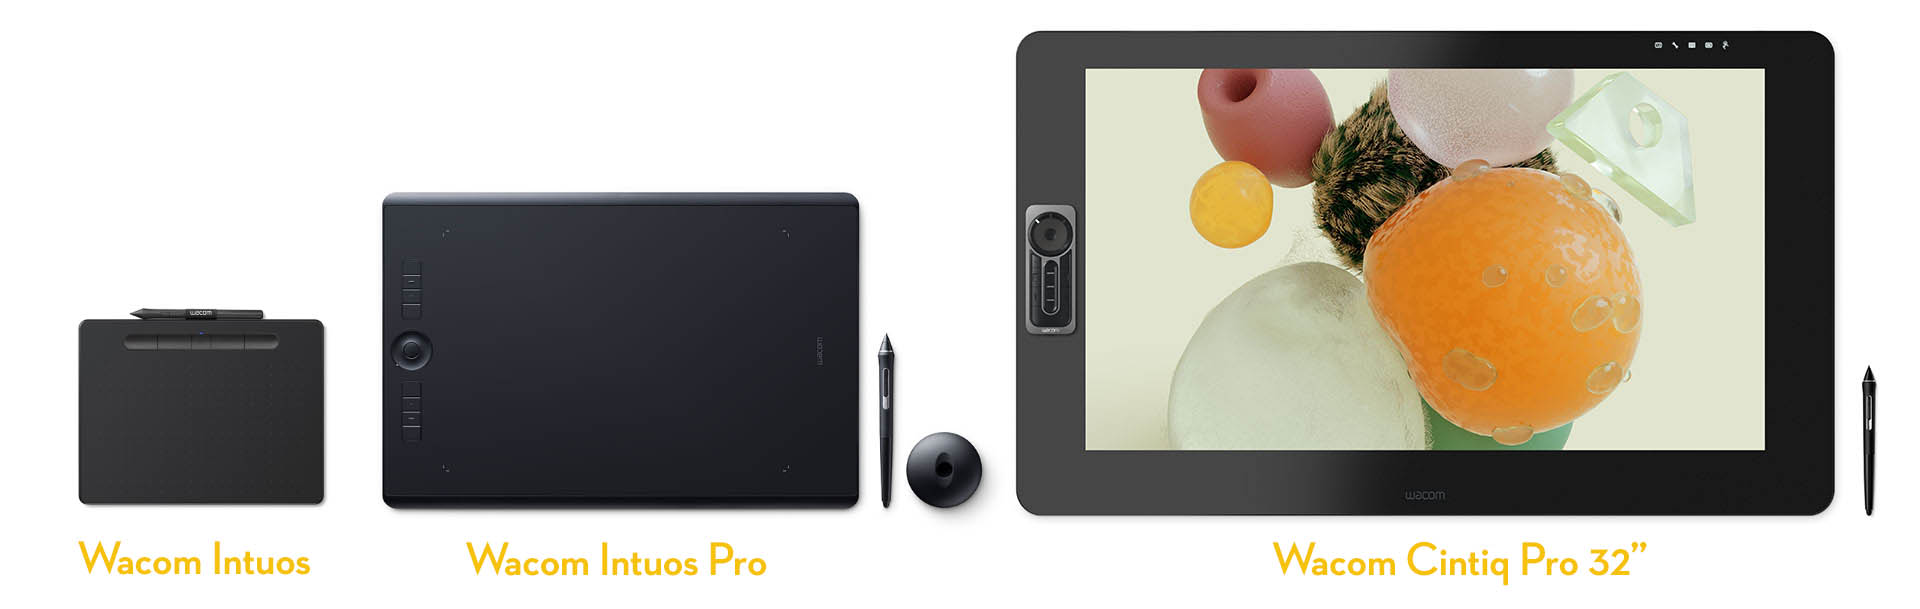
To quickly explain there are a fair few different Wacom models, but for film editors, these three are the most useful:
- Wacom Intuos (small) – Freelance travel size – [amazon_link asins=’B079HL9YSF’ template=’PriceLink’ store=’jonelwfiledi-20′ marketplace=’US’ link_id=’03ad010f-8030-4a02-8123-a3606e4590a3′]
- Wacom Intuos Pro (medium) – Edit suite desktop size – [amazon_link asins=’B01MQU5LW7′ template=’PriceLink’ store=’jonelwfiledi-20′ marketplace=’US’ link_id=’9cf0cd4d-450a-49a5-ad0f-fe760c8ddeb5′]
- Wacom Cintiq Pro (biggest!) – Hollywood editor size – [amazon_link asins=’B07NQX5PXY’ template=’PriceLink’ store=’jonelwfiledi-20′ marketplace=’US’ link_id=’b1f8b159-3a33-4356-9341-7b61f07e1a9c’]
As you can see, the main difference between the Intuos and Cintiq range of tablets (there are also Pro and ‘regular’ Cintiq versions) is that the latter have a display built into the tablet surface itself.
I use my Wacom Intuos Pro medium on daily basis in my edit suite and it’s last perfectly year after year, more than returning on the investment.
I’ve got the much more affordable Intuos small tablet for working on freelance gigs, when I need something I can tuck into my editing bag and head out the door with.
Personally I’ve found the ‘large’ tablets to take up a bit too much desk space, especially while keeping a keyboard within ergonomic reach. The small tablets can be a little cramped for hours of weekly use. For the odd day here and there, they are excellent.
Using a Wacom Cintiq for Film Editing – A Hollywood Editor’s Guide

Film Editor Alan Edward Bell was basically just the nicest guy, in being up for giving me so much of his time to talk about a really specific and niche workflow. It was a real pleasure to chat to him, and he was entirely open about sharing his proven process and hard-won wisdom. For which I am very grateful.
Before we get started I just wanted to introduce the ‘cast of characters’ in terms of the equipment Alan uses and give you a visual layout of how has his home-theatre/remote edit suite is set up, so that you understand how everything works together, while digesting our conversation.
Alan is using the following equipment:
- 32″ Wacom Cintiq Pro Touch, mounted on an adjustable arm
- 27″ Asus computer monitor, mounted on an adjustable arm
- Wacom Express Key Remote module
- Wacom bluetooth small keyboard
- Razer Orbweaver Mechanical gaming keypad
- Elgato Stream Deck (15 keys)
- UHZ65 4K Laser Projector
- Full size wireless keyboard and mouse
Alan started his film career working as an assistant editor on films such as Heathers, Misery, A Few Good Men and the The Green Mile (as an Assembly Editor) to name just a few. He also racked up numerous editor credits during the late 90s and early 2000s on independent movies such as The Story of Us, Alex and Emma and Little Manhattan.
Today, Alan is probably most well known for editing the indie hit 500 Days of Summer, the massively successful Hunger Games trilogy and most recently, the action-packed Red Sparrow.
Alan began his journey of working with a Wacom tablet when he was running a boutique visual effects house in Los Angeles and doing a lot of compositing as a result. This expertise helped him to both add value to the indie films he was editing, by also delivering the visual effects himself – or hiring a crew to get them done – and earning a little extra from each production too.
This smart decision no doubt set him up on his career trajectory towards editing visual effects heavy films like The Amazing Spider-Man, as he is able to create compelling temporary visual effects himself, instantly enhancing the look of the work in progress edit, and improving the communication of the director’s vision to other departments.
Although using a Wacom Intuos pen and tablet for detailed rotoscoping and painting tasks is a huge step up from a mouse, there is still the element of disconnect between where your eyes are looking on the computer screen, and where your hands are moving on the tablet surface. You still have to do the spacial translation.
So when Alan began work on the bigger budget The Hunger Games: Catching Fire, he decided to invest in himself and acquired a 24 inch Wacom Cintiq to use full-time for film editing.
Now he would finally be working directly on the image.
For a time Alan had edited in Final Cut Pro Studio, before moving back to Avid Media Composer around the launch of FCPX. That period with Final Cut Pro, and it’s rather buggy trim-tools, led him towards a more tactile, timeline driven way of working.
Part of why that the tablet works for me really well is there was a period of time in my career where I switched from Avid to the original Final Cut Pro.
And at the time that I switched it was relatively buggy. So the trim functions were a real gamble. It was a crapshoot to see whether or not it was going to crash. So I learned to edit without them.
So I was cutting by dragging things around in the timeline, in that sort of Final Cut Pro way. And when I switched back to Avid, Media Composer now had some of these Smart Tools that allowed you to work in the same way that you did in Final Cut Pro.
So I adopted those and I still, to this day, don’t go into trim mode as often as other people do. I do use trim mode, but I use it more with the pen.
I’m not in that loop where I’m like (in trim-mode) ‘Okay add another frame here, take a couple more there.’ I just don’t cut that way.
So the screen made sense for me because it felt more tactile to be able to drag the timeline around and adjust things in the timeline with the pen.
After initially struggling through a bit of trial and error with the awkward placement of a full-size keyboard, essential for any shortcut driven editing, in this innovative new set up, Alan settled on using a more nimble Logitech G13 gaming keypad instead.
The smaller footprint G13 enabled him to have one hand on his essential shortcuts, such as J K L, marking in and out etc. and the other working in this more tactile fashion with the pen directly on the Cintiq.

Today, Alan has further developed this system to include a smaller bluetooth keyboard (just for typing) attached via a strip of velcro to the top left of his 32″ Wacom Cintiq Pro, and his essential shortcuts and macros are even more accessible through the use of an Elgato Stream Deck (here is my detailed review and set up guide for the must-have Stream Deck!) and Wacom’s own accessory module, the Express Key Remote.
The 17 button and touch ring Express Key remote allows any Intuos or Cintiq user to have numerous keyboard shortcuts or macros strapped to the side of their tablet. The only disadvantage of using an Express Key Remote over the Stream Deck is that there are no visual labels on the remote, so you will have to memorise what you have mapped on each button, per application.
The updating visual labels of the Stream Deck are one of the reasons it is so easy to use and, along with its macro shortcut capabilities, delivers so much value to film editors.
After Logitech discontinued the production and support of the G13 keypad, and after Alan had worn out the four he owned, he switched over to Razer’s popular Orbweaver gaming keypad for a more reliable option.
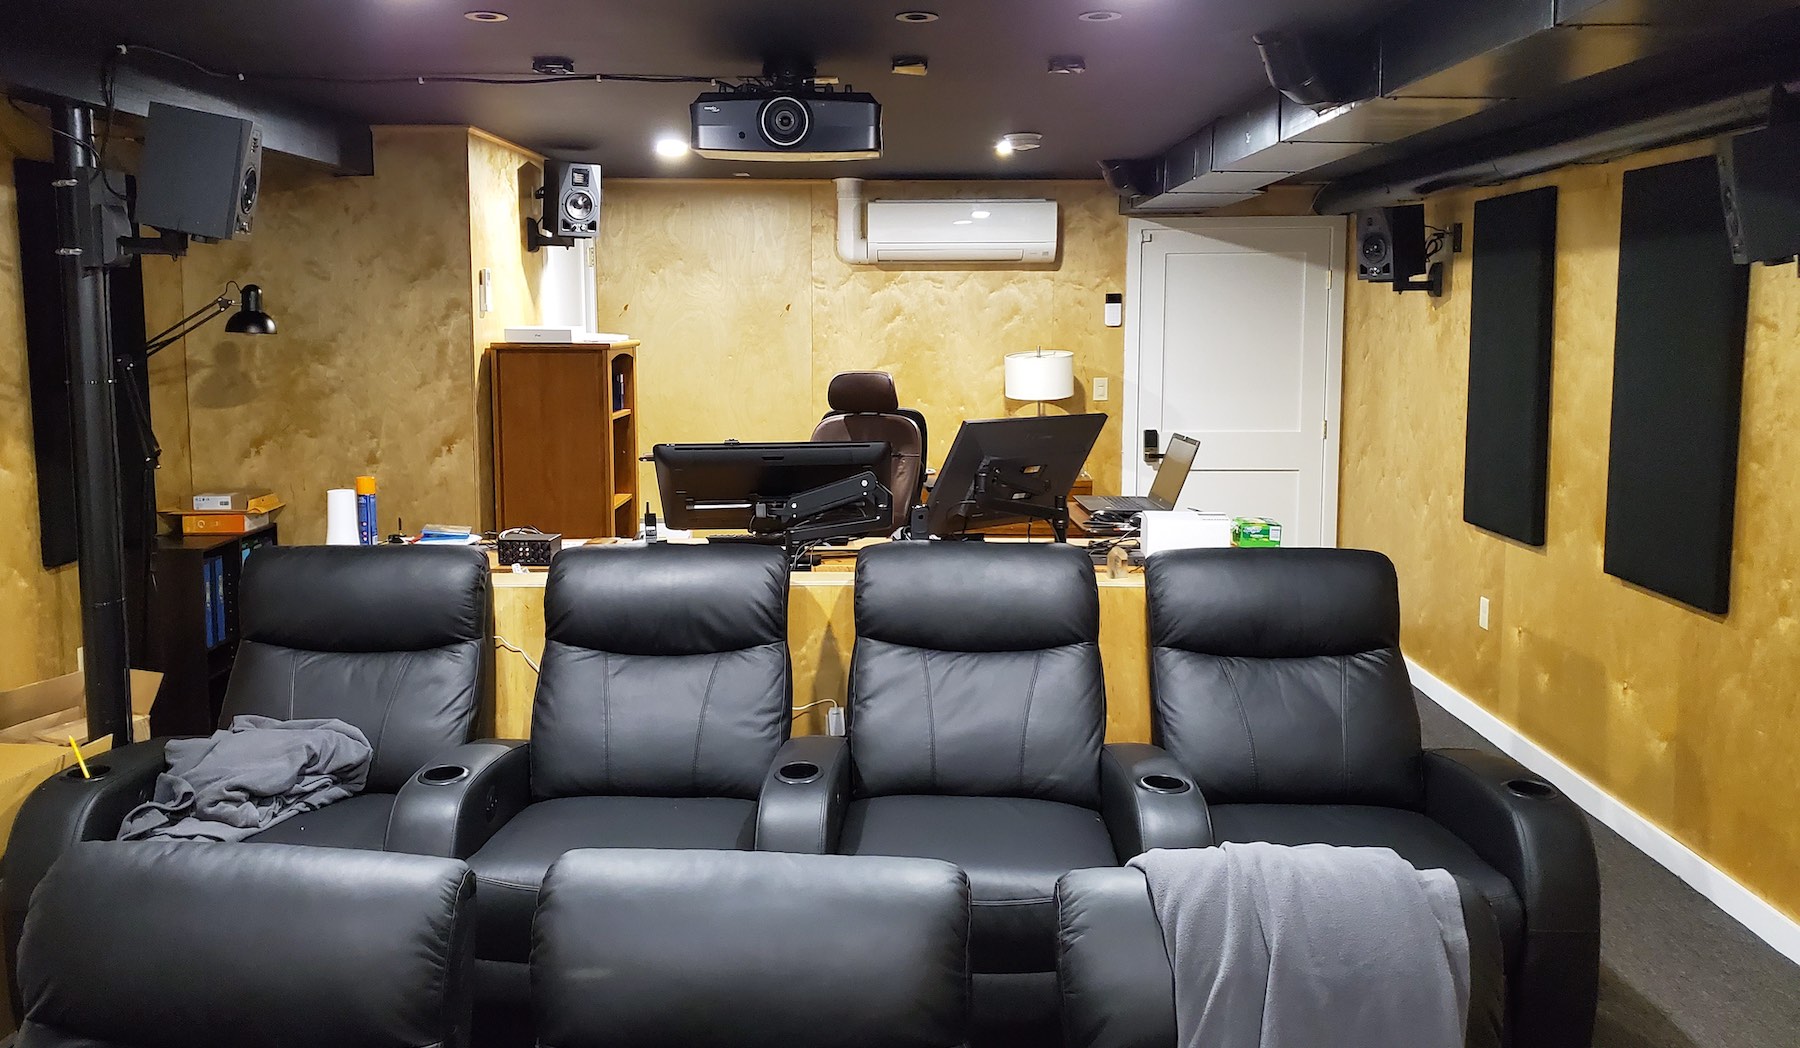
Alan recently moved from Los Angeles to New Hampshire (for non-US readers that’s from one coast to the other!) and built an amazing 7.1 surround sound theatrical edit suite, from which he largely works remotely.
Because I cut features, I like to see what I’m working on projected. So I have this theater experience I create, even when I’m on location.
And what that means is when I have to go places, like Los Angeles, I have a secondary system of, at the very least, a Cintiq and a Stream Deck and Orbweaver that I can ship, so that I can have the setup wherever I need it.
Because once you get used to it, that muscle memory is so important for editing quickly, and if you have a short term gig you can’t just say ‘Okay I’m gonna cut with a keyboard and mouse now…’ I could do it but it’s not very much fun.
It’s a 7. 1 system but I only cut in 5. 1. So when I’m screening, I’m screening in 7.1 but when I’m editing the right and left center surrounds don’t operate.
I just use the left rear and right rear surround. Also the speakers are behind the screen which is cool as I have a perforated screen so it’s very much like being in a theater. It’s really cool.
I love it and and I built it in such a way, knowing that when I retire, I’ll pull the editing console out and because I’m up on a platform behind the seats, I’ll be able add another set of four chairs and then I’ll have a room with 13 re seats.
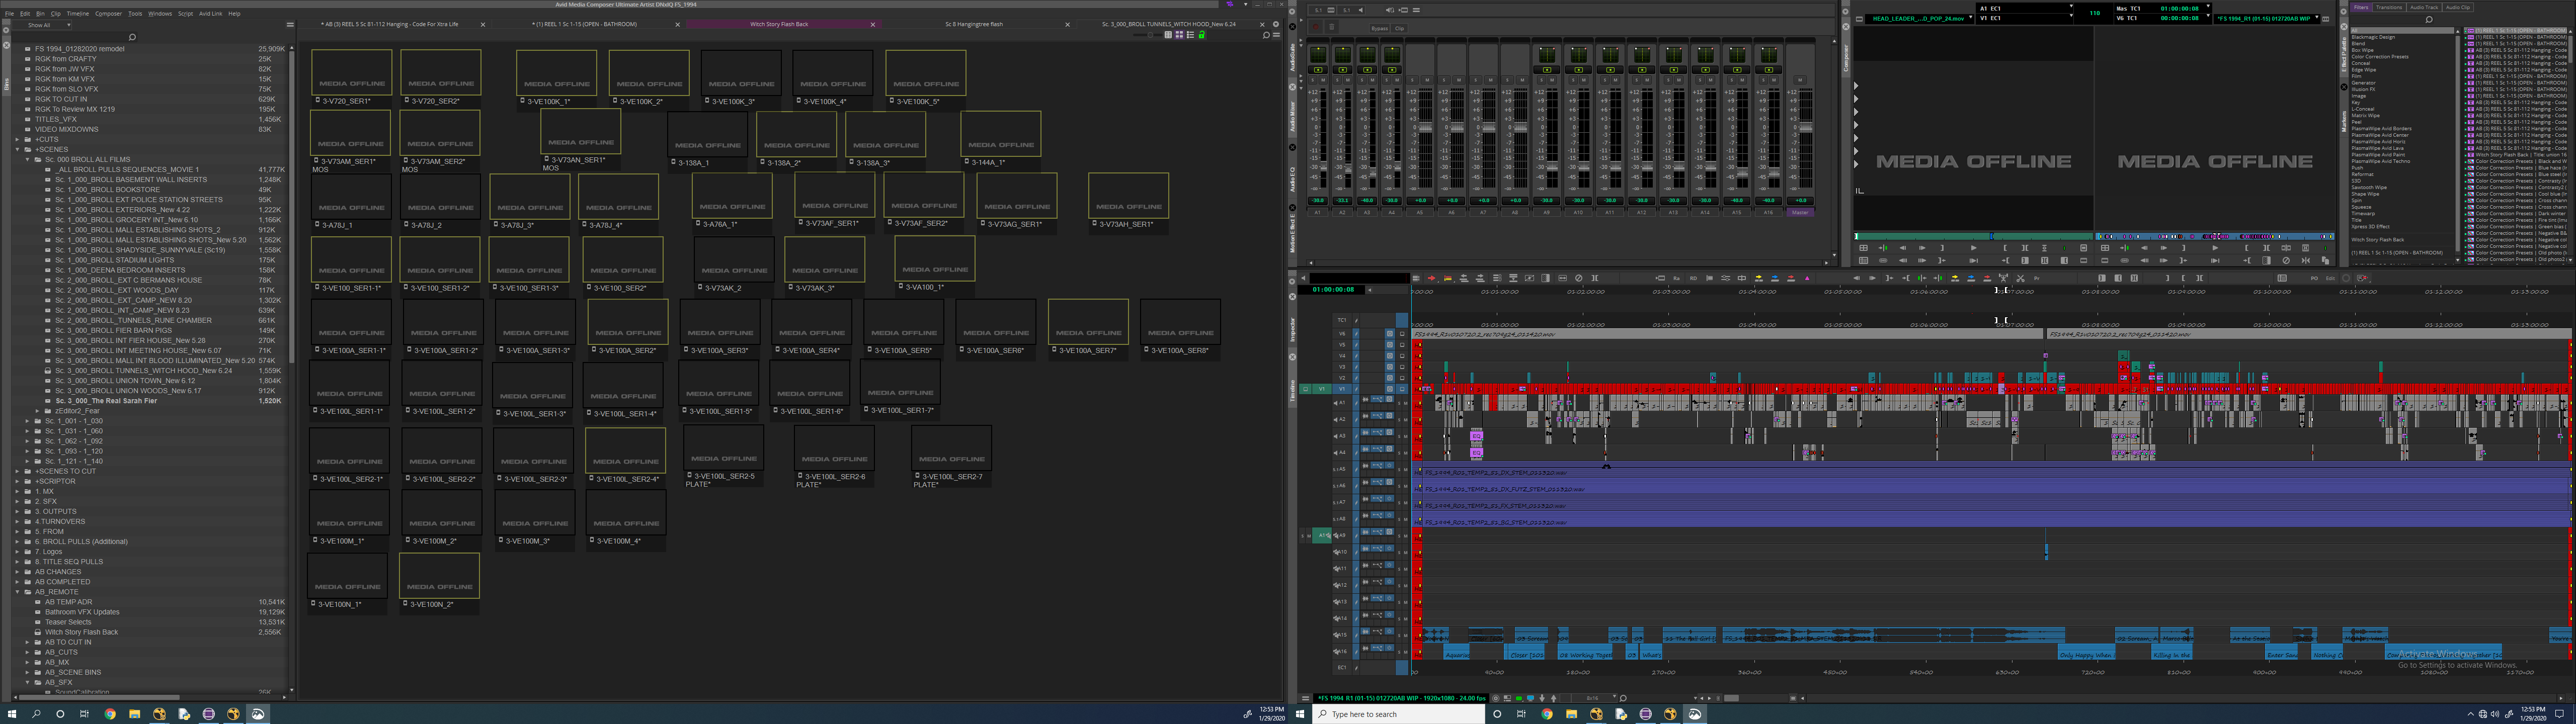
Here is a screen grab (click to see full 5K wide image) of Alan’s two monitors (the Asus and the Cintiq) and, as you can see, he’s using the computer monitor for viewing his Avid Media Composer bins in frame view. You can also see the layout of his Media Composer windows on the Cintiq, while the output from the Avid is also being projected onto his cinema screen.
On the Cintiq I have my timeline and my source and record monitors, which I keep very small.
With the way you can have tabbed interfaces, the timeline takes up the lower half of the Cintiq screen, while the upper left corner is a tabbed interface which is my channel mixer, motion effect palette, and it would have my effect palette but I don’t use a lot of Avid effects.
Although every once in a while I have to re-edit other people’s work, so that would be in there. And then I have my Audio Suite tab there too.
Next to that is my source and record monitor with two rows of controls, and then a small marker window and then my timeline is also tabbed with an inspector. So if I have something in my bin and I click on it, I could just click the inspector and see if there’s information I need or whatever.
And then because the latest version of Avid allows you to extend the buttons on the timeline that you can map on there. I actually have some duplicates there just because I find that sometimes when my hand is over on the right and I’m doing something I want to clear in and out and sometimes I want to do it over on the left.
So there’s a few things that I have duplicated there. I’m still sort of experimenting with that.
Right, now we have gotten the complete lay of the land, we’re ready to dive into the nitty-gritty of Alan’s Wacom Cintiq workflow!
You’re working in this amazing projected edit suite and with a Wacom Cintiq, can you just explain how they work together?
Most of my fine cutting process is, I’m looking at the (projected) screen and I see the moment that I want to mark, where my cut to be, and I either mark it on the fly or I just stop and roll to it and mark it on the Cintiq. And then I am using those little preview windows.
I also will often, and this I do a lot now that I’m working remotely, but I did do a lot when I had the director in the room as well, is, I would toggle the monitor off. So that what I’m doing on the Cintiq is no longer being shown on the big screen. Because there are times when you’re editing and you don’t want them to see all the machinations that go into getting that piece right. And so then I’m looking at those little windows on the Cintiq.
Often if I’m working with the director that I’m very comfortable with, I can tell them “This is going to take me 10 minutes, I’ll let you know when it’s time to look” and then they’re not focusing on the screen, waiting for something to happen.
Every once in a while you get one of these people who are so impatient and they’re so impulsive that you’re not even a third of the way through doing what they asked you to do and what they’ve seen on the screen now creates an impulse for them to say “Oh wait, try this!” and you’re like, “Well can we finish what we were doing before? Before I try that new thing!“
I did experiment with this idea of creating a different workspace that increased the size of my source and record monitors, so that when I did turn off the feed to the projector, I would have a bigger canvas to look at because I do keep them quite small but I never really settled into it. I just ended up looking at the little screen and I’d lean into it a little bit.
But most of my editing is done using waveforms. I’m monitoring a lot of my cuts just set as a still frame because I’m familiar enough with the footage at this point, and audio wise I’m using the waveform to decide where the audio cuts are going to be. And then I’ll watch it on the big screen.
But it is really helpful to have little viewer windows down on your monitor right in front of you. I know a lot of people have those calibrated monitors, usually to the right or the left of them (as a main image monitor) but I found that I never used them. And since I’m not colour correcting, that little monitor is just taking up desk space. I’d rather just have a room to put a notebook or something there.
In this video from Cintiq you can get a sense of just how adjustable it is, and Alan also has his Cintiq mounted on a moveable arm.
How has using a Wacom Cintiq changed how you edit?
I discovered once I had the Cintiq, it did two things. One, because I’m not up against a wall or I don’t have a big monitor that I’m trying to look over to see the projector – because I can just push the Cintiq down, and I tend to move it around a lot and I very rarely work with it very high, it’s almost always at about a 45 degree angle or less.
What it means is that the canvas that I have in front of me is very personal. If you’re sitting behind me I’m kind of blocking most of it. And if you’re sitting in front of me you can just turn a little bit and I can always see the top of your head or if you’re off to the side you just need turn a little and we’re actually making eye contact and talking.
And so I feel more integrated in the room and I feel much more in control of what people are able to see of what I’m actually doing.
Because every once in a while you get one of those directors who, you know, they want to point and jab the screen and they want to be right in there. And it’s not that I don’t appreciate that they’re excited about what I’m doing but really their focus should be on what’s on the big screen not my screen.
So that was an added advantage to going down this route, and then the other advantage of course is when I do have to do visual effects, which is the one of the main reasons why I got into the Cintiq, it’s proven really valuable.
I really enjoyed your presentation from NAB on using Fusion for editorial visual effects. Are you still using Fusion and how does the Cintiq feature in your editorial VFX workflow?
I’ve moved on a little bit from Fusion since then. I happen to already own a license for Nuke and so on the show that I’m on now, I basically finally switched over from Fusion to Nuke. There’s a little more housekeeping to do than when I was using the Fusion Connect plugin through Avid but I was able to write some scripts that make it actually really effective.
One of the issues with Fusion Connect is that you throw this plugin on your timeline and select the two or three layers you want and then it exports them. Well it exports them as Fusion RAW files, not Blackmagic RAW files, and there’s only one program in the world that can read those files and that’s Fusion. So that’s a closed element.
And those files happen to be 16 bit, so they’re enormous. Your Avid media, the actual MXF file itself maybe 100 megabytes, but when you export that 10 second clip or whatever it is, all of a sudden that thing is 2 gigabytes and it’s taking up all this space on your hard drive, as sequential files.
But with Nuke I was actually able to create a script where I just select the clip where I want my effect, I right click on it and choose reveal file and I go in and find the MXF file and copy it to the clipboard.
Then I have a Python script called Nuke Builder, I open it and it sees that I have something copied in the clipboard, from which it strips the name out and it allows me to add to the name and then I just click go.
Then it creates a directory, very much like the Fusion directory but for Nuke, and copies that much smaller MXF file into the media folder and creates a new workspace. Then I open Nuke bring that piece in and do a little bit of housekeeping, but I also wrote a script to create a write file, so its just a couple of little button clicks.
But the advantage is I have the entire piece of media at my disposal, so if I go back and decide I want to change anything, it’s all right there. All I have to is just change the in and out. It’s definitely working better for me.
I will say, Fusion was much faster than Nuke in that you can do something with Fusion and use two nodes that will take six or seven nodes in Nuke. And finally getting used to that has taken me some time but you just learn all these workarounds. You can make all sorts of quick, simple python scripts that save you tons of time.
So I’m not using Fusion all the time anymore, especially as I had tons of roto to do on my current show.
Here is an example of the rotoscoping workflow in Fusion Alan is talking about above and below. There are several other great older Fusion tutorials on his Vimeo channel.
And with these visual effects you’re creating, are you polishing them to a high degree of finish or are they just there to communicate the essential ideas?
If I’m doing a split screen for instance. My goal is to make it so that you can’t tell that I did a split screen. But now that nobody uses locked down cameras there’s always camera motion. So it’s pretty common for me to track everything, stabilize one side and then match move it to the other and hide it so you can’t really tell that I did anything to the image. That’s my plan.
And then if I’m doing something that’s really difficult, that requires a bunch of 3D stuff. Well then it’s going to look temp but I’ll throw 3D objects in there, I’ll do particle simulations and things to illustrate stuff.
That won’t necessarily look like it’s meant to look, but it it will give you a better sense than just a text block that says “moss grows up from blood drop into a tree” or whatever. You’ll actually see something happening.
I do a lot of stuff where I cut people’s faces out put them on the same person at a different point in time or I’ll slow down a section, or this person eye blinks and I want them to maintain eye contact and not look away.
I might just make them continue to stare at the person for ten or twelve frames, so that I don’t have a blink right over the cut. Or a blink and then they look down and instead of the blink and the look down they continue to look ahead. Stuff like that.
That stuff I want it to be invisible.
And I’m guessing it’s easier for the VFX vendors, if you’re using Nuke, for when you hand over to them?
Yeah, it’s very handy because I just have a directory that has all my Nuke projects and they’re all self-contained. So if I have an in-house compositor working I just hand that over to them.
And they can then carry on from where I left off and if they’re doing finals, they can see what it is that I did on the temp, so there’s no confusion.
And in these situations I’m assuming the Wacom Cintiq comes into it’s own, for this kind of intricate, visual work? Compared to a mouse, or even to a standard Wacom Intuos?
Yeah it’s a lot better especially when you’re painting. A lot of times what I’m doing is, if you’re changing the duration of a clip and there’s camera movement. Say for example, you have a clip thats maybe 30 seconds and you want to cut 10 seconds out of the middle or you have two performances and you want to bring the reactions closer together.
But the camera’s moving up during the shot, so once you make that cut, the left side is moving up while the right side is moving down. So now I have to create a clean plate to go behind one side or the other so that I I actually have the wall space or the floor space that’s no longer in frame. Because the frame dropped down.
So then you’re creating clean plates by painting on a still frame, which you put behind your main character and track it in so that it has the same motion and you can’t tell anything was done.
And for me, when I’m painting with a pen, and I’m actually painting on the screen, it’s so much easier than with a pen on a tablet down below and I’m translating looking up… or even worse trying to do it with a mouse.
So it’s just so much faster and what you see is what you get.
In this moment from a dynamic interview between Steve Hullfish and Dody Dorn, at NAB 2017, she briefly discuses why she uses a Cintiq to edit with.
The Cintiq, for me, I can’t work without them. I mean, I own four of these things! I can’t imagine working with anything other than this.
And you know I’m not the only editor using them. Dody Dorn who is an Academy Award nominee, she is a fantastic editor. She got in touch with me a couple years ago and asked; “What am I hearing about your system. What are you doing?“
And now she’s using a Cintiq and I think she’s also using a G13, or she may have gone back to a keyboard, I’m not sure. But I know she’s using the Cintiq and a projector and cutting in 5.1 the same way I am now.
And every time I see her she’s like “I’m using your system and I love it!” She likes the fact that she can work right on the screen but also it puts her in the room more.
It’s that thing I was talking about of having control of the room, because people come in and they’re sitting in front of you and you can actually see them.
And the people sitting behind you, their focus isn’t on these monitors that are in the way, they’re looking past you at the big screen that you’re all working on.
When you’re working on a Cintiq you’re much more in the room than if you had a wall of monitors separating you, and you’re kind of looking through to see that big TV screen that somebody else is looking at.
Because what really happens to people is that the editor is often up against a wall and they’ve got two or three monitors in front of them and then the director is either behind them or in front of them looking at a different TV screen and you’re kind of separated by all this technology.
But with my set up, when the Cintiq is angled down, even if you’re working with separate TV screens, you’re much more in the same space.
It sounds like a little thing, but it’s like people are remotely working in the same room. Because it’s no different than when I’m on the internet streaming something out to somebody in Los Angeles and they’re a disembodied voice. It can be that way, whether we’re in the same room or they’re a thousand miles away.
So this way we’re actually in the same space and it’s just different.
It’s a nuanced thing that makes a massive difference.
Whenever I’m editing with a director for an attended session, which is rare for me these days, I try to remind myself to turn around so that they’re not just talking at the back of my head. But instead I’ve turned around, hands off the keyboard and we’re actually collaborating.
Yeah, it’s important to connect! We spend a lot of time alone looking at minutia. It’s nice to actually make eye contact and have real discussions, as opposed to like “Oh okay, yeah three frames here, four frames there.“
It’s much better when you’re actually discussing the intention as opposed to the detail.
When they’re right behind you and you’re not turning around, the times that I’ve been in that position, I feel much more like I’m just part of the machine and not part of the creative drive.
It’s hard to have a conversation about style or creativity without actually looking at someone for me, it just feels rude otherwise.
*******

At this point Alan very generously put me in touch with editor Dody Dorn, who is an Academy Award Nominee for her work on Christopher Nolan’s Memento (for whom she also cut Insomnia) and whose impressive credit list includes collaborations with Ridley Scott (Kingdom of Heaven, A Good Year, Matchstick Men), Baz Lurhmann (Australia), David Ayer (End of Watch, Fury). She is currently working on Army of the Dead with director Zack Snyder for Netflix.
Dody was kind enough to answer my questions about how she edits with a Wacom Cintiq and many other topics – so much so that I’ll be putting together a whole other article with the rest of our interview!
But for now, here are a few select comments from Dody on why she chose to switch to a Wacom Cintiq and the difference it makes to her working life and her relationships with these Hollywood A-list directors.
The thing that was immediately apparent to me from my conversation with Dody is that she is effortlessly warm and approachable, which no doubt serves her tremendously well in her working relationships, whilst also being fearlessly experimental in approaching how she edits and deeply curious about adding to her learning.
As a small example of this, she continuously evolves her Avid Media Composer settings from project to project, adapting them throughout the life of an edit as any given editing task requires in that moment.
To me this is fairly counter-cultural to how many other editors seem to approach their life in the edit suite. Sticking with the tried and true, rather than taking on the challenge of adapting to a new way of working. It throws us out of our comfort zone just a bit much.
Dody however seems to have harnessed a life-long thirst for experimentation to her benefit.
Having been editing on 35mm film, she first leapt into editing on a digital system back in 1991 for the TV movie Murderous Decisions, which was actually two films shown simultaneously on German TV where the viewer could switch back and forth between two channels to see the film unfold from two different perspectives. (A bit like the Honda Type R advert The Other Side.)
The muscle memory that I use for my work doesn’t really have that much to do with the tools. Because when you think about it, in straight ahead narrative the tools are basically cutting; butting one image up to the other or dissolving or fading. Everything else is kind of a bell and a whistle.
I’ve been doing this for so long, it’s more about having the idea than how that’s going to get manifested. I’m kind of entertaining myself by changing it up, instead of doing things by rote.
I’m not just a mind coming up with creative ideas, I’m also a body. I’m going to be better off getting to the end of my life with more variety. Variety keeps the brain more active, it keeps the body more active. It just makes sense to me.
So I have been doing the work automatically, but then I realised I could do it very consciously, so why not.
When I asked Dody for other examples of things she enjoys ‘changing up’ in her edit suite she said:
Tons of things. For example, the track ball craze, I guess I still know some people who use a track ball. Mouse vs track ball, Wacom tablet versus keyboard versus mouse, sitting versus standing, standing versus sitting and standing.
I mean these are all physical changes that really affect you if you’re going to work 12 to 18 hours a day.
And then keyboard settings. I’m mostly talking about the F-keys because those are the ones I program most often. I tend to use whatever the Avid presets are on the rest of the keys because they’re printed on the keyboard! (laughs) Why make that, that hard?
But I also use all sorts of different timeline settings and those are evolving constantly. While I’m working, I’m like, “Oh geez, I’m working in track A14 a lot here”, and I’ll create a setting where everything else gets tiny and A14 gets giant.
Also I’ve worked with some other assistants-slash-editors, and whenever they come in and they have tips or tricks I almost always incorporate them.
Back in 2006 I switched to more keyboard, so I was using keyboard and mouse instead of just mouse. Before I was using so much mouse and I was gripping my table with the left hand and I was clicking with my right hand, I think I was on my way to carpal tunnel.
And then I started using the keyboard and found it more fluid. Before, one hand was immobile, now both hands were moving all the time. That came directly from an assistant who ended up as my co-editor Robb Sullivan.
He was also the one who introduced me to these multiple timeline views. And now when I click on my Timeline View window a list as long as my arm comes up. He takes his with him, I don’t. I just make them new every time.
Dody switched things up again in 2007 and started using a Wacom Intuos tablet whilst working on the Baz Luhrmann film Australia. Then in 2017, after chatting with Alan, she moved to a Wacom Cinitq 22HD with a projector for the editing of Power Rangers and has subsequently used it on her last four projects too.
What I like about it is that I can stand or sit and I can create this really nice environment for the director where they’re in a screening room style setting all the time. Plus they don’t have to watch me do the work, because editing is not a spectator sport.
My usual way of working prior to the Cintiq would have been to have the director immediately to my right and they would be seeing everything that I was doing all the time and they would be seeing all of this gear.
And I don’t think that that is the ideal way to work for a director who needs to stay fresh as much as they can.
It also helps me stay fresh because when I’m done working, really done, like not just cutting something and previewing it, but done with the whole sequence.
I go around my table and sit down on a sofa and watch, without electronics in front of my eyes. I just have me and the screen. I might have a bluetooth keyboard if I need to stop or go back, but I don’t have the editing gear, the timeline, all of those visuals to either distract me or make me want to stop and change something.
One of the things that Alan said that he likes about the unique setup that you guys have, is that he feels like he’s far more in the room and part of the creative process, as he’s not separated by a wall of monitors. Do you feel like that’s a benefit of this way of working, with the Cintiq?
Well look, let’s talk about what happens 90 percent of the time in the editing room with the director.
It’s either you’re working and they’re looking at their phone or laptop, or you’re talking with them about some bit of life that has nothing to do with the movie.
Ultimately, what you want from them is to watch a sequence, give feedback on what they like or don’t like and to discuss other options they would like to explore. It’s more complicated than that, but that’s the basic work flow.
Then you go back to work and while you’re editing it’s really not fun or necessary for a director to watch your keystrokes.
The directors that I’ve worked with this Cintiq-theatre set up, so much of our relationship is about face to face communication.
I stop what I’m doing. I come around and I sit on the sofa and we talk. And we’re talking face to face. It’s so much better than talking shoulder to shoulder or having to turn your chair around to look at somebody while you’re trying to work.
So what it does is, the work part becomes really work part and they (the director) can do something else. And then I say “Okay let’s watch this together.” We both become viewers instead of interacting with the machine.
But there are times when the director can’t see me and that gives me this other weird kind of freedom, which, as rude as it might sound, is that I can surreptitiously check my email without them knowing it or thinking that I’m being disrespectful.
Often when I’m playing something back, I have already seen it and I don’t really need to be focused on it. In fact, it helps me to stay fresh if I’m not watching something over and over and over again. I’m just playing something back for the director and that creates a little gap for me to have a tiny little break.
Depending on the director, I might be doing a lot of the work in my room by myself and have already signed, sealed and delivered it. I’m ready with this and I want to show them and get their feedback. I actually like that little gap.
It’s funny because I came from being a sound editor where you’re not always ‘on’. You prep your work and then you’re ‘on’ but most of the time you’re not, because nobody watches a sound editor work! (Laughs) That never happens!
No one is gonna come into your editing room and watch you cut dialogue or sound effects. They just want the presentation. Plenty of people do sit and watch film editors work, and I don’t think it’s necessary.
What I love most is when a director really loves being in my editing room, whether or not they’re watching me work. And this is what I think this set up achieves.
They can be in the editing room, and it can be a nice quiet respite for them.
I can still be working, and they don’t have to watch and see exactly what I’m doing, so that they can disengage from the process and actually have some peace and quiet, because sometimes they step out of the room – especially the bigger the director, the more of a machine that surrounds them.
The editing room could be one of their only places of respite, even in their own office they could be getting bombarded constantly.
Keep a look out for the rest of my interview with editor Dody Dorn, coming very soon!
** Back to Editor Alan Bell **
Given your experiences with the Cintiq do you think more editors should be trying them or trying different ways of working and discovering new things that work for them?
Do you feel like actually this is a really intuitive and tactile system, even just for building simple edits, even if you’re not doing all of the intricate VFX work that you’ve described?
I do. To me it’s just a great way of working. I know that Dody doesn’t do the types of temp effects that I do. But she really likes it because it’s very tactile.
One of the conversations that I had with her was that, a lot of editors are really resistant to changing how they do things. And I actually think that they do that to their own detriment.
Yes, muscle memory is worth a hell of a lot, don’t get me wrong. And I’m not suggesting that you should do it differently every time. But when you get used to something and you do it the same way all the time, you’re not flexing the elastic brain muscles that you need.
Your brain is constantly, even when we’re older, creating new pathways. And when you make changes, you make new pathways. So when I jumped off the G13 and onto the Orbweaver, well I didn’t have as many keys and the keys weren’t laid out the same. So I actually had to change the way I worked.
And while that was a little frustrating, because when I wanted to do something and before I knew that I hit this key to do that, so I’m not looking and I do it really fast, well the keys are no longer set up the same way. So what I expected to have happen didn’t happen.
And then I have to stop for second and think about it and relearn. And as frustrating as that might be, the actual job of relearning it, the benefit that you get from retraining yourself and being willing to retrain yourself on a semi-regular basis is actually healthy for your mind.
It allows you to be more flexible and snappy and think fast and creatively and solve problems and come up with solutions.
It sounds like I’m making a big deal out of what for most people is a huge hassle but I’ve discovered by questioning, that yeah maybe this is faster.
If I just did everything by the keyboard and I did it every time the same way, the minute something changes and that keyboard button is not there and then I’m freaked out — Oh I can’t do this. Well you just have to learn to adapt.
And by adapting I actually think that the dividends you’re getting are hard to quantify, because it’s not just in the immediate of like OK I hit these two keys and this happens, you have to retrain your muscle memory, but in doing that I think that you’re becoming a smarter, more adaptable human being which I think is a tool that is very valuable in our industry.
So that’s one of the things that Dody and I talked about. She thinks it’s good to change things up every couple of years because it keeps you on your toes and it forces you to look at problems differently. And I would agree with her.
So that’s why I didn’t run out and buy a bunch of used G13s and try to like repair them. I need to know that when something breaks I can buy a new one plug it in and work on it right away because when I am with the director, everything needs to work.
I wouldn’t say make all these changes the day that the director is coming in but if you’re beginning a new movie or a new show and you know you’re going to have three weeks without the director around, it’s not going to hurt you to stumble a little bit for a day or two. You know what I mean, you’re still going to get your work done.
You know how to edit. J K L is J K L no matter what app you’re on. Right? It’s forward, backward, in, out, make a cut. Like I don’t give a shit what tool you’re using.
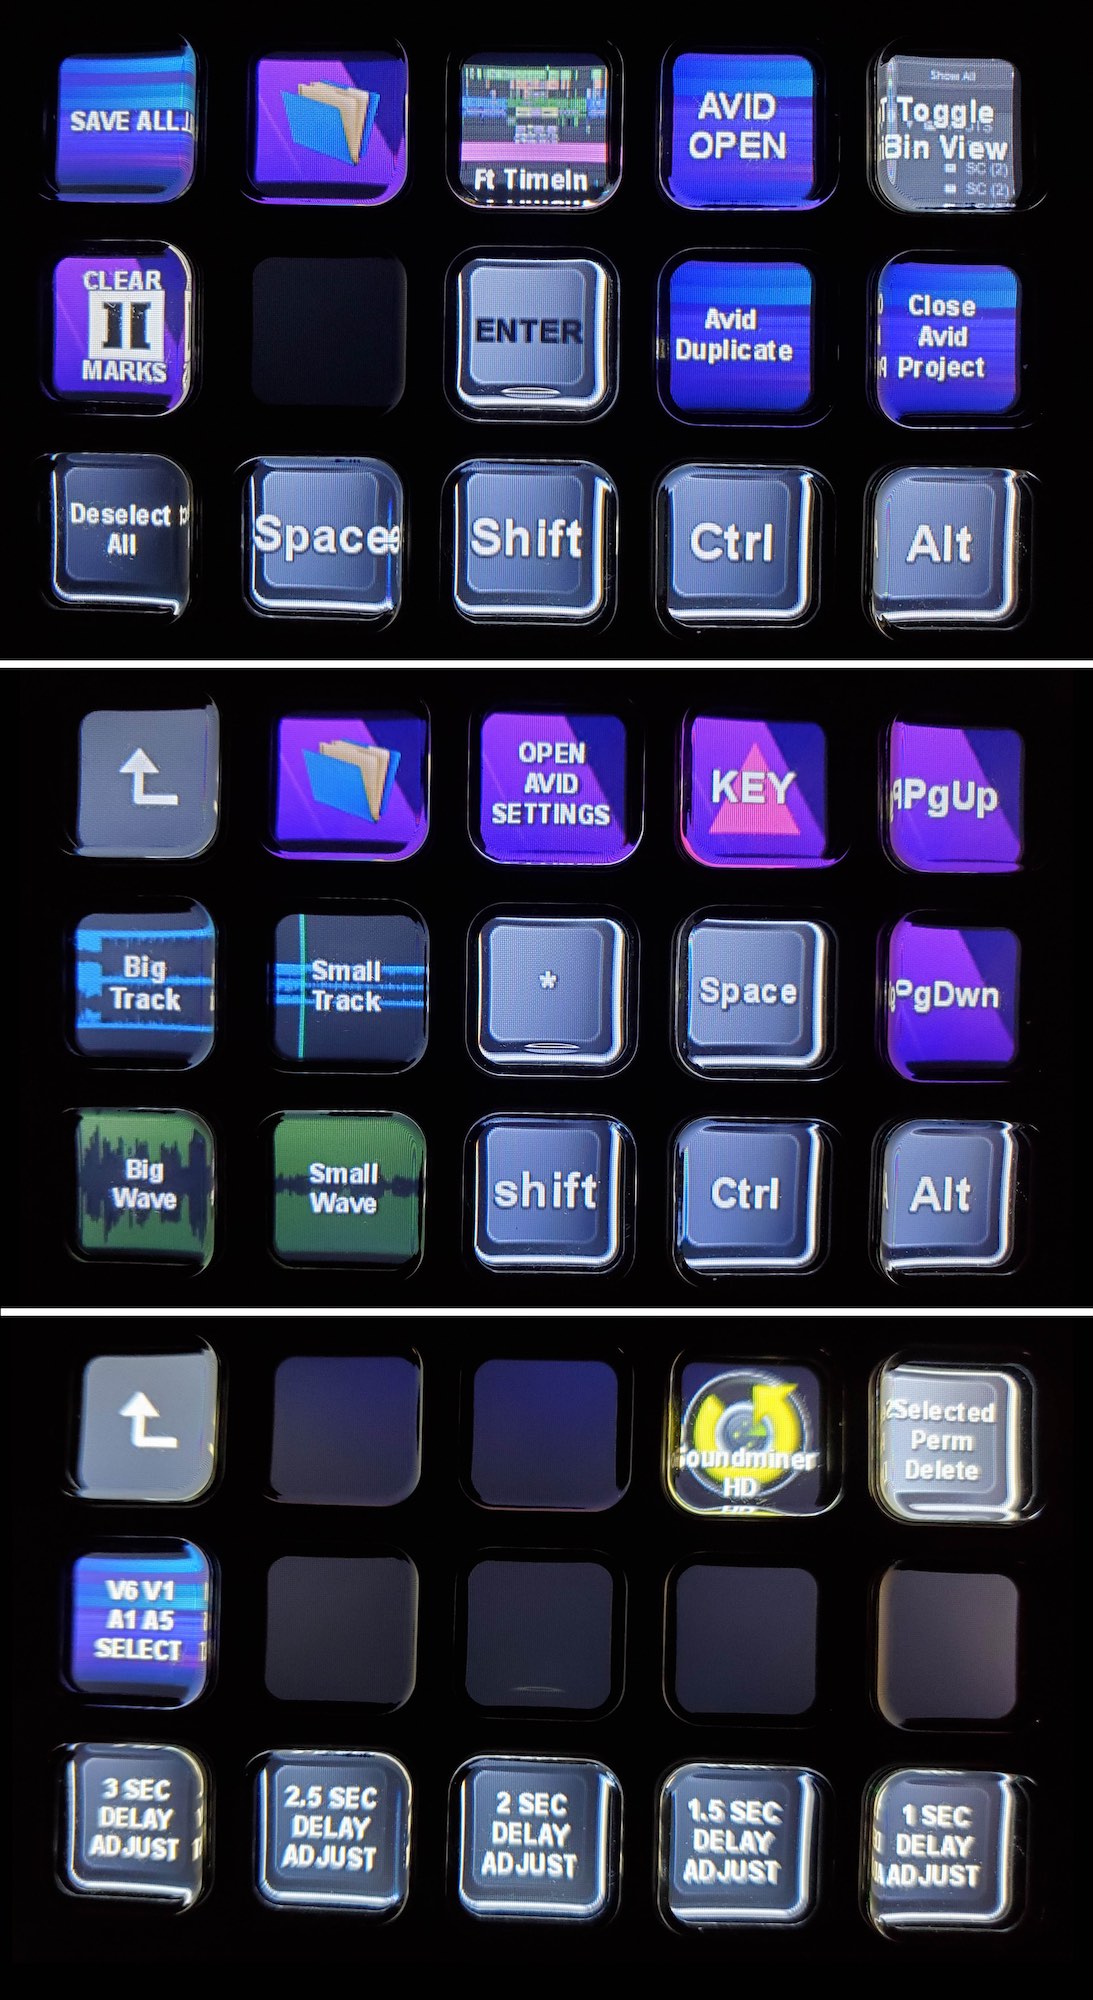
And then I’ve discovered that I’m really visual. So the Stream Deck is fantastic because it’s so easy to program and it’s so easy to make visual, that all those old tools that maybe I wasn’t using before, that I don’t have memorized, well I just have banks of them and and visually see, ‘Oh yeah there it is’. Boom. I hit the key and it’s done.
There’s so many things out there that you can utilise and add to the Cintiq and then we haven’t even gotten into like what the Express Key Remote can do and you can have all these on screen commands.
I wouldn’t use the Stream Deck entirely on it’s own, you need an Orbweaver or some sort of keyboard, but I think the Stream Deck is valuable and I think editors should consider it.
One of the reasons why I think a lot of editors don’t, and this is where I differ from all of them, is they expect to go to a job and have all their tools provided for them. Here’s your system sit down and work.
All these systems have been coming down in price over the years and post supervisors and producers are not going to be happy when you say “Yeah, I want this monitor that cost $3000 dollars so I can use my pen on it.” They’re gonna be like “Hell no!” I want to 4k laser projector. Hell no! I want 7. 1 sound. Hell no!
I want this stuff because it makes me look better. People come in and look at the movie, and it makes the movie look better. And I make enough, where I can afford to spend six grand a year keeping my stuff up to date. I may spend a little more than that because I’m now supplying everything for myself.
But I bought the Cintiq myself and threw it on, and it wasn’t on my system, it was a rented system but it was my Cintiq. And then when Sony said no we’re not getting you a projector, I was like OK. I’ll bring my own. I bought a thousand dollar projector.
Well now I’m using a much better projector but because I wanted to work a certain way. When I hired a guy to work on my house, I don’t provide him the tools, he brings his own tools.
So I sort of look at it like, if you pay me what I want, I’m gonna make sure I have the things that I know make me work better.
And I don’t think a lot of people are willing to spend that kind of money. But I think they should because it will differentiate them from the people who won’t.
You’re investing in yourself, and it must help people to look at the movie differently if they are literally looking at it differently.
Exactly. And I have to say there’s a wow factor. When you walk into my room or you walk into Dody’s room, you notice the difference.
I was in Los Angeles at another cutting room, and another editor, a great editor, very talented person, setup in the usual way, surrounded by monitors, the producers monitor over in front and her little monitor in the back. And I come in there and I put my stuff up and the director comes in and says “Wow what is all that?” because it just it looks awesome!
And in this case, it wasn’t even like I had a projector in there. I just had a Cintiq and we were both looking at the same viewing monitor, but I set it up like a theater even though it was a smaller room.
You shouldn’t under appreciate that stuff because perception is 90 percent of the game.
Alan thank you so much for giving up your time and sharing your insights!
How to Set up a Wacom Cintiq for Video Editing
When it comes to setting up a Wacom Cintiq for video editing on a Mac there are a few things you need to do, but it’s not very complicated.
In the box you get:
- The Cintiq Pro 16
- Pro Pen 2
- Pen holder and spare nibs
- Wacom Link
- Power brick
- USB-A cable
- USB-C to USB-C cable
- Mini-display port cable
In the video playlist above I’ve saved all of the most useful official tutorials on setting up a Wacom Cintiq Pro 16 into one place, so refer to those for more details, or this official getting started page.
First of all you need to connect up the hardware and install the latest drivers.
With the Wacom Cintiq Pro 16, the top left port will give you a UHD (3840 x 2160) USB-C to USB-C connection if you’re connecting it to a recent MacBook Pro or iMac, which will drive both the display and the interface. You’ll still need to plug the Cintiq in to deliver power to it.
When connecting to my 2013 Mac Pro I needed to use the supplied Wacom Link, which is a little box that connects to the Cintiq via the same USB-C port mentioned above, and then outputs the display through a mini-display port or HDMI cable and the interface is connected via the ‘regular’ USB-A cable.
This was a little bit of a ‘gotcha’ for me as I initially forgot to connect the USB cable too – but it is all right there in the quick start guide!
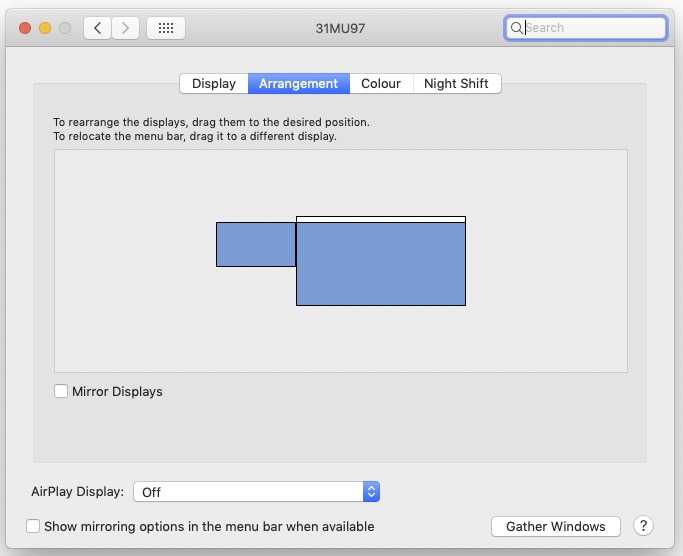
Once everything is connected and the drivers are installed and up to date, you’ll need to configure the arrangement of your two screens in System Preferences > Display to set up the new second screen of your Cintiq on a Mac.
The screen with the little white bar on it, should be considered your primary display by Mac OS and so your login screen should appear on that display when booting up. I’m using the excellent LG 31″ MU97 4K display.
Also arrange the screens so that if you move off your main screen to the Cintiq that it makes sense to your brain. For me I think of heading out of the right side of my primary display, to arrive on the Cintiq.
Set up Display Toggle
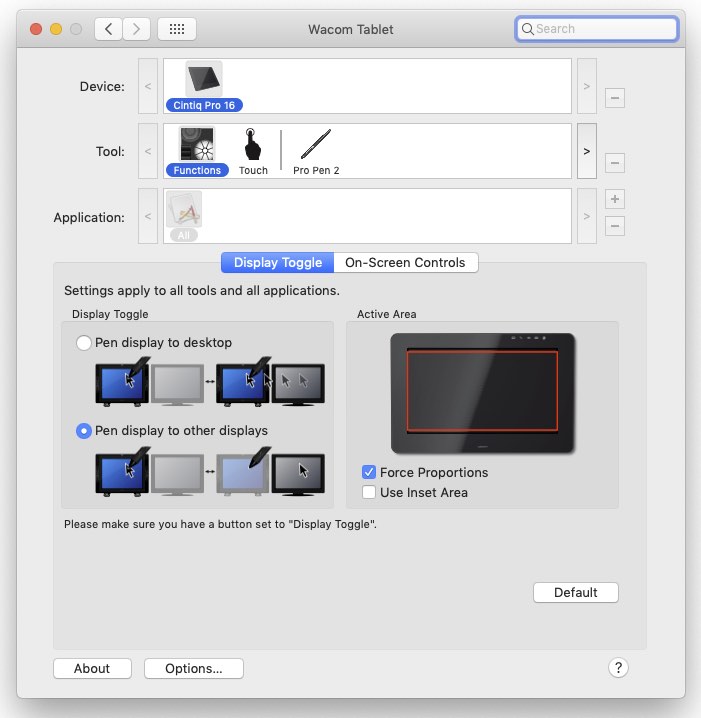
There is a preference that you’ll need to experiment within System Preferences > Wacom Tablet > Display Toggle, which controls how all of your displays work in relation to each other and the Cintiq.
If you select ‘Pen display to desktop’ the Cintiq will act as one smaller part of your larger desktop.
If you select ‘Pen display to other displays’ then when you display toggle from the Cintiq to the other display(s) the Cintiq is now acting like a regular Wacom tablet for that other display.
This is my preferred way of working as it feels the most fluid and frictionless when moving between the screens, especially when using display toggle.
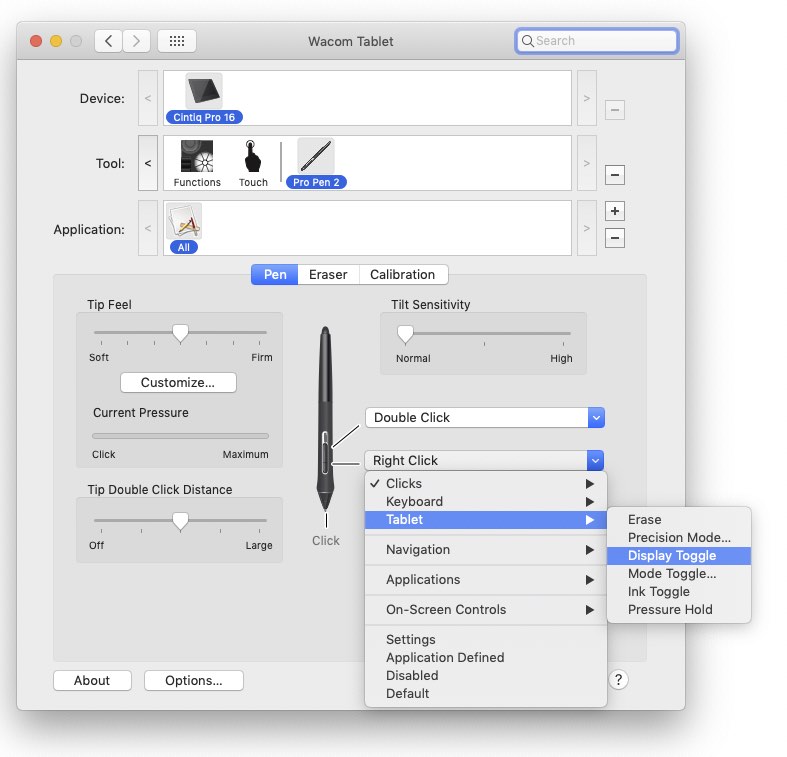
It’s essential to set up a button on your pen to activate display toggle, as there aren’t any physical buttons on the Cintiq Pro 16 to use instead.
Having it under your finger tips is great for efficiency, instead of having to reach for a separate button and slightly annoying if you accidentally push it.
Display toggle also has a super useful function by allowing you to ‘teleport’ items between displays by grabbing them and holding display toggle down.
When you do this the file/window/whatever that you were holding on the first screen has ‘teleported’ to the Cintiq (or vice versa) which is much faster than trying to drag between the displays.
Setting up Adobe Premiere Pro to Work with Two Displays
Setting up Premiere Pro to work with two displays is very easy although there are a few helpful things to know.
First of all if you just want to be able to use one display for a full-screen video playback then this can be set up in a few clicks. Go to:
Premiere Pro > Preferences > Playback… and toggle on ‘Enable Mercury Transmit’ and then tick the check box for the monitor you want to use for full-screen playback.
When you hit play in your timeline the image should appear in full-screen on your selected display.
However, if you want to use both displays, including the Cintiq for the user interface, like I am, then you simply have to drag the specific windows to where-ever you want them on each display.
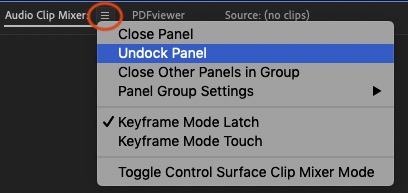
Click on the three line ‘burger’ menu next to any window name and choose ‘Undock Panel’ and then drag or display-toggle-teleport the window to your preferred location.
Once you’ve got everything as you’d like it, save your current layout via: Window > Workspaces > Save as New Workspace
This layout should then appear in the top centre of the Premiere Pro interface alongside the default ‘Editing’ ‘Graphics’ workspaces.
If you want to be able to have a video preview window on your main display and the Cintiq (like editor Alan Bell does) you could either toggle this via the playback preference above (e.g. to his projector) or open what Premiere calls a Reference Monitor to effectively have a second Program monitor.
By toggling on the ‘Gang to Program Monitor‘ button, the two screens will stay in sync and display the same image from your timeline.
One thing to be aware of is that if you want to be able to draw masks, work with text etc. with your Cintiq pen on the image then you need to have the Program Monitor on your Cintiq and the Reference Monitor on your computer screen. This is because controls for masks etc. don’t show up in the Reference Monitor window.
Setting up Final Cut Pro to Work with Two Displays

Setting up Final Cut Pro X to work with multiple displays is also just as easy, but you don’t have the customisability that you do with Premiere Pro.
In the top right corner of the FCPX interface is a small ‘two monitor’ button which needs to be on (blue) to enable one of the three options seen in the image above.
Choosing one of these three options will put that element on the secondary display but you can’t customise what panel goes where like you can with Premiere Pro. But you can get the timeline on the Cintiq, which is the main thing.
Larry Jordan has a great article about using two monitors in FCPX, with examples of what is one each of the screens in all three scenarios.
The experience of noodling around in FCPX with the Cintiq Pro 16 was very fluid and responsive.
Setting up DaVinci Resolve 16 to Work with Two Displays
In DaVinci Resolve (16+) Studio you can now have both full-screen playback on a second monitor (without the previous requirement for Blackmagic Design hardware) and work in a dual-monitor workspace layout.
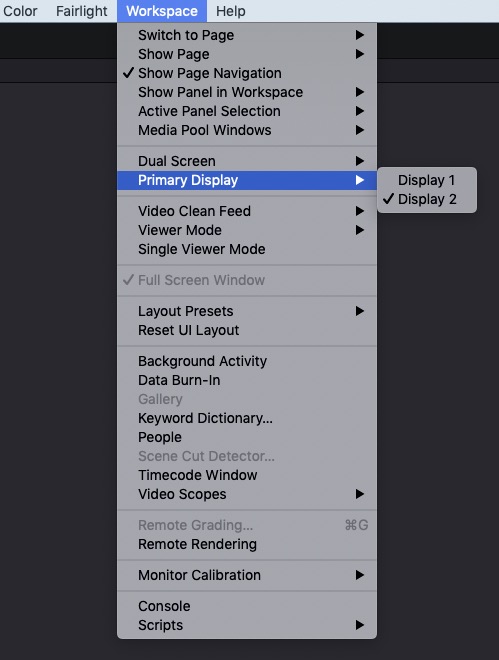
As with FCPX there are a few restrictions but a greater degree of customisability. All the details are on page 85 of the 16.1 manual but essentially you first need to set which display is to be considered your primary display and then:
For full-screen playback go to Workspace > Video Clean Feed > Display 1 / Display 2 and choose your preferred display.
Dual-screen interfaces, as we’d need for working with the Cintiq Pro are available for the Media, Edit, Colour, Fairlight and Fusion pages (but not Cut and Deliver) and you can invert what is on each display by switching the Primary Display setting.
I found that on different pages I wanted different tools and panels on the Cintiq, so I had to keep switching which one was considered the primary display as I changed pages.
You need to turn on ‘Dual Screen’ under the submenu pictured above. There is also an option in that sub-menu for ‘Full Screen Timeline’ which will just put a massive timeline on the primary display.
Certain elements such as the Media Pool, Video Scopes and Audio Mixer can all be undocked, repositioned and scaled as you’d like too. You can save your custom workspaces under:
Workspace > Layout Presets > Save Layout as Preset
Again the experience of noodling around in DaVinci Resolve with the Cintiq was a very enjoyable one, particularly working with the curves controls, masks etc felt far more tactile and intuitive and the interactions were instantaneous.
A Cintiq could be a particularly enjoyable option for colorists working long days in Resolve!
Useful Wacom Cintiq Accessories
In this nicely shot video from Wacom you can get a sense of how artists at VFX powerhouse Framestore are using Cintiq range, as well as a few of the key accessories too. These include the Express Key Remote, the adjustable stands and the small bluetooth keyboard.
One other accessory that is worth mentioning is the Wacom Color Manager X-rite calibration device you can use to more accurately calibrate your screen.
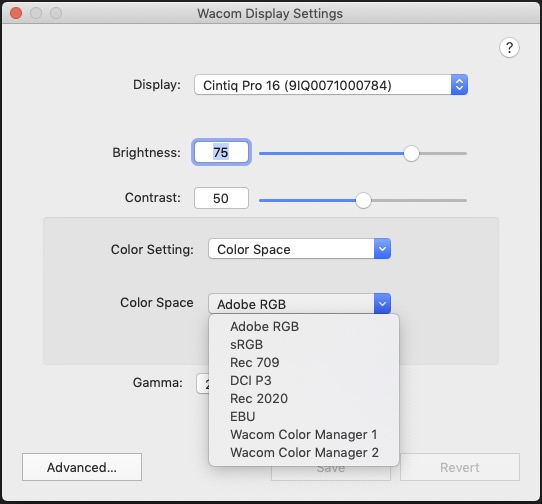
The Wacom Cintiq Pro 16 supports the colour spaces in the image above, but I wouldn’t want to trust it for colour accuracy without calibration.
Also the Cintiq Pro line delivers less than 100% Adobe RGB (94% for the 16″ and 98% for the 32″) and in this video from photographer Karl Taylor, you can see how a Cintiq compares to an Eizo computer monitor.
That said, the Cintiq display is very good and delivers a nice image to look at with decent contrast, saturation etc. just don’t use it as a reference monitor, which it isn’t designed to be!
If you want to read more about colour management as a film editor check out this detailed post on the subject.
Using a Wacom Cintiq Pro 16 for Video Editing
Buy 16″ Wacom Cintiq Pro on Amazon Global Stores
Congratulations if you’ve made it this far in the article!
Or if you’ve skipped down to hear my thoughts on actually working with a Wacom Cintiq Pro 16 then I’ll try to deliver an honest appraisal of my experiences in a concise fashion.
The Wacom Cintiq Pro range includes a 13″, 16″, 24″ and 32″ option and Wacom were kind enough to supply me with a 16″ Cintiq Pro for the purposes of this article.
The Wacom Pro 16 features a diagonal screen size of actually 15.6 inches and a UHD native resolution (3480 x 2160). The more affordable non-pro Cintiq 16 has an HD (1920 x 1080) resolution and a lower colour accuracy. It also doesn’t have the touch functionality that the Pro line has.
As you can see there’s a substantial price difference between them for these additional features:
- Wacom Cintiq Pro 16″ Tablet, price on Amazon = $1,119
- Wacom Cintiq 16″ Tablet, price on Amazon = $649
I’ve not worked with the HD version of this tablet so I can’t comment on whether for the simplicity of editing in a timeline and seeing a small preview window you need the far greater resolution of the Pro tablet but I would hazard the guess that the discrepancy between the two displays (in my case the other display being a true 4K LG monitor) would prove annoying at the least and futile at the worst, as well as hampering much future proofing of the purchase.
All this to say, buying either device isn’t likely to be an impulse purchase, but as you’ve heard from the incredible editors above(!) they are fully persuaded as to the utility and benefits of working with a Wacom Cintiq all day, every day.
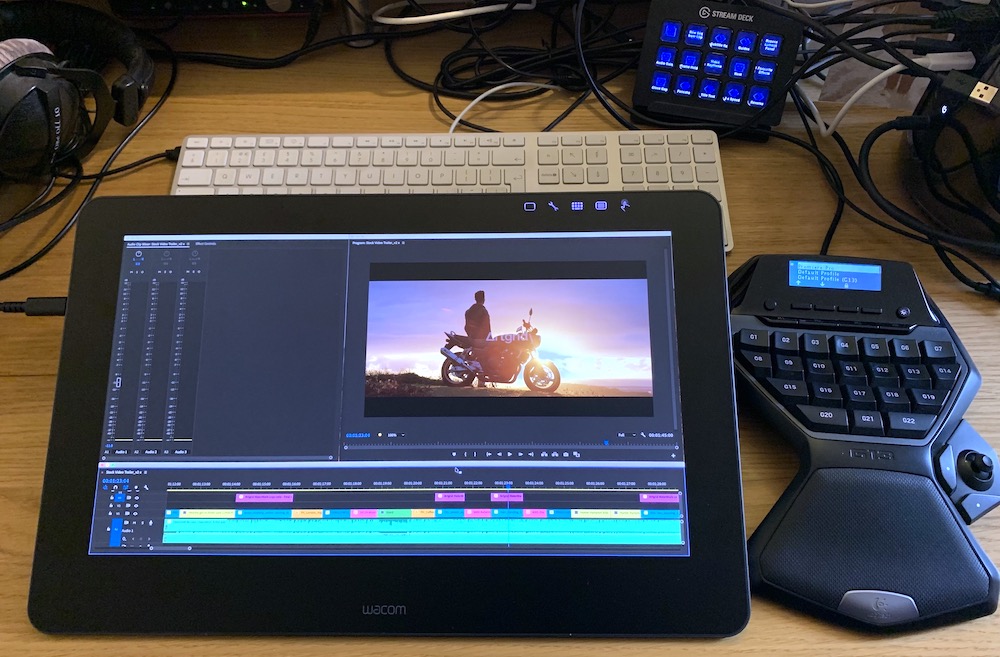
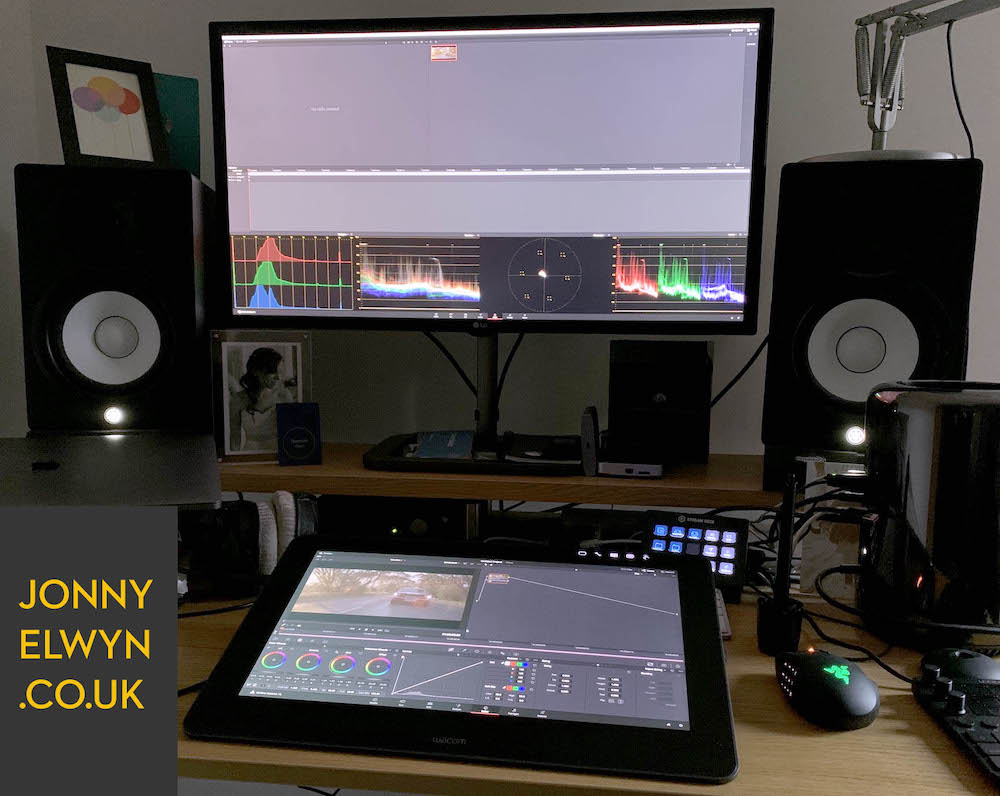
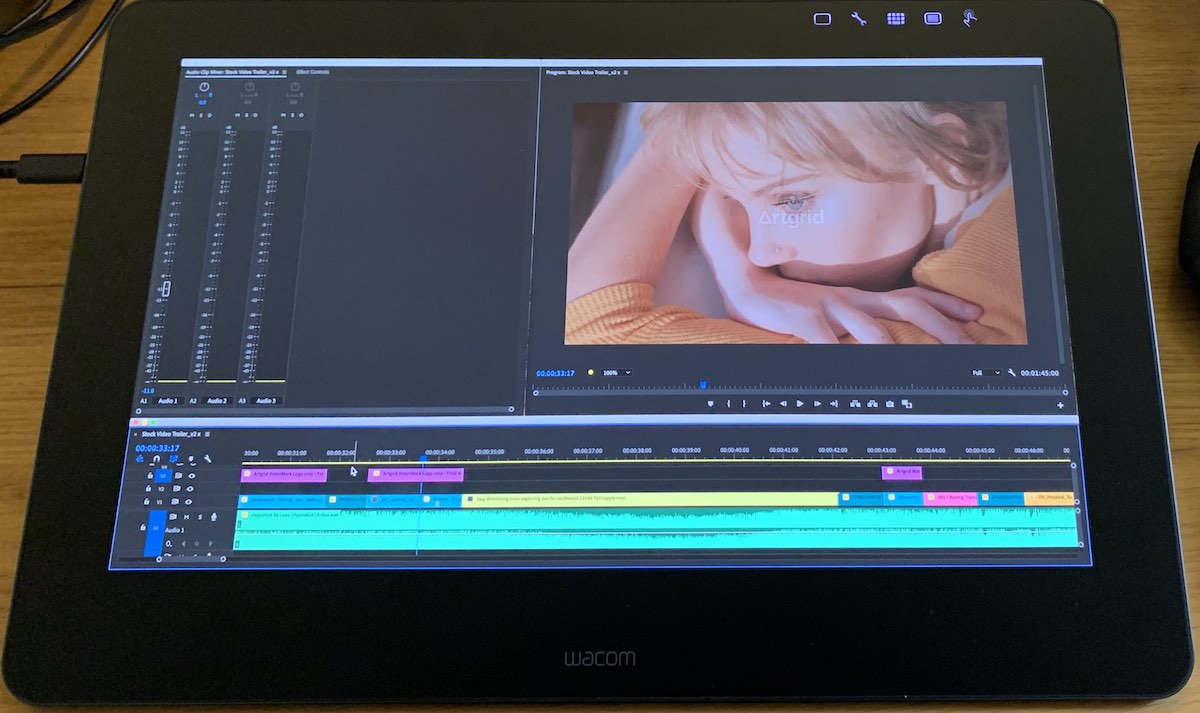
My Wacom Cintiq Pro 16″ Video Editing Set Up
I experimented with a few different physical set-ups for my Wacom Cintiq in combination with my full-size Apple keyboard, Logitech G13 gaming keypad, Elgato Stream Deck and a few other peripherals, which you can see in the images above and below.
Given my particular desk set up, the image above was probably the best combination, with the keyboard still reachable over the top of the Cintiq, whilst the G13 (once I got it to work) delivered all of my main editing keyboard shortcuts. The Stream Deck stayed where it was before and is such a useful device – seriously, go read this post about it and buy one next time it’s on sale!
One thing that is definitely worth considering when working with a Wacom Cintiq tablet is ensuring you’ve got a good ergonomic layout in front of you, as the Cintiq 16″ needs to be tilted up on its fold-out legs so that the fans on the back can get sufficient airflow.
Depending on how you like to work it’s probably a good idea to invest in a stand for these smaller Cintiq’s, but it’s basically essential for the larger 27″ and 32″ beasts, which also weigh a fair amount. The VESA arm mounts would also give you a great deal of flexibility if you can make it work in your edit suite space.
One quick side note about these images, I made the preview/canvas window really big as it had nice images on it, but in reality when editing the larger the timeline the better!
I think it would be fair to say at the start of this review that I had pretty high expectations of working with the Cintiq, as I was excited when Wacom agreed to send me one and even more delighted when I got it all hooked up. It’s a beautifully designed product!
It feels great under your hand and the physical size of the screen and the clarity of the image is excellent. Working in both Adobe Premiere Pro and DaVinci Resolve is a very fluid and enjoyable experience – especially when working with things like the curves controls, drawing masks or working with audio keyframes and the like. Some how you do feel more connected with the interface and the interactions feel more direct.
I’ve always been delighted with the quality and capability of every product I’ve used from Wacom, such that I’ve never considered buying similar products from other lower-cost brands.
But I was still a little hesitant about actually editing on a Cintiq as I’m about eight years deep into my existing set up of a medium Wacom Intuos in place of where you see the Cintiq in these images. One of my other concerns was that, given how much of efficient film editing is keyboard driven, was the Cintiq an elegant solution without a real problem?
Don’t get me wrong, I’m confident that tablet driven editing is far, far superior to mouse-based interactions, especially from an ergonomics/career longevity stand-point, but I wasn’t sure how much of a difference it would make actually being able to touch the timeline.
But I’m getting ahead of myself.
Making it all work together

Setting up the Cintiq itself was very simple, especially when connecting it to my Macbook Pro, as it’s just a single cable connection. Things were slightly more involved when connecting it to my 2013 Mac Pro (Trashcan) but still very easy once I remembered to also plug in the USB cable from the Wacom Link, to have both the visual and controller connections.
The trickier part in making my new editing workflow function was getting the Logitech G13 to play ball.
Although I was excited about having a direct tactile connection to my timeline through the Cintiq, most of the heavy lifting of film editing is using the same few keyboard shortcuts repeatedly. This makes having something like the Logitech G13, Razer Orbweaver or any of the other single-hand gaming keypads available today, pretty indispensable.
It had been a while since I’d used the G13 and I’m not sure if it was my upgrade to OSX Mojave, or Logitech dropping support for the device, or the order in which I installed things or turned them on but I had some initial problems getting it to register my keystrokes.
After trying numerous things like upgrading and also downgrading the G13 drivers, giving the LGS software extra permissions in System Preferences > Security and Privacy > (add ‘LCore’ from the LGS package contents) as well as turning things on in a different order it all started working.
Another aspect of running the Cintiq that I hadn’t fully anticipated was the fact that I was now running two 4K screens on my system and the impact that would have on system performance. It wasn’t enough to be detrimental to my day-to-day editing but I definitely noticed the up-tick in fan noise and heat from the Mac Pro which sits on the desk in front of me.
Having followed the dual screen set up process described in detail in the sections above, it was a huge benefit to be able to display toggle between my two screens and still use the Cintiq as a tablet interface for my main monitor. This made the whole working experience much smoother as I wasn’t trying to perform all of my tasks on the Cintiq – although maybe using it with a single screen mentality might make things simpler.
The discovery of the ability to have a second preview monitor in Adobe Premiere Pro via the Reference monitor window was a real help, as it meant that I could see my edit regardless of which screen I happened to be looking at. In a way, I suppose its a poor-man’s projection set up! Just without the viewing distance or the sofas…
The Adaptation Challenge
My interviews with Alan and Dody came part way through my teething problems with the new set up and I found their encouragements to be adaptable and experimental, helped motivate me to press on. I had been using my existing set up for such a long time that it was a real struggle to get used to a different way of doing things.
I say this to highlight that changing your working set up isn’t without its hurdles and although I thought I was simply swapping out one tablet for another, this is adaptation is far more fundamental than that.
The whole set up feels physically very different, and instead of looking straight ahead, I’m now having to look down at the tablet and up at the main screen continuously.
It is still early days in my Cintiq testing so I can’t quite tell if this is ergonomically better for me – more movement, or worse – because I’m more likely to hunch over the Cintiq.
Another niggle I do have with the Cintiq Pro 16 is the fan noise.
In my previous set up, unless I’m exporting something particularly intensive, my 2013 Mac Pro hums along fairly imperceptibly, so my edit suite is effectively silent.
The sleek, thin design of the Cintiq however necessitates a fair amount of fan noise to keep it cool, which was a definite distraction when trying to do audio work. It’s not like editing the middle of a typhoon or anything, but it’s noticeable.
Actually Editing on a Cintiq
So what’s it like to actually edit on a Cintiq?
Pretty great. The Cintiq itself is fun to use, working in the timeline is straight forward and there’s not the physical paradigm shift you experience moving from working with a mouse to working on the tablet. In that regard it’s a straight swap.
The screen size of the 16″ Pro was plenty of space to work with and there’s no lag in the interaction. The angle of the screen is comfortable to work with when it’s stood up on the built-in legs, although having an adjustable stand would probably be a worthwhile addition to the set up, for the flexibility of movement.
With the right keyboard shortcuts on the G13, and a bit of re-familiarising myself with the layout, I was happily chopping away without thinking too much about it.
One thing that’s worth considering in comparing my experience to that of Dody and Alan is that they’re a) working on much larger devices b) putting in many more hours with it and c) evolving their set up over many months of feature film editing until they’ve gotten to a place that’s comfortable for them.
I’ve not gone the distance with the Cintiq yet, so it feels premature to deliver a verdict on it.
Also I do wonder how I would feel about using it in a different physical set up such as editing with a laptop and the Cintiq in a client office. Rather than knowing I’ve made a slight change to my existing set up, I’d be starting from scratch.
Time will tell if that opportunity arrises.
Final Thoughts
Am I sold on editing with a Cintiq? Not yet. But that’s more my fault than a design flaw with the Cintiq.
It delivers an excellent, high quality, tactile interface for creative work with a simple set up and a depth of features* that you won’t really touch shifting clips around on the timeline. (*Think over 8000 degrees of pressure sensitive brush strokes in Photoshop.)
It really does help when working with masks, curves and other editing interfaces, and makes engaging with them a more enjoyable process, which is meaningful if that’s what your day consists of!
That said, I know that I’m faster with my old way of doing things with the Wacom Intuos Pro Medium tablet, my full size Apple keyboard and extra macros and such on the Stream Deck. And that efficiency matters more to me at the minute than being open to a different way of doing things.
Maybe I just need to commit to the change!
Well, as you can tell, nearly 12,000 words later, this article got a little out of hand. I hope you’ll come to appreciate the depth of content though if you decide to take the plunge yourself into embracing a more fluid and adaptable workflow with a Wacom Cintiq at the heart of it.
If you do, let me know how you get on!
Other Editors Using a Wacom Cintiq for Film Editing
Editor Rob Ashe cuts for the Conan O’Brien Show and you can read all about how he does that here.


One of the things I love about Alan’s setup is that he can turn the client monitor off when he’s doing a bit of work then turn it back on when he’s ready to show it. But did he talk at all about what he did with sound when working “small”? Does the sound still come out of his big theater system or does he have smaller speakers he switches to in order to avoid distracting others in the room?
That’s a great question, that I failed to ask at the time! Maybe he does toggle that on and off too. If I can find out, I’ll be sure to update the post…
It seems nobody’s talking about this on the whole Internet. Thanks for sharing it.
I came here looking for information to go from mouse to tablet, but now I’m not sure if I need a tablet or a pen display.
I don’t have enough money for a Cintiq Pro or to make a room like Alan and Dody, but I’m trying to figure out if I should do the jump to a tablet with screen instead of a classical tablet. I’ve searched for it and nobody else seems to be doing it for editing. What do you think?
Hi Alvaro, thanks for checking out the blog.
If you’re keen to start editing with a tablet, I’d highly recommend it – especially over a mouse. As for the video editing with a Cintiq, you could look into the new Wacom One, which is a cheaper video tablet option.
But I’d maybe recommend something like the Wacom Intuos Pro Medium as a starting point.
These other posts are also well worth a read:
https://jonnyelwyn.co.uk/film-video-editing-tools-for-editors/why-i-love-to-edit-with-my-wacom-tablet/
https://jonnyelwyn.co.uk/film-and-video-editing/the-best-mouse-for-film-editing/
https://jonnyelwyn.co.uk/film-video-editing-tools-for-editors/avid/editing-gear-keyboards-mouse-tablets-and-more/
Thanks Jonny.
I already checked those posts before. I surfed all your site. You have an awesome and useful website here, thanks for that. I’m following you already.
I think I’ll do the jump about the tablet. Thanks for your help.
I have been editing with a Wacom tablet for over 25 years. After trying every mouse and trackball on the planet, its the only device that does not give me carpel tunnel pain and its direct. by direct I mean that there is no ‘mousing around’ its point and go. I started my career cutting 35mm film on a KEM flatbed and editing with a Wacom is much closer to that experience. The only downside is I have found that its a little less responsive on Windows than on MAC but its minor