Learn DaVinci Resolve 15’s New Features
- Learn DaVinci Resolve 15’s new features
- Download free Fusion title templates
- Colorists pick their favourite new features in Resolve 15
DaVinci Resolve 15 is Blackmagic Design’s biggest release yet (which is what they always say, and it’s true!) with hundreds of new features and fixes. The biggest of these is undoubtably the addition of Fusion into Resolve, a process that will be on-going over the next 12-18 months.
There are also some major improvements to Fairlight’s integration, which bodes well for the future of Fusion in Resolve.
The update from DaVinci Resolve Studio 14 to 15 is free, and of course there is still the free version of Resolve ‘lite’.
But you should just spend the $299 a pick up the app for the incredible colour grading, visual effects, audio and editing features. It’s an amazing all-in-one app, and so far, all the updates have been free.
To learn more about all the new features it’s definitely worth reading the new documentation:
- Download DaVinci Resolve 15 Configuration Guide (55 pages)
- Download DaVinci Resolve New Features Guide (282 pages!)
- Download DaVinci Resolve App Version Comparison Guide (3 pages)
- Download DaVinci Resolve 15 Supported Codecs (11 pages)
- Download DaVinci Resolve 14 Manual (1,346 pages)
Colorists Favourite New Features in DaVinci Resolve 15
Colorist Alexis Van Hurkman, the author of the epic manual and two great colour grading handbooks, shares his favourite new features in DaVinci Resolve 15 looking across all of the pages in the app.
Alexis’ inside view through working with Blackmagic Design makes him one of the best people to learn from (via RippleTraining.com) and listen to in presentations like this!
In fact, Ripple Training just announced the following training titles for Resolve 15, which will be launching in the coming months:
- New Features in Resolve 15 – Alexis Van Hurkman
- Dive into Fusion – Alexis Van Hurkman
- Color Grading & Finishing 101 (Blackmagic Certified)
- Professional Color Grading 201 (Blackmagic Certified)
https://www.youtube.com/watch?v=-2zowRwdjIE
Kays from Midphase has had access to the DaVinci Resolve internal beta and so he’s already had a chance to play with some of the new features. In this short video he showcases his Top 5 Favourite Cool New Things in Resolve 15 (that nobody is really talking about).
Kays demonstrates each one of the following things:
- Multiple timelines/tabs
- Searchable sound library in Resolve
- Recording ADR into Resolve (with depth)
- Noise Reduction on audio (and other useful audio plugins)
- Disable multiple selected nodes at the same time
- Patch replacer ResolveFx plugin
Hopefully whether you’ve read all 282 pages of the New Features document or not, some of these will be new to you!
Check out Joey D’Anna’s excellent write up of his top 4 new features in the Color page in DaVinci Resolve 15 in this free article from MixingLight.com.
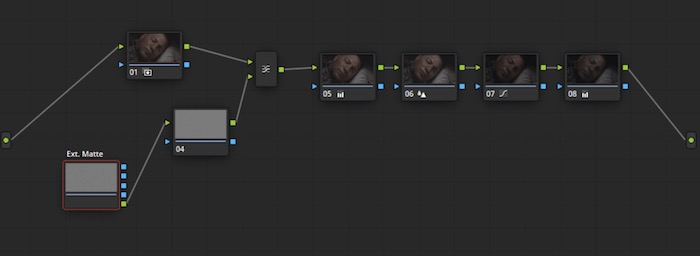
This is a case where I think Fusion has really rubbed off onto the color page in a great way. Resolve 15’s node graph has been majorly improved over previous versions and is now easier to navigate and use than ever.
Spencer from RippleTraining.com gives a five minute overview of just some of his favourite things in DaVinci Resolve 15.
It’s interesting that Spencer’s first new feature is the updated Keyboard Customisation, which allows you to set different keyboard commands per page, as well as add shortcuts for some of the newest features.
I’ve previously reviewed Spencer’s DaVinci Resolve Editing and Colour Grading 101 training in this post which rounds up some great free DaVinci Resolve 14 tutorials.
Theo from Miesner Media is launching a new run of 15 days of DaVinci Resolve 15 tutorials, so be sure to check out his YouTube channel for more of these. He’s also offering 15% off his products during this time too, using the code resolve15
Theo’s top 3 new colour tools are:
- Shared Color Nodes
- Enhanced mode in Spatial NR
- Realtime LUT previews
Alex from LearnColorGrading.com shares his thoughts on the latest update, demonstrating features like the LUT browser, shared nodes, Fusion, multiple timelines and more.
In this 3 minute tutorial Alex takes a closer look at Shared Nodes.
Scripting in DaVinci Resolve 15
Scripting is across the full app. Help menu.. developer documentation
— Rohit Gupta (@rohit_bmd) April 15, 2018
I’m not sure if this is one of those things that’s always been there or if it’s a new thing for DaVinci Resolve 15, but some people are excited about the possibility of being able to develop applets for Fusion in Resolve using Python and Lua.
You can check out the current documentation available in DaVinci Resolve 15 under the Help Menu > Developer Documentation
In this package, you will find a brief introduction to the Scripting API for DaVinci Resolve Studio. Apart from this README.txt file, this package contains folders containing the basic import modules for scripting access (DaVinciResolve.py) and some representative examples.
This is worth a read, as are the other documents if you’re into this kind of thing.
On startup, DaVinci Resolve scans the Utility Scripts directory and enumerates the scripts found in the Script application menu. Placing your script in this folder and invoking it from this menu is the easiest way to use scripts.
You can download the 217 page Fusion 8 Scripting Manual here.
We can add some Lua examples in the next beta. The Fusion manual will be included in the Resolve manual moving forward.
— Rohit Gupta (@rohit_bmd) April 15, 2018
If you want to get into this kind of thing, the SteakUnderWater.com forum seems to be a good place to start.
If you build something cool, let me know!
SteakUnderWater is seeking to be ‘the friendliest Fusion Studio community online‘ and has a really handy tool called Reactor, which lets you install a plethora of Fusion scripts from their library in a couple of clicks.
Learn more about getting started with Reactor here.
DaVinci Resolve LUT Browser vs Color Grading Central LUT Gallery
I’ve long been a fan of Color Grading Central’s LUT Gallery (my review), a plugin for FCPX and DaVinci Resolve that basically did all that the new LUT Browser can finally do in Resolve 15.
As it stands there is now no real reason (that I can think of!) to buy LUT Gallery for Resolve, as Blackmagic Design have incorporated all of the same, and better, functionality into DaVinci Resolve 15’s Color page.
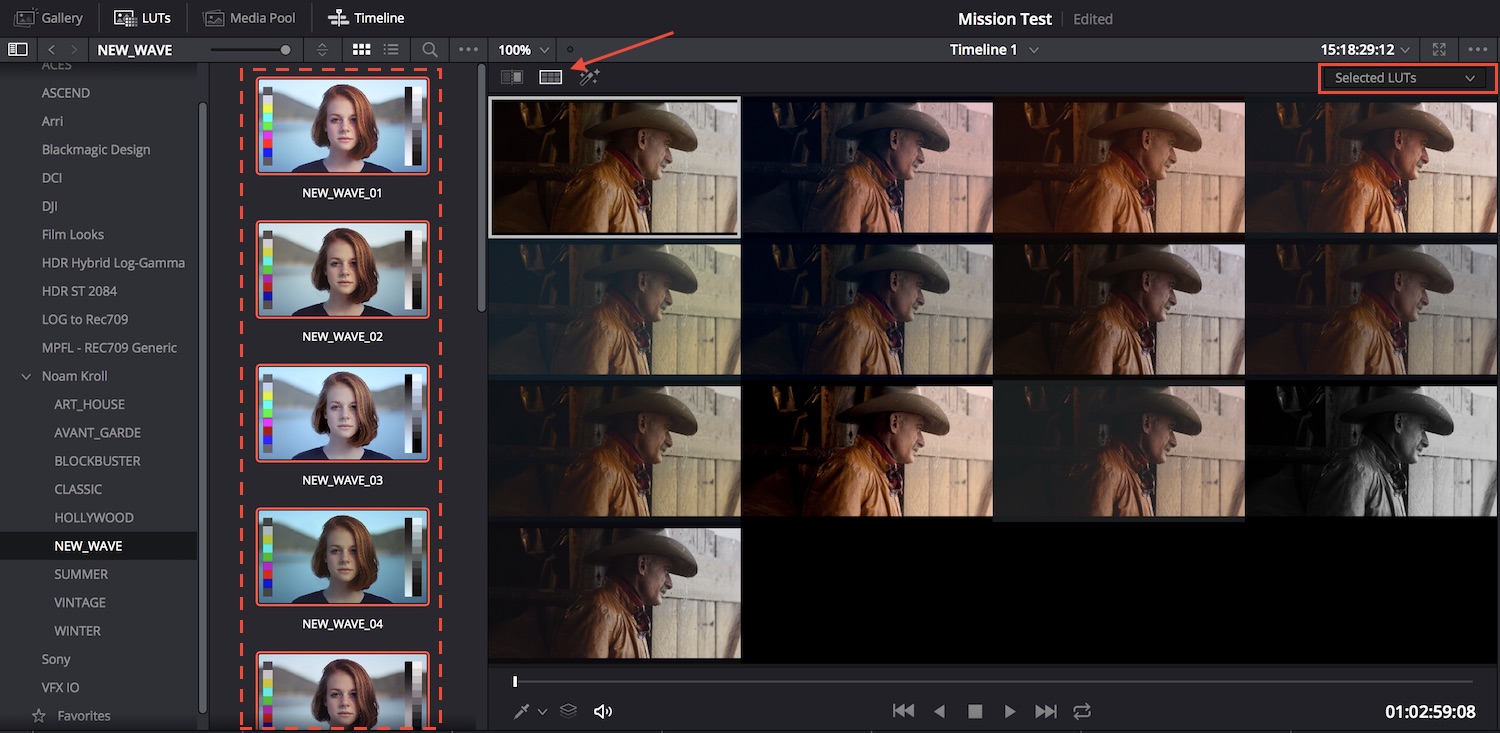
By default you can see a (very small) preview of each LUT, as applied to the test image of the red-headed girl, by hover-scrubbing over the LUT thumbnail you want to preview, in the LUT Browser.
To see a full-screen preview of your LUT collection instead, as in the image above – and in the same way as you could in LUT Gallery, take the following steps:
- Open the LUT Browser with the button in the top left of the interface.
- Navigate to your chosen LUTs in the sidebar. (Here I’m using Noam Kroll’s excellent LUT packs as an example.)
- Turn on Split Screen (see red arrow)
- In the drop down menu on the right of the viewer (red rectangle) choose ‘Selected LUTs’
- Select the number of LUTs you want to preview (16 is the max, 1 will give you a before/after split screen view – see dashed red rectangle)
- Press CMD+F or go to Workspace > Viewer > Cinema Viewer to see these full screen.
If you want to build a short list of your most frequently used LUTs then there are some easy ways to do that using the Favourite function.
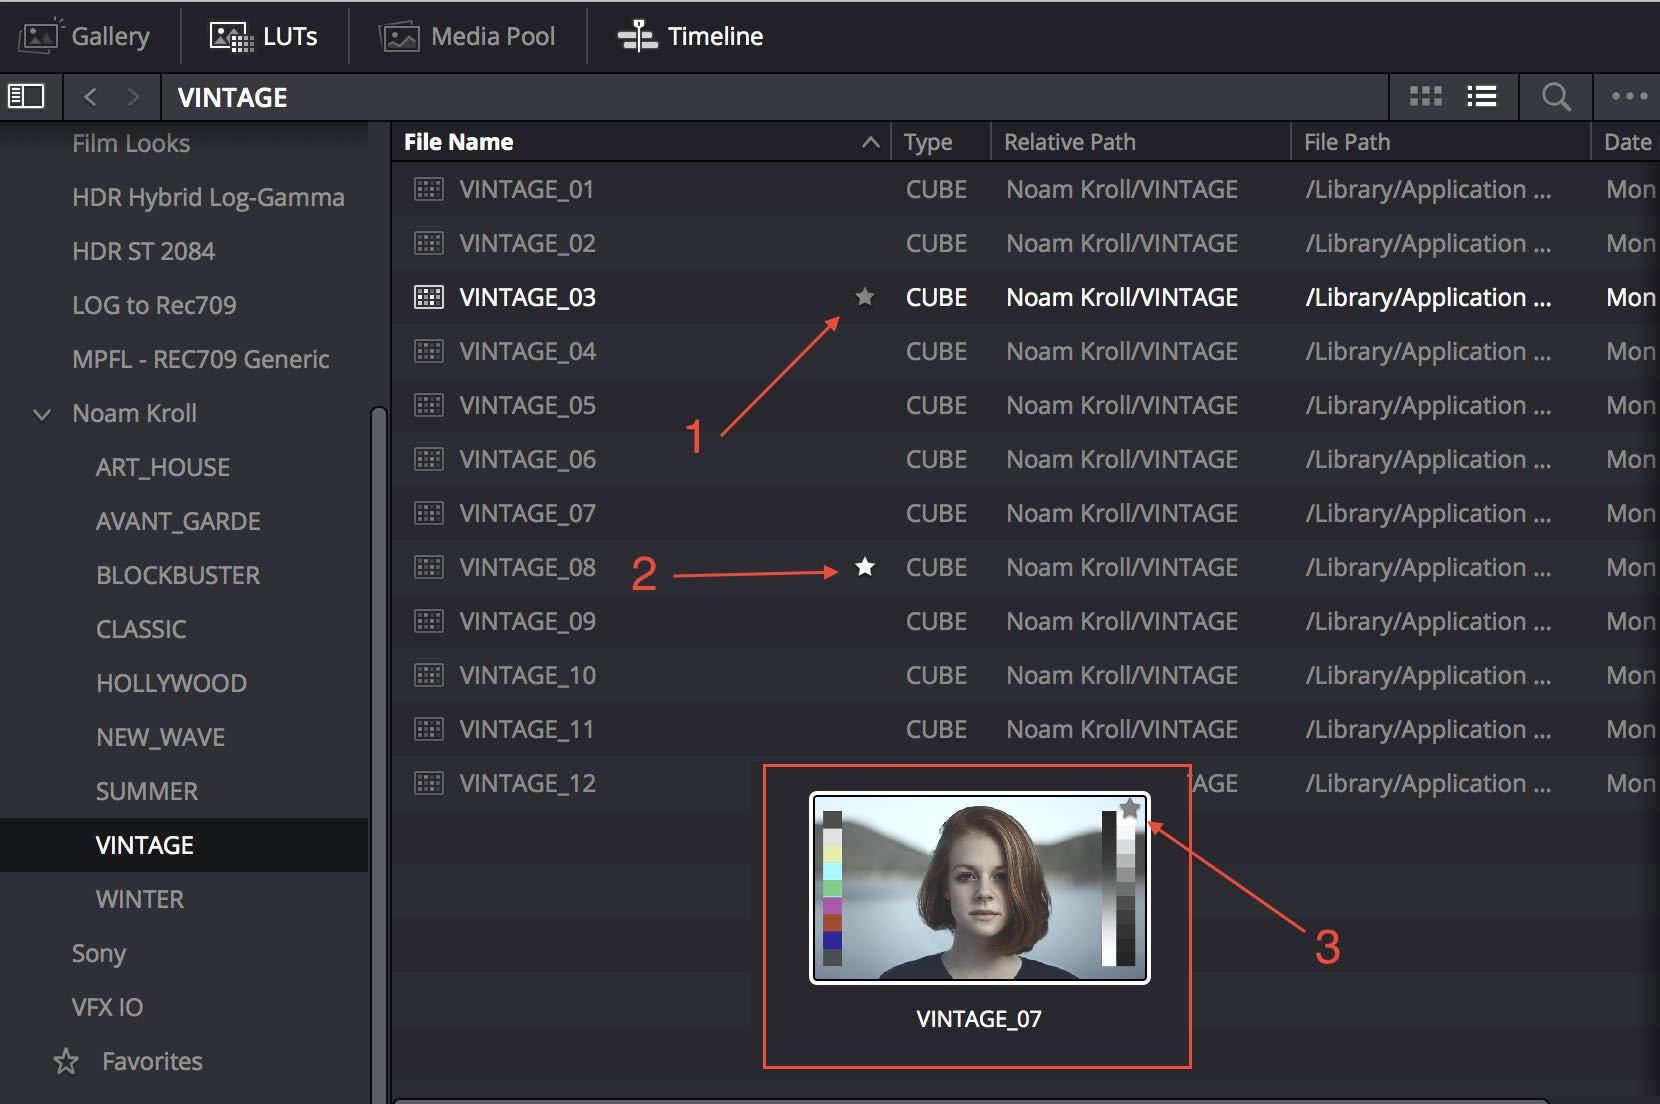
If you know all the LUTs you want to favourite from the get-go, a quick way to achieve this is to toggle the LUT Browser preview window to list view and then click on the ‘favourite star’ that appears when you move over any LUT (1). You can see previously favourited LUTs this way as well (2).
You can also click on the little star in the top right of the thumbnail LUT previews, when in the grid view of the LUT browser (3). – Note, the red rectangle in the image above for Vintage_07 is just a picture-in-picture composite by me. It doesn’t look like that in Resolve!
You can access your favourite LUTs from the bottom left of the LUT Browser sidebar.
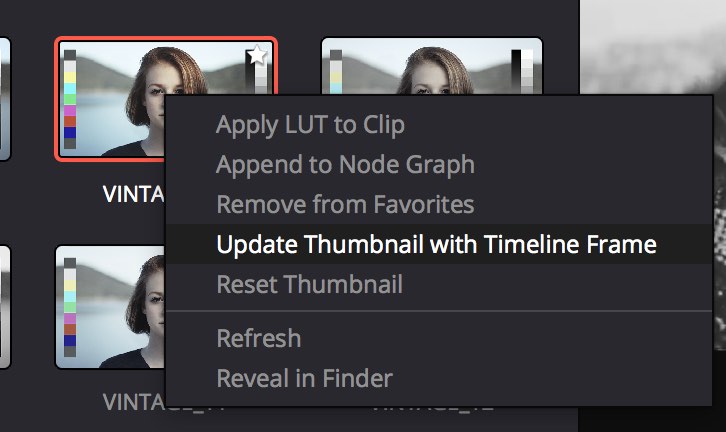
You can update the thumbnail of any given LUT by right clicking on it and selecting ‘Update Thumnail with Timeline Frame’. If you change your mind at a later date you can always right click and choose ‘Reset Thumbnail’.
This image also lists all the other things you can do in the LUT browser with your LUT.
Where can I get free LUTs?
If you want to get your hands on well over 100 free LUTs, including some nice film print emulation LUTs then check out this popular post: Free Film LUTs for Colorists, Editors and DITs.
This post also has some useful LUTs and tools for helping you to match the look of a specific film that you’re trying to reference.
If you have a lot of LUTs in your collection then check out the ‘Organising your LUTs in DaVinci Resolve’ section of this post on LUT Gallery.
Should you still buy Color Grading Central’s LUT Gallery?
Yes, but only if you’re working in FCPX and use LUTs a lot. At this time there is no way to replicate this incredibly useful functionality with FCPX’s native colour grading tools.
The LUT Gallery toolset is part of Color Finale Pro for FCPX, which you can handily get at a discount with the promo code: jonnyelwyn.
DaVinci Resolve 15 Free Training
It’s a sign of just how much there is to get to grips with in DaVinci Resolve 15 that the ‘what’s new’ videos are now 20 minutes long, each!
The first video tutorial covers Fusion’s integration along with some of the improvements to Fairlight. The second half of the video (10 minutes in) covers the new colour features.
Use the time-stamped links below to jump to the topics covered in the video:
- Adding a Fusion clip in the Edit timeline
- Fusion page UI layout and fundamentals
- Creating a simple 2D composite
- Green-screen composite and matte refinement
- Creating an animated 3D text title including particles
- Saving and loading multiple Fusion clip versions
- ADR tools in Fairlight, including CSV import of cues
- Sound Libraries in Fairlight and Edit pages
- Audio and video scrolling timeline options
- Fairlight audio plugins options
- General improvements to Resolve
- Improved keyboard shortcut customisation
- Stacked and tabbed timelines on the Edit page
- Closed Caption and Subtitle tools
- Shared grades across projects
- New LUT Browser
- Updates to Node Viewer and Shared Nodes
- Streamlined editing experience
- Working with Subclips
- Improvements to Media Pool
- Floating Timecode window
- Edit page improvements
- New ResolveFX and 2D/3D title templates
- Improvements to Color page toolset
- Using the new Patch tool to fix blemishes
- Delivery page updates
This follow up video tutorial from Blackmagic Design covers the Fairlight page in more detail. This is a handy watch for anyone who has never used the Fairlight page before as it walks through the various parts of the UI, adjusting effects and mixing.
Some of the topics from the first video (above) are covered again but in a bit more detail.
It’s an exceptionally powerful set of audio tools that will go to waste unless we all learn how to use them, myself included.
This 20 minute tutorial will give you a detailed guided tour of the Fusion page. It’s worth watching this tutorial, even if you watched the ‘What’s new’ video above, as it goes into much more detail.
The tutorial takes you through creating a few different 2D and 3D composites, including green screen replacements and 3D animated motion graphics (12:42mins in).
Download Free Resolve/Fusion Templates and Training
If you’re looking to get up to speed on Fusion and using it within DaVinci Resolve, hop over to these two previous posts and learn all you can from some great free tutorials:
Getting Started in Fusion 9 | Getting Started in Fusion 8
You can also download the Fusion 9 Studio manual here and the helpful Tool Reference Guide here. This second document lists out all of Fusion’s incredible toolset, what each one does and how to navigate individual tool parameters.
I stumbled across JayAreTV (Justin Robinson’s YouTube channel) whilst looking for someone who was making Fusion templates and I was not disappointed. He might also have one of the most under-rated training channels I’ve seen. He deserves way more views than this! I really enjoyed his clear and concise content delivery.
In a recent tutorial he suggests that if you’re having a tough time keeping Fusion stable, go to DaVinci Resolve > Preferences > Configuration and tick ‘Always run Fusion on CPU’.
You’ll suffer a reduction in performance but a boost in stability, he wagers.
Justin is kindly providing several free lower thirds and title templates for you to download and drag and drop into Resolve’s Fusion tab, or Fusion itself.
From there you can customise them to your own requirements.
Download the free Fusion title templates here.
You can learn how to build a much more complicated lower third in this further tutorial from JayAreTV.
In this tutorial Justin walks you through how to make simple lower thirds in Fusion, adding text, masks and animated keyframes.
In the tutorial he’s using a Fusion connect clip, which you don’t need to do in Resolve 15 obviously and all the principles are the same.
If you’re just starting out a really useful nugget of information in this tutorial is that Merge nodes allow for the following connections:
- Yellow is the background
- Green is the foreground
- Blue is the alpha channel
- Red is the output
Justin’s tutorial creation output has been pretty tremendous (2-3 in a day!) and this 14 minute quick start guide provides a very helpful overview for anyone encountering Fusion for the first time in DaVinci Resolve 15.
At about 6 minutes in JayAre covers the powerful spline editor which allows you to adjust the timing and velocity of your keyframes, with ease.
He also discusses creating 3D composites with cameras, particles and rotoscoping.
Vito LeManna, the chap behind Con-Fusion, an excellent Fusion tutorial channel, gives his perspective on the new Fusion integration. As he is a long time Fusion user, it’s interesting to hear what he likes and dislikes about the first beta.
DaVinci Resolve 15 Tips and Tricks
Oh and look just a little @netflix IMF preset in the Deliver tab of @Blackmagic_News Resolve 15! Anyone use this yet (or when you use it) I'd be curious to here the QC results #NAB2018 pic.twitter.com/e6CKuEIBhm
— Brady Betzel (@allbetzroff) April 9, 2018
During NAB numerous colorists and editors were tweeting out their favourite new features and tips for DaVinci Resolve 15, which I’ve collected together here.
#DaVinciResolve 15’s option to load timelines on demand instead of when opening the project is a nice feature for big projects to open faster. Then open the timeline you need and will load at that moment.
That would be really cool for #FCPX.
— Marc Bach (@marcplanb) April 10, 2018
Oooh new annotation tools in @Blackmagic_News Resolve 15 #NAB2018 pic.twitter.com/LjJfKlzHpF
— Brady Betzel (@allbetzroff) April 9, 2018
New Pancake Timelines @Blackmagic_News Resolve 15 edition #NAB2018 pic.twitter.com/kNhPXlBbN2
— Brady Betzel (@allbetzroff) April 9, 2018
3d titling in 3d space in @Blackmagic_News Resolve 15's new Fusion Tab, might be time for everyone to dabble in Fusion tutorials #NAB2018 pic.twitter.com/IALedOGtO6
— Brady Betzel (@allbetzroff) April 9, 2018
Resolve 15 now includes native DCP and IMF. No encryption support. For advanced features use the easyDCP plugin. #resolve15
— Rohit Gupta (@rohit_bmd) April 9, 2018
@robbiecarman what's your opinion on the "software CMU" in Resolve15? Does it work well? Does it needs a lot of additional horsepower?
— Mathieu Marano (@ilovehue) April 10, 2018
#Resolve15 Shared nodes for instant rippling with lock on/off
— Jamie Dickinson (@dickij10) April 9, 2018
#Resolve15 Subclips which you can trim beyond their initial in/outs, I like that
— Jamie Dickinson (@dickij10) April 9, 2018
#Resolve15 BIG floating timecode window. So many wishes that people have asked for!
— Jamie Dickinson (@dickij10) April 9, 2018
Ooh, you can copy and paste in t/c entry boxes for markers in #Resolve15 I hope that's across the system
— Jamie Dickinson (@dickij10) April 10, 2018




Thank you man for your efficiency, to read your articles is always pleasure!