
Using LUTS to Match a Real Film Look
- How to match the look of Hollywood films
- Colour grading tutorials for a cinematic look
- Free Look LUTS, Grain, Film Print Emulations and more!
When it comes to matching the colour grade of your favourite Hollywood blockbuster there are several ways to go about it.
First of all you could pull up a reference image and manually try to match the look of the film. Analysing what it’s doing across colour channels, contrast ratios, saturation and so on. I’ll share some great resources that will teach you how to do this effectively.
Or you could let someone do *most* of the hard work for you and download or buy preset looks in the form of LUTS, like the recently released Motion Picture Film LUTs collection from Colour Grading Central, which we’ll also get into.
If you’re not sure what a LUT is or how to use one, then hop over to the most popular post on this blog; Free Film LUTS for Editors, Colorists and DITs.
This is a growing collection of free film LUTs, but the post also explains what a LUT actually is, how to use them, manage and organise them and a ton of places where you can get them for free.
Or you could take Ripple Training’s new short course on Working with LUTS in DaVinci Resolve which will teach you everything you need to know about using LUTs correctly. You can even save 20% on the course with an exclusive discount code!
You can read my review of this new Ripple Training course below.
How to match the look of a Hollywood film

This section of the post will give you some great tutorials on how to re-create the look of a specific film yourself, by understanding how to deconstruct that image and re-apply the same characteristics to your current project.
One of the first things you should do is to spend time seeing how others approach this process and learn from them.
If you want a full 22 minute tutorial on precisely matching the look of a reference still, in this case Mad Max Fury Road and Her then scroll down to the bottom to see my thoughts on colorist Denver Riddle’s ‘Look Hacking System’, which comes as a bonus to his Motion Picture Film LUTs Pro bundle.
In this previous post you can see some of my favourite colour grading breakdowns from some incredibly talented colorists, which will help you understand how they are building up, layer by layer, the final look of an image.
The videos from Steven Spielberg’s colorist Dale Grahn and Maxine Gervais on American Sniper are essential viewing!
These images demonstrate the layers of the grade used to create the final look of Francis Ha. Which I think delivers a pretty interesting looking black and white grade.
Colorist Juan Melara delivers a 9 minute masterclass on matching images by taking on the challenge of re-creating the Kodak 2383 LUT within DaVinci Resolve as a PowerGrade.
You can pay what you like for the PowerGrade Juan creates on his store, or pick up similar PowerGrades for the Kodak 2393 LUT for only $12.99.
Juan has also previous re-created two otherwise very expensive LUTs which you can still download for free here.
What’s really great about this tutorial is that you can pick up some useful tips and tricks for matching looks for yourself, from a highly skilled colorist.
You can download three free film emulation LUTs from Juan too, as featured in my Free Film LUTs post.
If you’re after even more PowerGrades created by a professional colorist, check out my review of Pixel Film Tools PowerGrade Collection Vol. 1 here.
Casey Faris delivers the ‘ultimate guide to matching cameras’ in which he matches 10 different cameras to each other, by using his usual shot matching workflow.
In watching this tutorial you will learn how to compare two shots and discern their differences by using the scopes, as well as your eyes, in DaVinci Resolve.
Things to be looking for include:
- White Balance
- Contrast levels
- Saturation levels
- Hues in different parts of the image
- Black and white levels
One of the best ways to really get an in-depth education on understanding what’s going on within an image, specifically when applying LUTS to it, is by taking Ripple Training’s new course on working with LUTS, which I review below.
Ripple Training Working with LUTS in DaVinci Resolve 14 Reviewed
Colorist Jason Bowdach’s one hour course Working with LUTS in DaVinci Resolve 14 takes you through everything you could want to know about working with LUTs.
You might be thinking: “How much is there to know? I just slap the LUT on and I’m done.” Well you would be wrong, and a prime candidate for taking this course.
With the rise of the popularity of using LUTS there’s actually plenty you can get wrong in applying them, such as clipping or crushing your footage, incorrectly transforming from one colour space to another and so on.
If you do take the course, be sure to use the coupon code “save-luts” to get 20% off, which is a special code the good folk at Ripple Training created just for my readers! (Thanks!)
You can check out a full course breakdown on Ripple Training.com, but to get a sense of what’s covered here are the chapter headings:
- What is a LUT?
- Categorizing LUTs
- Limitations of LUTs
- Evaluating LUTs
- Working with Technical LUTs
- Working with Creative LUTs
- Using Resolve Color Management
- Using the Color Transform Effect
- Creating & Installing LUTs
This was my first time learning from Jason but he makes for an engaging and easy to follow instructor. There’s no waffle or lame jokes (like most YouTube tutorials seem to specialise in!) but he delivered everything in a personable and open manner. You can check out his grading work at CineticStudios.com.
The course is fast paced and very accessible and I quickly learned some really useful essentials when working with LUTs; such as always using a 3 node structure, or how understand and evaluate what a LUT is actually doing, applying LUTs to groups and timelines efficiently and whirlwind tour of using Resolve’s Color Management process instead of relying on Technical LUTs, plus a whole lot more.
One quick tip I picked up during the lesson on Evaluating LUTs came when Jason uses Color Grading Central’s incredibly useful LUT Gallery, which makes finding the LUT you want to use, a breeze, and he points out that you’ll get better performance in Resolve by applying the LUT natively, rather than through the OFX plugin itself.
Jason also makes use of the Mac OS X app Lattice, which is probably worth picking up if you’re a DIT or colorist creating or using LUTs on a daily basis, but less so if you’re an editor.
The course is well worth taking if you’re a new to working with LUTs, as you’ll walk away actually knowing what you’re doing, but it’s also worth a look for more experienced colorist, who will be sure to learn at least something new or at the very least some finesse. The course costs $39 and will easily fit into a lunch break or single viewing sitting.
Check out the course and watch free preview videos on RippleTraining.com
Use the promo code “save-luts” to get 20% off.
Tools and Tutorials for creating a real Film Look

One of the best ways to get a the real look of film is to print your digital image to film and then scan that back in again, like this short film did. That will give you all the grain and colour response characteristics of a film image.
Another way is to use a plugin like FilmConvert, which has it’s own blend of grain and film emulation curves to give your footage that real film feel. I’ve previously reviewed FilmConvert in quite some detail here. It’s incredibly easy to use and delivers great looking results.
You can actually save 10% off any FilmConvert products with the coupon code ‘Elwyn’ or just click this link to activate it.
Simply adding film grain to your footage can really help the look of your project, whether or not you’re trying to emulate a real film look. This tutorial from colorist David Torcivia is one of the best I’ve seen on adding grain correctly in DaVinci Resolve.
You can download a bunch of free grain files in this post: Download Free Film Grain and Light Leaks.
Another handy tool in the quest for a real film look is to use film print emulation LUTs, like these freebies from colorist Juan Melara. These LUTs essentially mimic the look and feel of the stock of the film used when printing the final reels for use in actual cinema projection.
In the download Juan offers you can get two Fuji and Kodak film stocks with three variants of each LUT; ConstLclip, ConstLmap and CUSPclip. Each of these treat out of gamut colours in a different way.
- Fujifilm 3510
- Fujifilm 3513
- Kodak 2383
- Kodak 2393
Applying a print LUT is the probably the best “film look” treatment I’ve seen and the easiest way to make your digital footage look like film.
What print LUTs do to the colours and highlight rolloff in your footage is about as close as I’ve seen to a one click “make awesome” button.
Your images will still need work and you will still need to know how to colour correct and grade, but your work can look so much better.
Quick Tips for a Real Film Look
In this tutorial on achieving a film look, you’re effectively created a loose teal and orange grade, by pulling blues out of the highlights and adding them to the shadows.
Desaturating your shadows is also another way to create a more ‘cinematic film look’.
Color Grading Central Motion Picture Film LUTS Reviewed
Who is Denver and why should you buy his LUTS?
Denver is a professional colorist whose credits include several feature films and a client roster with work for Facebook, Apple and Instagram, to name but a few.
He’s also created a thriving community on Facebook and a product set including numerous LUT packs, LUT Gallery and the popular Color Finale Pro plugin for FCPX and professional training courses.
That is reassuring to know, but doesn’t necessarily mean his LUTS will be any good! Luckily you don’t have to take his or anyone else’s word for it, as you can download some of them for free and try them out for yourself…
Jump over to my free LUTS post and grab his existing freebies.

Graded with the Revenant LUT
Denver is also giving away 3 free LUTS from his new Motion Picture Film LUTs collection, which includes the ‘Super Hero’, Revenant and Moonrise Kingdom looks.
What you get?
- 22 LUTS based on the look of specific films
- Camera Profiles
- Tutorials
- Extras and discounts
Depending on which version of the package you buy, you’ll get different things. Personally I was most interested in the Pro pack, which features the following items and costs $149.
- Motion Picture Film LUTs (value $99)
- Specific camera and Rec 2020/ACES support (value $49)
- BONUS #1: Look Hacking System (value $299)
… A total value of $447 but only costs $149
To me, as an editor who grades most of his own projects, this has the best balance of products to price.
So rather than having to get the base image of any LOG footage to a decent place before I can apply the LUTs (which you need to do with the basic pack as they are limited to a Rec. 709 colour space), I’ll be able to match the originating camera’s LOG profile with a specific LUT from the collection made for that camera.
In the Pro pack the supported LOG camera profiles include: ARRI, Blackmagic Cameras, Canon, Cinestyle profile, DJI, GH4/GH5, GoPro, Panasonic VLog, RedLogFilm, RED IPP2 and Sony Slog2/3. There’s also support for working in ACES and Rec. 2020 colour spaces.
The last item in the Pro pack is Denver’s ‘Look Hacking System’ tutorial which walks you through how to understand and re-create a film’s look for yourself. Denver demonstrates how to do this in DaVinci Resolve, Adobe Premiere Pro and Final Cut Pro X and you can download the follow along exercise files.
The course is pretty short, but it packs a lot in, and delivers a solid methodology that will equip you to logically and consistently match your footage to reference stills. Denver also shares some great tricks along the way. His teaching style is easy to follow, if pretty fast paced.
In watching Denver grade in both DaVinci Resolve and Premiere Pro it’s a solid reminder of how much easier it is to grade in Resolve, but if you know what you’re doing, how good the results can be in Premiere.
Which films does the LUT collection emulate?
- 80s*
- Amelie
- Aviator
- Blade Runner
- Buffalo 66
- Devil’s Rejects
- Drive
- Enemy
- Graduate
- Grand Budapest Hotel
- Hannibal
- Her
- Inside Llewyn Davis
- Let The Right One In
- Mad Max
- Mafia*
- Moonrise Kingdom
- Revenant
- SciFi*
- Seven
- Steel Assasin*
- Super Hero*
* Generic names used for trademarked names
If you hit the Motion Picture Film LUTs site you can see each of these LUTs in action, via a bunch of interactive before and after image sliders, featuring a fair number of hipsters.
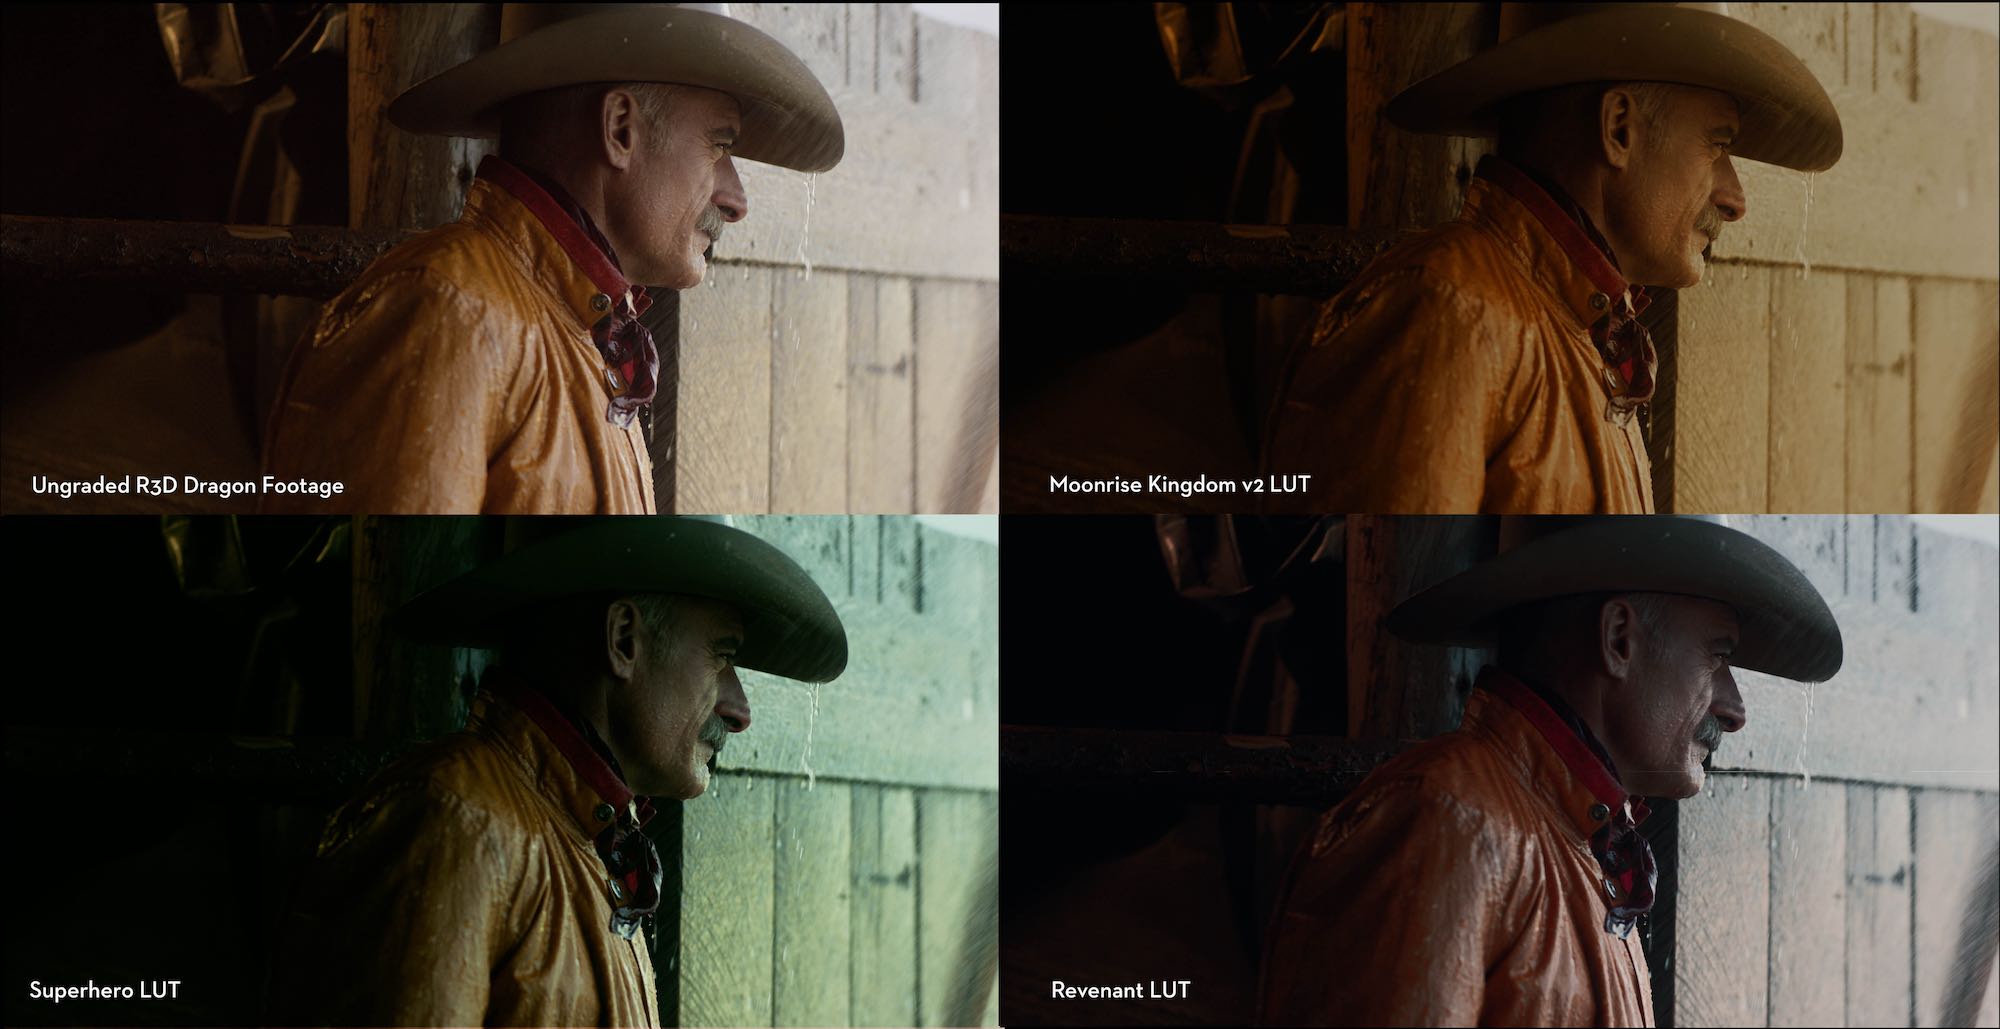
The Free Motion Picture Film LUTS, click to enlarge.
Are Color Grading Central’s Motion Picture Film LUTS any good?
Having had a chance to play with the LUT collection, they do deliver a wide variety of nice looking film looks, most of which will be applicable in more than just situations in which you’re seeking to directly mimic the look of the original film.
So for example, in the image above, which features the free LUTS you can download here, you can see that the ‘Revenant’ look could potentially apply to a corporate video, whilst the green tinted Superhero LUT might be a bit of a stretch for that.
But the main point of a LUT collection is to give you a great selection of creative starting points to adapt to your own needs, rather than assessing them ‘as is’, or leaving them as they fall.
It’s worth remembering that the intensity of any of these looks can be dialled back to taste, and this initial level of intensity is something that Denver has deliberately chosen to go for, so you’ve got somewhere to ‘dial back’ from. In my own testing of the LUTS I often pulled the look back to around 50-40% of the original intensity.
Most of the LUTs maintain some semblance of skin tone, which is key to delivering something that’s more than just a colour wash across the whole image. Except for maybe the Blade Runner 2049 orange look which is pretty full on.
Given how much bonus material you get with the Pro package, including all the camera specific variants of the LUTs (732 .cube files in all!), they’re a pretty good deal at $149.
Check out the Motion Picture Film LUTs Collection here.
If you want to learn more about creating your own creative looks from scratch, then I’d also highly recommend checking out colorist Warren Eagles creative looks course on FXPHD.com, which I’ve previously reviewed here.
If you’re after a more naturalistic set of LUTs to work with I’d highly recommend checking out filmmaker Noam Kroll’s LUT collections which I’ve talked about at the very bottom of this post.


Hey Jonny, were there ever any discount codes for Lattice? Would love to try it but it’s now $239.99! Thanks
Hi David, thanks for checking out the blog. Not that I’ve seen I’m afraid!