
DaVinci Resolve 12.5 Tutorial Round Up
DaVinci Resolve 12.5 is now out and you should check out this post which rounds up some of the best insights and tutorials on the new features and improvements. You can download it today as a public beta from the Blackmagic Design site.
In this round up of DaVinci Resolve tutorials I’ve kicked it off with this demo from colorist Warren Eagles at the Abel Cine booth at NAB 2016. It’s a fantastic way to spend 25 minutes and you’re going to pick up some excellent tips, no matter how advanced a colorist you are.
Talented colorist David Torcivia, who is making some of my favourite DaVinci Resolve tutorials at the minute, recently posted this excellent tutorial on using the Vectorscope to perfectly nail your client colours.
This is especially crucial in commercial grading where things must match exactly – or you will get notes from the client! If you want to see more of David’s tutorials, check out his Youtube Channel or hit this link to see every post on the blog that his work appears in.
Colorist Mathieu Marano, from My Canadian Studio, demonstrates how to create ‘project templates’ in DaVinci Resolve 12, to save yourself a lot of prep time. It’s a really cool tutorial on an area that’s not often covered online, but would be super helpful to anyone wanting to work with a professional methodology.
One of the new features in Resolve 12.5 is the ability to create ‘power bins’ that contain resources that can then be seen across all projects, which might be a simpler way to do ‘some’ of what Mathieu is demonstrating. Check out this previous post for even more DaVinci Resolve tutorials including two from Mathieu.
In this tutorial from Ben Brownlee for the DigiMedia Dude, you can learn how to perform a sky replacement inside Resolve 12.
Three Days Editing in Resolve 12.5
Filmmaker Walt Biscardi has written up an essential read, in a set of three articles, for anyone looking to perform their first full edit inside of DaVinci Resolve 12.5. Learning from Walt’s experiences provides a great leg-up to anyone looking to cut their first project in Resolve. As a Premiere editor myself, it’s interesting to note that he often compares it to the experience of cutting in Premiere, which helps provide a useful baseline.
Walt Biscardi Editing in Resolve Day 1
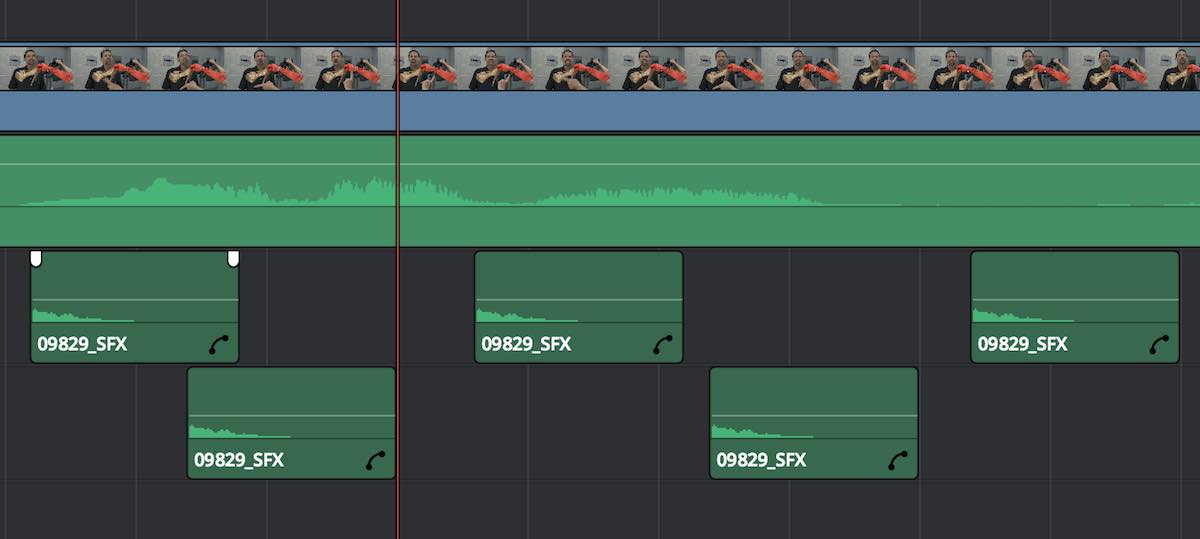
See how clearly labeled the audio clips are? There’s a delineation between the clip name and user controls that’s fabulous. With Premiere Pro, the audio labelling frequently disappears with the audio clips so I have to double click them back up into the Source Monitor to confirm the clip name. The labelling is also plenty large and easy to read. Really nicely done.
I’ve pulled out a few highlights of things that stood out to me from Walt’s experiences, but you really must read the entire series of articles to get the complete picture. In Day Two you can get some answers to some day one questions including how to toggle auto scaling, generating optimized media when working with 4K H.264 files and more. One of the things Walt highlights is how well the Wacom tablet works in Resolve, as this is a pet peeve of mine too, in Premiere
Organising media – “I really like the dual Metadata / Inspector Window. Nice use of space to make them both share the same window.”
Syncing dual sound – “There were about 50 clips to sync and it was done in about a minute or so. I LOVED that no new clips were created. No multi-cam clips or extra clips to be sorted through. The audio from the Zoom recorder was simply placed on a new audio track on the video clips. Double click the video into the Source and I heard the clean zoom audio.”
Trimming – “Everything about editing in Resolve 12.5 so far is intuitive. The Trim commands are fabulous and I especially love that some features are active by simply hovering over a different area. Hit Trim and hover over the thumbnails in the video track and you’re automatically Slipping the video. I use slip a LOT and loved this. It was very intuitive and easy for me to poke around and discover stuff.”
Titles – “I finally played with the Text Tool and it’s quite good and useful. Is it as feature rich as Adobe’s? Not by a long shot, but can you create titles with it? Absolutely.”
Workspace/layout – Panels move and replace themselves as you set about doing different functions while editing. It’s so well thought out and I’m not searching for windows, or dragging more windows out, or losing windows under windows. Granted I have a 5k Retina iMac, but the interface is so efficient I have no need for the second window. It’s absolutely remarkable so far.
Conclusion
Does Resolve have the rich feature set of Adobe Premiere Pro or Avid? No, not even close. Does Resolve have a very good, useful feature set that any editor can cut a narrative story and is easy to adapt you muscle memory to? So far, from what I see, the answer is yes. Especially with the latest additions with Resolve 12.5.
The Day 3 post has a ton of great details and insights on the little things he loves about working in Resolve and this is probably the most important page to read! Just to reiterate, it’s a really brilliant set of blog posts and I can’t recommend reading them in their entirety enough, as it’s probably one of the best ‘editors guides to Resolve’ I’ve seen.
Is Resolve Studio Worth $1000?
In these two free video insights from subscription colorist training site, Mixing Light.com, colorist Patrick Inhofer summarises the Studio-only features in DaVinci Resolve 12.5. Patrick shares some interesting thoughts on Blackmagic Design’s potential strategy behind the delineation between the free and paid versions and whether that’s changing with this most recent update.
Studio Only Features in Resolve Part One and Part Two
Watching these two videos will help you decide if it’s time to upgrade from the free to the paid version of Resolve, although it’s worth pointing out that you can try all these features in the free version but they will export with a watermark on any shot you use them on.
As I run through this list of Studio-only features, notice how they have nothing to do with multi-user workflows… which, prior to this release, essentially defined why you’d buy DaVinci Resolve Studio. Instead, Blackmagic seems to have made the strategic decision to hold back some new features that are very desirable to working professionals from all backgrounds.
DaVinci Resolve Workflows for Beginners
In this hour long presentation from Soho Editors at BVE 2016 you can get a good schooling from Rory Cantwell in how to to grade a 30 second commercial in Resolve, that’s been cut in FCPX. Rory covers a lot of ground in his presentation so well worth a watch if you’re new to Resolve.
For more great presentations from Soho Editors check out this post on Advanced FCPX Tutorials.
In this seminar from colorist Moritz Fortmann, who works as a product specialist for Blackmagic Design, you can walk through another good foundation for using Resolve for the first time, in under half an hour. This video was filmed as part of the latest FCPeXchange day.
In this free half-hour crash course Casey Faris walks you through the basics of using Resolve 12.5.
DaVinci Resolve Quick Tips
Colorist, author and trainer Alexis Van Hurkman continues his fantastic series of free training tips in these two episodes of Ripple Training’s Resolve in a Rush. If you want to take your colour grading skills seriously you should grab a copy of Alexis’ Colour Correction Handbook 2nd Edition, which I’ve previously reviewed here.
Alexis’ tips in this episode of Resolve in a Rush will do a great job of vastly improving your keyframing workflow, especially when tracking complex power windows.

Placing each rendered shot in its own folder automatically organises output media for you.
In this short post over on No Film School, Tristan Kneschke talks through how colorists can improve their workflow when working with visual effects departments, with some helpful workflow tips when working with DPX files.
DPX files are image sequences, meaning you’ll be generating a file per frame, leading to a ton of files. For the sake of organization, it’s customary to render each clip to its own folder. Graphics houses will typically label each effects shot with a unique shot number as a way to keep track of them. The folder and shot names for your output should follow this nomenclature.

In another great post from Tristan, this time over on Premiumbeat.com, he walks you through in quite some detail, how to use an ‘offline/reference’ movie in Resolve to ensure that your conform is correct, and so perfectly matches the client’s rough cut. This is something that Resolve has particular methodology for, but it’s an essential skill to obtain.
Tristan also calls out a few ‘gotchas’ along the way.
If you’re not seeing your picture at all, chances are your reference Quicktime has lost its timecode when you brought it in (usually reset to 00:00:00:00) and the timeline starts at a different time.
This can happen if your reference filename is too long. Timecode can also be lost in compressing to another format. Not to worry. You can change the timeline’s starting timecode by right-clicking it in the Edit tab and choosing Starting Timecode.

A third tip from Tristan, again on Premiumbeat.com, demonstrates how to leverage the ‘usage’ metadata within a project to help you simplify it to create a more streamlined version, which you then might want to use for archival or what have you. A handy tip!
The Media page organises every clip in sortable spreadsheet-style tabs familiar to any NLE user. Right-clicking on the column heading brings up a host of other metadata options that can be hidden or revealed. The one we’re looking for is Usage.
In this 5 minute episode of My Canadian Studio, Mathieu delivers a quick overview of how Remote Grading works in Resolve 12. This is a feature of the Studio (paid) version of the software that lets you remotely grade footage on the other side of the world, or the office, from inside of Resolve.
In this quick tip Casey Faris talks through how to use middle-click on a mouse that doesn’t have a middle button, which is something that opens up a lot of functionality inside of Resolve.
In this short tutorial Theo from Miesner Media demonstrates how to use the newly improved LOG controls in DaVinci Resolve 12.5
More DaVinci Resolve How Tos
In these three tutorials from Casey Faris you can learn how to work with key frames in Resolve, how to fix over and underexposed footage and some great tips on creating sound designs in Resolve. For many, many more tutorials from Casey check out his YouTube channel here.
Understanding ACES (in Baselight)
In this tutorial from colorist Andreas Brueckl, who once upon a time shared probably the best colour grading breakdown of a beauty commercial ever, has shared this tutorial on understanding ACES (the Academy Colour Encoding System) in both theoretical and practical terms. In these tutorials he’s using Filmlight’s Baselight which is a much more expensive system than DaVinci Resolve.
Andreas does a great job of explaining what ACES is and some of the pros and cons of working in ACES (about 11 minutes in), so if you want to get a good foundation of ACES, this is a very decent watch. Andreas also recommends watching two tutorials from Filmlight, that are at the top of this DIT post on Understanding Colour Management, if you really want to take a deeper dive into understanding ACES.
Personally, this insight from Mixing Light.com colorist Robbie Carman is the most easy to understand write up I’ve seen yet about ACES and how it works.
In an ACES workflow is you’ll never run into the limitations of smaller color spaces and because ACES encompasses the entire locus, it’s future proof. In other words, whatever future color spaces are used for presentation and distribution, new transforms (using the RRT/ODT combo) can be written using what’s called CTL programming or Color Transform Language, to parse the ACES data into whatever space is appropriate.
In this second, older tutorial Andreas shares some of his creative experiences when grading in ACES whilst working on the film Redha.
What is ACES anyway?
The Academy Color Encoding System (ACES) is becoming the industry standard for managing color throughout the life cycle of a motion picture or television production. From image capture through editing, VFX, mastering, public presentation, archiving and future remastering, ACES ensures a consistent color experience that preserves the filmmaker’s creative vision. In addition to the creative benefits, ACES addresses and solves a number of significant production, post-production and archiving problems that have arisen with the increasing variety of digital cameras and formats in use, as well as the surge in the number of productions that rely on worldwide collaboration using shared digital image files.
If you want to know more, check out the official ACES website here. This older post ‘ACES in 10 minutes’ from Bennet Cain is also a fine read.
DaVinci Resolve Twitter Tips
Colorist Dado Valentic shares these short video tips on his Instagram channel, colour.training. They are 15 second nuggets of gold for Resolve users, so be sure to follow him to get more tips on a regular basis.
Qucktip #6 – Order of operations in Resolve pic.twitter.com/T41blbFv26
— Will T. (@thewilltejeda) March 21, 2016
Here are some more really helpful Twitter tips. Check out this recent tutorial round up for even more of these from both Will T and Alexis Van Hurkman.
QuickTip #5- If you're in the color tab in Resolve, and, notice you're dropping frames, briefly shut off your scopes for a performance boost
— Will T. (@thewilltejeda) March 20, 2016
#Resolve Tip (1/2)—Using the DaVinci Control Surface, pressing SHIFT-UP and PRIMARY opens the Primaries Wheels of the Color Wheels palette.
— Alexis Van Hurkman (@hurkman) March 14, 2016
#Resolve Tip (2/2)—Also, pressing SHIFT-DOWN and PRIMARY opens the Log controls, while just pressing PRIMARY opens the Primaries Bars.
— Alexis Van Hurkman (@hurkman) March 14, 2016
Here's the new thing compared to the old thing. Now, back to ignoring it and getting work done. pic.twitter.com/FcJolEfk5A
— Alexis Van Hurkman (@hurkman) March 11, 2016


Resolve will become an editor of choice, once it will equal media composer trimming tools. There is no way one can fine cut with the ripple 4 small windows mode. Please imitate media composer for that matter and you will win many editors who need precision.
Wonderful, wonderful resource. Thanks.
As someone completely new to filmmaking with no budget this will prove to be invaluable. I was going to put my efforts into learning the free version of Lightworks, but it seems Resolve 12.5 is now a better alternative. Added to that I’ll only need to use one product for both my NLE and grading.
It’s a very good tool and amazing that it’s free! Hope you enjoy learning it.
Hope you enjoy using it Stuart, thanks for taking the time to check out the blog.