
How To Be a DIT – Part 16
It’s been a while since my last How To Be a DIT post, and so this one’s a bit beefy as a result. But it’s packed with great insights on the world of the DIT, including book review updates, professional DIT workflow write ups, tips and tutorials and more free training resources.
One of the things you’ll want to check out is this companion post to this one, which features an interview with author and DIT trainer Robert Trim, who was kind enough to answer some of my questions on what it takes to be a DIT, but proved too detailed to squeeze into this already lengthy post. So a double-whammy of DIT goodness.
I always enjoy listening to what Michael Cioni has to say, and in this 10 minute interview from the Digital Cinema Society, you can get his thoughts on where the industry is headed with regards to digital filmmaking and the reason why you need to be cannibalising your own business, before someone else does.
DIT Books Updated
About a year ago I put together a post on 5 Books To Help You Learn How To Be A DIT, which included both David Stump, ASC’s epic Digital Cinematography – Fundamentals, Tools, Techniques and Workflows, and Robert Trim’s Digital Imaging Technician. In this section of the post I thought I’d update things a little, starting with this nice video from the Digital Cinema Society featuring David’s thoughts on the process of moving the industry from film to digital and the process of writing the definitive book on digital cinematography.
Doing a [manuscript] outline on something that is changing as fast as digital cinematography is like mud wrestling an anaconda. And the outline ended up taking me vastly more time than I ever dreamed it would, because every time I got through it, I’d have to go back and change everything that had changed in the mean time. And as I did, I would keep thinking of things to add… there was originally going to be a 3D chapter in the book and even my publisher’s cried uncle and said “Stop writing! We don’t have any more room… I thought I was going to turn in 300/350 pages, with the 3D chapter in the finished manuscript, as I turned it in, I was at 1101 pages.
https://www.youtube.com/watch?v=jP8EUOmCFcE
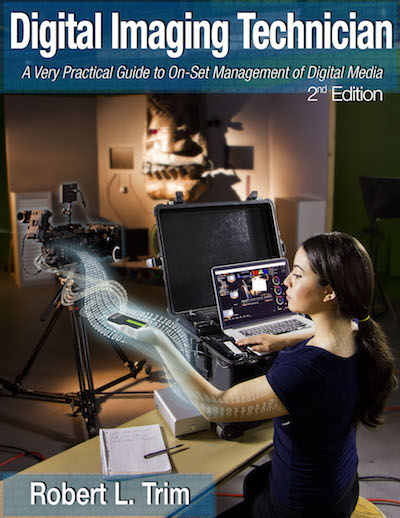
Author and DIT instructor Robert Trim has recently released the second edition of his ebook Digital Imaging Technician, which is available as a PDF or iOS iBook. You can check out my previous review here. In the video above you can get a good taste of what it takes to be a professional DIT, with a comprehensive math lesson which is the foundation for being able to answer the question “When can we all leave the set?”
Robert was generous enough to answer several of my questions about what it takes to be a DIT, the core creative, technical and personal skills of the role and a whole lot more. That turned into quite a lengthy interview so I’ve split it out as a separate post which you can enjoy, here. Here’s a quick excerpt on the update to the book.
What’s in the update?
Lots! The workflow tutorials are the core of the book. You are taken through the same, daily workflows with four key pieces of software. There’s been drastic improvements in workflow, features and interface with all of them. DaVinci Resolve now v12, Scratch is v8.4. REDcine-X has seen both fixes and additional features, requiring update.
A significant amount of new hyper-links have been added to good-current information, I have mined off the web. The web is a slippery place for stable links as we all know, so those 404 dead ends should be fewer, but never fixed totally. That’s the nature of the web.
Most significantly is the massive revamp of the chapter layouts. It was clear in the first edition that it ‘sorta-worked’ as a whole, but needed to be ‘re-thunk’. Students are great for feedback like this. Comments like ‘I got this part but not until I read this a few chapters later’. So why not fix that as well?
As with any publication, the layout was tweaked a bit. This is easier to do when it’s an ebook. And ebook formats like iBooks from Apple allow for interactivity with the book itself.
I can’t say much about the rest of the update that’s coming at this time because it’s in development. But I can say that if you’re a visual learner– you are going to love this addition to the book. Plus it will be surrounded by a vast array of other ‘like minded’ information making it a hugely valuable resource.
That last paragraph hints at some exciting things that Robert has let me in on, which, if you’re working in and around the world of DIT, you’ll find of real benefit. So, be sure to keep an eye on this and Robert’s site, as I’ll be sure to talk about them in a future How To Be A DIT post when it’s all released.
One of the things that I really like about the book are the end of chapter review questions that help you to lock in your learning as having to answer a difficult question will show whether you were really paying attention and have absorbed the knowledge. Also the practical exercises make sure you’re not just observing, but engaging with the material for real. These all reveal Robert’s extensive experience as a successful educator, and in fact, this summer he will be teaching a summer school in Austria on the role of a DIT.
Buy Digital Imaging Technician on iTunes | Buy Digital Imaging Technican as a PDF
DIT Professional Workflows

In this section of the post I’ve gathered together a few great posts featuring some professional DIT workflows as used on the films Chappie, No Escape and Man with the Iron Fists 2, as well as some great indie tips from Mentorless which tackles a lot of the common mistakes people most often make when doing common DIT tasks, without a DIT.
Data management went smoothly, and the team ran “a four-clone workflow, every card being backed up four distinct times,” says Muller. “This might seem paranoid, but we were bouncing drives and RAIDs along over rough ground, and sure enough, one of the RAIDs did cough and splutter along the way. There isn’t time on set to repair RAIDs, and we simply shelved it and put a new one into play. During some of the longer, more improvised scenes, we could fill a 128 GB RED MAG between each take, so it was very comforting having that level of assurance when it came to throwing those same mags back into the fray as quickly as we had to.”
HD Video has a nice article on the shooting of Neil Blomkamp’s Chappie, which on page 3, also includes some nice technical details about the DIT workflow, performed by DIT Richard Muller, as well as the equipment they used to wrangle all the various types of cameras that were used. For a lot more information on the making of Chappie, check out this previous post.

SHOOTING ON THE CARDS
Sandra: Once a card is shot, I take the piece of paper tape that I used to label the card and tape over the connection point of the card, which prevents me from inserting the card back into the camera once it is shot. This is a pretty good system that works for me, since I would have to physically peel the tape off of the card in order to even get it in the camera…
Eve: Wait, you do what???
Sandra: Um…
Eve: Never tape over the slot of the card. I know it’s dummy proof and will prevent you from putting the card back in the camera, but that connection point is the only part of the card that you shouldn’t touch and needs to work 100% of the time. Don’t give it any chance to get tape stickiness anywhere near it.
Lots of people do this, but it doesn’t fly in my world. Once the card is shot, take RED PAPER TAPE and wrap the card in the red (around, not over the connection point), labeled: SHOT A01, but ideally you put the shot card in it’s case and tape over the opening of the case with red tape labeling SHOT A01. (or hot pink, something bright!)
Sandra: Ok. Got it. Thanks!
In this guest post on Mentorless.com from ‘one-woman band/non-fiction television producer Sandra Alvarez-Smith and cinematographer Eve M. Cohen’, you get a very comprehensive run down of some of the common approaches (largely) non-technical people take with their data, and the things they really should be doing. If you work with people who do these things, tell them to stop, and send them the article!
https://www.youtube.com/watch?v=VFpK71yBv1s
ditspot.net is a fantastic DIT resource created by DIT and filmmaker John Burkhart, which includes some great write ups on how he tackled a few different film specific workflows. What’s interesting about both the write up for No Escape and The Man With The Iron Fists 2, is that one of the main challenges is simply keeping up with the sheer volume of footage and the resulting data. In both cases John led a team of DITs and data wranglers to keep up with camera 24 hours a day.
For No Escape, 135 hours of footage was shot on Red Epic, Arri Alexa and Phantom cameras resulting in 62TB of data. Check out the full write up here which covers data wrangling, set up, dailies, editorial proxies and archival.
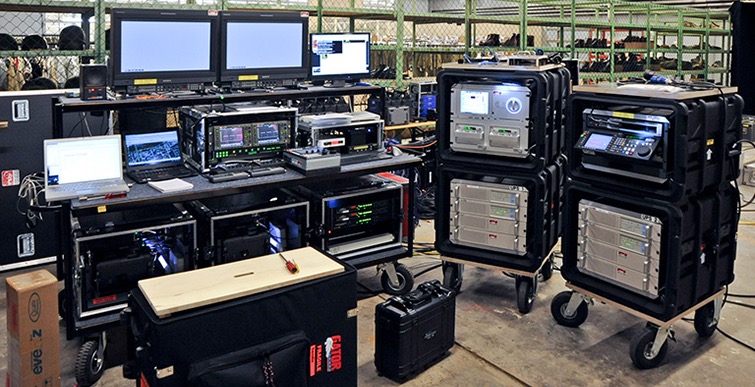
Data Wrangling: Macbook Pros with ShotPut Pro handled all our wrangling needs. Our guys would offload the material from the cards with an MD5 checksum onto simple Western Digital Thunderbolt Duo’s in RAID 0 configuration. We would have one master drive, and one back-up drive on set, as well as the original cards. Once I had archived the day’s footage to LTO tape that evening we would return the cards to set the next morning before the shoot started.

The major challenge of this shoot was the sheer amount of material coming in on a daily basis. There were usually 4 Red Epics shooting concurrently in 4K at 1:8, so while our average data usage was just under a modest 1TB/day, that ended up being about 8 hours(!) of material to transcode and upload daily.
In the similarly detailed Man With The Iron Fists 2 write up, John shares some really useful insights, often discovered out of necessity, that could be of huge benefit to your own project’s workflows and hardware choices, so be sure to give it a thorough read!
My take away is this: If you’re making h.264 deliverables of any kind under a deadline, you simply have to ditch the MacPros (which have Xeon processors, without quicksync), and get yourself a MacBookPro, iMac, or even Mac Mini or other i7 based cpu (with Intel’s quicksync enabled) to do the conversions. It’s remarkably faster.
DIT Tips and Tutorials
Kicking things off is a fairly general video, and not all of these will be new to you, but a useful watch for anyone spending all day, every day at a Mac computer. Command+Ctrl+N was a new one to me, which creates a new folder filled with any selected files. Handy!

Reducing the exposure on this Alexa Log C frame in Nuke, viewing under an sRGB preview LUT, reveals the previously blown-out detail in the sky. Screen capture courtesy of Dan Sturm.
ProLost has posted a helpful breakdown of LOG Vs RAW and why you would want to shoot one over the other. Although it’s focused largely on still photography workflows, it’s a helpful post for anyone who wants to take a deeper dive into the topic.
Log, in its many flavors, is a smart, flexible, and powerful way of storing high dynamic range digital cinema imagery. It’s closer to raw than you might think, and often much easier to work with for results of the same or better quality.
Here is a PDF version of the stops to log IRE conversion table if that is more convenient for anybody: https://t.co/1eJuljGhAp
— Nick Shaw (@nickshaw27) December 8, 2015
Nick Shaw from Antler Post has put together a “Stops to IRE conversion table for Camera LOG Curves” which you can download as a PDF here. Nick has also previously created this Scope levels vs exposure document which provides “digitally generated images showing 18% grey, black, and five stops above and below 18% grey, encoded with different transfer functions used in digital cinema cameras, and how those levels appear on a waveform monitor.”

Kylee Wall has written up a fanstastically detailed post on checksums, transfer speeds and the relative risks to your media, depending on which flavour you use. The whole post is worth the time and effort it will take to digest, but equally so are the numerous comments that it sparked, especially those from Michael Brockington and Dan Montgomery of Imagine Products.
It is important to note that none of these checksums are perfect. Each checksum brings with it variables that determine both safety and speed. The reality of post production today is MORE media, LESS time. How likely is a lapse in data integrity, and how can you balance risk with time? What are the most important considerations for video professionals who manage data?
Some of the following links I’ve been sitting on since my last DIT post, so they are a little dated in places but, I felt, still worth sharing.
Avid Tutorial Guru Kevin P. McAuliffe has a useful introduction to figuring out which codec you should use in a variety of different situations in this post over on Pro Video Coalition. Although the post is coming from an Avid centric workflow, it’s still got some really useful insights for editors and DITs in other contexts.
Speaking of codecs, Streaming Media.com has a couple of nice articles on the state of codecs as of mid last year. OK so an ice-age ago for digital tech, but still worth a read if you’re only just getting to grips with the context of HEVC/H.265 and VP9, as we all move towards higher streaming standards and UHD deliverables. Check them out here: The State of Video Codecs in 2015 | The Great UHD Codec Debate

In the latest RED Learn workflow tutorial you can pick up some useful tips for working with R3D files natively in Adobe Premiere Pro, including how to save settings presets for adjusting some of the metadata controls of the R3D file. There’s also a handy tip on using RMD files in Premiere too. Due to their Vimeo embed settings you’ll have to jump to the Red site to watch the tutorial.

Digital Rebellion have shared a handy, and simple to follow, step-by-step guide for creating feature film dailies with ARRI Alexa footage in DaVinci Resolve.
In the event that the audio is not synced correctly, open the video in the viewer, scrub to the exact frame that the slate hits on and write down the timecode for that frame. Then open up the audio file and stop it on the exact frame that you hear the clap of the slate (in a lot of cases this will be an obvious short spike in the waveform towards the beginning of the file). Then right-click the audio file in the Media Pool and select Clip Attributes. In the Timecode pane, enter the timecode from the video you noted down earlier. Then repeat the earlier step of selecting the video and audio files, right-clicking and choosing Auto-sync Audio Based On Timecode again.
When it comes to transcoding your footage, it seems to be a little tricky to really work out, definitively, which app is the fastest in any given scenario and on which hardware configuration. This is why doing your own testing, and re-testing, is a crucial part of being an efficient DIT.
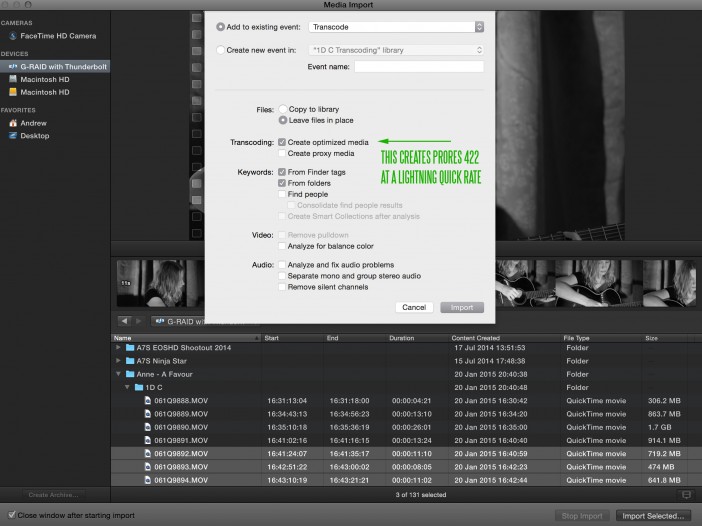
In this post from EOSHD it seems that transcoding to Pro Res in FCPX could be the fastest way of converting 4K files like those from the Canon 1D C.
FCPX on the other hand was simply magic. It was able to transcode in realtime from MJPEG to ProRes. It didn’t introduce the banding I saw earlier in Premiere either.
For 1 min (4GB) 4K MJPEG…
- Resolve = 3 min
- Adobe Media Encoder = 3 min
- Apple Compressor = 3 min
- Apple FCPX = 58 sec
The reason it is so fast is that it is the ONLY software I know of that encodes to ProRes using both GPU and 64bit CPU acceleration. The conversion is real-time so a 1 minute clip takes 1 minute to convert.


