
If you’re a professional video editor, then you want plugins for your NLE that will actually help you get real work done. Not just adding fancy transitions, graphics or colour grades from a library of templates. Although those seem to endlessly sell – I don’t know why.
Well, I’ve built a few of the useful post-production plugins that can help you:
- Build instant stringouts of every performance of a specific line.
- Visually mark every instance of a specific keyword on your timeline.
- Navigate your timeline at pace – saving endless scrolling and zooming.
- Including opening closed Sequences at the push of a button.
- Transcribe and translate foreign language audio into subtitles you can understand.
- Export a list of every picture transform, speed change, effect etc., to turnover to Online.
- Tidy Premiere’s single-folder, consolidated project mess to mirror your bin structure.
I’ll guide you through each of them in this article, but it’s worth mentioning that two of these are free to use!
But first… if you’re not already signed up to my free weekly newsletter, you’re missing out on the industry insights, craft knowledge, and AI workflows that 2000+ editors are reading ahead of you.
Free Premiere Pro Plugins
These two are free to use:
- Transcriber Translator (TT) = Foreign audio in | Translated SRT subtitles out
- XML Parser (XP) = Export a list of every picture change as a turnover deliverable
And the others are super-affordable. Why make them so cheap? I want as many people as possible to benefit from using them, rather than pricing them out of reach.
- Keyword Marker (KWM) = Mark every instance of custom keywords with a click
- Tidy Media Manager (TMM) = Deliver Consolidated projects in tidy folders
- Teleport (T) = Anchor a location in your timeline and return to it in a click
I’ll guide you through each one now.
Compare Performances in Adobe Premiere Pro
KWM version 2 adds three major tools on top of the marker engine you already know — a multi-keyword search builder, an automatic breakdown sequence assembler, and a scripted line finder built for drama and multi-take shoots.
Build Breakdown Sequence – One click builds a whole sequence.
Choose your keywords, set a handle length, hit Build.
Keyword Marker assembles a new Premiere Sequence containing only the moments that match — a selects reel, automatically. Clips land in chronological order with the handles you asked for. Your source media is never touched.
Works with single keywords, multi-keyword rules, and scripted line results alike.
Scripted Line Finder – Twenty takes of the same line. Found in seconds.
Type or paste the full scripted line — with a preview of the results — and Keyword Marker finds every take in the transcript. Add alternate versions with one click. Build a breakdown sequence of every performance in one go.
Made for drama editors and assistants.

Multi-Keyword Search
Single keywords find moments. Multi-keyword search finds relationships.
Build a rule with an anchor keyword, then add conditions:
- AND — find moments where two topics appear together
- NOT — filter out results where an unwanted word appears nearby
- THEN — find word A followed by word B within a time window
- NEXT — find a specific word sequence, one word at a time
- TO — capture every clip from one word to the next (“action” to “cut”)
Preview every result before creating a single marker. Click any result to jump straight to it in the timeline.

How It Works
- Transcribe your footage and export to SRT (like you already do)
- Import the SRT into Keyword Marker
- Type the keywords you’re hunting for
- Preview them in context with timecodes
- Batch-add hundreds of markers in seconds
- Navigate by color and keyword instantly
Markers can live on the timeline or on clips (so they travel with your media in multi-cam workflows).
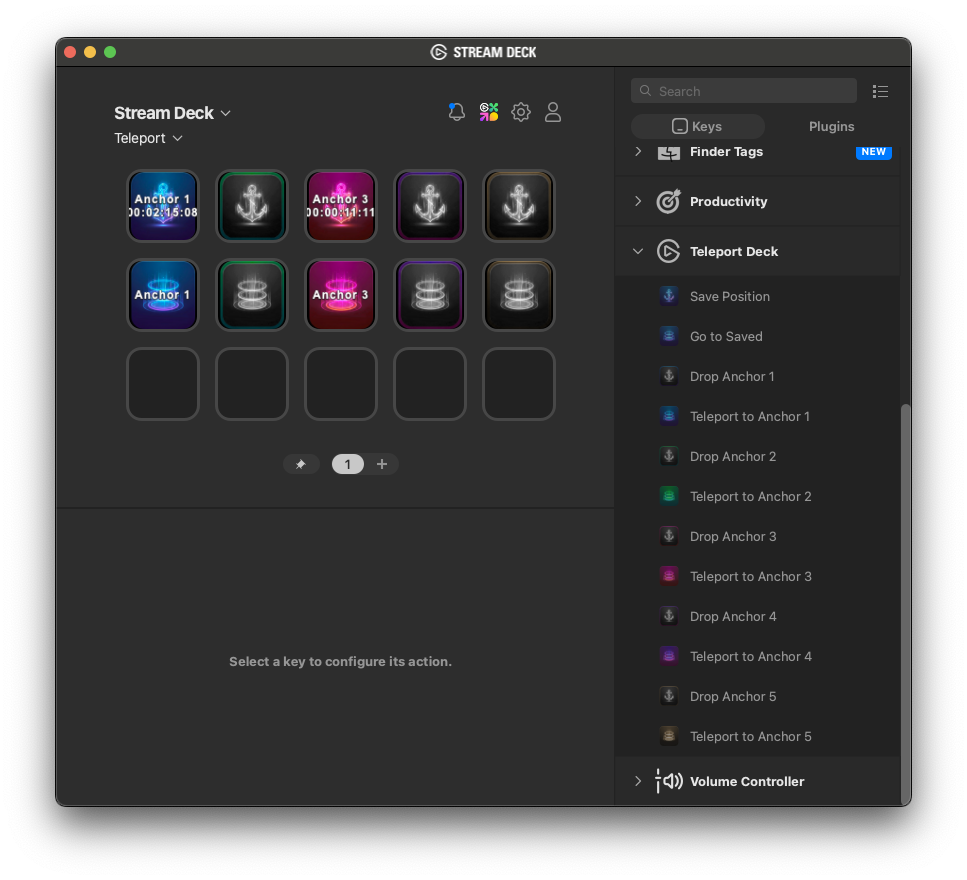
Navigate Your Timelines with Stream Deck
How does Teleport work?
- Set an anchor in a click to record the current timecode of your playhead
- Add a custom name if you like
- Go off to wherever you want to work next
- Teleport back to your original anchor location in a click
You can store up to 5 anchors, give them custom names and teleport to any of them in a click.
Teleport 2.0 Advanced features
Teleport was recently updated to v2.0 which brings some valuable new features that cannot be replicated by the Premiere Pro marker panel (which only shows the markers of the currently open timeline).
- Auto-switch between open sequences
- Auto-open closed sequences from the All Timelines View
- Clip-based Anchors – set an Anchor within a clip and Teleport to the clip wherever it is
- Choose between colour-coded Anchors or original single colour design
- Stream Deck support via the Teleport Deck plugin
- DaVinci Resolve Teleport (coming soon!)
How do Timeline and Clip Anchors work?
If no clip is selected in the timeline when you drop an Anchor then Teleport will record the current timecode at the position of the playhead. This will Teleport you back to the same Sequence timecode location each time.
If a clip is selected, then the source timecode of that clip and the clip name will be stored in the Anchor.
Now you will Telelport back to that position within the clip, no matter where it’s moved to in the timeline.
If the clip has been deleted Teleport will issue a warning. If the clip has been trimmed to remove the Anchor timecode from the Sequence it will Teleport to the current first frame of that clip.
All Anchors are Sequence-specific, even if you rename the sequence, as Teleport uses Premiere’s internal ID system.
Transcribe > Translate > Edit

Transcriber Translator was built so that I could quickly edit foreign language interviews with English subtitles. And do it cheaply!
How it works
- Drop your source audio files into TT
- TT transcribes the audio file into native subtitle captions
- TT translates those captions to multiple target languages
If you already have an SRT file to translate into other languages, e.g. to localise your final edit, you can just drop the srt file into the TT app and it will output your selected translations as multiple SRT files.
Under the hood, TT is using the industry-leading ElevenLabs API to transcribe in 100 supported languages. With Elevenlabs generous free tier, you can get 2.5 hours of transcription every month compared to only 12 minutes if you go through the website.
The translation is then performed via API by either Gemini (limited to free tokens) or Anthropic’s Claude (pay-as-you-go plan).
Drag audio into the app, then import the high-quality translated subtitles back over your footage to get cutting.
Here’s what one happy editor had to say about Transcriber Translator:
The translation quality was extremely high.
This is going to be really helpful and save a lot of time (and money).
As you know, Premiere’s transcription quality is so lame it’s hardly worth using.
— Kyle Rainford, Finalise.TV
I’ve recently updated Transciber Translator numerous times with licensing improvements, bug fixes, AI-model updates, and much more.
Create Turnover Deliverables Quickly
When Premiere consolidates a project down into just the media you need to turnover as your final timelines, it does so by creating a new folder and copying every single image, video and audio file into it.
It’s a huge mess!
Tidy Media Manager solves this by extracting the bin structure from your source project and mirroring that organisation at the Finder level. Now everything is where it should be.
Other features include:
- Undo your last tidy in a click.
- Consolidate sub-folders into parent folders to simplify complex structures.
- Exclude folders from organisation if you want to leave those behind.
List Every Picture Change in Premiere
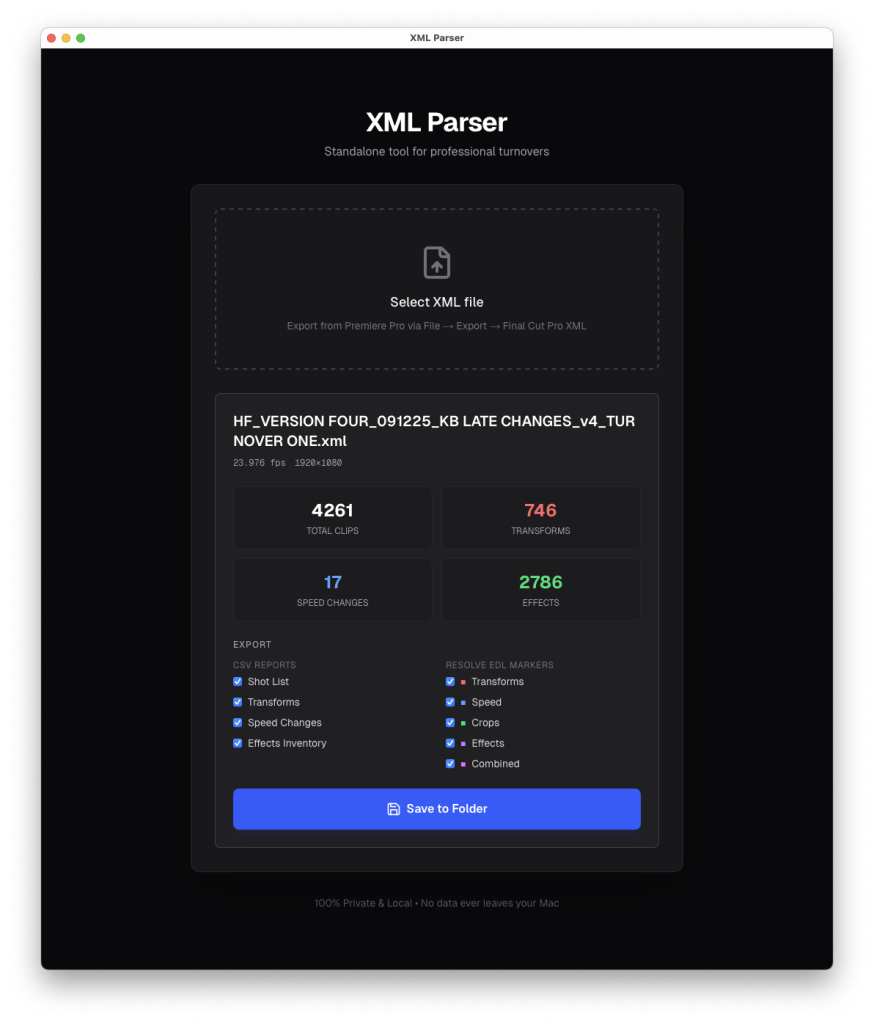
XML Parser is a free Mac desktop app for post-production turnovers.
If you like it, you can pay what you think it’s worth or have it for free!
XML Parser reads your Premiere Pro XML files and generates detailed CSV reports and DaVinci Resolve marker lists — everything a finishing artist needs to accurately conform a project.
It works 100% from your local machine. No account, internet or data sharing needed.
What it does
Drop in an XML file exported from Premiere Pro of your final Sequence and get back 9 files:
CSV Reports
- master_shot_list.csv — every clip on the timeline with Shot #, timecodes, track, speed, scale, rotation, position, keyframes
- transforms.csv — clips with non-default transforms (scale / rotation / position / keyframes)
- speed_changes.csv — clips with speed changes (slow motion, fast motion, reverse)
- effects_inventory.csv — applied effects per clip (Lumetri excluded)
DaVinci Resolve Markers (import via Timelines ? Import ? Markers from EDL)
- markers_transforms.edl — Red / Yellow
- markers_speed.edl — Cyan
- markers_crops.edl — Green
- markers_effects.edl — Blue
- markers_combined.edl — all categories, colour-coded
Each marker note contains a Shot # (e.g. #42: Scale 115% Pos 1893,941) that cross-references the master shot list CSV.
Online and Finishing Artists can scrub through the timeline and look up any flagged clip instantly.