
Professional Film Editing Timelines
It’s not often that you get to peer over the shoulder of a Hollywood feature film editor and see exactly what they look at day after day, whilst honing the latest cinematic blockbuster. But thanks to interviews like the Art of the Cut series Steve Hullfish has conducted for PVC, and other editors who are willing to share their work via Twitter’s #TimelineTuesday, now you can.
This opening image is the Avid timeline for reel one of Ridley Scott’s The Martian, edited by Pietro Scalia. Check out my making-of round up of The Martian here to jump to Steve’s fantastically detailed interview with Associate Editor Cheryl Potter, which explains just what’s going on in this timeline.
UPDATE: Suicide Squad timeline
This is what #SuicideSquad looks like right now #EditingSkillsOnPoint pic.twitter.com/CwN2jKYCrA
— David Ayer (@DavidAyerMovies) February 6, 2016
Suicide Squad director David Ayer recently tweeted this image of the current cut of the film, from editor John Gilroy’s Avid timeline.
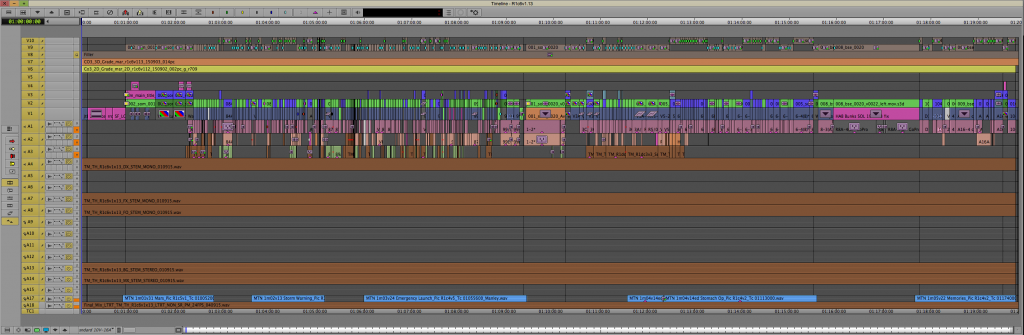
Another treat from Steve’s Art of the Cut series, is this screen grab of editor Eddie Hamilton’s reel one Avid timeline for Mission Impossible: Rogue Nation. You can read more about that in this previous post, including Steve and Eddie’s detailed conversation.
What I love about images like this one is that you can see the scale, complexity, organisation and methodology required to keep track of a feature film’s worth of footage, visual effects plates, sound design, music, colour correction and final elements. A quick note about getting the most out of this post – if you want a bigger view of each of the images, click on the tweet to open the Twitter.com page and then click on the image to enlarge further.

Eddie also recently shared some screengrabs of his full Avid Media Composer editing layout, which I’ve taken a stab at dissecting in this post over on Premiumbeat.com. You can learn a lot from how he lays out his bins, effects and works with his rushes.
#TimelineTuesday #MissionImpossible #RogueNation (on iTunes now) #Avid #MediaComposer #Timeline Reel 1 of 7 pic.twitter.com/r2IHOqIAMS
— Eddie Hamilton (@eddiehamilton) November 24, 2015
UPDATE: Eddie Hamilton recently posted timelines of all seven reels of Mission Impossible: Rogue Nation on Twitter, with a link to download them as high res tiffs too.
UPDATE 2: Apparently Eddie’s download link has expired, so here is a link to download the Kingsman timelines and desktop and a download link to the Mission Impossible timelines.
#TimelineTuesday #MissionImpossible #RogueNation (on iTunes now) #Avid #MediaComposer #Timeline Reel 2 of 7 pic.twitter.com/slTRMaJuhu
— Eddie Hamilton (@eddiehamilton) November 24, 2015
#TimelineTuesday #MissionImpossible #RogueNation (on iTunes now) #Avid #MediaComposer #Timeline Reel 3 of 7 pic.twitter.com/km1pVSpLjJ
— Eddie Hamilton (@eddiehamilton) November 24, 2015
#TimelineTuesday #MissionImpossible #RogueNation (on iTunes now) #Avid #MediaComposer #Timeline Reel 4 of 7 pic.twitter.com/QZohJyUuWd
— Eddie Hamilton (@eddiehamilton) November 24, 2015
#TimelineTuesday #MissionImpossible #RogueNation (on iTunes now) #Avid #MediaComposer #Timeline Reel 5 of 7 pic.twitter.com/K3BJyfWtER
— Eddie Hamilton (@eddiehamilton) November 24, 2015
#TimelineTuesday #MissionImpossible #RogueNation (on iTunes now) #Avid #MediaComposer #Timeline Reel 6 of 7 pic.twitter.com/u0iwVmsrot
— Eddie Hamilton (@eddiehamilton) November 24, 2015
#TimelineTuesday #MissionImpossible #RogueNation (on iTunes now) #Avid #MediaComposer #Timeline Reel 7 of 7 pic.twitter.com/s2PPvnijjW
— Eddie Hamilton (@eddiehamilton) November 24, 2015
High res TIFFs of those timelines available here… https://t.co/0eeR3ndlLB
— Eddie Hamilton (@eddiehamilton) November 24, 2015
High res TIFFs of that desktop and all Reels 1-7 #Kingsman #Avid #MediaComposer timelines can be downloaded here: https://t.co/7xOCpAvM4C
— Eddie Hamilton (@eddiehamilton) December 4, 2015
An Editor’s Timeline Breakdown
Closer look at timeline detail.
Green=SOT & Intv, Red=SFX, Purple=Music, Yellow=VORubberbanding!#TimelineTuesday pic.twitter.com/hGhrqfaBrt
— SHANE ROSS ? (@comebackshane) August 6, 2014
Occasionally an editor, in this case Shane Ross, will go to the trouble of explaining what’s going on in their timeline, which greatly adds to the educational value. As you can see in this tweet, Shane breaks down his colour coding system for keeping his sound organised.
Below Shane describes how he lays out his bins, timeline and project panels. Further down you can see how he organises and labels his tracks.
A little something different for #TimelineTuesday. You all know how I organize my TLs, but how about bin layout? pic.twitter.com/Yb5mFyH2Vj
— SHANE ROSS ? (@comebackshane) May 20, 2014
“On left, Project window, below it my current cuts bin. On right you have all my picture bins on top, audio bins on bottom.” – Shane Ross
Upper left is the Effect Palette, and tabbed bins for SFX and common Filters I use. And theres my TL #TimelineTuesday pic.twitter.com/QRvzHIFPKa
— SHANE ROSS ? (@comebackshane) May 20, 2014
For this week's #timelinetuesday, I present to you my current track layout in #Avid MC 8.3.1. Mono and stereo tracks pic.twitter.com/OK3j2nysN6
— SHANE ROSS ? (@comebackshane) April 7, 2015
After 20 years of editing, this is STILL my best way to train apprentices. Just say, "Post-It note my timeline." pic.twitter.com/s7AY0c7V8x
— Chris Bové (@heybove) July 3, 2014
Premiere Pro Feature Film Timelines

Although the majority of feature film editing timelines you see online tend to be in Avid Media Composer, some editors prefer Premiere. In this image you can see four of editor Vashi Nedomansky‘s Premiere Pro timelines for feature films, including one Audition timeline.
Below are a couple more tweets from Vashi. I’d also highly recommend you check out his Adobe Max presentation here, in which he discusses some of his Premiere Pro editing techniques. Notably David Fincher’s Gone Girl was edited on Premiere Pro.
Editing #4K #H265 for the first time in @AdobePremiere
Full resolution and real-time playback @Samsung #NX1#HEVC pic.twitter.com/1g1vSklblb— Vashi Nedomansky, ACE (@vashikoo) October 18, 2015
#HEADLOCK – futuristic spy thriller coming in 2015#TimelineTuesday http://t.co/CN2oW23qGp pic.twitter.com/cQjLULaWoy
— Vashi Nedomansky, ACE (@vashikoo) August 5, 2014
Tomorrow the documentary I edited @TWILDM
screens in the US Capitol for Congress#filmmaking @AdobePremiere #TWILDM pic.twitter.com/2HpIiOCdym— Vashi Nedomansky, ACE (@vashikoo) July 10, 2014
A little late, but I keep forgetting each week, so here we are =)#TimelineTuesday – Artifice feature#editcave #PPro pic.twitter.com/pobIMbYYfc
— Weston Woodbury (@westonWoodbury) May 20, 2015
"Faster Filmmaking w/ #PremierePro & #AdobePrelude" REPLAY: http://t.co/gMB4b6i9iE | #AskAPro #TimelineTuesday pic.twitter.com/2lkauTmfrl
— Adobe Premiere Pro (@AdobePremiere) May 27, 2014
FCPX Feature Film Editing Timelines

UPDATE – Editing Whisky Tango Foxtrot in FCPX.
These screengrabs from editor Jan Kovac’s FCPX timeline for Whisky Tango Foxtrot are courtesy of Steve Hullfish’s excellent, and very detailed, interview on the process of cutting a Hollywood feature film in the software. In the image above of one 20 minute reel from the film, Jan points out the use of colour coded markers to help with collaboration.
The red [markers] are me leaving notes for my assistants on stuff to do. Once they’re done they become green markers. The blue markers are a section representing three lines of dialogue and the green markers are “action.” The orange ones are chapter markers which we are using to mark VFX with. You can see the stuff that’s above them are the VFX shots that are cut in over the originals.
Head over to Steve’s article on ProVideoCoalition to get a lot more details on how Jan organises everything in FCPX, the benefits of shooting and working natively in ARRI Pro Res as well as some great feature film editing insights.
The three big advantages of editing in the highest resolution and in ProRes from the get go is that all your DCPs that are created throughout the process (for screenings) look amazing and you get a much better feedback since there is a lesser amount of technical imperfections your audience can bump on. And the second really good thing was that since we didn’t have to deal with ArriRaw, editorial could carry a copy of the o-neg for our in-house vfx crew. We had 1200 VFX shots – it’s hard to create Afghanistan in New Mexico, so there was a lot of small stuff to do. We would not be able to do that if we had to go to outside vendors, but we had a lot of VFX artists in-house – at some point 20 of them – and I carried the O-neg on my SAN.
I had one chassis just for the O-neg, so they were working straight from that with us. They figured out a color pipeline and there was no pulling frames. No waiting for the DI house to give it back to you. No dealing with different vendors. We could see shots immediately and making small changes as we went. It was a big financial saving, but for me, it was mostly creative because it gave us more time on temps and all the temps we worked on – even in Final Cut – were a real step towards the final. It wasn’t like you were just working on a temp and threw that work away. When you worked on a temp, as it was getting approved, it was becoming the final.
And the third reason for working this way was, that it allowed Glenn and John to shoot faster. They didn’t have to worry about a microphone being in a scene for example. They could concentrate on getting the performance they wanted since they knew we could take care of stuff like that later.
If want a lot more information on editing in FCPX check out the FCPX category on this blog, or this previous post on Jan’s previous FCPX feature film Focus, which is packed with interviews and further resources.
Feature Film Editing Timelines
@Bluetrundle's single screen grab roadmap on how to win Oscar gold and kill at the box office. #Gravity pic.twitter.com/bRKxzTpGVu
— Matt Feury (@MattFeury) April 12, 2014
This screengrab from Gravity editor Mark Sanger’s Avid timeline kicked off this popular previous post, packed with editor’s timelines, that I wrote for PremiumBeat.com.
Like the Gravity pic? Here's Star Trek Into Darkness! @bad_robot knows how to rock a @MediaComposer. #timelinetuesday pic.twitter.com/8cD3eBn42O
— Matt Feury (@MattFeury) April 22, 2014
Now that #EarthToEcho is only 1 week away from release, here's a picture of our timeline to commemorate the journey. pic.twitter.com/ugrNdzOy6q
— Carsten Kurpanek (@Kurpanek) June 27, 2014
While I’m sharing #HeroPunk awesomeness, here’s the full timeline for the locked cut. It’s in @AdobePremiere, btw. pic.twitter.com/ngyLqNJbhP
— Kanen Flowers (@iamKanen) July 25, 2014
The beginning of the first assembly for feature, with scene numbers added above for convenience #timelinetuesday pic.twitter.com/L8h719ISRz
— Paul Forte (@PaulForte) May 6, 2014
Day 17 of 21 on set – #timelinetuesday – string out in progress. pic.twitter.com/hNN4JwG5iQ
— Paul Forte (@PaulForte) May 20, 2014
Christmas break on the film I’m cutting. Here’s several months of work reduced to colored squares #Avid #timeline pic.twitter.com/VnzeriNODb
— Evan Schiff (@schiffty) December 20, 2014
Discover the #MediaComposer Timeline of @Rodriguez's @SinCityMovie 2 in this #Avid #4K Webinar http://t.co/dVNmz69yuX pic.twitter.com/kHhDVCAeOf
— Wim Van den Broeck (@editorbelga) January 22, 2015
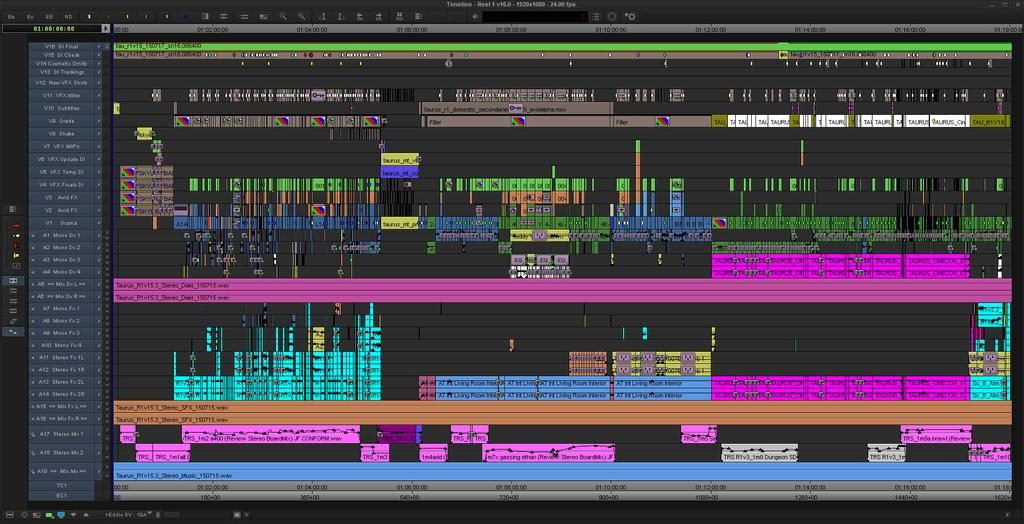
Thought you might be interested to see this… @KingsmanMovie @Avid @MediaComposer #timelinetuesday… Final Reel 6 pic.twitter.com/sQsOKuf8Kg
— Eddie Hamilton (@eddiehamilton) June 9, 2015
According to editor @eddiehamilton, they hid cuts in the #Kingman fight scenes using quick punch zooms & momentary foreground obstructions
— Jason Bowdach (@JBowdacious) June 16, 2015
#BuskingTurfWars was edited entirely on Final Cut Pro X. Here is a picture of our full timeline! #FCPX #FeatureFilm pic.twitter.com/ocMfFc030c
— Busking Turf Wars (@BuskingTurfWars) August 7, 2015
Documentary Editing Timelines
RT @stevecutsdocs: #timelinetuesday @Avid @MediaComposer @frontlinepbs pic.twitter.com/mzpyqapyNG
— Steve Audette, ACE (@stevecutsdocs) July 1, 2014
Looking for a preview of @frontlinepbs July 29th #LosingIraq? Here is @stevecutsdocs timeline. #Avid pic.twitter.com/jleO2X0mz2
— Barry Clegg (@cleggthis) July 22, 2014
#Avid timeline. 28 minutes done and dusted. #rendering pic.twitter.com/MIGWldlmhj
— Jonathan Fresco (@Frescodk) August 14, 2014
From the @frontlinepbs Edit room #TimelineTuesday #postchat @Avid @MediaComposer #documentary pic.twitter.com/UV3Rg3nvlU
— Steve Audette, ACE (@stevecutsdocs) April 21, 2015
TV Editing Timelines
You wanna see the 1st ep of season 2 of #Transparent, right? Here's the editor's cut! #Timelinetuesday @MediaComposer pic.twitter.com/DvZvgcNVq6
— Catherine Haight (@catehaight) July 14, 2015
This is 28 days of work. 100% solo on this ep. #timelinetuesday pic.twitter.com/TG3gdePIQx
— Dan Wolfmeyer (@dwolfmeyer) August 6, 2014
#timelinetuesday bomb pic.twitter.com/jDCFpzauuJ
— Joe (@editingjoe) May 20, 2014
The final cut of #BeatThePack ep1. More entertaining if you watch the actual show, BBC1 3pm with @mrjakehumphrey pic.twitter.com/A6QIkfaVXL
— Scott Edwards (@SS_Edwards) March 4, 2013
Monster fine cut done-believe its been edited every way possible! #timelineThursday #timelinetuesday #AVID #postchat pic.twitter.com/6ZdV7PxU20
— Keith Shapiro (@keithwshapiro) October 9, 2014
For #timelinetuesday I present to you, the rough cut of Act 5 of Episode 72 of A HAUNTING: pic.twitter.com/xOrwMKfIyv
— SHANE ROSS ? (@comebackshane) June 3, 2015
For #TimelineTuesday I present one weeks work on Act 1. From a 14:20 string out, to an 11:33 1st cut.
Reality show pic.twitter.com/xClef5aXru
— SHANE ROSS ? (@comebackshane) October 27, 2015
More Editor’s Timelines
Coming soon #timelinetuesday#electricdesert #avid pic.twitter.com/QwVvlPdfci
— Tahel Sofer (@tahelsofer) June 10, 2014
Compact and extended views of the timeline. Less clutter, focus on the edit. #timeline #FCPX http://t.co/VyEoj5eTQ7 pic.twitter.com/bUjA80gS0n
— Marc Bach (@marcplanb) June 18, 2014
In this FCPX tweet you really need to jump over to this link and click on the images to enlarge and compare the timelines.
65 layer(!!!) project in #fcpx,both 1080p & 2K. 2045 clips in only 14 sec.The new Mac Pro loves it! #impressed#apple pic.twitter.com/MFsLWy3XfC
— ????? ???? (@sundsvein) June 19, 2014
#FCPX Trailer Timeline. Fcpx its perfect for cutting trailers too. pic.twitter.com/4AHidjqkir
— timetraveller (@timetraveller_) August 13, 2015
I haven't done a #TimelineTuesday in a while… here's an episode of my current thing. Animatic + day 1 backplates. pic.twitter.com/3CTvd0AhNZ
— Judith Allen (@jaa_edit) July 1, 2014
Software tutorial with a twist – #GFX and sound design inside @AdobePremiere dir. Kristian Boysen #timelinetuesday pic.twitter.com/nHnYHTHmKY
— Freddie Smith (@fredstreads) October 27, 2015
172 layers embedded in 14 video tracks. Inside The Edit's first feature length tutorial.@avid #videoediting pic.twitter.com/sE5ATP6s17
— Inside The Edit (@insidetheedit) October 23, 2014


I can’t believe none of them make use of nested sequences
Because nested sequences are wonderful for the editor but a pain for all the other parties, like the colerist and sound mixer. Especially if you use the adobe workflow.
Jonny,
The dropbox like to Eddie’s screengrabs is no longer working. Is it possible for you to reup them or send to my ermail?
Thanks
Hi JR, thanks for letting me know, I’ve updated the post with a couple of direct download links.
I can’t believe I never thought to colour code clips within the timeline, nor think to rename the tracks.
No wonder editing can become an organisational nightmare for me.