Inside Cinema Grade – Reinventing the (Grading) Wheel?

- Cinema Grade Reviewed
- Cinema Grade Discount Code
- A Quick Chat with Denver Riddle
Colorist and independent app developer Denver Riddle ups the ante once again on the way we colour grade with his brand new interface – Cinema Grade – a new and totally different way to make adjustments to your images inside of FCPX, Adobe Premiere Pro and even DaVinci Resolve.
Fresh off the back of the launch of Cinema Grade, I had a quick chat with Denver and tested out the app myself, to see what all the fuss is about.
Denver was also kind enough to offer the readers of this blog 10% off the price of Cinema Grade with this coupon code:
** 10% off Cinema Grade = f2d4d00f90 **
(Those are zeros by the way, not ‘ohs’)
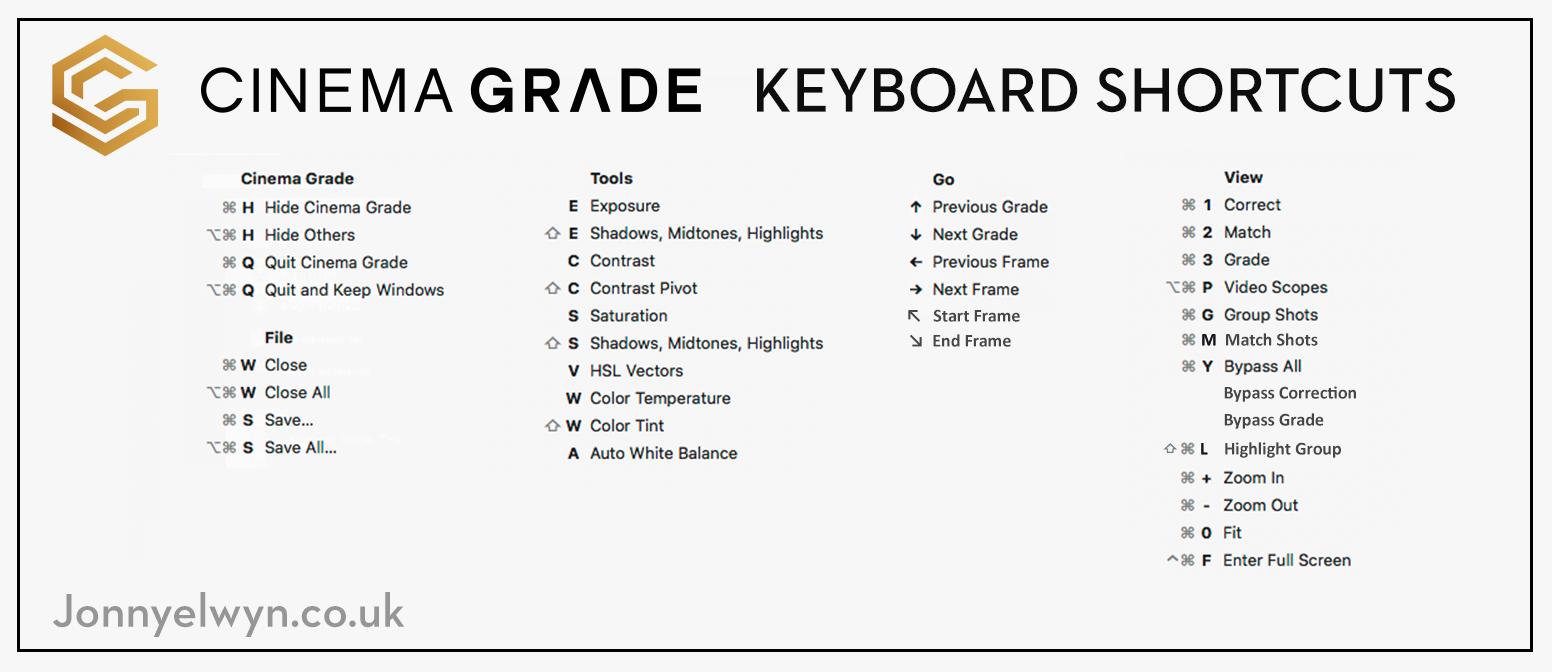
If you do already own Cinema Grade you should download my free keyboard shortcut cheat sheet here, as an easy way to improve your speed and fluidity in the plugin.
If you’ve been following this blog for a while you may well have heard of Denver from ColorGradingCentral.com, as I’ve previously reviewed several of his products on the blog, LUT Gallery being one of my favourites.
If you want some further reading you can check those out here:
- Using LUT Gallery in FCPX and DaVinci Resolve
- Motion Picture Film LUTs Review
- Grading like a Hollywood Colorist Crash Course
Denver also gives away some great free LUTs too which can be found in this incredibly popular post.
Cinema Grade App Reviewed
What is Cinema Grade and why is it different?
Cinema Grade is a brand new plugin for Adobe Premiere Pro, FCPX and DaVinci Resolve, which allows you to colour grade your images by clicking on them directly, and making your adjustments by moving your mouse (over the image) rather than working with separate controls and tools.
You effectively don’t need to flick your eyes between the controls and the image, as they are one.
It is also provides a really helpful way of building vital colour grading workflow considerations into the plugin itself. By that I mean that, both the grouping and matching of shots – which all need to look the same – is part of the way in which you interact with the plugin.
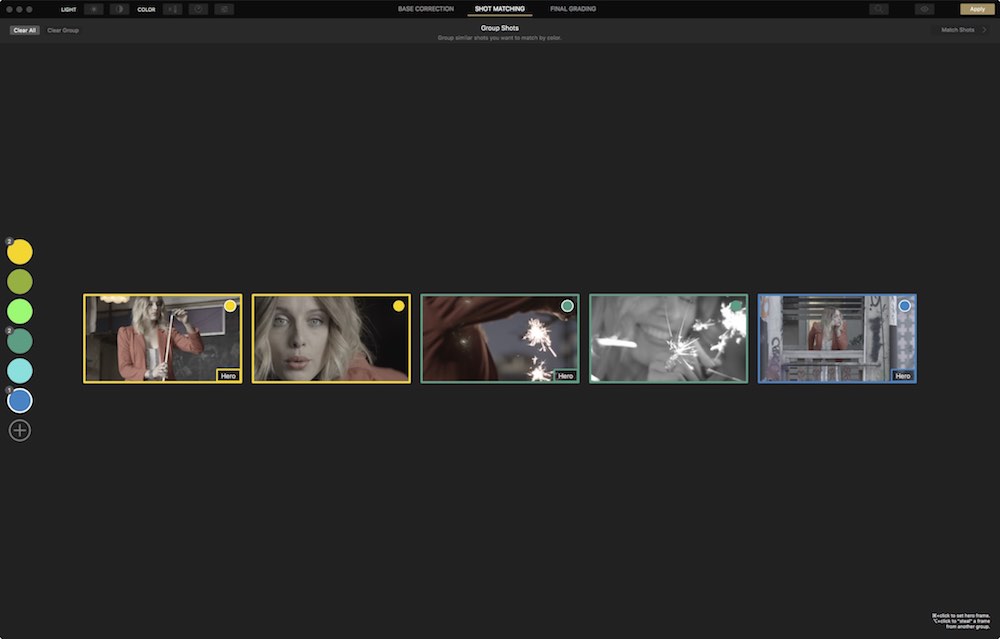
For example, when you group a selection of shots, say a unique scene by colour coding them, any adjustments that you make to them in the Final Grading page of the plugin, are automatically applied to each shot in that group.
Assuming that you’ve followed the rest of the workflow correctly and made your base corrections and matched your shots so they’re all starting from the same point, this is a huge time saver, especially when working in Premiere or FCPX as this kind of ‘group grading’ isn’t possible.
Resolve of course, already has shared nodes, groups and other ways of working with multiple clips simultaneously.
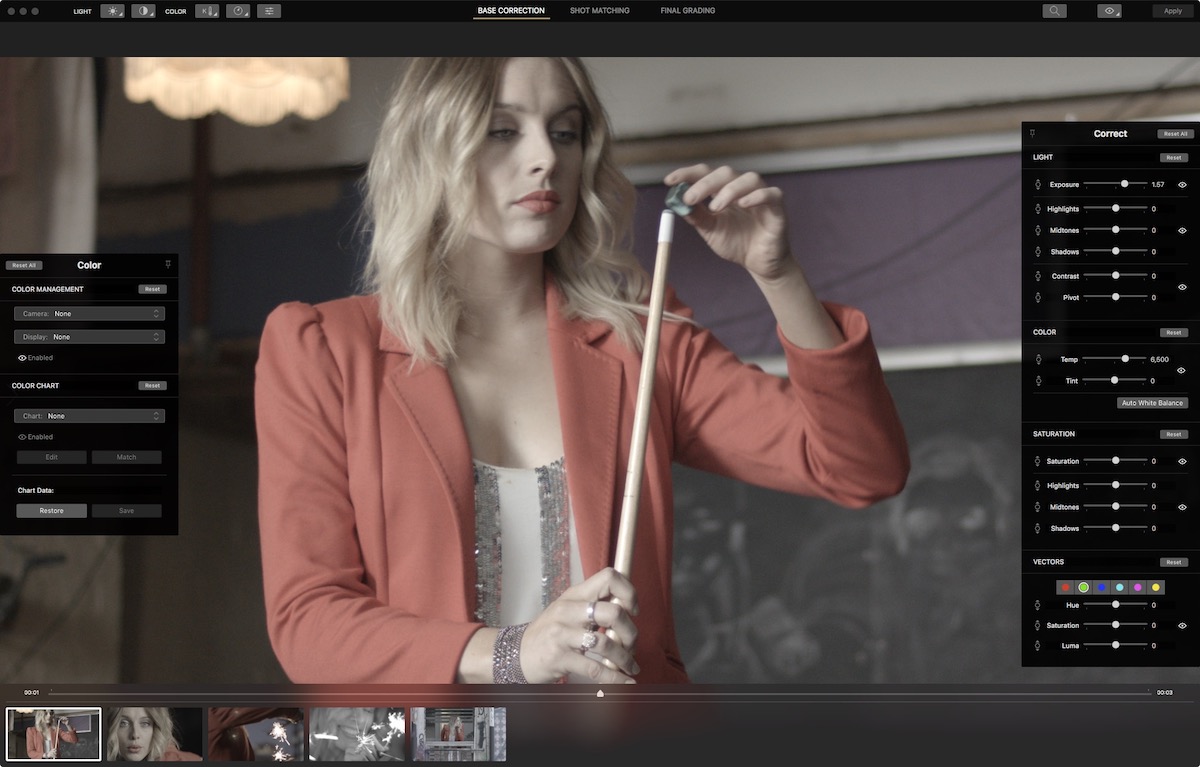
Cinema Grade Base Correction page with all the side ‘draws’ open to reveal further controls.
What do you get?
With 1 purchase you get 2 licenses for 3 platforms.
This means that you can install it on both your desktop and laptop, which is ideal for me as I often work from both systems. It’s also handy that a single Cinema Grade purchase isn’t restricted to one video editing software, so you’re not paying to use the same app in multiple applications, which some other grading apps make you do.
That said, it’s worth noting that the DaVinci Resolve version of the plugin has a limited feature set, in that it doesn’t contain the Base Correction and Shot Matching pages. But, as you can do group grading in Resolve anyway, it’s not a deal breaker.
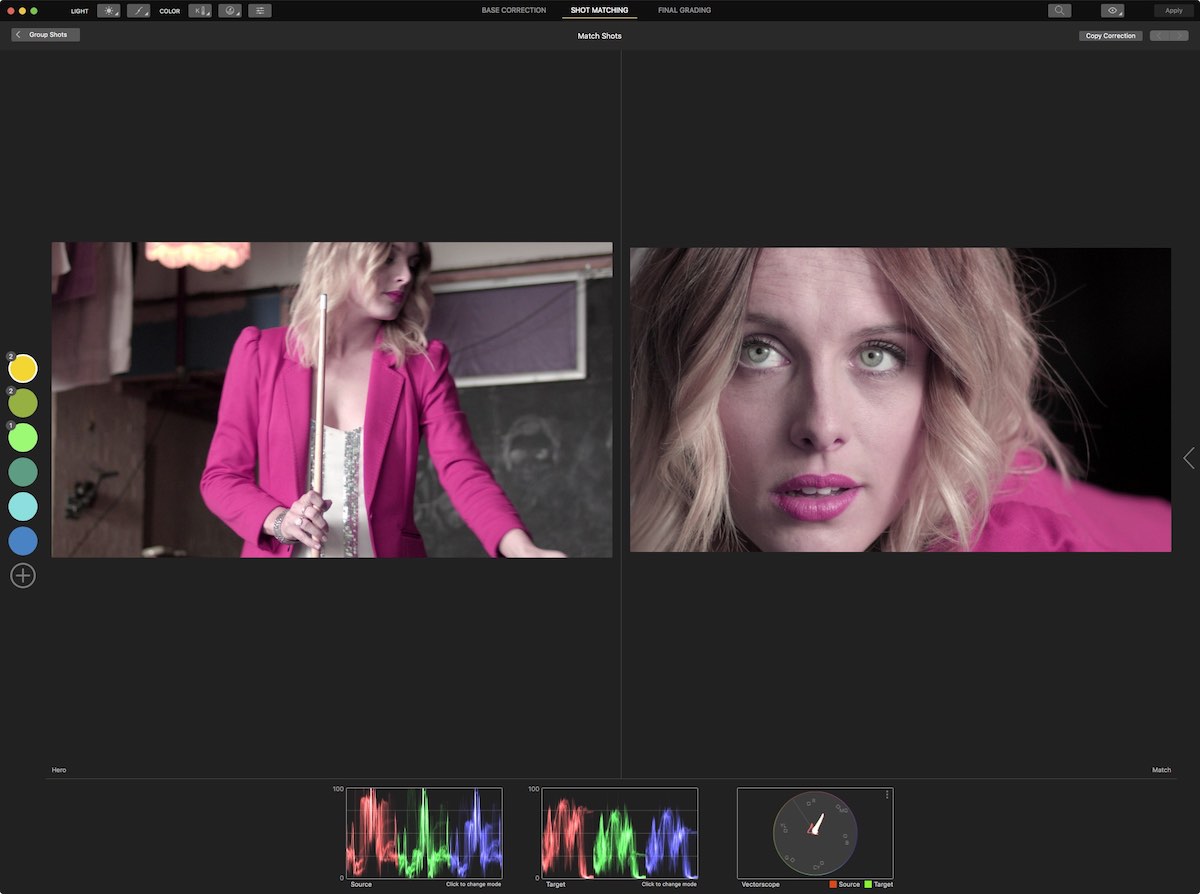
One of the cool things about Cinema Grade are the unique scopes you can access when matching shots in the comparison view. Here you can see you get two RGB parades (although you can also choose an RGB Waveform) as well as a blending Vectorscope.
The two scopes help you to match the characteristics of each image more easily and the blended Vectorscope has a red and green trace (one per image) that turns yellow when the two shots in question overlap.
This makes it much easier to line up your shots more evenly before you move onto creating a specific look across all of your shots.
In the Finishing page there is also an ‘experimental’ Look Transfer tool which allows you to import a reference image and ask Cinema Grade to try to match the look for you.
Lastly, you can of course also use Cinema Grade to apply LUTs to all of your shots.
To run Cinema Grade you’ll need, at least, the following spec:
- Apple Mac (2011+)
- Mac OS X 10.13.x and later
- FCPX 10.4.x and later
- Adobe Premiere Pro 12.1.x and later
- DaVinci Resolve 15 and later
- OpenCL 1.2
Is it easy to use?
Working with Cinema Grade is pretty straight forward, but it’s worth watching the tutorials in the ‘How It Works’ section of the official site.
In your video editing software of choice select all the shots you want to grade in your timeline, apply the Cinema Grade effect and then in the Effects Controls of one of the clips just hit ‘Open Controls’.
This opens the Cinema Grade app proper, within which there are three pages to move through in chronological order, following a traditional colour grading order of operations workflow.
- First you correct your images to get them to a fairly even starting point
- Group the shots, selecting a hero shot to grade first, from which all other grades in the group will ripple out
- Polish up your look, add a LUT or saved look and have that automatically apply to all shots in the group
You make adjustments by selecting a tool from the top of the plugin and then click and drag up and down on the image to affect the change. There are also traditional sliders and controls if you want to see numerically what you are doing but this isn’t the best way of using the plugin.
For a more fluid and enjoyable interaction you should really learn the keyboard shortcuts for switching between tools (to see this in action check out Casey Faris’ review and the bottom of this post), instead of moving the mouse up to the top of the plugin menu bar and back to the image, all the time.
The most important ones to remember are probably those listed under Tools and using CMD+1/2/3 for switching between pages.
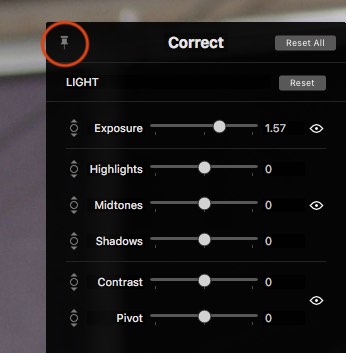
It’s worth noting that you can pin open any of the other control ‘draws’ that open up from the sides and bottom of the plugin, if you want to keep them open permanently.

Helpful on-screen prompts in Cinema Grade
One detail I appreciated when using the plugin the first few times, were the helpful on-screen prompts reminding you which control you’re using and how to use it.
There doesn’t seem to be a way to toggle these on and off at the minute, but a bit like a tool-tip in any other app, they fade out after a few seconds each time you select the tool.
When you are grouping shots by colour, be sure to select the hero shot first, as this is the default behaviour.
When grouping shots you can use CMD + click to set a hero shot and ALT + click to ‘steal’ a shot from another group into your currently selected colour. You can also add a fair few extra colour groups (although you can’t define the colour for yourself) so you could easily tackle multi-scene projects in the plugin.
When it come to matching the look from one shot to another the Shot Matching page first allows you to group your shots and then to match between your hero shot and other images.
As mentioned before the dual scopes help you to do this, as well as a 2-up view.
It’s worth noting that you can only make changes to your hero shot in the Base Correction page and not in the Shot Matching page. It would be nice if you could tweak both, but maybe it helps you to be disciplined about setting and keeping a hero-look.
Either way you can easily switch between the two pages with a quick CMD+1 or CMD+2.
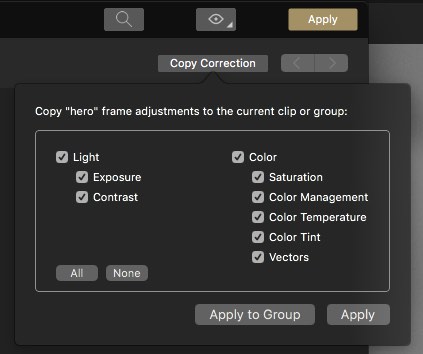
In the same Shot Matching page there is a ‘Copy Correction’ tool which allows you to choose which adjustments are copied from one shot to the other, or to all in the shots in the group.
When you’re finished grading be sure to hit ‘Apply’ before you close the plugin, to actually apply all your corrections, or just the selected grade, to your current edit.
Because Cinema Grade is a plugin you can use it in combination with any other plugin in your video editing software, so for example if you want to add film grain to your shots with FilmConvert, you can.
How much does it cost?
At $149 Cinema Grade isn’t hugely expensive as far as stand-alone plugins go.
FilmConvert is the same price for a single app, Red Giant’s Colorista IV is $199, although DaVinci Resolve Studio is only $299.
Now obviously these are not apples-to-apples comparisons but just something to give you a little context.
Existing owners of Colour Grading Central products were offered a discount during the week it launched, so check your emails if you’ve previously purchased products from Denver and are interested in Cinema Grade.
In terms of updates and future releases, as a small developer they will likely give some updates away for free, whilst needing to charge for major new versions. As an example of this, within a week of launching they have already added scopes to the Base Correction and Final Grading pages, as previously these were only available on the Shot Matching page.
Hopefully they’ll keep up a regular rhythm of some free updates before the next big release.
There is a free trial so you can check it out for yourself to see what all the fuss is about!
What do critics say?
Where’s the Windows version?
I guess this is a good problem to have, but people are clamouring for a Windows version of the plugin.
As Color Grading Central are a ‘Mac shop’ they aren’t currently planning on creating a Windows version. That said, if enough people request a Windows version and are willing to pay for it in a Kickstarter style development campaign, they’re willing to satisfy that demand.
You can add your support for a Windows version of Cinema Grade by commenting on this FaceBook post.
Colour Management
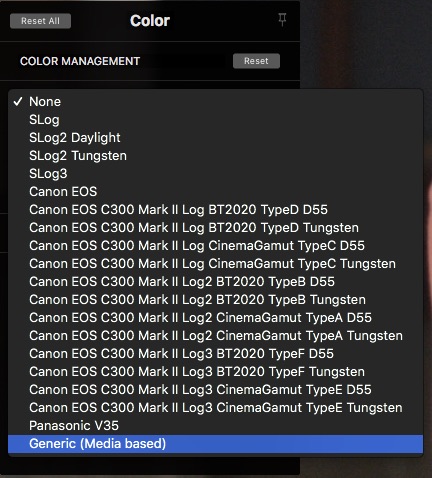
I wasn’t quite sure what the ACES colour management built-in functionality was doing, hopefully this will be explained in more detail later. There was also a slightly odd selection of cameras to choose from in the drop-down list. Hopefully in future updates this list will grow too.
Power Windows
If you’re wondering how you might create a ‘Power Window’ within your grade you can’t do this at the minute.
When working with the Lumetri colour grading tools in Premiere I would normally just use multiple instances of the effect and the built-in mask/feather features to layer my grade. You can use the built-in mask/feather controls in Premiere to isolate the Cinema Grade effect, but you can’t add multiple instances of the plugin to a shot, otherwise it throws up an error message.
Hopefully some kind of PowerWindow functionality will be in the development pipeline – they can only built so much at a time! – to help isolate some specific corrections.
Final Thoughts
Grading in Cinema Grade is fun and intuitive. You just click on the bit of the image you want to change and drag around.
It would be really interesting to try using Cinema Grade on a Wacom Cintiq where you can actually draw on the image directly, instead of using a mouse or tablet separately for a completely seamless experience.
To really be efficient in the app, and to help you stay in the flow of adjusting the image instead of selecting tools or adjusting sliders, you really do need to memorise the keyboard shortcuts. Hopefully my free cheat sheet will help in that regard.
If you’re a professional colorist working in DaVinci Resolve as a full-time job you’re unlikely to want to use Cinema Grade as a replacement interface, mostly because if you’re a professional colorist working in Resolve you will have:
a) years of muscle memory, workflow and shortcuts built into the way that you work
b) a colour grading control surface which allows you to keep your eyes fixed on the image and your hands doing the grading work.
Also the feature set of Cinema Grade is much more limited in Resolve and can in no way compete with Resolve itself.
That said, if you’re a professional colorist who is interested in new approaches, new techniques and new possibilities, you would do well to give it a try for curiosities sake.
However, if you’re an editor who grades their own work in your video editing software then you are likely going to really enjoy using Cinema Grade, especially for it’s time-saving group workflow and simplified shot matching.
There are a few bugs and quirks in the plugin right now, but it’s only been shipping for a week and they’ve already updated it once, so hopefully the surrounding hype and sales will result in swift further development.
It will be exciting to see where Denver and his team take the plugin in future updates!
Check out Cinema Grade for yourself here.
Denver Riddle on creating Cinema Grade from scratch
After the success of Color Finale’s FCPX grading controls and then it effectively being swallowed up by Apple in the FCPX 10.4 update, what made you want to double down again and build another colour grading app?
Well we had actually wanted to build something based off of direct colour grading in the viewer for some time. I had had the idea 9 years ago in fact but it wasn’t until meeting Dmitry (Denver’s developer) in 2013, and creating Color Finale in 2015 that I even discovered that direct colour grading in the viewer was even possible.
We loved our experience developing plugins for Apple but really felt like we were limited by the plugin architecture. When the writing was on the wall with Apple’s announcement that they were going to do their own grading tools we decided to go all in on our ideas and build our own application.
It has been a dream of ours for some time to create our own colour corrector with fresh innovative ideas.
From the moment you started developing Cinema Grade, how long did it take to get to the shipping version?
I would say one year. We met up in Amsterdam during 2017 IBC and purchased a white board at an office store!
We sketched out a rough wire frame of the application and brainstormed our ideas and workflows. We ended up leaving the the white board with our Airbnb host.
We released Cinema Grade almost one year exactly from the day that we decided we were going to do this thing 🙂
Were there any moments during the development that you thought you might not make it?
Always. Software development is difficult and we constantly felt we were pushing our release date. We are a small company with no outside investors so we really have to be scrappy and bootstrap our development.
The biggest advantage we have though, over well funded big companies, is that we listen very carefully to our users’ needs and are able to pivot and adapt quickly based on user feedback rather than waiting long periods of time for improvements.
What’s your favourite feature in Cinema Grade?
I absolutely love the vector grading where I can simply click on a sky and change the colour of it. Click on a skin tone and fine tune the colour. It really is a dream to be able to colour grade directly in the viewer. It really is colour grading the way that it should be!
Do you already have long-term plans in mind for what you want to do next with Cinema Grade?
Short term is to address user feedback requests as quickly as we can and push those out as incremental updates.
Long term plans and I don’t want to sound ‘hype-y’ but our biggest ideas are yet to come and I predict that we will see a huge shift in the way that colour is handled and treated in post production.
I don’t want to give anything away, so you’ll just have to stay tuned.
Lastly, are there any existing or planned hardware integrations?
Yes we have a planned integration with something NEW, that’s completely new to the market but we will have to let you know when that drops…
More Cinema Grade Reviews
Casey Faris has a great walkthrough of using Cinema Grade for the first time, including how to make the most of all the keyboard shortcuts which are the key to speed and efficiency.
Colorist Jason Bowdach recently demonstrated how to use Cinema Grade in Adobe Premiere Pro at a recent LACPUG meet up.
The thing that I figured out really quickly was it gives me the almost identical feeling that I have when working with my panel after a day or two.
In as much that I’m not really thinking about ‘what editor am I using’, ‘what control am I looking for’ but I’m directly thinking about what do I want to change about the image and what do I have to touch to do that and it’s a much quicker way of working.





How does Cinema Grade compare to mFilmlook (by motionvfx) ?
Hey Sam, that’s one I’ll need to check out! Thanks for the suggestion.
I have realy loved the way cinema grade works,though ihave achallenge to 1st buy any mac computer to access and use the software as an uprising colourist.
iwish t worked on my pc too.
I’m pretty sure they are working on a Windows version…
Just purchased Cinema Grade Pro for FCPX and a big thanks for the discount code. I’m absolutely blown away by it after half an hours dabbling on a project. The feeling of applying adjustments directly onto the clip feels so natural and intuitive. As a self-taught shooter and editor, this will only make my workflow easier and more enjoyable. Great article by the way and glad to have found your website/blog etc. Cheers Jonny! 🙂
Really good review Jonny – I already use Cinema Grade being an early adopter but still found a couple of things here. Like Color Finale the improvements will follow quickly and enhance this brills app so really looking forward to the future enhancements.