
Improve your Edit through Sound Design
- Film Editing Pro: Secrets of Creative Editing Review
- Three Simple Tips to Improve your Audio
- Music and Film Editing
- A Quiet Place Sound Design Case Study
- Sound Design Resources and Inspiration for Film Editors
If there is one way to dramatically improve the quality of your editing, it’s to improve your understanding of story structure. The next best way to improve the quality of your picture editing is to improve your sound editing.
Learning how to creatively leverage sound design – effects, foley, silence, dynamic range etc. – will transform how your storytelling abilities and ultimately the overall quality of your work.
That’s what this post is all about.
Before we dive in though, it’s worth mentioning the links towards the bottom of this post which will lead you off into many of the other posts on this blog that cover this topic in more detail.
There are some really excellent articles, interviews, free training and a lot more to enjoy, so be sure to make it all the way to the end!
Simple Tips for Better Audio Edits

If you’re just starting out and you want a couple of practical tips on how to improve the quality of your audio with very little effort, I would suggest the following things, which I’m describing how to do in Adobe Premiere Pro, but I’m sure you’ll find a way to adapt to your video editing software of choice.
- Tiny cross-dissolves on every cut
I’ve changed the default audio transition in Premiere to be about 2 frames long. This means I can simply, lasso over a whole bunch of audio clips, press one keyboard short cut and have tiny cross-fades across every edit in about 1 second.
The benefit of this is that if there are any blips, clips or jolts between my audio edits, they’ll largely be smoothed out with this process. Anything that requires more attention will stand out.
Change the default audio transition under: Premiere Pro > Preferences > Timeline
The default keyboard shortcut for applying the default audio transition is: SHIFT+CMD+D
- Multiband Compression
Most of the projects I cut have fairly simple audio; dialogue, sync sound and music. One of the fastest ways to ensure your dialogue always remains audible above your music is to add the Multiband Compressor effect to your clips.
If you’re looking for royalty free production music for your projects, this post rounds up the sites I trust to deliver the goods for my edits.
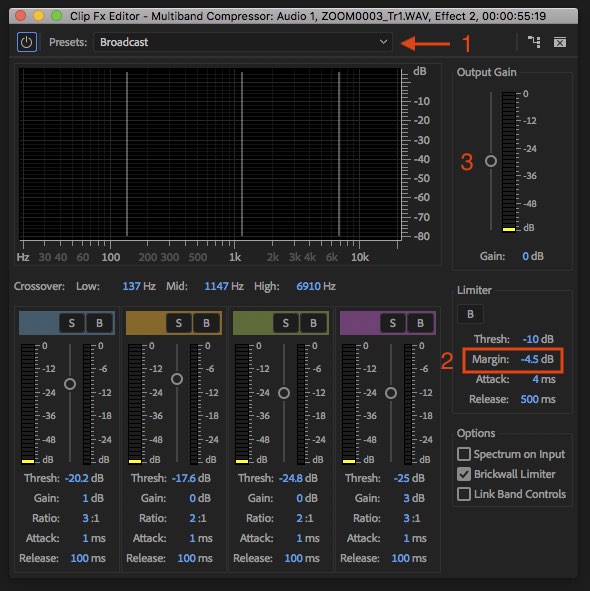
When I’m in a hurry I drop this effect on and follow a three-step process to get around a random bug with this effect.
- Change the dropdown menu to anything else, and then change it back to Broadcast to apply these settings.
- Adjust the margin to -4.5dB
- Adjust the Output Gain if the level is to low or two high on the audio meters
I learned how to do this thanks to the original and best post production trainer, Larry Jordan, and you can read a lot more about these settings in this article from the man himself.
This 6 minute tutorial from Larry will walk you through the finer details.
- Create endings from nothing
Often when you’re editing you need to make a music track stop in a specific place, sometimes that works out just fine with a little music edit using the natural conclusion of your piece of music, other times, not so much.
Here are a two easy ways to bring things to a finish; adding a reverb ring out or a cymbal crash.
In this quick tutorial Derek Lieu demonstrates how to create a reverb audio ring out at the end of a music track to create a nice ending from nothing.
The other suggestion is just to try a quick cymbal crash or impact hit to bring things to an simple conclusion. It works more often than you think it would!
You can download a substantial range of excellent free sound effects, including cymbal crashes, from 99sounds.org, which I also included, along with some other sources, in this post on How to Edit a Film Trailer.
- Edit with silence
So, how important is silence to an overall cut?
“It’s critical.” Chris tells me.
“The silences are what give meaning to the moments where people are speaking or acting. Those silences, whether it’s a moment of contemplation or the calm before the storm, a lot of times, the most drama is in those silences.”
There is also a great article on Frame.io about editing with silence, featuring editor Chris McCaleb (Halt and Catch Fire, Breaking Bad, Better Call Saul) that is well worth a read.
These two quotes are probably my favourite nuggets from the piece, and a good reminder not to edit everything as ‘breathlessly’ as possible. If in doubt, add some silence.
A lot of times, the best moments, the truest moments, the most authentic moments that feel like your real life, are those silent moments.
They’re the times between the times. The beats between the beats. That’s the stuff I look for, that’s the stuff I’m interested in. – Chris McCaleb
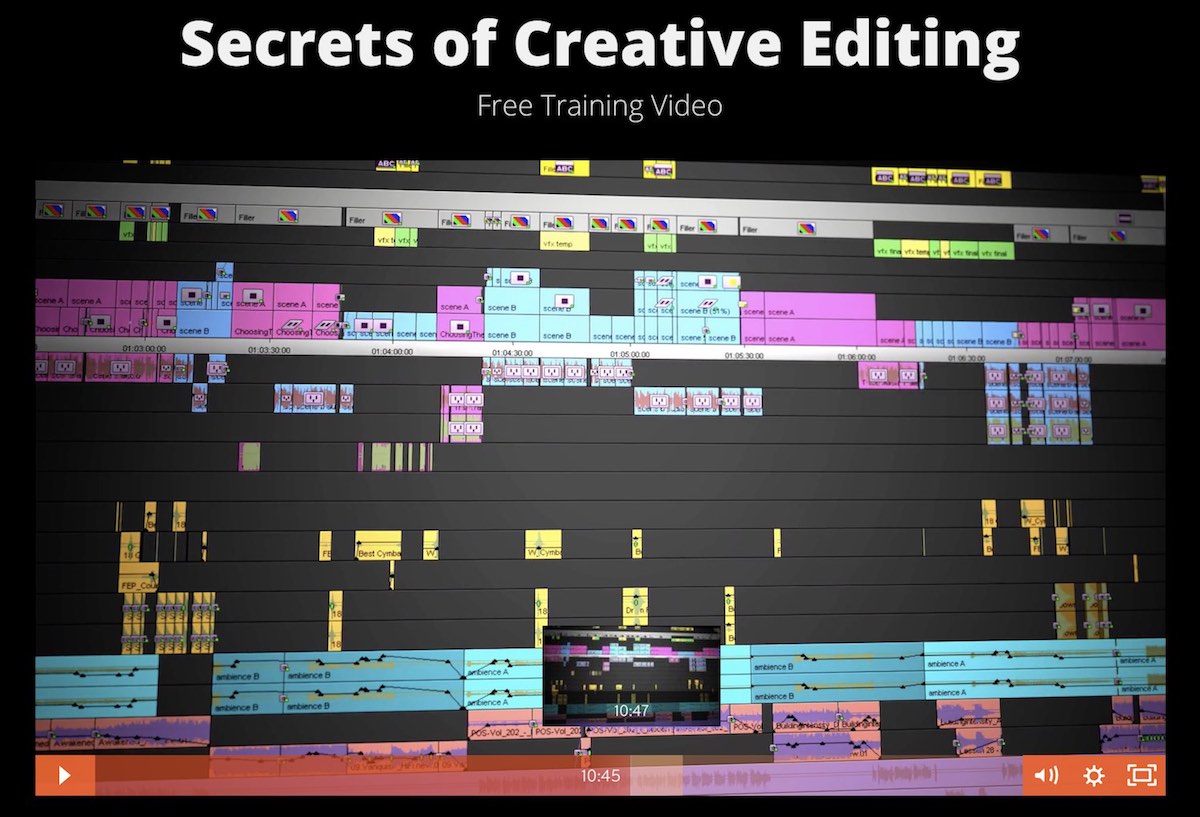
Film Editing Pro: Free Secrets of Creative Editing Lessons
What I liked about Film Editing Pro’s Secrets of Creative Editing was it’s massive emphasis on the power of sound design and the effective techniques an editor should know to leverage this power.
Yes, it covered shaping actors performances, cross-cutting for pacing and tension and designing a perfect timeline, but where it really shone was in the lessons on deconstructing professional sync sound, motivating drama with sound and polishing spoken audio. It really is (mostly) a course on sound design for film editors.
These are topics I’ve not seen addressed in as much detail as they are in this course anywhere else, which is why I wanted to include this review in this post.
Scroll down for the full review, but first the freebies!
As with previous courses that Film Editing Pro have released, they have created some free training as part of the launch, and so if you sign up here, you can get access to nearly 30 minutes of sample video lessons and two in-depth articles as well.
I signed up for it myself to see what you get.
The first lesson, at just over 18 minutes long, covers a trio of different topics including:
- 3 ways to cut dialogue to smooth out challenging audio edits
- A colour coding strategy for optimising your timeline
- Techniques for cutting and shaping actor performance
Now if you’re an experienced editor you might think: “Big deal, I know how to do all these things!”
Well, I thought that too, at first – but one of the strengths of the production process behind Film Editing Pro is that their tips and techniques aren’t sourced from just one editor, but a group of highly experienced editors, which means they pretty much always have something new you haven’t seen or heard before.
For example, I’ve cut dialogue for many years on a daily basis, but never articulated to myself, (or to anyone else for that matter) that cutting right before the next incoming ‘modulation’ could help to hide a change in room tone fairly effectively, because the energy of the sound distracts the viewer from the background change.
Now I might like to tell/kid myself that I’ve been doing this for years and just didn’t know it, (and maybe I have) but the fresh awareness that came with another editor explaining it, meant that it at the forefront of my editing memory. So just today I managed to hide a noisy join using this same principle and some well-timed music.
Every day is a school day.
One thing that I’ve always appreciated about the level of quality that goes into each Film Editing Pro course, are the animated graphics, sound effects and creative highlighting, such as in this before and after graphic (above), illustrating some of the key changes that have just been made to an edit.
This makes it much easier to understand and follow what has changed and the result of those changes on the edit, without having to watch each new version of the scene every time (although this does happen frequently for clarity).
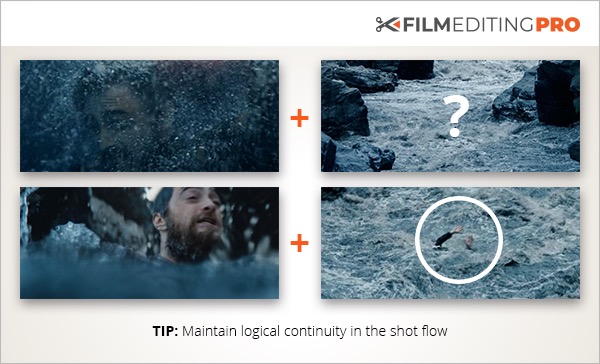
One of the other freebies is a great article on the balance of being an artist and a technician as an editor, with some interesting insights from a scene breakdown from Jungle which includes tips on maintain clear scene geography, continuity in the flow of events and adding visual accents.
Sign up for it yourself here for some excellent free training.
If you like what you see here, it’s also worth mentioning the 45 minutes of free training Film Editing Pro released for their trailer editing course which you can snag for free, along with a ton of other trailer editing resources.
Film Editing Pro’s Secrets of Creative Editing Review
As a film editor I want to improve my abilities to craft effective sound design and audio edits, but I don’t want to take a course geared towards actual sound designers and sound editors, as that will be more information than I need and likely focussed on software I don’t own.
Film Editing Pro’s Secrets of Creative Editing, is actually mostly about working with sound and learning how to crafting it from the perspective of a film editor, fitting my requirements quite nicely.
For the team of editors behind Film Editing Pro, their declared aim is to teach you “specific, actionable editing techniques, in a clear way that’s also interesting to watch”, and to that end they deliver by the truck load.
To give you a sense of what the complete course covers here are the chapter headings:
- Module 1 – Introduction (2 lesson)
- Module 2 – Designing the Perfect Timeline (4 lessons)
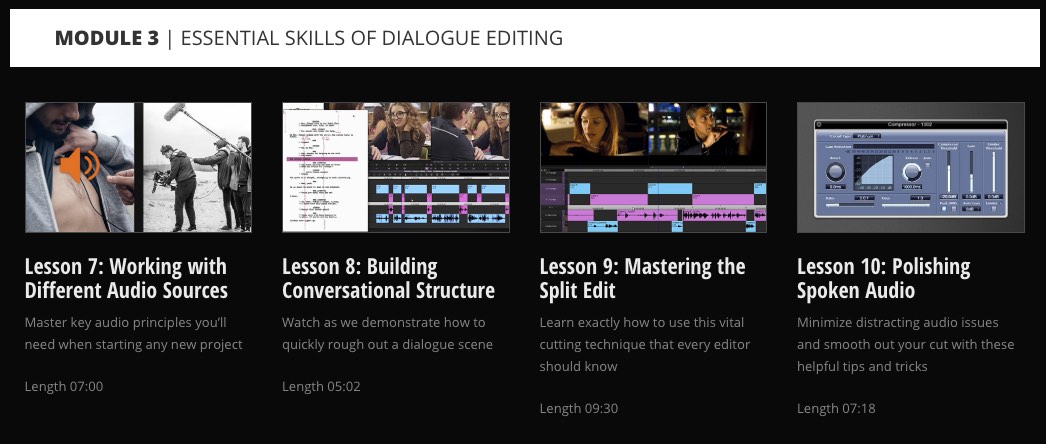
- Module 3 – Essential Skills of Dialogue Editing (4 lessons)
- Module 4 – Sculpting and Shaping Actor Performance (2 lessons)
- Module 5 – How to Focus a Viewer’s Attention (2 lessons)
- Module 6 – Using Sound to tell Rich and Compelling Stories (3 lessons)
- Module 7 – Crafting an Invisible Narrative with Sound (5 lessons)
- Module 8 – Wrap up and learnings review (2 lessons)
As you can see there’s a strong focus on working with sound at all levels of narrative storytelling.
If you sign up for the freebies above, you’ll be end up at a page detailing the entire contents of the course, so I won’t go into too much more detail here.
Each of the lessons within a module is usually under 10 minutes, making it easy to digest as well as jump to the bit you might be particularly interested in.
I would say that the course is aimed at beginner to intermediate editors who already know their way around common editing software, but just haven’t had the chance to learn the finer details from more experienced editors, which is why a course like this would be of a real benefit to them.
The lesson on Polishing Spoken Audio should be required viewing for many of the junior editors I’ve supervised, with a bevvy of practical tips on improving the quality of the cut. That said, I’d personally also not heard of the “15 x 15” rule used for punching a hole in your music eq for clearer dialogue. So as I said before, there are new tips to pick up.
The module on Using Sound to Tell Rich and Compelling Stories, featured a handful of ways to use off-screen sounds in creative ways, featuring specific film analyses from several different genres including drama, comedy, supernatural horror and action movies.
What I really enjoyed about these lessons were the observations on the powerful but subtle use of off-screen sounds as well as the huge creative freedom that thinking about and using these kinds of sounds gives to the editor for improving their work.
It’s being able to think in this way and understand some of the creative possibilities at your disposal, that makes these lessons so valuable.
Most of the time the Film Editing Pro course focuses on creative techniques instead of anything to do with the in’s and out’s of particular editing software, but where you do need to know how to use a specific feature – such as changing clip colours in Avid Media Composer, Adobe Premiere Pro or using Roles in FCPX – then they give you some concise instructions.
This means that you can easily apply the creative technique to your own video editing software of choice, even though the course is demonstrated in Avid Media Composer.
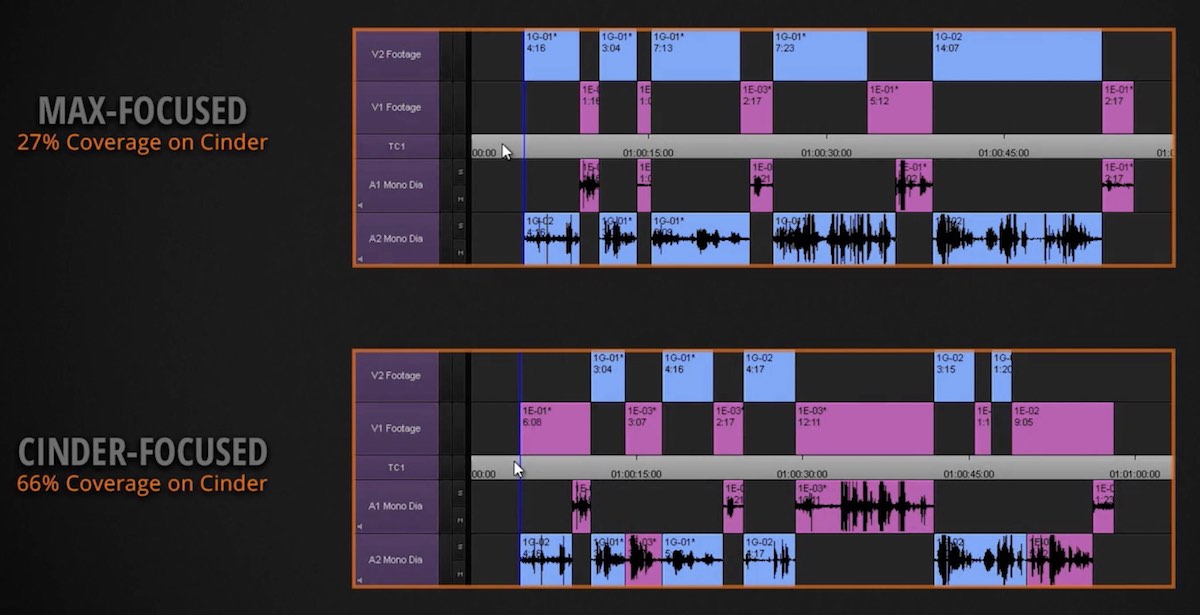
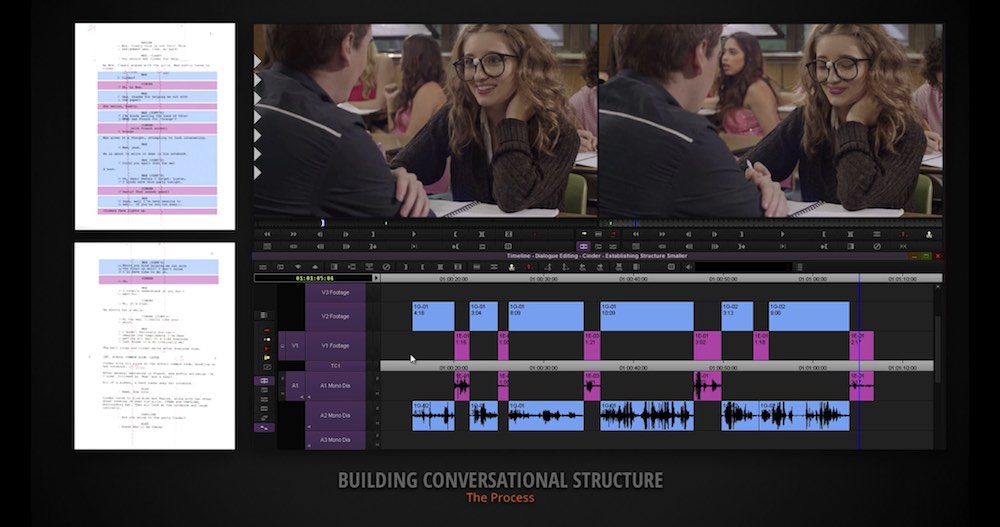
This image is from a section of one of the free lessons on colour coding your timeline, not just to keep things tidy looking but to help you diagnose and correct problems in an edit, in this case shifting the focus between two characters one particular scene, leveraging a couple of different techniques.

Film Editing Pro were also kind enough to give me an embed code for a full lesson from the module on Designing the Perfect Timeline. This eight minute video delivers an excellent primer for newer editors on maintaining an organised and logically orchestrated timeline.
This is helpful to apply consistently not only for your own workflow, but for any other editor who needs to take over from you at a moment’s notice, so that they can quickly and easily decipher what you’ve put where. Otherwise you’re just wasting their time.
Even if you never have to hand over your work to another editor, you’ll thank yourself for staying organised when future you opens up on of your own old projects.
Final Thoughts
Each lesson in the course is engaging and well-paced making the training an enjoyable way to learn, without feeling overwhelming.
If you’re a younger editor you’ll definitely get a lot out of the course, especially if you’re self-taught and don’t get many opportunities to look over the shoulder of more experienced editors to pick up these kinds of tips and tricks.
I would argue that for editors with a more ‘intermediate’ level of experience the course is still worth taking, to help elevate your abilities and creative thinking.
However, whenever I’m writing a review like this it’s always tricky to discern whether something is ‘good value’ or not, mostly because I think that’s a very subjective calculation.
At nearly $400 the course costs a fair amount of money, but then again, if that was about a day’s wages and it gave you life-long skills and know-how, then it seems like a pretty good deal. Especially if you’re a younger editor looking to develop on your own.
Secrets of Creative Editing is the cheapest of all the the Film Editing Pro courses so far, at $397, although you can purchase it over 6 months at $77 a month.
Music and Film Editing
I wanted to update this post with three excellent videos from This Guy Edits, which consider the topic of sound design and of adding music to a scene.
All three of these videos are packed with great insights, the first of which looks at using sound design to focus or transform a scene, as well as a step-by-step breakdown of how a sound editor/mixer/designer works, in this case Ugo Derouard of Ugosound Studios.
In the video Ugo walks through 5 steps of audio post production:
- Sound Editing
- A Spotting Session
- Dialogue Editing
- Sound Design
- Sound Mixing
This second video takes a look at adding music to a 12 minute action scene from Atomic Blonde (caution advised for younger readers!), which features no music at all.
Action is the alpha-male dance. You can dance the tango or you can dance karate. – Editor Elizabet Ronaldsdottir
Sven (This Guy Edits), works through the fight scene adding different tracks to the scene to see how it transforms the final result. Along the way he shares some great wisdom from various editors on working with music.
You can also watch Sven’s ‘Bubble-gum’ edit of the Atomic Blonde fight scene, if you’re one of his Patreon supporters, here.
This post rounds up my own go-to sources for royalty free production music, if you’re looking for great tracks to edit to.
The third video is one of Sven’s older episodes, in which he was editing a feature film and letting you peer over his shoulder as he worked, and tackles the question of ‘should you edit to music?’ It’s a short watch but definitely worth it.
If you’re not already a subscriber to Sven’s brilliant YouTube channel, then click here to solve that.
Sound Design Case Study: A Quiet Place
For a case study on the power of sound design you don’t have to look much further than everyone’s favourite low-budget horror/thriller, A Quiet Place, which brings sound and the lack of it, to the forefront of it’s cinematic storytelling.
In putting this post together much of the creativity in the film reminds me of the similar creativity of one of my other favourite low-budget monster movies, Gareth Edward’s Monsters.
That said, one of the things that stood out to me in the discussions of sound design in my giant making of Blade Runner: 2049 article was the use of dynamic range within the film.
That it could be as quiet as a single bee buzzing through hazy orange post-apocalyptic Las Vegas, to the thunderous crashing of waves on a concrete storm wall.
In my edit, I set out to make contrasts as sharp and intense as possible.
One I love is during Luv’s violent attack on Joshi where there are some very sharp cuts… literally and editorially. At the height of the attack, we shift outside to an exterior looking in and the soundtrack plummets down to the soft sound of snow falling.
I am very happy that the soundtrack preserves an idea prevalent in all the assemblies which was that it would be extremely dynamic. You could have big grand overpowering pieces of music and sound, such as the seawall sequence and yet you could also zero in on the sound of the bee beating its wings on K’s hand and an odd moment of desert silence. That’s the kind of range. – Editor, Joe Walker
So an easy practical take-away is to consider the breadth of your sonic dynamic range in your edit. Even in a ‘turn it to 11 trailer’, moments of quiet accentuate moments of full-throttle, full-peak madness. If it’s all the same all the time, it will lose it’s impact.
Anyway, back to A Quiet Place.
The video above comes from (the always superb) Lessons From The Screenplay,
It features Ethan Van der Ryn and Erik Aadahl, Supervising Sound Editors/Sound Designers, whose credits (separately and combined) include to many huge Hollywood blockbusters to mention. Director John Kransinski describes his sound designers as “the most talented guys in the world, you really got to see the art form of sound design at the highest levels.”
The LFTS video discusses sound design from the perspective of screenwriting, the unusual way that the script communicated sound and the things he learned from chatting with Ethan and Eric.
A must watch!
Gordon Burkell from AOTG.com interviews editor Christopher Tellefsen (Smoke, Man on The Moon, The Village, Moneyball, Joy) about his work on A Quiet Place, and what he did to help shape the performances to make the family as believable and cohesive as possible.
Through the process of going through cut after cut (of the whole film) you just learn more like – pull it back a little bit here, or this isn’t feeling right – so it’s always a constant sense of discovery in trying to draw out all of the dramatic moments and all of the underpinnings and all of the subtext.
That’s just an on-going thing in all of the films that I work on, that’s just something that I’m constantly trying to ‘work’.
They also discuss editing tense films through controlling the information the audience learns and when and what it takes to edit an entire film with only two scenes of dialogue, among other topics such as how the structure of Jaws fed into their editorial process.
Well worth a listen!
Video essayist Thomas Flight also takes a look A Quiet Place, this time dissecting the opening eight minutes of the film and its efficient establishment of the information needed to get into the world of the film, through skilful cinematography and powerful sound design.
It’s a great breakdown of excellent filmmaking.
https://www.youtube.com/watch?v=B1cpKV1d1RY
In this making of featurette the focus is on the sound editing and design in more detail than in the featurette at the bottom of this section.
There’s some great discussion over developing the rules of the film, including the noises that the creatures should create. What was particularly great was the inclusion of previously un-released temp sound design.
Best watched with some decent headphones!
In this short video from Insider you get the chance to see how some of the specific foley elements within the film were created, including hitting some grapes with a stun gun.
It’s the imagination and lateral thinking of the foley artist that always surprises me! Check out ‘The Secret World of Foley’ in this post for more of the same!
Director John Krasinski breaks down the lantern scene from the film, for Vanity Fair and how it fits into the wider ‘rules’ of the story. Even though it’s a horror movie, to John it’s a really film about family.
He also talks about his choice for shooting on film, casting a deaf actress, re-writing the script onto a farm and many other choices.
In this instalment of the Deadline Production Value video series you can hear more from Erik Aadahl and Ethan Van Der Ryn on their work on the film.
When we were working on the film, we’re like, ‘This is so unique, and maybe it’s too out there for audiences. Maybe we’re taking such experimental risks that they’re just not going to get it, or they won’t be patient with these long stretches of holding your breath, and different gradations of quiet. – Erik Aadahl
https://www.youtube.com/watch?v=ORwd0vSEq1k
In this excellent 15 minute behind the scenes featurette you can hear from many of the principle artists including the producers, writers, production designers and stars.
A thoroughly enjoyable watch!
More Resources on Sound Design for Film Editors

There are 59 other posts on this blogged tagged with Sound Design, so be sure to dive into those to learn a lot more! But a few highlights on how an editor should think about sound would include:
- Hans Zimmer’s Masterclass on Film Composing
- How to Edit a Film Trailer
- Sound Design Tips for Film Editors
- The Best Studio Monitors for the Edit Suite
- Improving every part of your Edit (Free Lynda.com training)
- Free Sound Design and Sound Editing Training
- The Art and Craft of Sound Design
Although this next thought isn’t strictly related to sound design, it is about using sound, or the lack of it, to improve your editing.
One of the things that Ron Howard talks about in his Masterclass on Directing, is how much he learns about a film by turning the sound off.
This technique of watching films silently, is a great thing for any filmmaker, and especially editors to do, as it helps you to take a step back and really evaluate how each shot is constructed, how each edit works with the next and techniques that you might be able to use in your own projects.
It’s just a better way of ‘watching what you are watching’, instead of being sucked into the flow of the scene itself.
I also wrote a post on 5 ways to stay fresh to your edit, over on Premiumbeat.com which echos similar ideas and is (hopefully IMHO) worth a read. It also includes a really helpful ‘hat-trick’ from editor Joe Walker (Blade Runner: 2049, Arrival, Sicario)
Sound Design Inspiration for Film Editors
The best gun shots have two syllables. – Ben Burtt
I’ve previously included other sound design breakdowns from In Depth Sound Design’s YouTube channel, which are worth a watch/listen in this previous post: Resources on Craft of Film Editing for 2018.
What I love about them is that it’s one of the few ways to really learn how many layers go into professional sound design and what they are. And then you also get to hear how these are accentuated or contrasted in the final mix.
All in an enjoyable few minutes.
In putting this post together I also updated these three massive making of posts with more sound design goodness from the always excellent SoundWorksCollection:
The Making of Blade Runner: 2049 | Inside Dunkirk‘s Oscar Winning Editing | Editing Baby Driver – Beat Driven Heists
The connection being that many of the sound effects stems used in these In-Depth Sound Design episodes, come from the SoundWorks Collection.
What I love about this clip is that it demonstrates that all sound design doesn’t need to be loud.
The discussion that I had with Editor Joe Walker in the editing room, was all about silence, and how we would handle silence and what was my approach to silence. If that’s the first conversation you’re having with your filmmakers, that’s pretty exciting.
This example from The Day After Tomorrow, provides a brilliant layer-by-layer reveal which includes listening through every layer of the mix, one layer at a time:
- Ice and wind
- Engine
- Sound effects
- Helicopter sound design only
- Foley
- Dialogue
- Music
- Final mix
I also love the layout of the ‘sound design essay’ includes two slowly reducing bars from left to right, colour coded to the layer of the mix you’re currently listening to. It’s an effective way of staying aware of what you’re listening to in isolation.
Tron Legacy is one of my favourite soundtracks to work to and in this awesome breakdown you can hear some of the superb sound effects and music that went into the light cycle arena scene.
These are followed up by sound designer Steve Boeddeker’s commentary, which sounds like it was recorded at a live event.
We ended up getting these Ducatti recordings and I would just do radical pitch manipulation so when the dopplers went by they would go from really high to really low. And I did this thing called resonant sweeping – where you take the resonant pitches, sort of inspired by what a DJ might do when they sweep out of a song, and if you do that and follow the pitch of a motorcycle going by it sounds like this really high-tech whine to it.
Make sure you listen to this on a decent set of speakers or headphones, preferably cranked up to 11.
If you’re after some more great soundtracks to work to, including the full Tron Legacy soundtrack by Daft Punk, then have a browse of through the albums in this previous post; The Best Film Soundtracks To Work To.


