
Given the ever increasing abundance of visual effects shots in modern filmmaking projects, knowing how to tweak the composite of 3D renderers and VFX deliverables is a valuable skill for any editor to have in their toolkit.
In this sponsored post I’m going to be taking a look at how to composite multi-channel EXR files rendered out of Autodesk’s popular photorealistic renderer, Arnold.
What even is a multi-channel EXR file?
The purpose of format is to accurately and efficiently represent high-dynamic-range scene-linear image data and associated metadata, with strong support for multi-part, multi-channel use cases.
— OpenEXR.com
OpenEXR is an ‘professional-grade’ file format designed specifically for the motion picture industry as a way to accurately store still images, in a way that offers greater flexibility, functionality and fidelity than using, say, the png or jpg format.
EXR files are often used to create image sequences for ‘photorealistic rendering, texture access, image compositing, deep compositing, and digital intermediates’ – and so can do many clever things for animators, VFX artists and colorists.
This includes containing multiple passes of an image in a single file for each frame, a bit like multi-channel audio files; together they create a mix but you have access to each individual element stored within.
Colorist Juan Salvo has a useful thread on the benefits of using EXR files, including a link to a paid app that allows you to view (among many others) EXR thumbnails on Windows machines.
** Time Limited Special Offer – 20% off Autodesk Software **
For 3 days only you can save 20% on industry standard 3D software including Autodesk’s 3ds Max and Maya. This is a rare opportunity to save hundreds of dollars on annual subscriptions!
This limited time offer is available from 11/7/2022 through to 13/7/2022.
Check out Autodesk’s complete media and entertainment package here.
Pros and Cons of Multi-Channel EXR Files
EXR files support 32-bit floating point pixels so they’ve got a ton of bit depth to deliver colour accurate and detailed final images.
One of the key benefits of using a multi-channel EXR file is that it can contain every single rendered pass, for that frame, in a single file.
The most popular passes to render from 3D software packages often include:
- Reflection pass
- Specular pass
- Shadows pass
- Diffuse colour pass
- Ambient occlusion pass
- Z depth pass
- Beauty pass
- Mattes of specific elements
So rather than having to manage, organise and maintain all of these separate passes, per frame, in 5 different files, EXR will store them all as one – whilst still allowing you to work with each ‘channel’ (each pass) individually.
Alternatively, a benefit of having individual files per pass is that it is easier to see which passes have been rendered (they’re not ‘hidden’ in the multi-channel EXR) but then you do have many more files to mange.
The downside of doing this is that the file sizes can be much, much larger.
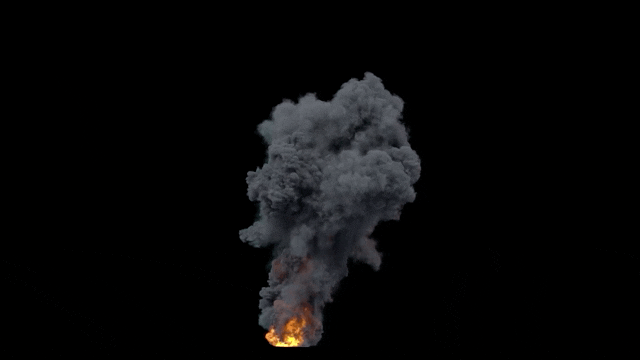
The four explosion VFX shots that you can download for free, a little lower in the post, weigh in at a hefty 7GB when zipped for just 17 seconds of final footage.
When uncompressed one single explosion takes up 1.3 GB for just 120 frames.
What is Arnold Renderer?
Arnold is “an advanced Monte Carlo ray tracing renderer” specifically designed to meet the stringent demands of feature-length animation and visual effects work.
What this means is that it is an unbiased renderer that can deliver photorealistic results but that this requires a greater amount of processing power and longer rendering times, compared to a biased renderer, which uses clever shorthands to reduce rendering overheads.
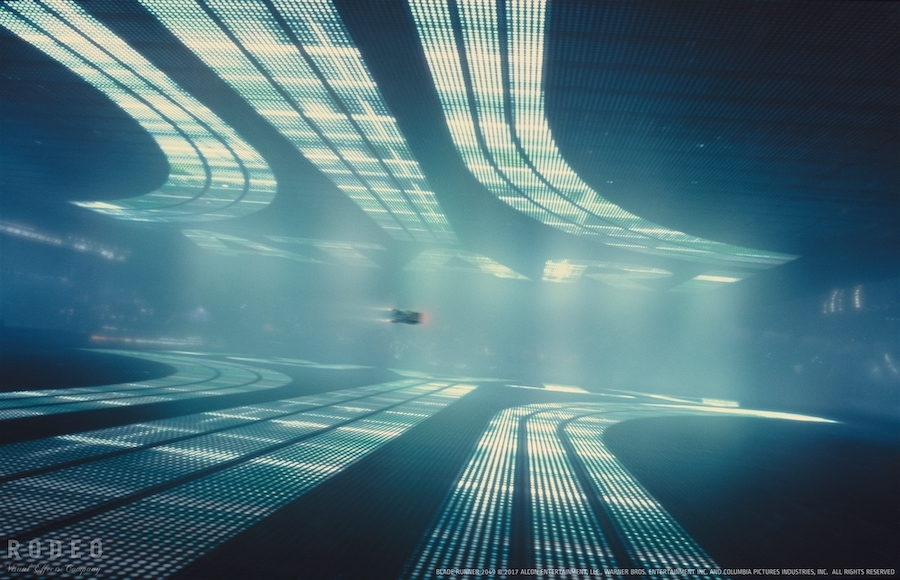
Because of Arnold’s photorealistic results, its used on a huge number of top film and TV projects, and, for example, has been used by Rodeo FX and Framestore to render visual effects shots for Blade Runner 2049 (check out my massive making-of article here), Kong: Skull Island, Guardians of the Galaxy Vol. 2 and Game of Thrones S7, to name just a few.
Arnold is available through a subscription licensing model, which means that you can choose to pay for it only when you need it on a monthly basis for $50, or save money and activate it in 3-year increments saving over $700 in the process – if you’re going to be rendering with it all the time.
Download a fully-functional free trial
Arnold was recently updated to version 7.1, adding several improvements including OptiX 7 Denoiser, a Triplaner shader and other complicated but interesting sounding things! Plus a huge number of bug and stability fixes, which are the kind of things that make a huge difference to your day to day experience.
Best of all you can download a fully-functional 30-day free trial of Arnold, rendering without a watermark for that time too!
How does Arnold compare to other Renderers?
Today, the most popular renderers, which are most frequently used by visual effects and 3D artists are Autodesk’s Arnold, OTOY’s Octane, Chaos Group’s V-Ray and Maxon’s Redshift.
Arnold is my daily driver renderer, which I use every single day. I use Arnold primarily for the incredibly beautiful looks it delivers, but the plugin itself is a joy to use thanks to its thoughtful design and added production features.
Chad Ashley, Greyscale Gorilla
Greyscale Gorilla’s Chad Ashely, has a really helpful article, which he has updated over the years, answering the frequently asked question – which renderer should I use?
His professional and personal recommendation is to use Arnold (followed by Octane) because of its speed, stability and how fun it is to use. But he also suggests that you ‘do your homework’ when it comes to choosing the right renderer for your needs and hardware configuration.
In this very balanced comparison video from MographPlus, you can get a great sense of the strengths and weaknesses of three different render engines, in which Arnold largely comes out on top in every category, except for when it comes to rendering at speed, especially during a look-dev process.
Which apps does Arnold support?
You can render in Arnold in all the major 3D packages including Autodesk’s 3Ds Max and Maya as well as Cinema 4D, Houdini and others.
For the past 15-20 years Arnold has been so widely used and respected within the industry that its creator, Marcos Fajardo, was awarded with a Scientific and Engineering Award (Oscar) from the Academy, in 2017.
Get Started with Arnold Renderer
The chaps from GreyscaleGorilla have a great hour long introductory tutorial, albeit from 2016, on getting started with Arnold for Cinema 4D.
They also have a ton of other Arnold specific tutorials in this playlist.
3D Artist Lester Banks also has a detailed array of Arnold specific tutorials on his site.
How to Render Multi-Channel EXR Files from Autodesk Arnold
In this clip from the MographPlus tutorial I talk about near the bottom of this post you can get a concise walkthrough of how to export multi-channel EXR files from Cinema 4D using the Arnold Renderer.
Arnold refers to these passes as AOV’s (Arbitrary Output Variables) but it’s just a render pass.
Here’s a quick step by step guide to rendering out your own multi-channel EXR files with Arnold.
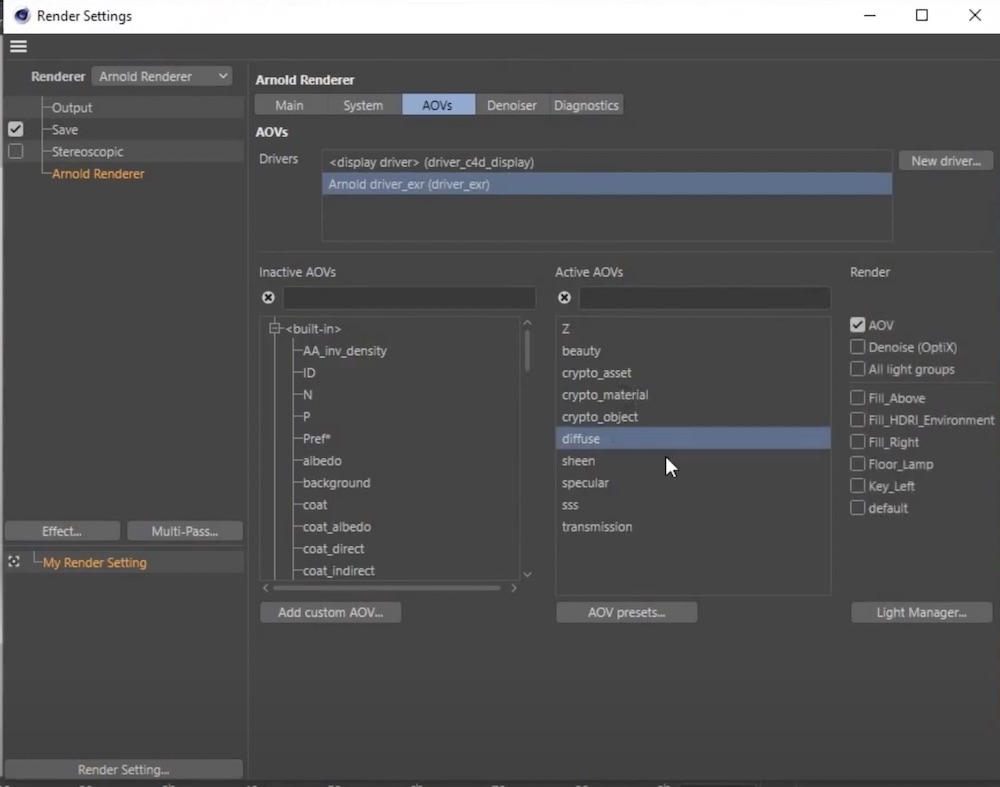
Once you’ve finished creating, shading and lighting your scene in Cinema 4D go to the AOV tab of the Render Settings.
You should have the Arnold EXR Driver set as your main driver.
In this example of a ‘back to beauty composite’, 5 main passes are rendered out.
- Diffuse
- Sheen
- Specular
- sss (SubSurface Scattering)
- Transmission
You could render out both diffuse direct and diffuse indirect and then recombine them in post, for a greater level of control but that adds an extra layer of complexity.
It’s very simple to add the passes you want from the Inactive AOVs list to the active AOVs list, and you can save custom presets of groups of AOVs, to save time in the future.
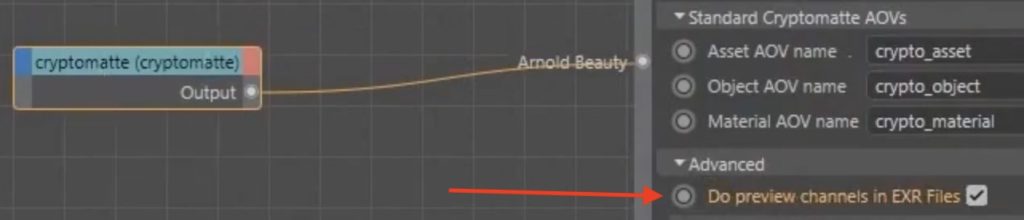
In this example he also has cryptomatte and lighting groups set up to export in the EXR as well.
These cryptomattes will give you a massive amount of control over parts of your image, later on in post.
- crypto_asset – creates the same matte for all assets.
- crypto_material – creates a matte based on the assigned shader.
- crypto_object – creates a matte based on the object name.
In order to include these you need to turn on ‘Do preview channels in EXR Files’ which is turned off by default, under the Advanced section of the Cryptomatte shader controls.

Finally enable ‘Merge AOVs’ in the Arnold Driver settings, to output a single, multi-channel EXR file, which includes all your pre-selected AOVs (passes).
Download Free Multi-Channel EXR Explosions
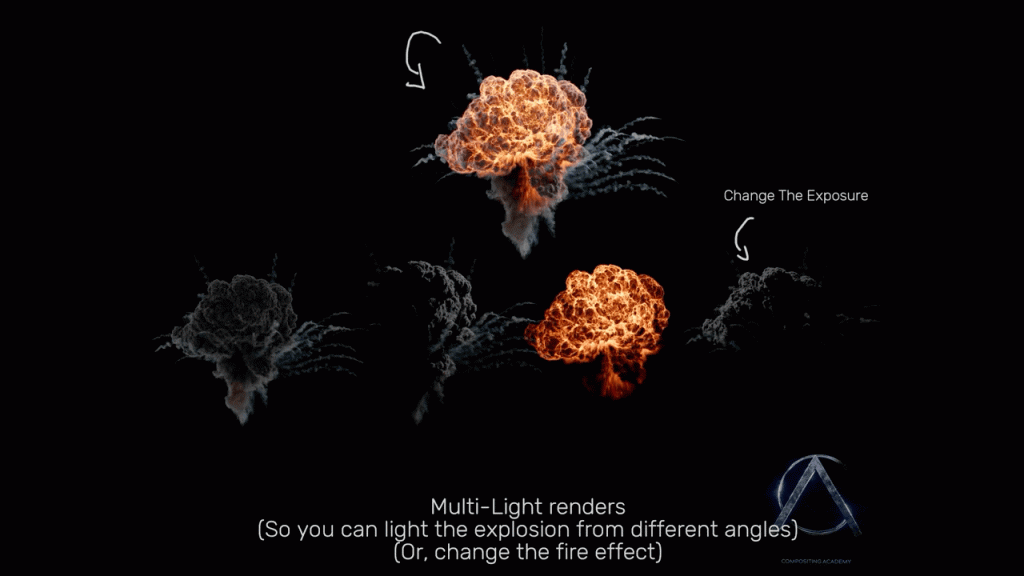
If you want to follow along at home and practice your own compositing skills and see what’s possible you can download a set of four free visual effects explosions, delivered as multi-channel EXR files from CompositingAcademy.com.
Multi-Light CG explosions allow you to adjust the lighting based on the shot that you are compositing them into.
You can also adjust the glow / emission pass as necessary.
Alex Hanneman
Run by Alex Hanneman, a professional compositor and instructor whose credits include Avatar: The Way of Water, Dr. Strange in the Multiverse of Madness, The Mandalorian and Alita: Battle Angel, Compositing Academy offers several detailed compositing training series based in Nuke.
So if a career in VFX compositing complex shots is something that excites you, definitely check out Alex’s training!
Otherwise download the four free 2K EXR explosions here.
If you’re after even more free visual effects library elements, such as explosions, smoke plumes, bullet holes and the like ActionVFX.com has a bunch you can download for free here.
How to Composite Multi-Channel EXR Files in After Effects
In this 2 minute tutorial from ActionVFX.com you can get a quick overview of how to set up multi-channel EXR composites in After Effects, which includes making sure you get the colour management and alpha channel settings correct.
The basic steps are:
- Import an EXR file
- Apply the EXtractoR effect (native to After Effects) to break out the separate passes
- Add Color Profile Converter effect and tick ‘Linearise Input Profile’ checkbox
- In EXtractoR tick the ‘Unmult’ checkbox to ensure the Alpha channel operates correctly
- Add the ‘Shift Channels’ effect and choose ‘Take Alpha from – Full On’
- Duplicate the EXR layer, rename to Matte, delete all effects and set blend mode to ‘Stencil Alpha’
To access all of these passes, after importing your EXR file sequence into After Effects, add the EXtractoR effect, found under 3D Channel Effects > EXtractoR
Jake in Motion takes a 3 minute stroll through some other uses of the EXtractoR effect including manipulating the depth of field or creating specific mattes in this quick tutorial.
In this follow on, and more in-depth tutorial, Zach from ActionVFX.com works through compositing a fireball explosion in a couple of different ways, demonstrating along the way, which effects to add to a better blend with your VFX to the background plate.
How to Composite Multi-Channel EXR Files in DaVinci Resolve Fusion
The process for working with multi-channel EXR files in Blackmagic Design’s DaVinci Resolve Fusion page and their standalone Fusion Studio is essentially the same.
But without a free and incredibly useful plugin (Reactor) and a small LUA script (Hos_SplitEXR_Ultra) it will be a painful and time-consuming process.
I’ve put this 5 minute ‘recap’ tutorial up front as it explains the basic process very efficiently before I share some more in-depth tutorials, if you want a more detailed understanding.
Although Brandon is talking about importing EXR passes from Blender specifically, the workflow is the same, regardless of where your EXR files are originating from.
You can watch the slower paced and more detailed 40 minute version of Brandon’s tutorial here.
Download Reactor and the Split EXR Script
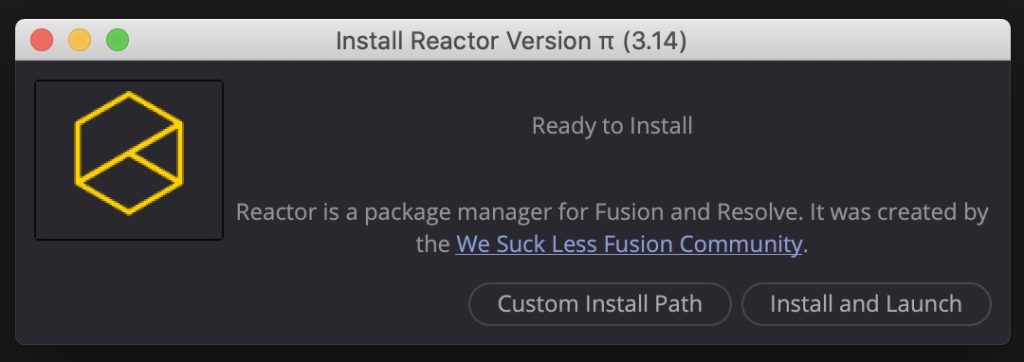
Reactor is a free plugin for Fusion and DaVinci Resolve which functions as a toolbox for a whole host of individual scripts that will give you a massive array of Post Production superpowers, which I won’t go into here.
Download Reactor for free, from WeSuckLess at SteakUnderWater.com (confusing branding, I know), to get started.
This will download a Reactor-Installer.LUA script, which you run by simply dragging it into the node tree section of the Fusion page in DaVinci Resolve.
Once installed you will have access to the Hos_SplitEXR_Ultra script, which will automatically split out each of the multi-channel passes within your EXR.
To install this specific script from Reactor, search for EXR within Reactor and then tick the checkbox to install the Hos_SplitEXR_Ultra script.
To open the Reactor window again later within DaVinci Resolve go to:
Workspace > Script > Reactor… > Open Reactor.
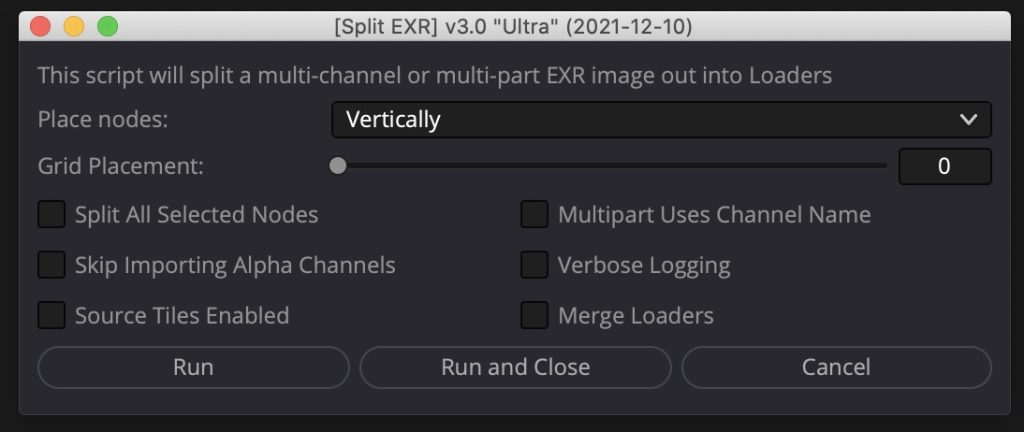
To run the hos_SplitEXR_Ultra script in DaVinci Resolve’s Fusion page:
- Add a loader node (Shift+Space – search for Loader)
- Select your EXR file
- Right click on the Loader Node > Script > hos_splitEXR_ultra
This will open the options window above and a way you go!
FYI – SteakUnderWater.com – is a brilliant resource for all things Fusion and DaVinci Resolve
Loading Reactor and the EXR Script in Blackmagic Design Fusion
In this 3 minute tutorial, you can see how it easy is to install the Reactor plugin and load the Hos_SplitEXR_Ultra script in the standalone version of Fusion too.
Detailed Guides to Compositing Arnold Renders in Fusion
But now that you actually have all your passes organised, how do you composite them together inside of Fusion?
In this taster lesson from MographPlus’ massive 12 hour course on using Arnold 6 & 7 for Cinema 4D, you can learn how to use Fusion’s toolset to composite these passes together in an ACES colour managed workflow.
In about 15 minutes you can learn how to:
- Build a ‘back to Beauty’ composite
- Construct a Light Mix composite
- Work with crypto mattes to isolate colour corrections
There’s also a great opening tip about organising your renders into colour labelled groups to stay on top of which pass is which, and it’s just a fantastic tutorial from start to finish!
EXR Vs PNG Renders
This is a nicely executed tutorial from Polyfjord, which demonstrates the benefits of working in EXR renders vs PNGs, as well as the specific workflow for bringing Blender renders into DaVinci Resolve, whilst maintaining the Blender ‘Filmic’ LUT.