FCPX Advanced Workflows and Tutorials
If you’ve already mastered the basics of FCPX, then hopefully this round up of advanced FCPX workflows and tutorials will help you take your skills up a notch. If you’ve never used FCPX before and are looking in over the fence then this is a good opportunity to learn just what’s possible in this innovative NLE. Plus the first parts of this post are a few helpful things for those looking to build an on-ramp into the software.
This post got quite long so here are a few direct links to jump to what you want to see first!
What’s new in FCPX 10.2.3 | Quick Tips for Beginners | FCPX Keyboard Cover Review | Whiskey Tango Foxtrot Workflow | Advanced FCPX Tutorials
What’s new in FCPX 10.2.3?
But first a quick bit of info on the latest update to FCPX 10.2.3. Here are a few headlines and further resources.
- Customizable Default Effect lets you choose both a video and audio effect that is assigned to a keyboard shortcut
- 4K export preset to create video files for Apple devices
- Improves speed when opening libraries on a SAN
- Resolves an issue that could affect the timecode display in the Dashboard on OS X El Capitan
- Import Canon XF-AVC including video files from the Canon C300 Mark II
Noah Kadner over on FCPWorks.com shared some useful thoughts on how to get the most out of the update in the post, pointing out that:
If you do work across a SAN, this is really critical. It now means Libraries can be kept on a SAN volume without the performance hit normally associated with it that forces many users to keep Libraries on local volumes. This feature opens up huge new workflow potential and is a major leap forward toward X’s viability in more enterprise grade post/broadcast environments.
#FCPX 10.2.3 release notes.
“backup the version of Final Cut Pro X that you're updating.”https://t.co/1JK6rirNga pic.twitter.com/qCqgqnoGYq
— Richard Taylor (@RichardTaylorTV) February 4, 2016
It’s the little things that make all the difference: Final Cut Pro X 10.2.2 text entry box update! #fcpx pic.twitter.com/DUFBBHzgik
— Alex Gollner ? (@Alex4D) September 3, 2015
Mark Spencer from Ripple Training has a useful blog post on the best bits of the update here, as well as a couple of useful tutorials on how to leverage that new customisable default effect.
In the first FCPX In Under 5 Minutes video you can hear from Mark Spencer on setting up the customisable default effect, but in this Macbreak Studio episode Mark and Steve Martin take things a bit further. One important point they make is that if you’re using a customised keyboard set up you might have to go in and assign these new keyboard shortcuts yourself.
Quick Tips To Help New FCPX Editors

Mike was the First Assistant Editor on Focus, the first major Hollywood feature to be cut on FCPX. This previous post covers that in enormous detail, and if you want to go even deeper you should check out Mike’s excellent book which takes you through his experience and workflow on the film.
So far in this on-going series Mike has covered Smart Collections, Trimming and Audio, each with a corresponding blog post, so be sure to check those out too.
Other things that can be part of (or excluded from) a Smart Collection are: text, ratings (more on ratings in an upcoming post), media type, clip type, media format elements, used media, dates and more. These parameters can be combined in infinite ways.
In this little ‘bonus’ tutorial, Mike walks through his preferred method of sharing a sequence between two editors.
Edit Faster – FCPX Keyboard Covers
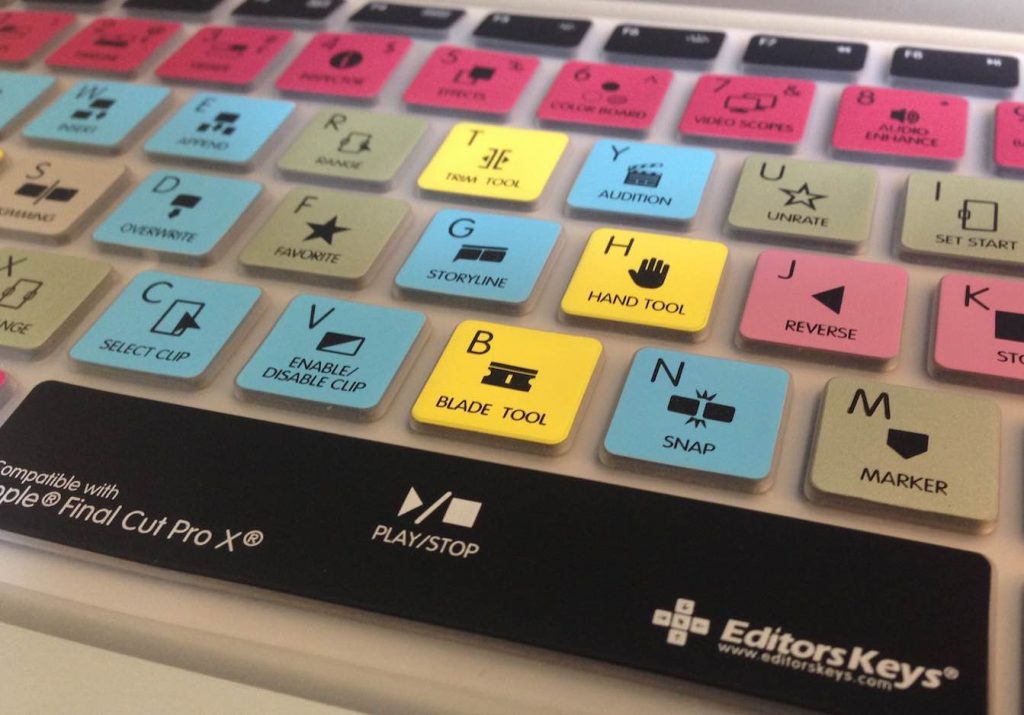
If you’re new to editing in FCPX, or learning any creative software for that matter, then a keyboard shortcut cover could be just the thing to help you get to grips with the software, faster and ultimately help you edit quicker too. I’ve previously reviewed some of Editors Keys full length covers before as part of my post on Film Editing Keyboards, Mice, Controllers and More, and they recently sent me an FCPX laptop keyboard cover to test out.
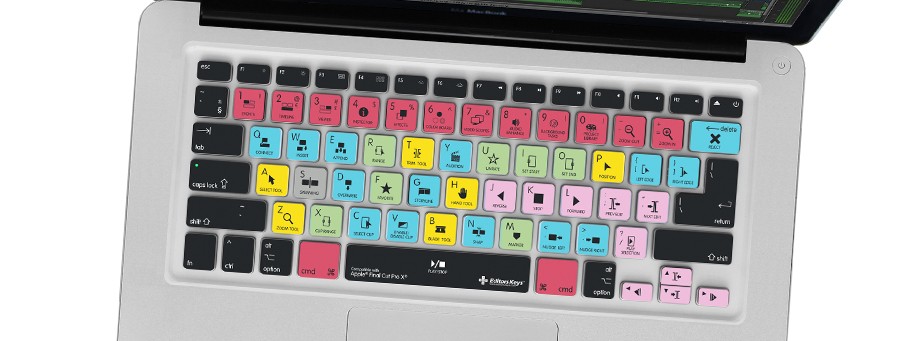
The FCPX shortcuts keyboard cover from Editors Keys is pretty versatile and fits a fair amount of keyboards including the 2008+ Macbook Pro 13, 15 and 17″ laptops, the Macbook Pro Retina 13 and 15″ models and the 13″ Macbook Air. It will also work with the short form Mac wireless keyboards, the only thing I know it won’t fit on is the new 12 inch Macbook.
You can also buy shortcut keyboards for numerous creative apps including Avid Media Composer, Premiere Pro, Photoshop, Pro Tools, DaVinci Resolve and many more. Being a removable cover means you can of course move from program to program as you wish.
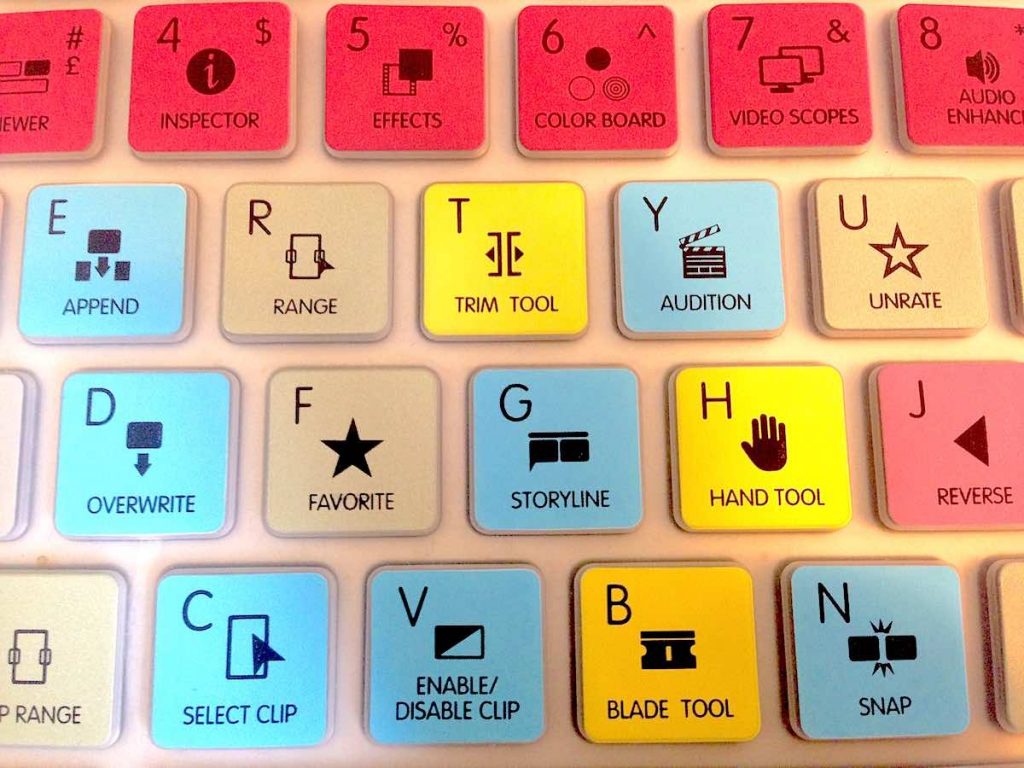
The keyboard covers have a great feel to them and fit’s pretty snugly on my 17″ MacBook Pro (as above). The colour coding helps to keep things visually coherent and breaks down to something like:
Yellow – Edit tools
Blue – Timeline tools
Pink – Playback control
Gold – Organisation and selection
Red – Window navigation
A couple of tips on making the most of a shortcut keyboard cover would be to firstly to simply give it a slow perusal before you actually use it. Which shortcuts are you using already? Which ones have you never even seen before? Which ones cover features you’ve not yet integrated into your day to day editing style?
The second tip would be to actually leave it on all the time for a while, even when you’re not actually working in FCPX. This will just give you more opportunity to learn some of the keyboard shortcuts via osmosis. My only caveat to that suggestion, especially as someone who does a lot of typing (mostly for this blog!), is that I prefer the focus of a blank keyboard when I’m getting stuck into putting down a few thousand words in a day. But other than that, the feel of the covers is so nice, why wouldn’t you keep it on all the time!
An added benefit to the silicon construction of the cover is that it is fully washable so cleaning your keyboard just became a whole lot easier. Plus, for any freelancers moving from edit suite to edit suite, it’s always a *joy* to have to work on someone else’s sweat-encrusted keyboard, and so with one of these in your back pocket you can easily side-step any communicable diseases from the hard-working fingers of a fellow editor. Furthermore because the cover completely encases the keyboard you’re not going to get any crumbs or gunk falling into the gaps. So many ways to keep your edit suite clean!
A keyboard cover like this one isn’t that cheap at $29.99/£23.50, but it will last the hours you’ll put it through and even comes with a 1 year guarantee. If you did some kind of money-per-hour-speed-improvement calculation it would probably be worth it’s weight in gold!
Buy FCPX Shortcut Keys on Amazon.com | Buy on Amazon.co.uk
Editors Keys also created the first backlit shortcut keyboard after a hugely successful Kickstarter campaign, which I’ll also be reviewing shortly for DaVinci Resolve, so keep an eye out for that.
Update: Currently the FCPX laptop keyboard cover seems to be on sale over on Editors Keys for only £8.99, down from £14.99.
As a quick aside, if you’re wondering whether the new 12 inch Macbook can be used for editing and whether it can even handle 4K, then this short video from Jonathan Morrison demonstrates just what is possible with FCPX.
Editing Whiskey Tango Foxtrot in FCPX
The latest Hollywood feature film to be edited in FCPX is Whiskey Tango Foxtrot, from the same directing duo who created Focus – Glenn Ficarra, John Requa. It’s great that yet again there’s been a fair few decent interviews and write ups on the film’s post production workflow, the best of which I’ve brought together here.
The first of the two must read articles would have to be this very detailed write up by Peter Wiggins of FCP.co fame. The post features a group interview with Director Glenn Ficarra, Editor Jan Kovac, Assistant Editor Kevin Bailey and Apprentice Editor Esther Sokolow and cover’s the full gamut of the editorial process during production, post, VFX turn overs, grading in Resolve, public DCP screenings and delivery. It’s a fantastic read and packed with great insights like these on the dailies process:
Kevin: The LightIron 2K footage [graded dailies from ARRI Alexa’s shooting Pro Res 4444 XQ] including multiple mono audio files was supplied with XML that contained scene information and data like circle takes. We took all this into FCPX, relinked, checked formats and then ran a program called Shot Notes X which combines FCPX XML with a CSV file of script notes from the Filemaker Pro database that the script supervisor used. That renames the clips, adds the notes into the notes field with other metadata such as camera angles all in a batch.
The production audio was then run though Sync-n-Link with FCPXML which batched synced the clips and made multi-clips. The syncing took about 45 minutes, 5 minutes of syncing and the rest checking!
We would then begin line breakdowns like Focus which took about two to three hours a day. Each scene had an event and those were made into an FCPX Library for each reel. For the first three weeks I got the synching system up and running and then Esther took over for the rest of the production. All the editorial crew helped with the script breakdown.
If you followed the article closely enough it would probably serve as a detailed enough primer that you could replicate the entire workflow, right down to file naming conventions! There’s also a really interesting example of a homemade, one handed, FCPX controller 3D printed by director Glen Ficarra.
The second essential reading on the post workflow for feature film like this is Steve Hullfish’s interview with editor Jan Kovac, over on Pro Video Coalition. What’s particularly interesting about this instalment of Art of The Cut is that Steve is coming from an Avid Media Composer’s perspective – and a highly knowledgeable one at that, so his questions require Jan to explain things in quite fine grain detail, to translate the concepts. This is particularly helpful for anyone who isn’t that familiar with the way FCPX does things. For example in this discussion of the line breakdown work performed by Jan’s assistants. (See image above this one.)
HULLFISH: So all the markers are the markers that jump you to certain lines?
KOVAC: The key symbol is a keyword. It shows that it was shot on day 2 and the time. It shows you it’s ARRI. Then I have my action mark. SERx2 means series and that I have two “actions” in that series. It’s represented by two green markers: action and action1. Then I do have Line 1-3, then marker 4, marker 5, so you can see I have three markers for lines. There is also an alt that wasn’t in the book. Can you see that there’s an adlib under marker 12?
HULLFISH: “You’re not allergic to hookah?” That’s really fascinating to me. It would take some getting used to, but I can definitely see the power of this. But just like with ScriptSync in Avid, this is going to take some serious prep for the assistants. It’s a lot of man-hours to get this ready.
After a quick tour of the FCPX workflow Steve and Jan get into the finer details of actually crafting the film and the central performances, which is something that the FCP.co article doesn’t get into as much, due to it’s greater workflow focus.
HULLFISH: What about VFX? You said there was a lot of VFX in this. How much does that affect your editing?
KOVAC: A lot of the VFX were just green-screen TV coverage comps. A lot of split screens, re-speeds, stuff like that. So if I have time, I do that. If not, I have my assistants do it. The bigger stuff we temp in Final Cut and some of that actually made it into the final that were made in Final Cut thanks to us working in the O-negative resolution. There is, for example a shot of a person talking on Skype, but it’s not straight up, so you add the user interface and then Tina’s face in as a reflection. So things like that we’re creating in Final Cut and it has to look great. It can’t take you out of the story.
Another couple of articles that are well worth checking out are Steve’s further interview with Director Glenn Ficarra on his approach to editing in FCPX, as he was deeply (although chose to be un-credited) involved in the edit. They get into more of the craft of the edit and talk a bit about the similarities between writing and editing, restructuring the film, murdering darlings, bracketing performances and a whole lot more. It’s a great read!
HULLFISH: Jan was talking to me about you guys “bracketing performances” when you direct. Can you talk to me a little about that?
FICARRA: Because all of the movies we’ve done have been these mixed-tone movies we they’re kind of made in the editing room as far as shading the performances and the arc – where a movie might start funny and get more serious as it goes along. That requires us to have more control over the performances and the actors really like it because they’ll do a comic version of a scene and serious version of the scene without changing the script much. It’s all them doing the work and it gives you lots of choices later on – sometimes too many.
Lastly, but far from least, is Tim Wilson’s article over on Creative Cow, which includes an interview with Glenn and First Assistant Editor Kevin Bailey. Part of what makes the article such a good read are Tim’s wider industry observations injected along with his interview topics like the VFX workflow, audio turnovers, plans for the future and much more. One point that really jumped out at me was Tim’s observation of how much time and money was saved by working in FCPX.
Noting again that we’re talking temp work inside FCPX, during production. VFX and audio finishing were handled with Nuke and Pro Tools. Nevertheless, says Glenn, “We had significant, significant savings because of the way we did all these things with Final Cut Pro X.”
How significant? Enough to buy 10 extra weeks of postproduction without affecting the budget.
(Now there’s a potentially interesting angle on the conversation about NLE speed: not how many minutes did you save opening the project, or how many hours did you save on rendering, but how many weeks on location did your NLE help you save?)
“Whatever saves you time in production is the real money savings, because nothing is more expensive than a day of shooting,” says Glenn. “You’re making all these decisions to answer the question, ‘How can we save days?’ Because that’s the only way you’re going to knock big numbers down. On a production like ours, every three to four days of shooting is a million dollars. You have to use every trick in your arsenal to do that.
UPDATE – Light Iron on WTF
Everything from LightIron is always worth watching and more than anyone, or at least more eloquently than anyone else, CEO Michael Cioni seems to have his finger on the pulse of the future of the film industry. In this introduction to the WTF workflow event Michael explains what is unique and powerful about the WTF workflow and why FCPX works best in this way.
If you want to get ‘what the big deal is’ then Michael’s video is a must watch, and while you do ask yourself: Can I do all this in the current way I’m working?
FCPX is an advanced database sitting on top of an NLE. Once you embrace and understand the logic behind that, it enables you to open up the editing process that was never previously possible.
Update – NAB 2016
The key filmmakers behind WTF also spoke at NAB, and in this cut down you can hear a highlight edit of that conversation.
Advanced FCPX Tutorials
In these presentations from the Soho Editors’ booth at BVE 2016 you can learn a shed-load about how professional editors use FCPX to get the job done. Soho Editors are a London based post company who offer both access to talent (freelancers) and training (improving those freelancers), which is a pretty useful combination.
In this first video editor Thomas Grove Carter talks through his process of editing a high-end commercial at London based, Trim Editing. Personally, as an editor who works a lot with sequences in Premiere, it’s really interesting to see (about 6.30 mins in) how Tom has transitioned from a pancake timeline type of workflow – building sequences of rushes, string-outs and selects – to a ‘range based favourites’ workflow by hiding rejected and selected material.
If you like what Tom has to say but don’t have 40 minutes to take a deeper dive into this seminar, then check out the short tutorials from Tom, in this round up on Understanding the FCPX Magnetic Timeline.
Editor Rory Cantwell, from Soho Editors, talks through the wider eco-system of the FCPX world and a few of the workflow steps needed for colour grading, compositing, titling, effects and delivery, so that you can quickly and effectively meet all your client’s requirements.
Alex Snelling from Soho Editors talks through how to achieve a few useful common fixes and effects inside of FCPX, sometimes using CoreMelt’s suite of plugins like TrackX and SliceX. He also rounds out the presentation with a few round trips to Motion and demonstrates how to create your own little Motion plugins to use inside FCPX.
The following presentations are from the FCPeXchange event, hosted by Sam Mestman of FCPWorks. Sam will also be drawing together some of the best and brightest contributors to the FCPX world at NAB 2016, so keep an eye out for that too!
In this presentation of cutting trailers in FCPX by Charlie Austin, another professional editor championing the use of FCPX, you can learn all about Charlie’s process as well as why he thinks “Every editor should use FCPX as a plugin for whatever NLE they’re using.” You can also get a closer look at Charlie’s slides from the presentation here.
Another recent post from Charlie that’s well worth checking out is this one breaking down some VFX work he did for a trailer, all within FCPX using Coremelt’s Slice-X and Track-X. These plugins normally cost $99 each but you can currently grab a free version of Slice-X from Coremelt’s site (limited to rectangles and oval shapes) or download the free 15 day trials of any product to give them a whirl for yourself.
Editing Assistant Patrick Southern and (first time FCPX) Editor David Tillman discuss their collaborative workflow for cutting the documentary Challenger Disaster: Lost Tapes. You can also read David’s article about his FCPX journey in this post over on FCP.co.
Slowly but surely I acquiesced. I fell in love with having the audio tied to the video, instead of somewhere down below. I used the Q key to insert new material with reckless abandon. I wondered how I ever found footage before without FCPX’s thumbnail view, without being able to quickly skim through hours of footage, easily tag items with keywords and mark favourites. Finding stills in the browser was a joy since I could make the thumbnails as large as I wanted to without them becoming so pixelated they were unrecognisable.
In this FCPeXchange session Sam Mestman walks through the workflow for an indie pilot for “Off The Grid” as a way of demonstrating why FCPX is a great choice for any indie filmmaker.


