Colour Grading Tutorials in DaVinci Resolve

- Colour Grading Tips from Professional Colorists
- Troubleshooting Common Problems in Resolve
- Resolve to FCPX/Premiere Pro Workflows
- Resolve 12.5 Tutorials
Colour grading is what DaVinci Resolve is famous for, and for being free, but it’s also come along way as an NLE.
My most recent post on Resolve focused on tutorials and training to help you learn how to edit in Resolve, this post however, is packed with colour grading tutorials for colorists working in DaVinci Resolve.
UPDATE – DaVinci Resolve 12.5.4 New Features
Because their development team don’t seem to need to stop for food or sleep (it’s only been 48 days since 12.5.3!), they’ve just updated Resolve to 12.5.4 with the following new features:
- Added support for the MacBook Pro Touch Bar
- Added support for decoding MP3 files on Windows
- Added support for preserving super-white and sub-black data with ProRes 4444 codecs
- Added support for Grass Valley HQ and HQX codecs on Mac, Windows and Linux
- Added support for Rec. 2100 in DaVinci Resolve color management
- Added new sliders to control Dolby Vision analysis data
- Added P3-D65 IDTs and ODTs in ACES
- Added Rec.2020 ST.2084 1000 nits ODT clamped to P3 in ACES
- Added support for image orientation flag in DPX files
Just to keep you up to date, the 12.5.3 update included these useful improvements and bug fixes:
- Added support for Final Cut Pro X XML Version 1.6
- Added support for PostgreSQL 9.5.2 on macOS
- Added support for ACEScct color science
- Updated ACES support from ACES 1.0.0 to ACES 1.0.2
- Improved performance when encoding to MXF XAVC
- Improved importing of Flip and Flop from AAFs from Media Composer
- Improved importing of Dip to Color dissolves from AAFs from Media Composer
- Improved Dolby Vision XML export
You can download it for free here, to give this all a try for yourself.
If you’re totally new to colour grading then this episode of This Guy Edits, in which editor Sven Pape visits the colorist working on the independent feature he simultaneously ‘tutorialised’ on his YouTube channel, will give you a good idea of what’s involved.
So great is Sven’s editing course that I included it as part of my Alternative Film School for Film Editors – a way to self-teach your way into a career in film editing.
In this freebie from colorist subscription site, MixingLight.com, Patrick Inhofer demonstrates how a professional colorist works with a colour grading panel, namely the Tangent Element. This allows you to work faster and finish earlier.
This video is a freebie from Mixing Light’s extensive training series DaVinci Resolve Deep Insights, which I’ve previously reviewed here.
I’ve recently put together a massively detailed post on using a Tangent Element Kb panel to grade and edit with in Premiere Pro here, so that take a look at that too.
Or if you want more information on Affordable Colour Grading Control Surfaces, check out this detailed post as well.
If you watch only one video in this post you should watch this tip from ICA colorist Warren Eagles. (Although you should also watch Alexis’ quick tip too!)
Warren shows you how to import a reference movie to make sure that the conformed timeline you might have brought in from an NLE actually matches up to the offline reference. Nothing destroys client confidence like having them say “err…that’s the wrong shot.”
Troubleshooting Problems in DaVinci Resolve
These posts from Lewis McGregor on Premiumbeat.com will help you to solve the most common problems a colorist is likely to face, which is fixing both under and overexposed footage.
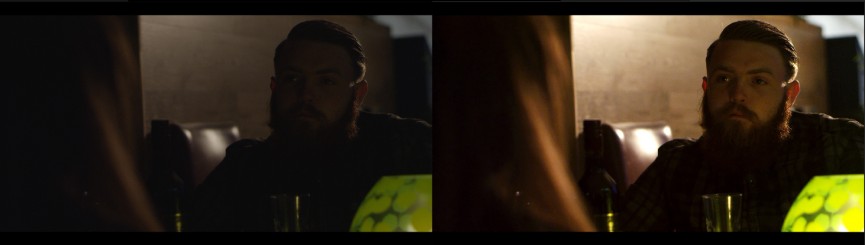
Lewis’ three-step approach to under exposed footage will only work if there is something to rescue, but it will help you restore your image to a useable shot. To apply noise reduction natively in Resolve you’ll need the full Studio version.
If your blacks are already at (or below) 0, then you’ll likely find that shadows will start to form into clunky areas of noise. If your shot is a few stops underexposed, this tip will bring life back into an underexposed image. This method delivers detailed shadows while maintaining the midtones that we boosted.
How to Salvage Overexposed Footage | How to Fix Under Exposed Footage
In this short tutorial from colorist Alexis Van Hurkman you can discover a new way to find a command in an application, when there is no way to search for that command in the shortcut editor. In Resolve this will take you to the menu item and the shortcut for that command.
This is also a great tip for anyone working on a Mac!
In this tutorial from Alex Jordan of LearnColorGrading.com, he talks you through how to playback 4K footage smoothly in Resolve, even on old hardware. Essentially this is just about using a proxy workflow by generating optimised media.
Alex uses an analogy involving unpacking and assembling IKEA furniture, which if you don’t understand codecs, decompression and proxies, might be helpful. Especially if you are totally new to Resolve.
Daria Fissoun, the colorist behind Goats Eye View’s epic collection of free tips and tutorials for DaVinci Resolve, has recently posted some follow up tutorials to a much older tutorial on importing media (above).
These tutorials help you to solve common importing problems in Resolve, how to correctly transcode media and walk you through an online/offline workflow.
There are over one hundred(!) other great tutorials in Daria’s Youtube Channel, covering topics such as
Here are the follow up tutorials on importing media.
DaVinci Resolve and FCPX/Premiere Workflows
https://vimeo.com/188175744
I found this tutorial from D.L. Watson thanks to Logan Baker’s post on Premiumbeat.com which takes you through the process of moving a project from Premiere to DaVinci Resolve without rendering.
D.L. Watson walks through cleaning up your offline edit and sending an XML version of the sequence to Resolve.

Richard Lackey on Cinema5D.com has started an introductory series for anyone totally new to Resolve and colour grading. In Part 1 he discusses what workflow actually is and lays the foundation for a Premiere to Resolve roundtrip online/offline workflow.
I’m going to edit in Adobe Premiere using compressed proxies, which are low resolution copies of the original camera media. Once the edit is locked, I will import the edit (sequence) in DaVinci Resolve using a XML file, but this time I will link back to the native REDcode RAW camera media for color grading and finishing.
DaVinci Resolve may end up being my final destination as far as the picture is concerned, or I may need to take the graded picture back into Premiere for some other reason such as final titling and packaging.

In part 2 Richard dives into the basics of colour grading and lays out an easy to understand order of operations that a colorist would go through when working through a project.
The overall goals a colorist has for any project are largely universal.
– Correction of any technical inconsistencies in camera source media, or mistakes made on set.
– Balancing and matching source media throughout the project.
– Consistency of color throughout the project, even if the mood or style varies, those moods or styles must be consistent.
– Meet all technical requirements for deliverables.

This post from Ripple Training.com‘s Steve Martin gives you the steps you need to move a project from FCPX to Resolve and back again. Again this involves an XML handshake, but they key is to know the nuances of your NLE and what will and will not translate over.
You should also be aware that not every color adjustment will transfer to Resolve. Exposure, Saturation and Color changes in the Color Board will transfer, but secondary corrections using Color or Shape Masks will not. With Resolve’s powerful windows and curves, you probably want to create your secondary corrections in Resolve anyway.
DaVinci Resolve 12.5 Tutorials
This ultra quick tip from John Nierras demonstrates how to use the new functionality in Resolve 12.5.2 (and above) to copy your local grades to remote, which allows you to quickly apply them to the same shot in other timelines.
In these tutorials from Theo of Meisner media you can learn how to do a couple of creative things inside of Resolve such as sky replacements, using garbage mattes and creating a ‘True Detective‘ style double exposure shot.
Although Theo starts off his sky replacement tutorial saying that you shouldn’t do sky replacements in Resolve, colorists do this kind of thing all the time, and he demonstrates its fully possible, so I’m not sure why he ‘disclaims’ that.
Composite Mode Tip

For an animated quick tip on using composite modes in DaVinci Resolve, check out this post over on Premiumbeat.com. It really is a pretty easy three step process!
Alex Jordan from LearnColourGrading.com demonstrates some colour correction techniques in this tutorial using curves in Resolve 12.5.
In this tutorial Alex demonstrates the power of working with curves in Resolve and why you might want to use them over some of the other controls the program offers you.
Although Alex is talking about clicking on specific parts of your image you’re only selecting the exposure point of that area of the image, but it will also affect the other parts of the image that have the same exposure point. So to really select particular objects you would need to use Power windows to isolate those parts of the images from the rest. (unless I am mistaken?!)
In this tutorial from Alex you can learn how to create 3D text in Fusion, from inside of DaVinci Resolve using the new Fusion Connect clip functionality in Resolve 12.5.
You can download Fusion 8 for free from Blackmagic Design here. Check out this previous post for a ton of free tutorials on getting started in Fusion 8.