After Effects for Editors Part 4 – Useful Things
After Effects is an essential piece of software for any editor to learn, even if it’s just being able to do a few simple things well.
In the fourth instalment of my series of posts on After Effects for Editors I’ve brought together a smorgasbord of ‘useful things’ including tutorials, keyboard shortcut keyboards, useful plugins and inspirational work.
I hope you find it as useful to read as I did putting it together. You can check out the other posts in this series here.
After Effects was recently updated to version 14.2 with some nifty new features including the After Effects side of the Essential Graphics Panel (which also partner with the same Essential Graphics in Premiere Pro), Lumetri Scopes and a Camera Shake Deblur.
All of these are covered in detail on the Adobe blog which also covers some of the smaller additions, such as:
- Native support for higher frame rates (up to 999 fps)
- Mask mode editing keyboard shortcuts
- Dynamic Link Support in Team Projects (beta)
- Coloured Markers
This presentation by Karl Soule from the Adobe NAB booth takes you through some of the smaller updates that will make regular After Effects users happy.
One of the biggest changes to everyone’s workflow will no doubt be the Motion Graphics Templates, which will make sharing (and selling) pre-made, easily customisable motion graphics templates even more accessible for non-After Effects savvy editors. You can download a free one here!
Motion Array have a quick tip on how to change the font in the templates, which was ‘seemingly impossible’.
Inspirational Work and how to emulate it
I was watching the trailer for Bosch Season 3 on Amazon Prime the other day when I noticed the nice lens flare compositing work in the trailer.
It’s an incredibly simple treatment but it does a great job of emulating the red and blues of the police lights, as well as an anamorphic lens flare aesthetic.
At a guess they’ve made that in something like the superb Optical Flares from Video CoPilot. You can download some free 4K anamorphic lens flares in this previous post, as well as pick up some tips and tricks on compositing them effectively into your shot.
I also included Bosch Season 1 in my previous post ‘What to Watch on Amazon Prime‘, if you’re after some decent Saturday night viewing.
The excellent title sequence from Bosch was created by Imaginary Forces.
Another trailer that recently caught my eye was this teaser for David Fincher’s next television project, MindHunter. It’s a great demonstration of sublime audio editing, subliminal single frames and effective graphics.
In this short tutorial from Mikey you can learn how to replicate the text treatment from the teaser, which is also a good way to learn about text animation in After Effects.
LogicKeyboard After Effects Shortcut Keyboard Review
I’ve reviewed a fair few keyboards, controllers, editing mice and other assorted editing gadgets and gizmos in my time. But I hadn’t had a chance to check out any of the keyboards from LogicKeyboard, until now.
In my quest to deepen my knowledge of After Effects I seized the opportunity to get hold of one of their freshly redesigned After Effects shortcut keyboards for Mac, when they got in touch.
LogicKeyboard make a full range of keyboards (full size, compact, wired, wireless etc.) for both Mac and PC, that cover pretty much every creative app you can think of including Avid Media Composer, FCPX, Adobe Premiere, After Effects, DaVinci Resolve and more.
They also have handy removable silicon skins for all of these giving you portable shortcut layouts for your laptop. Personally, I prefer these as they give you the greatest flexibility to use it when you want to, and to avoid the colourful distraction when you don’t.
Buy Astra Keyboards on Amazon Global Stores
They also have their expanding Astra series of keyboards, which deliver a backlit experience to working in dark rooms or during late nights. I’d be really tempted to get one of these for DaVinci Resolve, although I’m a little hesitant as I’ve heard they’re not very dim-able and Blackmagic Design keep updating the application!
But it would definitely help you find the right keys in the dark. They have recently released the PC version of the new After Effects layout in the Astra series and the Mac version is soon to follow.
All that as introduction, I’m writing up this review on the brand new, full size After Effects Advanced Line Mac keyboard.
Why shortcut keyboards are worth the money
The main, and hopefully obvious, benefit of a keyboard shortcut keyboard, or silicon skin, is that it takes all of the hidden keyboard shortcuts you need to learn, in order to work more efficiently in an app, and puts them right in front of you where you can see them. All day long.
This helps you not only learn and memorise the keyboard shortcuts for tasks you do all the time, but teaches you new ones you had no idea existed.
To my mind anything that can save you time, enables your creativity and makes you more productive is well worth investing in.
One of the ways to get the most out of using a keyboard like this, especially when there are so many shortcuts listed, along with their required modifiers, is to take a few minutes to slowly examine each key.
What does the key do by itself, and what are the result of using a modifier (CMD, Shift, Alt, Ctrl) with it?
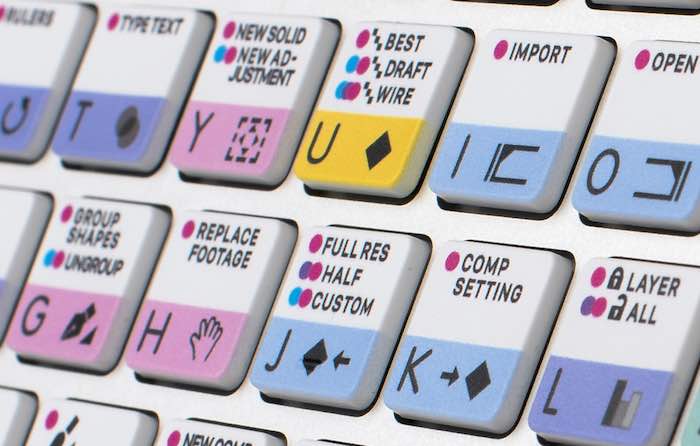
For example, in the image above the J key will:
- J = Go to previous visible item in time ruler (keyframe, layer marker, work area beginning or end)
- Cmd + J = Set resolution to Full in Composition panel
- Cmd + Shift + J = Set resolution to Half in Composition panel
- Cmd + Alt + J = Set resolution to Custom in Composition panel
To help digest all of this, in the box that the keyboard ships in (which is sturdy and closes with a magnet) there is a flyer with a link to the full list of keyboard shortcuts printed on the keyboard.
Apparently the team at LogicKeyboard are working on cheat sheets like these for all their new keyboards.
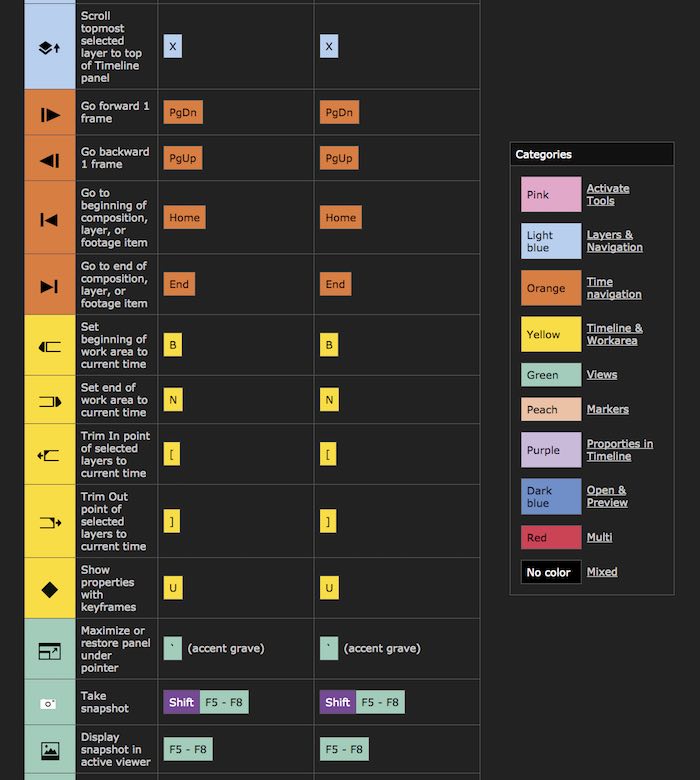
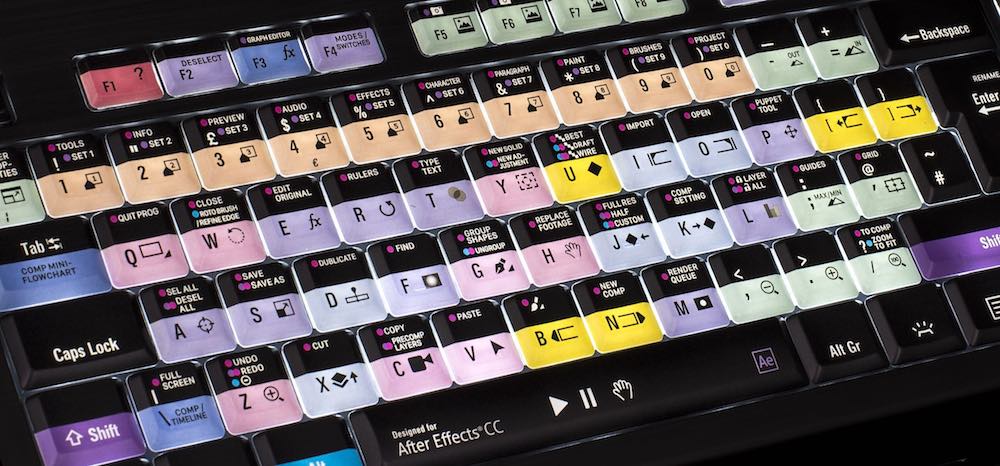
It’s worth taking the time to familiarise yourself with the colour coding system so you can understand the logic of the groupings. So, for example, all the orange keys are related to ‘Time Navigation’ whilst all the purple keys are for tasks related to ‘Properties in the timeline’.
This multi-colour coding system also unlocks the shortcuts for modifier keys too through the colour coded circles on each key.
Alt is a marine blue, Cmd a neon pink and Shift a dark purple. See the close up key image above, for examples of these.
Across the whole keyboard the hues of each colour are different enough to make them cognitively different at a glance, without the palette feeling too disparate.
New Layout – More Shortcuts
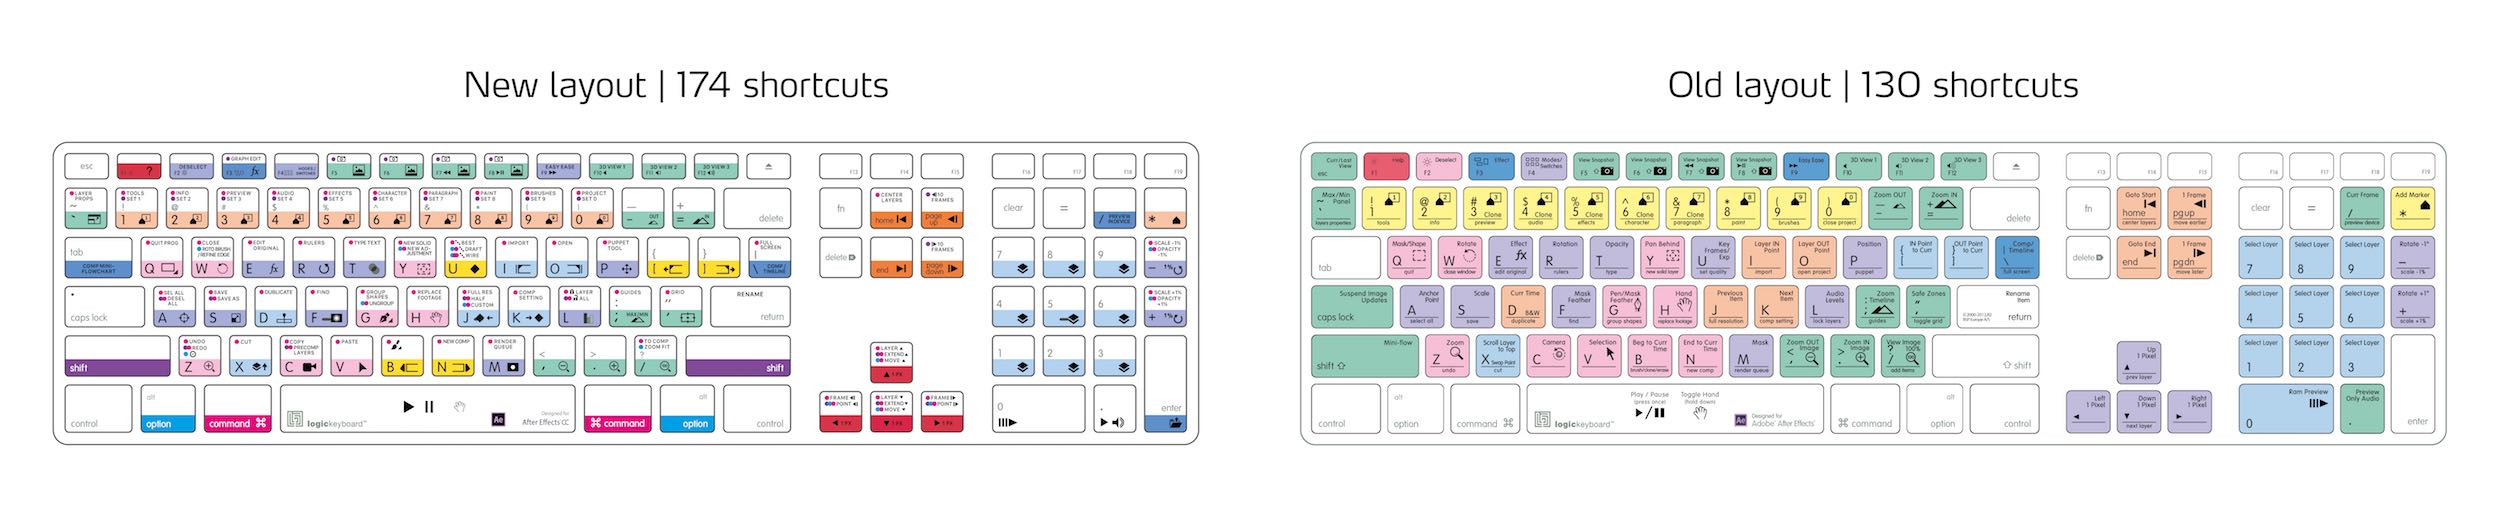
Click to see full size
LogicKeyboard have had an After Effects shortcut keyboard for years, but they’ve very recently overhauled the layout to make more room for these modifier circles and as a result added 44 more shortcuts to the layout. This means you’ve now got 174 individual shortcuts at your disposal!
On each of the keys the top line of text, that you’ll naturally read first, is the most ‘useful’ of that key’s shortcuts, and most often is the Cmd modifier. For example the S key has Cmd+S for Save on the top line and Shift+Cmd+S for ‘Save As’ on the second line.
Little touches like these make navigating and understanding the logic of the keyboard, dramatically.
So what’s it actually like to use in After Effects?
Pretty great actually.
The reason for this, above the benefit of having all those shortcuts to hand, is that After Effects is, arguably more shortcut driven than other creative apps, like NLEs. This isn’t to say that NLE’s can’t be drive solely from shortcuts. But creating motion graphics is a lot more detailed work.
Editing isn’t that complicated on the face of it, one shot abuts the next, where as motion graphics requires making everything from scratch.
If you ever watch experienced After Effects users creating something from the ground up, they’re more often than not calling out numerous keyboard shortcuts for the many attributes, parameters, layers, comps, transforms and keyframes to adjust, that being able to get to them with a few swift keystrokes, is much faster than navigating file menus, or contextual sub menus.
LogicKeyboard’s Manufacturing Process
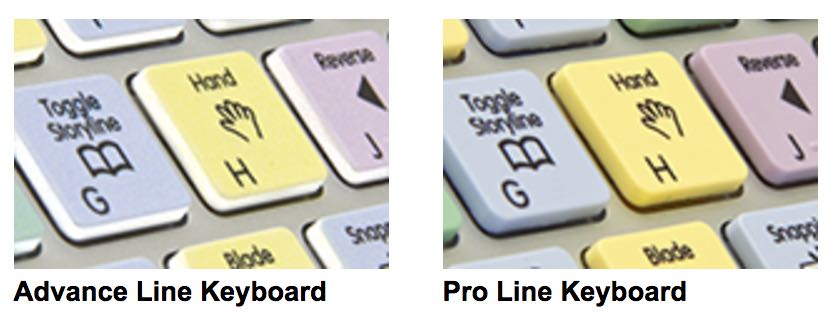
Image of FCPX keyboards
One of the huge benefits to buying a Mac keyboard from LogicKeyboard over one of the other makers of these kinds of tools, is that they print on, or replace the keys of, genuine Mac keyboards sourced from Apple.
This means you’re getting all of the same great design and build quality as you’d expect from any Apple product, along with the familiarity of the touch and feel of the keyboard. I’ve been editing/typing on a Mac keyboard for so many years, that it always feels awkward to have to switch to a different style of keyboard.
They have two types of printing process, one is a surface print (AM89) on top of plain white keys. The other is to replace the keys with fully dyed-in keys that are then printed onto. The difference is entirely aesthetic (see image above) although there is a slight cost increase with the Pro Line versions.
All that is to say the keyboard feels great, and although the keys have a slight ‘matte’ texture to them as a result of the printing, it’s basically unnoticeable after a few uses. Standard Apple keys have a slightly glossy feel to them in comparison.
The font and font size of the text on each key is pretty much a perfect ratio of being small enough to cram a lot of information on to each key, whilst big enough to read instantly at a glance.
It also has two USB ports, as per the Apple design, which is one of those things you don’t miss till they’re gone. (This sometimes happens on other manufacturers keyboards)
My Wacom tablet is permanently connected to my Mac Pro via one of these ports and the other one is usually where I reach for plugging in a USB stick.
Final Thoughts
Pros
- High quality keyboard
- 2 useful USB ports
- Easy to read and use layout
- Huge number of shortcuts
Cons
- Expensive for one keyboard
- Locked in to one creative app
In conclusion I’m really impressed with the quality of LogicKeyboard’s shortcut keyboard. Both in regards to the touch and feel of it, which is actually a vital consideration given that’s half of your user experience, and when it comes to the design and layout of the shortcut keys themselves.
The new layout is easy to navigate, making life in your creative app of choice a whole lot more productive.
The After Effects shortcut keyboard from LogicKeyboard is well worth the investment if you’re going to be doing a lot of work in After Effects on a regular basis, or you’re aiming to really improve your skills in the app. It will definitely help you work faster and more effectively.
However, if you’re an editor who is only occasionally doing work in After Effects, a ‘hard-coded’ keyboard like this might be a bit expensive for light use, but instead you might want to invest that same money in three silicon skins, for several different creative apps, that you can hot swap as you need.
Buy on Amazon Global Stores | Buy on LogicKeyboard.com
My @quadroapp setup for @AdobeAE. Most of this is very specific to the film I’m working on. I now feel handcuffed without it. pic.twitter.com/cfWlSVIB5C
— Stu Maschwitz (@5tu) April 5, 2017
Stu Maschwitz, who blogs on ProLost shared his Quadro App set up for After Effects in this tweet.
Quadro, the successor to the Actions app, for iPad and iPhone allows you to create your own keyboard shortcut led interface for your favourite creative apps.
You can even connect multiple devices to the same computer, run power macros, use macros and gestures and a whole lot more.
Quadro costs $14.99 a year, and you can try it for free for 14 days.
The whole thread that follows on from Stu’s tweet is well worth a read, as he gives more details on his set up and answers some questions.
For even more iPad apps for editors check out this post.
Useful Plugins for After Effects
One of the easiest ways to create motion graphics in After Effects is to not use the After Effects tools at all, but to get things done with the free drag and drop preset animation plugin, Animation Composer 2.
I’ve previously reviewed Animation Composer 2, in After Effects for Editors Part 1 (scroll all the way down!) and I wanted to point out they’ve got a new shapes pack available in their store. The pack includes nearly 600 pre-comps including
- 62 fireworks
- 78 impacts
- 192 lines
- 76 shape pops
- 39 swooshes
- Sound Effects for each element
This 5 minute walk through video demonstrates just how easy it is to use and customise. I particularly like the fact that they’ve bundled in a sound effect for each element, as finding these is half the work!
FX Console
Video Copilot’s Andrew Kramer created a plugin for After Effects, mostly to speed up his own workflow and then decided to give it away for free.
As a quick aside if you’ve not yet seen Andrew’s brilliant keynote speech from After Effects World, check it out here.
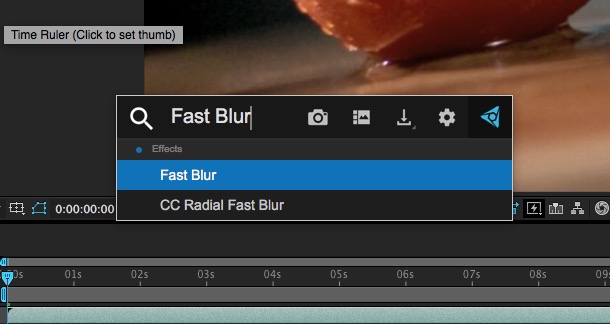
FX Console allows you to access hard to reach parts of After Effects in a jiffy. It’s main features include:
- Access FX & Presets quickly
- Create FX Shortcuts
- Create FX Overrides
- Customize FX Search
- Export Snapshot with PNG
- Access Multiple Snapshots
- Automatic Snapshot Tool & Gallery
- Sample colors from Gallery
- Re-import directly from Gallery
- Dockable Panel & More!
Version 1 was swiftly updated to version 1.0.1 which included these additions:
- Custom Shortcut Key
- Import and Export Settings file
- Tab to Presets in search results
- Over a dozen bug fixes!
Kevin P. McAuliffe has written up a detailed walk through of how to get started with the plugin over on ProVideo Coalition.
Once you’ve downloaded the script, which is a whopping 3 mb, you’ll be up and running with it in a few minutes. Keep in mind that you’ll want to have the “Allow Scripts to Write Files and Access Network” option checked in your General Preferences, or the Script won’t install or run properly.
Kevin includes some helpful installation tips, and at the bottom of the post a quick run down of some of Video Copilot’s other free plugins. Including the Star Wars themed, Saber plugin.
You can also watch Andrew’s always entertaining 20 minute tutorial above. Download FX Console for free here. It is available for both Mac and Windows After Effects users.
Check out @_pixelbump's FREE Multiplane script to automatically align 2d layers in Z-space for @AdobeAE: https://t.co/pQuVDIIIMo pic.twitter.com/eAgTmP9XmP
— Brady Betzel (@allbetzroff) November 3, 2016
Speaking of freebies it’s worth jumping over to Pixelbump’s site to download a bunch of free scripts for After Effects, including a multi-plane camera set up.
Mosaic After Effects Plugin from Yanobox
I also talked about Yanobox’s very popular Nodes 2 plugin, which has been used on countless sci-fi films from Avengers to Transformers.
This time I thought I’d point out another really interesting plugin from Yanobox which is called Mosaic.
It’s not cheap, at $299, but in the right hands it can deliver some stunning results. It’s worth noting that at this time it’s also only available for Mac OS X.
This 17 minute tutorial from Eran from Sternfx.com takes a little while to get to the ‘wow’ moment, but it’s a great demonstration of what can be done with the plugin in a variety of situations, so stick with it.
The tutorial also includes a breakdown of one of the ‘user interface’ shots from the trailer, originally created by Yanobox’s Jean Marc Noel. At this point the plugin is working alongside Video Copilot’s Element 3D.
You can download a free trial of Mosaic from FxFactory.com.
PQ FUI Toys 2
If you’re looking to create fake user interfaces in a few clicks then animator Peter Quinn’s FUI Toys 2 is a fast and affordable option.
It’s essentially a collection of pre-animated After Effects comps that you can search through and generate via the script UI panel. To install a script UI panel, like PQ FUI Toys 2, just drag the downloaded script file into the following folder.
Mac OS – Applications/Adobe After Effects CC 2017/Scripts/Script UI Panels
Windows – Scripts/ScriptUI Panels
Peter takes you through some of the new features in PQ FUI Toys 2, available from AE Scripts.com for $49, although you may as well pony up and get Peter’s Mo Bits scripts as well at the bundle price of $75.
Simple After Effects Tutorials for Editors
I’m planning on writing up a post with some much more complex After Effects tutorials, but in this post I’m going to stick with simple things.
In this video Tyler from Motion Array shares 10 things he wished he’d known when he started in After Effects, which should help you avoid too many frustrating moments.
Tyler covers:
- Sequence Layers
- Linear Interpolation By Default
- Easily Crop Compositions
- Adjust Multiple Keyframes
- Locking Panels
- Preserve Underlying Transparency
- Keyboard Shortcuts
- Parent Cameras To Nulls
- Kerning Tricks
- Use After Effects Scripts
In a similar fashion Caleb Ward shares 5 After Effects Lessons he learned the Hard Way, which include things like the value of messing around, and the power of using keyboard shortcuts and the graph editor.
Caleb links to this great little tutorial (above) that breaks down various keyframe interpolations in the graph editor, which is the quick way to get better looking animations. I talked about this quite a bit in this previous post.
While we’re on the subject of easing and keyframes, it’s worth (again) mentioning Animation Composer which has a free tool called ‘Keyframe Wingman‘ inside it. Which makes changing the parameters of multiple keyframes at the same time, a doddle.
Mikey Borup demonstrates some of the fundamental differences between Pre-comps, Parenting and some basic Expressions in this lesson from Premiumbeat’s Adobe After Effects Fundamentals course.
Pre-comping is a way of grouping layers into one composition, and then treating that composition like a single layer in your master composition. So like nesting in Premiere Pro.
The rest of the course is well worth a watch if you want to learn After Effects for free and in a more systematic fashion. Although it’s presented on an earlier version of After Effects, most, if not all the principles still apply.
The other technique that is most often recommended that beginners learn is how to use effectively is the camera in After Effects.
In this short tutorial from Evan Abrams (his whole channel is excellent) helps you improve your camera workflow in about 10 minutes. This is a great explanation of how to use both cameras and null objects to control them.
110 Useful Tricks in After Effects You May Not Know About
Over the last few years Serge from Ukramedia has been sharing useful tricks that you might not know about in After Effects. Now in it’s 5th instalment, Serge has shared 110 excellent tips to make your After Effects life that much more productive.
If you watched the NFL Superbowl this year you’ll have seen some of Serge’s motion graphics work on Fox Sports.
It’s well worth subscribing to his YouTube channel for more of the same!
It’s definitely worth checking out the blog posts that accompany each episode as there are detailed lists of the tips in the video, with timecode links to jump you to each tip.
Luckily Serge has compiled all 5 parts into this single, epic post.
Adobe Motion Design Live Stream Tutorials
To wrap up this post I thought I’d include this 12 part playlist in which you can enjoy countless hours of training from AdobeLive’s first 3 day live stream focused on Motion Design in After Effects and Premiere Pro, with a little of Cinema 4D thrown in for good measure.
Topics include: Flat design and adding depth, scripting, 3D workflows, dynamic effects. There are some streams that focus on video editing and colour grading too.
It’s worth checking out Adobelive.com from time to time to find check out what the latest Live Stream event is all about.