DaVinci Resolve 12 Free Training
DaVinci Resolve 12.1 is now available and packed with a slew of new features and updates. This post brings together some of the best free DaVinci Resolve 12 training available online, as well as a few pointers to some new paid tutorials if you want a more comprehensive schooling. You can see a full list of what the update includes in Blackmagic Design’s press release.
Here are a few selected highlights:
- Remote rendering on DaVinci Resolve Studio
- Support for native display color profiles on OS X
- Preferences option to enable 10-bit precision on viewers on OS X 10.11 El Capitan
- Ability to media manage selected clips on a timeline
- Support for smart bin filtering based on clip type
- Ability to decompose a compound node
- Ability to grade nested timelines
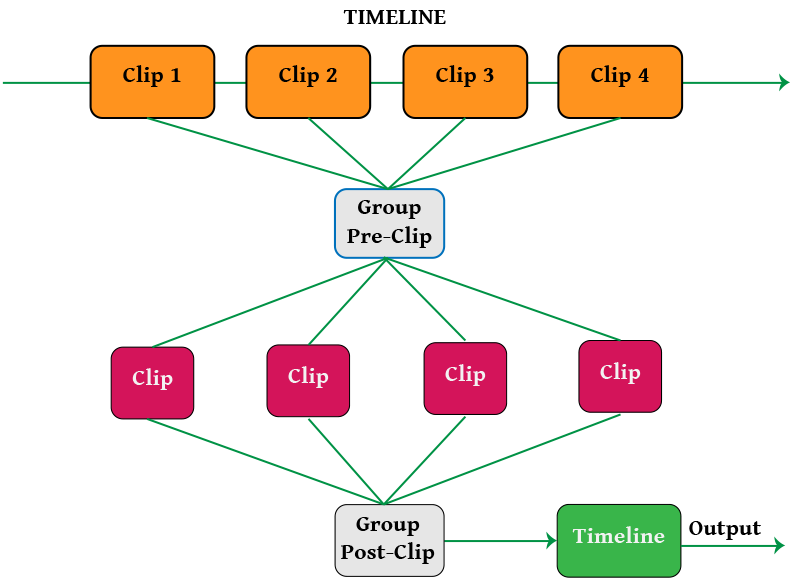
In these first two step-by-step guides Tomas from Time in Pixels, provides an excellent primer on how to work with groups of clips in Resolve, as well as a few ‘gotchas’ to watch out for.
Grouping is one of my most used features in DaVinci Resolve, especially in bigger projects where grades organization is a must. I use the grouping for two reasons: 1. Categorises the clips into logical groups. 2. Makes grading similar clips fast and easy.
I use groups in different ways, but the most common scenarios are: Group by a camera – when the clips were shot using multiple cameras, Group by a shot – close-ups, medium shots, long shots and Group by location. – Tomas, Time in Pixels.com

The second guide takes a quick look at using the Media Management tool in Resolve, to quickly trim a project to only the referenced media, rather than all of the source media.
Colorist David Torcivia has a great knack for sharing simple tips, with sufficient detail to leave you feeling like you could replicate the technique in your own work. In this tutorial David walks through how to perform some effective skin retouching in Resolve and After Effects, based on his recent work for a music video.
I’ve previously shared more of David’s other Resolve colour grading tutorials in these posts and you should definitely check them out as well.
UPDATE: Free Film Grain and Resolve Node Graph
David just posted another excellent tutorial on the numerous benefits of adding film grain to your projects in Resolve, and in this accompanying blog post shares a free 4K Pro Res Kodak 5219 film grain emulation file and a downloadable DaVinci Resolve node graph to speed up adding grain to your projects. For a round up of some of the best free film grain and light leaks from around the web, check out this previous post.
DaVinci Resolve 12 Fundamentals & Deep Insights
Patrick Inhofer and his compatriots from Mixing Light.com have been very hard at work, not only maintaining their excellent colorist training subscription site (check out my recent review here) but also creating a new DaVinci Resolve 12 training series so large they had to split it into two volumes. At over 21 hours of content across both series, they’ve also put together some useful ‘flight plans’ to help you navigate through the training in a less linear fashion.
DaVinci Resolve 12 Insights covers the fundamentals of using the software and practically grading with nearly 15 hours of training videos. The second volume, DaVinci Resolve 12 Deep Insights, delivers a shorter (still 7 hours!), more advanced guide to the more intricate parts of working in Resolve. Over the two courses that’s over 200 individual videos, running at about 5-6 minutes each. You can check out the full table of contents for both courses in these pdfs: Insights | Deep Insights.
The Insights course costs $149 and the Deep Insights $179, although you can get discounts for being a Mixing Light member. To get a taster of what’s on offer you can check out the playlist below for almost an hour of free training in Resolve, including topics like:
The difference between the paid and free versions of Resolve, Setting up dual monitors, Using the smart render cache, Using splitter combiner nodes, Creating and using versions, Understanding the Hue vs Curves and more….
Quick Tips in DaVinci Resolve 12
Sometimes you want to learn in a hurry and with laser guided focus. These quick tips will help you find the answers to how to do simple things in a jiffy. In these first few videos, Theo from Miesner Media shares some useful little tips on how to achieve some simple things, when you know how, in Resolve.
These two node breakdowns provide a simple explanation for understanding how the different types of nodes function in Resolve 12.
This is an interesting little tutorial from Alex behind learncolorgrading.com, you can learn how to relight your shot with blended in beams of light. One of the things that’s a bit ‘funny’ about these tutorials is that he is always using a still photo, rather than a video clip, which does mean that you never get to see how these affects work in a moving shot. Just something to think about.
In these two quick tips from Dave of the Post Color Blog, on how to do a couple of straight-forward things in the edit page. In the first two you can learn the shortcuts for Resolve’s equivalent of the track select tool and in the second tip, how to move one clip in between other clips, and get those clips to budge out of the way automatically, in one move. (Called a Swap edit – see below). The third tip is on time-remapping in Resolve.
In a display of why not all tutorials are created equal, you should watch Alexis Van Hurkman’s version of how to perform a swap edit, in this episode of Resolve in a Rush, as you will learn more than in the tutorial above. You can see all 21 episodes (so far) of Resolve in a Rush here, or jump over to Ripple Training.com to check out some of Alexis’ paid-for training.
What I love about Alexis’ tutorials and training titles, is that you know you’re learning the ‘correct’ way to work in Resolve, partly due to his ‘completionist nature’ and because he wrote the manual on Resolve. You can check out his excellent book on colour grading here.
@robsbessette Select the EXT MATTE node, open the Key palette, turn off the "Lock Matte" checkbox, and use the Offset slider to slip.
— Alexis Van Hurkman (@hurkman) October 28, 2015
#Resolve Tip—Open a Pan overlay for a clip in the Edit page timeline by clicking the pop-up menu at the far right. pic.twitter.com/s7IXDJqT9a
— Alexis Van Hurkman (@hurkman) December 18, 2015
In this recent blog post from Alexis’ personal site you can learn how to generate optimised media that won’t clip, when working with RAW media that Resolve generates it’s own reference media for to speed things up.
Uncompressed 16-bit float is a proprietary DaVinci image format designed to preserve out-of-gamut floating point image data. The only downside to this is that by using Uncompressed 16-bit float to generate optimized media, you create larger optimized media files. However, you still spare yourself the processor overhead of having to debayer your camera raw media, and you preserve high dynamic range image data for grading. So, you might need to make sure you have fast hard drive storage, but you’ll still work faster.
By default that optimised media is Pro Res 422 HQ, but by using Resolve’s proprietary codec, you can preserve your highlight detail. It’s a great tip that will save you both time and effort when working with processor intensive footage! Check out how to do this here.
It was nice to be an actively working colorist in a busy market while also being involved with the technology. I was able to bounce back and forth. That’s always suited me. I like being involved in development, but also being a practitioner of the arts. If all I did was client work, I’d probably get bored. I was looking to maintain a balance of technology and creative work. That’s my best-case scenario. – Alexis Van Hurkman
Tristan Kneschke, for PremiumBeat, recently interviewed Alexis on is career, personal creative preferences, working with clients, the state and future of the industry and his approach to colour grading. It’s a nice article, and well worth a read. Here is Alexis’ advice to those looking to learn to be colorists:
One good strategy is to try and figure out what you’re better at than anyone else you know, and what kind of work you’re really into more than anything else. Find your strengths and use those to market yourself and find a place in the industry. Find clients that benefit most from your combination of skills. If you find out what your superpower is, then you have an advantage in that you can have a goal for yourself. You can find the work that needs you. Finding a niche is incredibly helpful.
Colour Grading a Low-Budget Music Video
To round out this collection of tips and tutorials I thought I’d share this 35 minute beginner’s guide to Resolve 12 from filmmaker Tom Antos. Tom walks through his process for grading a music video, covering the basics as well as how to use some of the ‘secondary’ colour correction tools in Resolve.