Colour grading tutorials, tips & tales for students of all stages
It has been a while since I’ve been able to do post a round up of all the best colour grading resources that have come online lately, so this might end up as quite a long post. But that just means more great stuff in one place.
Colour Grading – Order of Operations
With colour grading, the order in which you perform corrections can have a dramatic impact on the final image. In this excellent tutorial colorist Juan Melara walks through the order of operations for colour correcting an image in DaVinci Resolve. Juan also includes some great tips from colorist Gray Marshall on understanding the different types on nodes and their functions in Resolve.
Creating Triad Looks
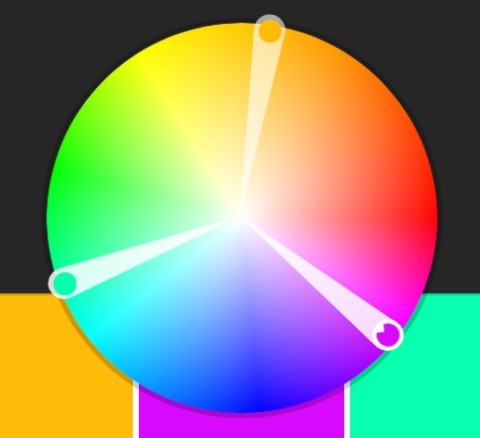
In this post from editor and colorist Aaron Williams you can learn how to create looks based on three main colours, shifted into different areas of the image.
Aaron makes use of the Adobe Kuler web app (you can also get the free iphone app) to create three color swatches.
A further element to this would be ensuring your deepest blacks are black and your whites are white to maintain some realism.
Aaron has another good tip, over on Premium Beat, on balancing your absolute blacks and whites relative to the contents of the image, rather than 0 and 100 on your waveform monitor.
Colour Grading 4K RAW Cinema DNG Files
In these lively tutorials colorist and online trainer Denver Riddle demonstrates how to grade 4k CinemaDNG RAW files from the Blackmagic Design Cinema Camera and newly shipping Pocket Camera. You can download and follow along with the same footage Denver is using by signing up for free on his Color Grading Central site.
In the first tutorial above, Denver shows you how to create one-light proxies in Resolve ready for your edit and then conform your footage back into Resolve ready for grading. In the second tutorial he walks through three different approaches to grading RAW; adjusting camera RAW settings, using a LUT and crafting a look from scratch.
Also if you’re playing around with Magic Lantern RAW files the latest update of DaVinci Resolve 9.1.5 will now work with these files. Other improvements include: support for Avid Media Composer 7.0 round-trip, support for reel names from FCPX XML and improved handling of multi-track Quicktime audio files.
Grading Wide Shots
Canadian colorist Charles-Etienne Pascal, currently working at SHED in Montreal with Autodesk’s Lustre grading system, has shared this great blog post about how to best grade wide shots, with some lovely detailed examples of doing just that. It’s great to see a thorough breakdown of the level of detail a professional colorist goes to to subtly enhance every inch of the frame.
There is a ton of stuff happening in a wide shot compared to a simple close up of an actor. The viewer will make a choice (deliberate or not) as to where he will look in the frame. That’s why color grading a wide shot is so important. It refocuses on the star of the shot and tones down the elements in the frame that shouldn’t get too much of our attention.
Interviews with Colorists
Hearing why any artist does what they do is always a fascinating way to spend your time and this episode of The Coloristo’s Colorcast is no different. This episode focuses on these three working color grading professional’s tastes, influences and background in the craft.
Den Lennie from F-Stop Academy has recorded this great interview with colorist Warren Eagles, whilst driving to the airport. Warren is as candid as ever and covers his career in colour grading, colour grading panels, and the general art and craft of the business.
Finally in this two part interview from Splice Vine, Colorist and DI Supervisor Alex Maclean from Colorflow discusses a whole host of topics from getting started in the job, working in a facility with other colorists, to ‘fixing it in pre’ and a whole lot more…
Software Monitor Calibration Tools
Thanks to the boys from Mixing Light for pointing out this new software based method of calibrating your displays and for giving us all a simple explanation of why SpectraCal’s VirtualForge is such a big deal.
For a long time, to properly calibrate a display you’ve had to rely on a professional Signal (Pattern) Generator. These boxes, which often cost $3k + for HDMI equipped units and $5k plus for HD-SDI equipped ones where often out of the reach of many small shops and independent colorists. I know what you’re thinking – why do I need a signal generator? Can’t I generate grayscale and color patterns easily on my computer with say Premiere Pro, Final Cut Pro or any other graphics or vfx app? Sure, but the problem with that approach is two fold: 1. Creating patterns that are actually accurate is harder than it sounds. 2. Providing a calibration probe control of the generation and frequency of those patterns is not something you can do just running patterns out of your NLE.
To find out more about it jump through to the Mixing Light blog or SpectraCal’s official site.
At $495 software only and also available with an AJA T-Tap Thunderbolt interface for $695 you can get a professional signal generator for literally a fraction of the price of traditional hardware unit.


Many thanks, was looking for this kind of tips since a long time !
Excellent set of tips and tutorials! Thanks!
Thanks for stopping by and commenting!