What’s new: Avid Media Composer vs Premiere Pro vs FCPX vs DaVinci Resolve?
It’s that time of year when all the big NLEs announce new features, pricing tiers, formats and must-have-stuff, to draw post production professionals into that most challenging of tasks, trying something new.
If you’re looking for a post on which is better; Avid Media Composer, Adobe Premiere Pro, Final Cut Pro X or DaVinci Resolve as a professional editing software, then this post won’t necessarily give you any direct comparisons, nor directive opinions, but it will hopefully provide you with a ton of facts to make up your own mind.
Scroll down (and keep scrolling!) to check out all the new features of each app and current pricing, circa NAB 2018, to see which one makes the most sense for you.
If by the end of this post you feel like some tips on switching NLE might come in handy, check out this previous post on doing just that.
Or if you want to cut your teeth on some free editing software for beginners, check out this previous post instead.
New Features in Avid Media Composer 2018.4
Avid Media Composer new pricing
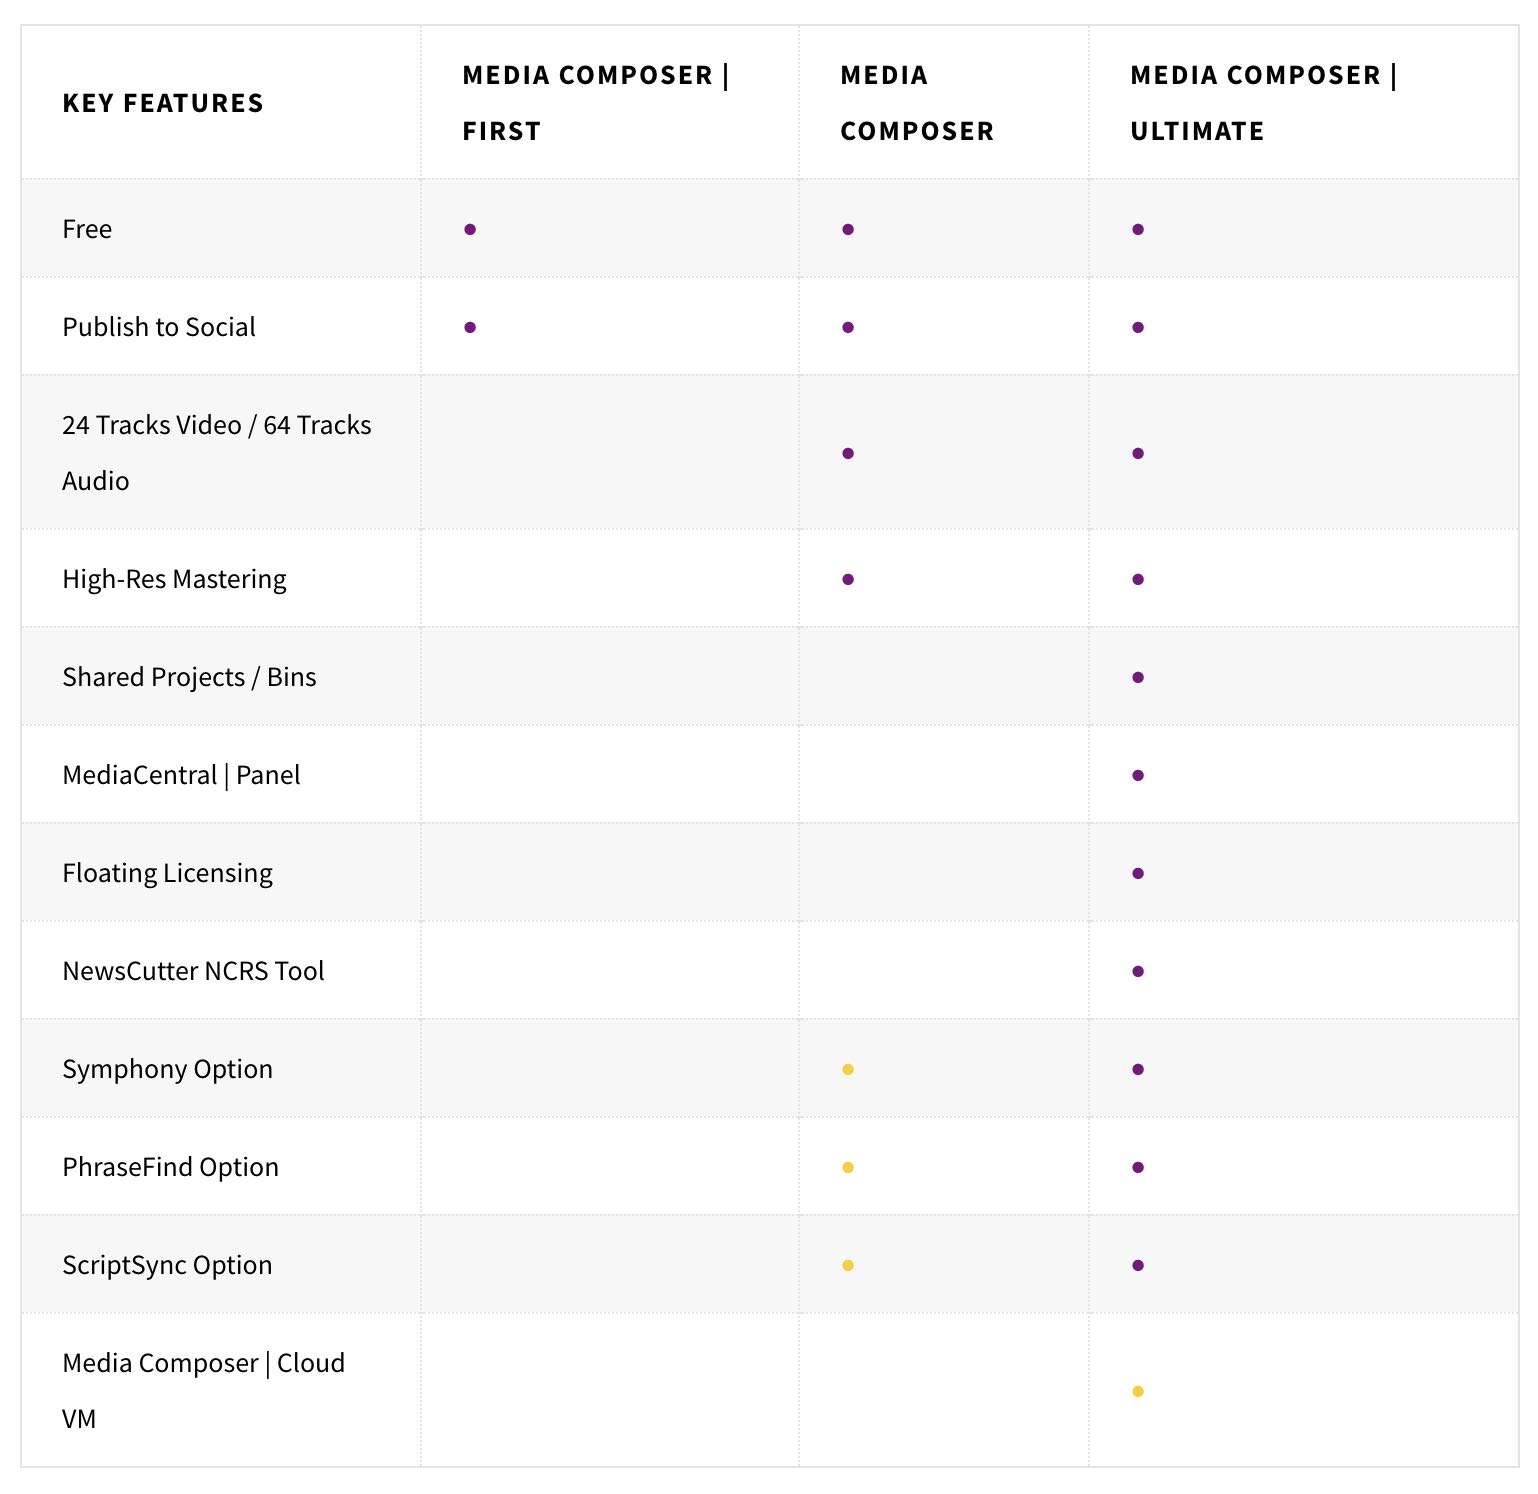
Media Composer now comes in three flavours. Media Composer | First which is free. Media Composer (for individual editors mostly) which is $19.99 a month or Media Composer Ultimate which is $49.99 a month. This is the fully fledged version of the app with all the bells and whistle’s included.
The pricing of Media Composer at $19.99/£23 (inc. VAT) seems to be a direct shot at trying to woo single Premiere Pro app subscribers who would be paying £19.97 (inc. VAT) a month.
You can save $100 off the yearly price of Media Composer Ultimate when you pay up front, or $60 for a yearly Media Composer subscription paid up front too.
New features
You can read the official Media Composer 2018.4 new features blog post here, for a full run down of each new item, but here are the headlines.
- Timeline Clip Notes Window Updates
- Updates to the Marker Window
- Customizing Timeline Views
- Setting Pre-Roll for Script Window and PhraseFind
- Color Adapters Listed in the Effect Editor
- Performing Insert Edit to an Exported Sequence
- Run Length Encoding for Alpha on Import
- iMac Pro Support
- Refreshing Locked Scripts
- Media Composer Generates iXML Metadata When Creating WAV Media
You can read up a little more on these new features in the official documentation here.
Avid Media Composer NAB Demo New Features
Avid #NABShow ACA Vote results demos:Shape Based Color Correction (@terencecurren =happy) 4K Title Tool (weren't we promised this last yr?) Multicam & Group clip improvements (make more changes when clips are already grouped) Live Timeline (make changes while timeline is playing) pic.twitter.com/MKJPed9KKE
— Michael Kammes (@michaelkammes) April 7, 2018
Michael Kammes was helpfully live tweeting during Avid Connect at NAB this year, which meant it was easy to pick out these new features “coming soon” to the software, which will also be demoed at NAB.
Avid Media Composer now has a live timeline! No more playback stoppage! Yes! #AvidConnect pic.twitter.com/Pp1Bo0O8NQ
— Monica Daniel (@Monica_Edits) April 7, 2018
Avid TitlerPlus….not limited to HD anymore, see menus on left. pic.twitter.com/MIUla3D65W
— Michael Kammes (@michaelkammes) April 7, 2018
See left. Shape based color corrector #NABShow #AvidConnect #Avid pic.twitter.com/baQvSpR1CC
— Michael Kammes (@michaelkammes) April 7, 2018
You can now add another angle to an already grouped group clip #NABShow #AvidConnect #Avid pic.twitter.com/7iy1K1Y04v
— Michael Kammes (@michaelkammes) April 7, 2018
Find out a lot more about each version of Avid Media Composer on the fancy official site here.
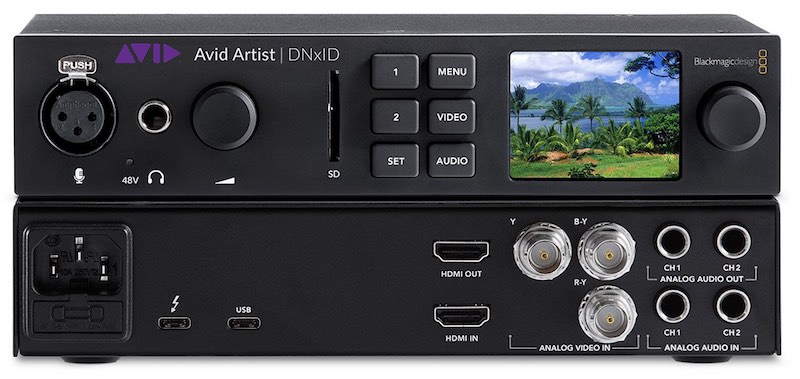
Avid Artist DNxID (with Blackmagic Design?) is Avid’s latest piece of hardware that piqued my interest. The main observation I’ve seen online is “That looks great, but what no SDI?”
For $1000 you can:
- Monitor HD, UHD, 4K anywhere you take your laptop
- Record live audio directly to timeline
- Supported by all major creative apps
- Accelerate file-based workflows with DNxHD and DNxHR hardware encoding
- Onboard SDXC card slot & USB port
Sign up here to be notified of it’s release.
One last thought
Although Avid might be solidifying it’s position in the world of shared storage and high-end collaborative workflows and maintaining it’s entrenchment in the Hollywood system, whenever there are ‘new features’ added to Avid Media Composer, more often than not, I’m usually surprised that they’ve not been in the software before.
Things like finally being able to move clips up and down in a timeline with a shortcut or being able to adjust various parts of the UI to suit your preferences, seem like they should have been in the app for years.
It’s slightly stupefying to me that you still can’t customise the keyboard beyond the straight key and the single modifier of ‘Shift’.
That said, if you are editing in the world of broadcast TV or feature film, the chances are Avid Media Composer is what you’ll need to learn and for good reason.
Check out these recent posts on Avid Media Composer for more.
New Features in Adobe Premiere Pro CC 2018 (12.1)
Where as Avid might be adding small but incremental improvements to their feature set, Adobe keep pushing the boundaries (sometimes with buggy code) of what’s possible in your editing suite with new and exciting features. Which they’d do well to keep up if they want to maintain all those monthly subscribers.
These features will be available in your Creative Cloud account right now. This update cycle also drops support for legacy QuickTime 7 era codecs, so be aware of that incase it impacts your workflow.
Helpfully thepremierebro.com has curated all of the Adobe new features short video demos into one playlist, embedded above. He also has a nice breakdown of some features that dropped in early January in version 12.0.1
New Features in Premiere Pro CC 2018 (12.1)
Here are the headline new features in Premiere Pro CC 2018 (12.1) but you can read about them in more detail here.
- Split view for comparing shots
- Shot matching in a click (with adjustments)
- Auto-duck music under dialogue with keyframes
- Improved Motion Graphics Template browser
- Improved UI for working with Motion Graphics Templates
- Gradients in text and shape layers
- Improved controls in Essential Graphics panel
- Replace clip for Motion Graphics Template
- Timecode Panel
- Video Limiter for broadcast specs
- Copy and paste sequence markers
- Support for Canon Cinema RAW Light (C200) and Sony X-OCB (Venice) RAW files
Personally, the things that make editing easier and faster, such as the auto-ducking and shot matching (as long as they work well!) will be the most useful new features.
I’ve yet to play with the Essential Graphics panel all that much, and so maybe the new improvements to it will help change that.
New Features in After Effects CC 2018 (15.1) and Audition CC 2018 (11.1)
This playlist features all of the new features in Adobe After Effects CC 2018 (15.1) and Adobe Audition CC 2018 (11.1) – just click on the little hamburger menu on the top right to skim through them all.
This latest release of After Effects brings with it a host of great new features and an array of improvements and fixes. Read through the complete list here.
Headline new features include:
- Adjust Master Properties across a project
- Advanced Puppet Tool
- Adobe Immersive Environment (VR headset preview)
- Improvements to Essential Graphics panel
- Property link pick whip
- Enhancements to creating data-driven animations
- Assume working Gamma defaults to 2.4 (Rec. 709) for new projects
- Custom LUT directory for Lumetri Color
- Better GPU memory usage
- Consolidated missing files dialogue box
- Copy and paste into a selected folder in Project panel
And a whole bunch more new features and fixes.
With every app hitting the same update cycle it’s helpful that where the same features overlap they come out at the same time. My next goal is to spend more time playing with Motion Graphics Templates in After Effects and adapting them quickly in Premiere Pro.
It’s the #LittleThings in #PremierePro 12.1… #Avid editors will love this sneaky checkbox at the bottom of the Timeline prefs. Now you can match back to the source clip and mark your in point at the same time. #NABShow2018 pic.twitter.com/sl3gzFGvHm
— Dylan Osborn (@dylanosbornfilm) April 10, 2018
New Features in DaVinci Resolve 15
As ever, Blackmagic Design find it easy to dominate NAB, not least with some big banners, but also with their announcements for new products and new software releases.
This year they’ve taken the logical next step since acquiring Fusion (a few years back) by incorporating it straight into DaVinci Resolve 15.
It’s pretty incredible the pace that Blackmagic Design has set in acquiring and incorporating other apps into their flagship product. Tracking the trajectory of this is easiest when seeing how far Fairlight has come since it was added in version 14.
Adding Fusion to Resolve will take the next 12-18 months, according to the press release and Resolve 15 is currently available as a public beta, it’s likely new updates will roll out on a regular basis over the next few months.
Given that this is also another free update to existing Resolve Studio users, and that an entirely free version of the software is also available to everyone, it’s fairly crazy not to pay the $299 to own four apps in one with free updates going forward.
You can read the complete list of every new feature in DaVinci Resolve 15 here. In fact, they even list four things that may not be complete in this first public beta, which include:
- Fairlight Sound Library
- Support for Preset Library for Audio Effects
- Support for legacy Fairlight projects on Windows
- Improved keyboard shortcut mapping
Amazingly the following Fusion/Color features are now available in the free version of Resolve:
- Fusion planar tracker
- Fusion planar stabilization
- Fusion planar transforms of roto
- Fusion planar tracked roto
- Fusion optical flow retiming
- ResolveFX Match Move
- Random frame access when using temporal OpenFX plugins
It was only a few years ago that Resolve was one of the best colour grading apps in the industry. Today it maintains that pedigree yet has Fairlight audio, excellent editing features and now high-end visual effects capabilities as well.
One ring to rule them all?
To check out the new features for yourself, head to the updated Resolve page or download the first public beta here.
It’s also worth checking out the new documentation:
- Download DaVinci Resolve 15 Configuration Guide (55 pages)
- Download DaVinci Resolve New Features Guide (282 pages!)
- Download DaVinci Resolve App Version Comparison Guide (3 pages)
- Download DaVinci Resolve 15 Supported Codecs (11 pages)
- Download DaVinci Resolve 14 Manual (1,346 pages)
As the first public beta release of Resolve 15 is so big, rather than updating the Resolve 14 manual, the new guides will cover the new features for now.
Here are the headline new features in DaVinci Resolve 15
Fusion
- Fully integrated into the DaVinci Resolve timeline
- Initial support for a full Metal, CUDA or OpenCL GPU processing pipeline
- New node graph (Flow)
- New viewers, toolbar and inspector
- Fusion page now includes
- Media Pool
- Tools library with Templates
- Timeline with Thumbnails
- Spline Editor
- Keyframe Timeline
- Metadata
- Dual screen layouts for the Fusion page
Fairlight
- ADR (Automatic Dialog Replacement)
- Audio Bounce of a range in selected tracks to layers
- Audio Bounce of one or multiple buses to tracks
- Fixed playhead timeline with audio and video scrollers
- 3D audio pan
- Sound Library
- Support for native FairlightFX
- Chorus
- De-Esser
- De-Hummer
- Delay
- Distortion
- Echo
- Flanger
- Modulation
- Noise Reduction
- Pitch
- Reverb
- Stereo Width
- Vocal Channel
Color
- New SuperScale option for high quality resolution upscaling
- New LUT browser in the Color page
- Live preview of LUTs and gallery stills
- Browse grades from other timelines in the gallery
- Browse grades from other projects in the expanded gallery view
- Batch color version management
- Switch between previous and next version for multiple clips
- Modify the qualifier by dragging the controls in the user interface
- Show marker overlays in the Color page viewer
- Copy nodes and paste specific values by selecting parameters and using Paste Value
- Preview LUTs by holding Alt/Option pressed while mousing over the LUT context menu
- Process a node in a different Resolve Color Managed colorspace or gamma
There are also 8 new ResolveFX plugins included in DaVinci Resolve Studio:
- ResolveFX Aperture Diffraction
- ResolveFX Automatic Dirt Removal
- ResolveFX Deflicker
- ResolveFX Dust Buster
- ResolveFX Film Damage (also in free version)
- ResolveFX Flicker Addition (also in free version)
- ResolveFX Lens Reflections
- ResolveFX Patch Replacer
Edit
There are hundreds of new features, here are some that stood out to me:
- Adding, managing and delivering Subtitles and Closed Captions
- Stacked and tabbed timelines
- Position curves in curve editor
- Menu actions to create Flags and Markers with a specific colour
- Timecode entry in the Marker dialog
- Markers annotations on the viewer
- Keyframing of OpenFX and ResolveFX plugins
- Alpha channel in compound clips
- Copying and pasting timecode in the viewer timecode displays
- Multiple timeline gap deletion
- Showing the iXML channel names for audio files in the timeline
- Replacing multiple shots across tracks while retaining grades and effects by Ctrl/Command dragging clips
- Categories of video transitions in the Effects Library
- Toggling the track-destination state
- Improved optical flow for speed changes
- Improved Smooth Cut
Fairlight audio is now fully functional and better than ever in DaVinci Resolve. This 14 minute tour will give you a sense of the scale of the improvements.
Take a look at some of the advanced Fusion effects DaVinci Resolve 15 is capable of in this 20 minute tutorial.
The DaVinci Resolve 15 release is so big that I’m going to be following this post up with a dedicated look at the new features and capabilities.
UPDATE – Here is that follow up post!
New Features in Final Cut Pro X (10.4.1)
The big news from NAB-time from Apple was that there will be no new Mac Pro until 2019 (so go buy an iMac Pro instead, please…) whilst their creative software of FCPX, Compressor and Motion all saw small updates.
These updates are all free to existing customers, which arguably makes FCPX the best value for money (over life-time ownership) when you consider that you only have to pay once (£299/$299) and every update (26 so far) has been free.
You will need to be using os x High Sierra though to run these updates.
Confirmed by Apple yesterday, the color wheels are fixed.
The update will not break previous grades. Old instances applied to clips pre update behave the old way even if copied and pasted.
New instances applied to clips will behave the fixed way.#FCPX https://t.co/GDxBPpgdnX
— Marc Bach (@marcplanb) April 10, 2018
FCPX saw the addition of Closed Caption functionality and ProRes RAW support, as well as long list of bug fixes. FCP.co has the full list here.
There was also some initial confusion over native video noise reduction being added, but this isn’t in 10.4.1 and seems to be due to some conflicting official online documents that have now been changed. But you can anticipate a drag and drop video noise reduction effect to appear soon!
Final Cut Pro 10.4.1 and Compressor 4.4.1 [now have] the ability to import, create, edit and export closed caption text…
The flexibility of Final Cut Pro X video roles means that captions in multiple formats and in multiple languages can be edited and exported from the same timeline.
Individual captions can be associated with video or audio clips in the primary storyline. This means that when these clips are edited and re-ordered, the captions move with their associated clip.
Alex Golner has the most comprehensive write up I’ve seen on these updates, so jump there to check it out in detail, it’s well worth a read. He really knows his stuff!
To me, the most interesting release from Apple is the all new Pro Res RAW file format, that will be a boon for editors, DITs and colorists everywhere. Although, for the minute, only if they’re using Atomos recording hardware and FCPX.
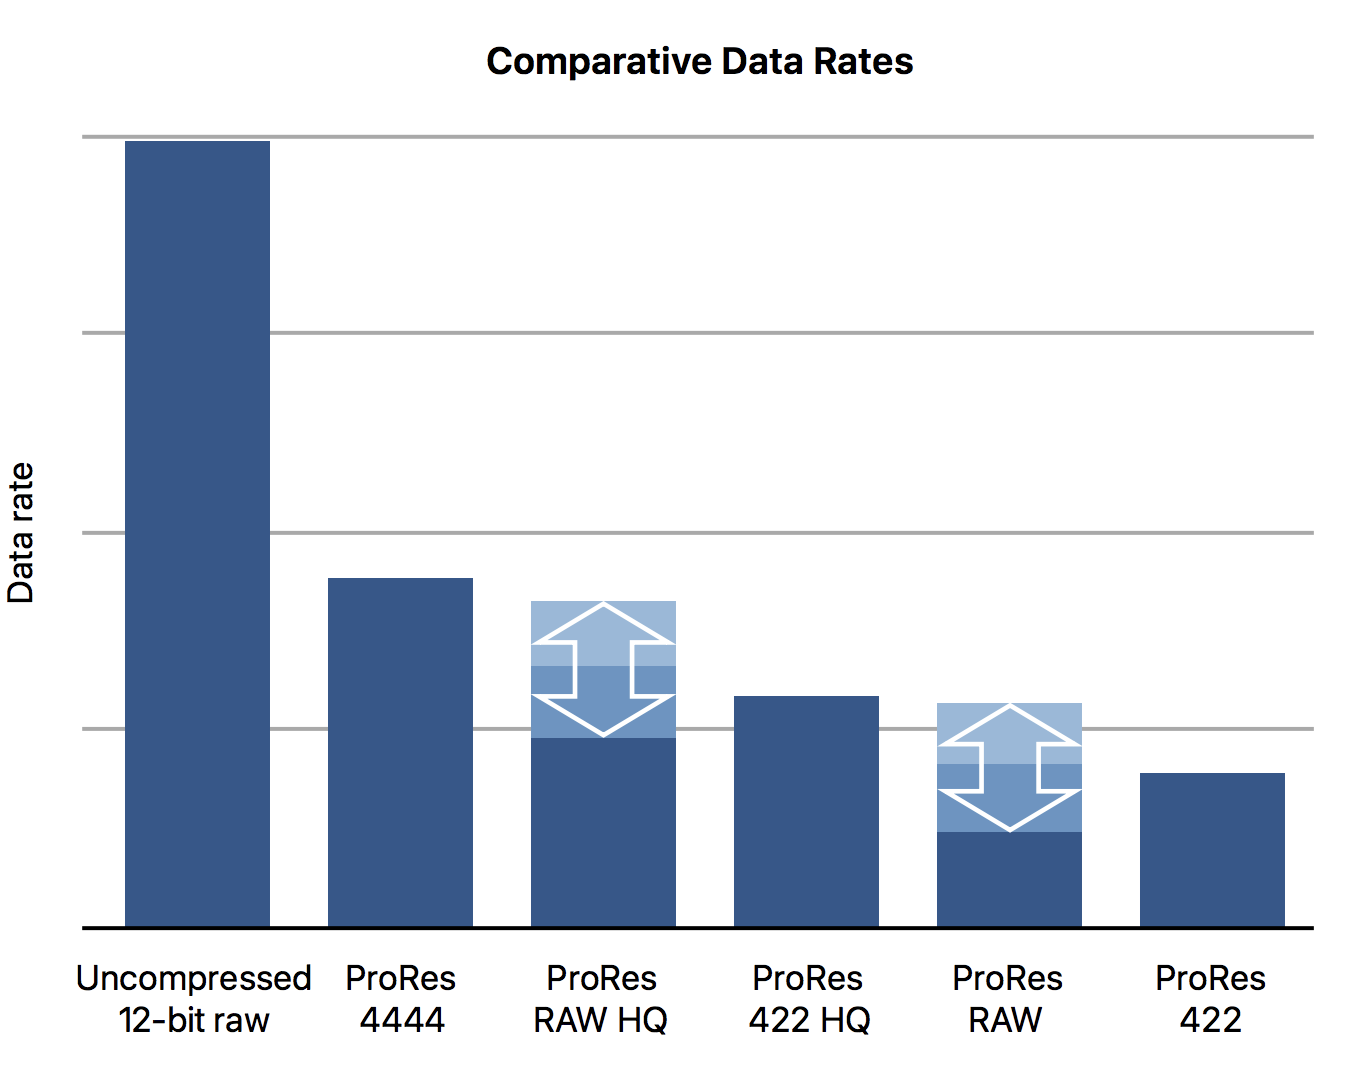
Whereas the current family of ProRes codecs is designed for all stages of video production, Apple ProRes RAW and Apple ProRes RAW HQ are designed for acquisition.
When ProRes RAW is used in Final Cut Pro 10.4.1, the output for distribution is ProRes 422 HQ or ProRes 4444 (although ProRes RAW would be a good codec for archiving ‘original camera negative’)…
In practical terms, ProRes RAW gives REDCODE RAW quality at ProRes data rates.
For 1 stream or REDCODE RAW 5:1 or 3 streams of Canon Cinema RAW Light, a Mac running Final Cut Pro 10.4.1 will be able to play back 7 streams of Apple ProRes RAW HQ or 8 streams of Apple ProRes RAW.
Also Final Cut Pro is able to render and export ProRes RAW HQ 5-6 times faster than REDCODE RAW 3:1. – Alex Golner
The whole of Alex’s blog post is worth reading if you want a step by step guide to using the closed caption features in FCPX or wrapping your head around ProRes RAW in more detail.
This video from the LumaForge Faster Together stage at NAB is a great watch and a first-hand primer on ProRes RAW’s origin story from Jeromy Young, CEO of Atomos. It also explains their close collaboration with Apple. Definitely worth the full runtime.
You can also download the official Apple white paper on ProRes RAW here.
Ripple Training have also released this 14 minute tutorial to using the new Closed Caption functionality in FCPX 10.4.1. It’s worth watching to ensure you set yourself up for success from the start.
Final Cut Pro 10.4.1: If you add some captions to a clip in the primary storyline and then lift it from the storyline (using Command-Option up arrow), the captions remain connected to the connected clip #fcpx
— Alex Gollner ? (@Alex4D) April 10, 2018
Update to Final Cut Pro 10.4.1 timeline options – Show Lane Headers #fcpx pic.twitter.com/kB75fFuxRp
— Alex Gollner ? (@Alex4D) April 10, 2018



I know this post is really old now…I’m slightly stupefied that you’re slightly stupefied that the keyboard can’t be modified. This is completely incorrect. Media Composer’s Keyboard has been almost infinitely customizable for the last 25 years and this has been one of it’s great strengths. I’m totally with you however in saying that a lot of the ‘new features’ should have been added years ago. Honestly, although Avid pretends to be the dominating force in Hollywood and all that, it’s merely because a lot of long time successful editors are too busy to learn new NLEs. But the truth is it’s been playing catch up for at least 5 years and has honestly been left in the dust in MANY ways by Premiere Pro and Resolve. I’ve been working heavily with Avid in TV for over 23 years, so this isn’t said lightly and I wish it weren’t so, but IT IS. If you don’t believe me, learn those other NLEs and you’ll find they’re anything but ‘toys’ that Avid Editors often claim.
Hi Daniel, thanks for taking the time to check out the blog and to comment. I agree with you that Avid is finally making progress to catch up and it’s entrenched because of editor preference, shared storage and collaborative workflows, but even those are being steadily eroded too.
As I said in the post, as far as I’m aware, you (still in 2020?) can’t add another layer set of customised keyboard shortcuts by holding down the CMD, Alt or Ctrl keys, in the same way that you can by holding down the Shift key.
You can add ctrl and alt(option) modifiers to existing keyboard shortcuts (e.g. changing I to alt+I through the command palette) but then you lose the regular I functionality.
You can only double the keyboard shortcut layer sets with Shift, you can’t quintuple them.
Happy to be corrected though!
Hi Jonny, thanks for your quick reply, for setting me straight on what you actually said and for your great blog!
Point taken. I should have read what you said more carefully and I agree with you.
Cheers!
Well, it made me double check and learn more detail about Avid so it’s all good.
Thanks for reading the blog!