
What is Film Emulation?
Film Emulation is the process of making digital footage look like it was shot and printed on film.
This means trying to recreate the specific look and feel of different film stocks, film grain and other characteristics of shooting with cinematic lenses on film, such as chromatic aberration, bloom, halation, lens distortion, dust, scratches, gate weave and other nuances of the medium.
Essentially digital often looks too clean and pristine and we clamour for the romance of a less than perfect film image, whilst seeking to maintain the ease and convenience of not actually shooting on, printing and scanning real film stock.
Film Emulation plugins, LUTs, texture overlays and PowerGrades all seek to deliver filmic results but, depending on the underlying process, they may not all equally successful at doing so.
That said, Film Convert’s Nitrate film emulation plugin is straight forward to use, easy to understand and generates a very pleasing looking cinematic image, in just a few clicks and with a fistful of fun.
You can either keep reading to find out how and why, or dive into Nitrate for yourself by downloading the fully functional free trial.
FilmConvert Nitrate’s New Features
Earlier this year FilmConvert celebrated its 10th birthday as a company. That decade has established FilmConvert as a go-to option for many editors, DITs and colorists and having stuck around this long, they must be doing something right.
I happen to know that FilmConvert are working on some major feature updates to Nitrate (coming next year) which will add additional filmic elements and controls to their already comprehensive film emulation plugin.
While FilmConvert Nitrate already contains 19 specific film stock emulations, these have remained the same broad selection since its inception, so I’d anticipate that some of the ‘major feature’ updates could include the introduction of new film stocks to work with.
Since I last wrote about FilmConvert, they’ve continued to add dozens of new camera specific film emulation response profiles and I’m sure they will continue to do so into the future as new cameras and shooting profiles are released by all the major manufacturers.
FilmConvert Discount Code – Save up to 30%!
FilmConvert Nitrate and it’s sister product, the camera matching plugin CineMatch, are both currently on sale with 20% off, but don’t forget you can save a further 10% on FilmConvert Nitrate and CineMatch all year round with the exclusive discount code ‘ELWYN‘ or just jump through this special link to have it automatically applied.
How does FilmConvert Nitrate work?
FilmConvert’s Nitrate is a plugin built for DaVinci Resolve, Adobe Premiere Pro, Adobe After Effects and Apple’s Final Cut Pro. It allows you to quickly give your footage the emulated look of specific film shooting and print stocks, including a range of different sized film grains and all in just a few clicks.
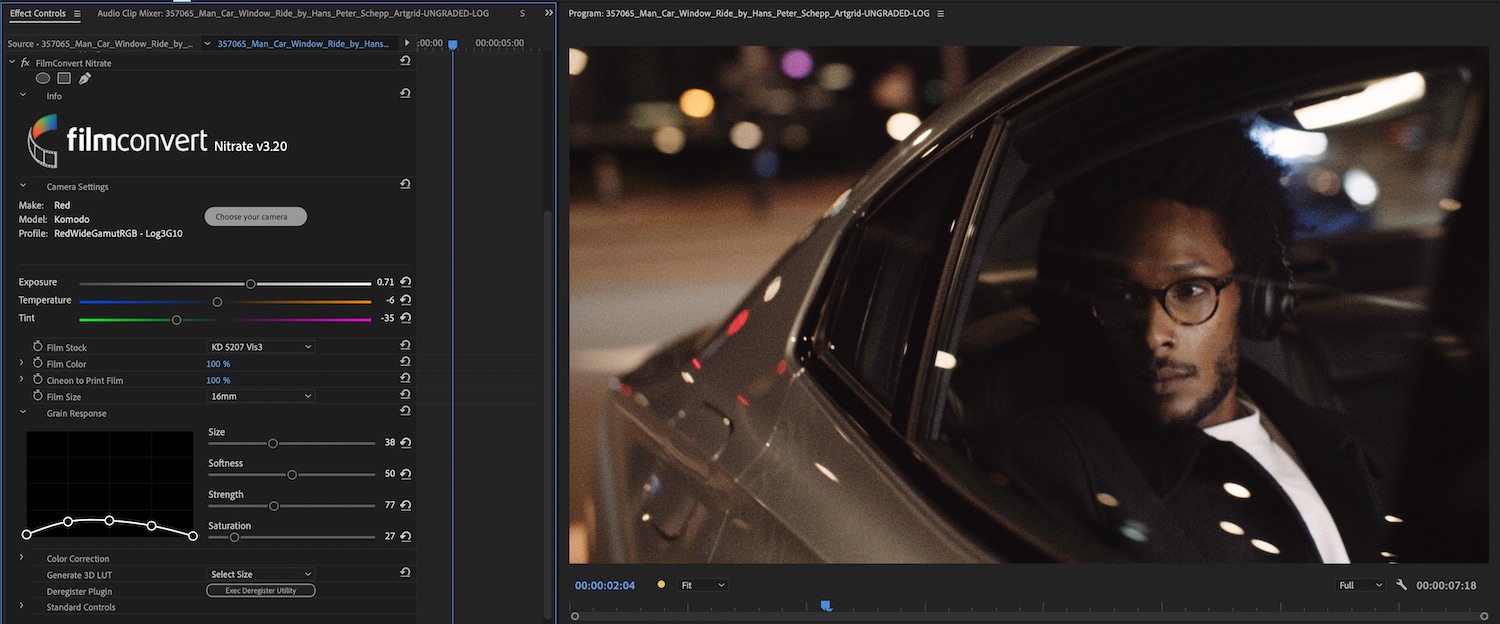
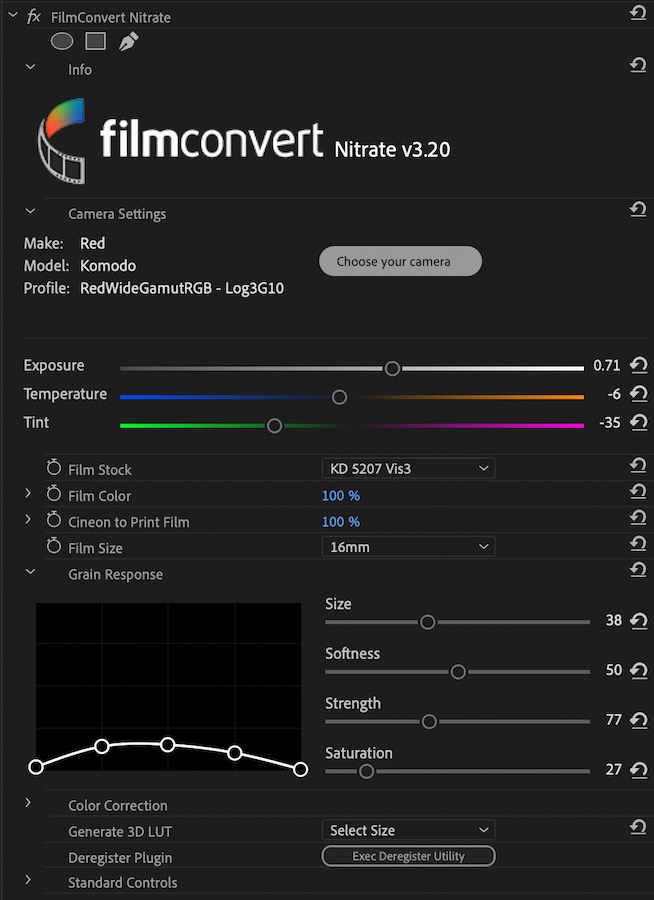
Nitrate uses a three step emulation process:
- Select the matching camera pack for your footage
- Select your chosen film stock
- Select your preferred film grain size and amount
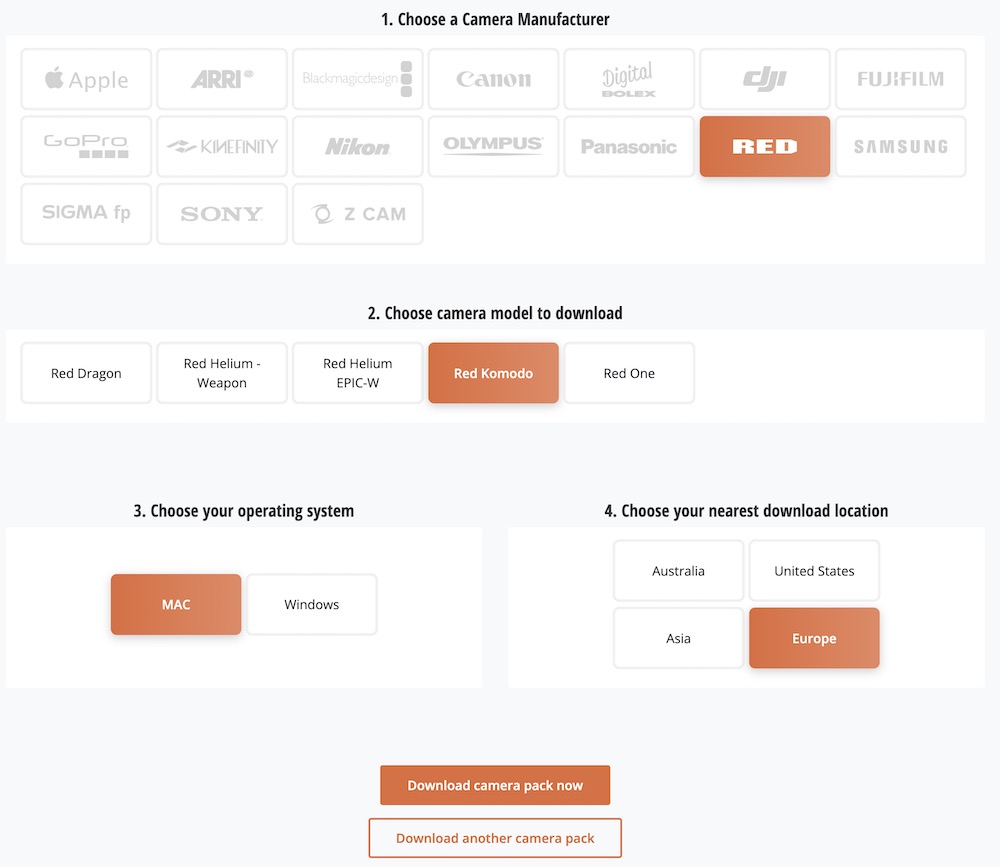
Nitrate handles the the process of correctly matching your original digital footage to the response curve of your chosen film stock via over 100 camera and shooting profile specific packs which you download from the FilmConvert site, as and when you need them.
These are all individually crafted to ensure that the way in which the originating camera’s sensor responds to light and colour correlates precisely to the chosen film stock and therefore ensures that each of Nitrate’s controls respond accurately as a result.
FilmConvert achieved this by shooting test charts and scenes for each of the camera and camera shooting profiles from every single manufacturer that they support, and comparing these to the 19 different film stocks, that were also used to shoot the same charts and scenes.
That is a lot of work! But also a far more accurate way to ensure that their film stock emulations work appropriately for all of the different kinds of footage you might throw at it.
You only need to download each camera pack as and when you encounter that kind of footage, although these can sometimes be relatively large – the RED KOMODO pack I downloaded was 1.2GB.
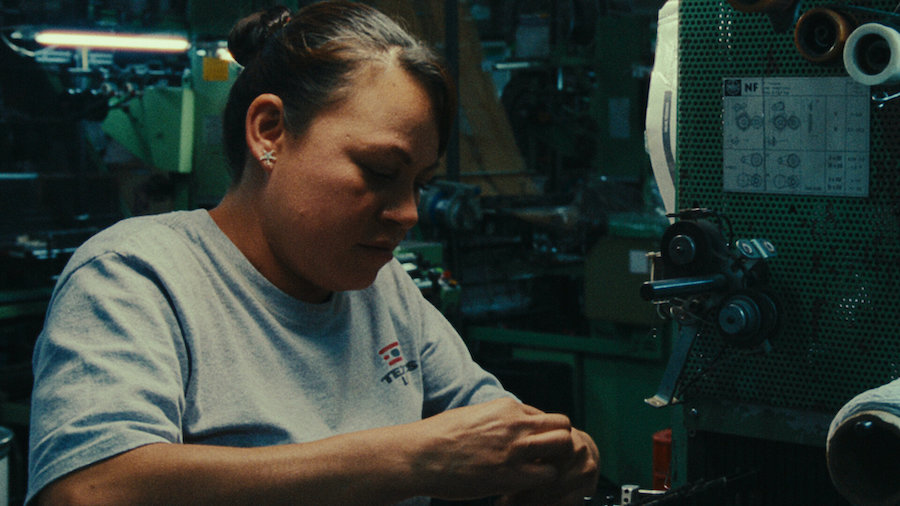
One of the benefits of using royalty stock footage from Artgrid.io, as I am in these images, is that you can see what the original camera was. I would love it if they also added the shooting profile metadata, but I’ve not yet seen this on any stock footage library.
Either way, make sure you find out what the original profile was, otherwise you’ll just have to guess at which ever one looks right to you.
19 Film Stocks to Choose From
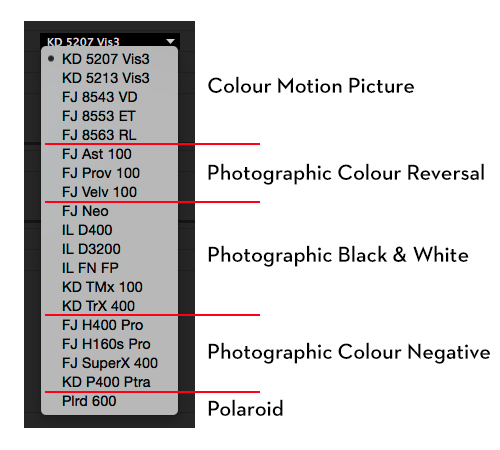
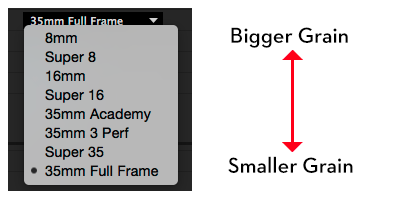
There are 19 different film stocks to choose from, each of which also has its own custom film grain response curve. As you can see from the image above these are divided into 5 different groups of different kinds of film stock.
There are 5 motion picture negative film stocks to choose from, if you want to run with a truly cinematic look;
- Kodak Vision3 250D 5207
- Kodak Vision3 200T 5213
- FujiFilm Vivid 160T 8543
- FujiFilm Eterna 250T 8553
- FujiFilm 8563 RL
But given that the whole purpose of using Nitrate is film emulation, you can emulate any film stock you like, even still photograph stocks that it would have been impossible to shoot a film on in the first place!
A Better Way to Add Film Grain
Adding film grain, most often through a simple overlay file (that hopefully originated from an organic scan) that is blended over the graded image, is an easy way to add the texture of film’s most distinguishing feature.
Nitrate offers 8 different grain sizes to work with from 8mm all the way up to 35mm Full Frame, which are all created with real film grain scans, rather than an emulation
Unlike other plugins that simply overlay film grain, Nitrate realistically models the amount of grain required for each colour and exposure level in your image.
Nitrate grain controls offer you more flexibility with our grain response curve. Adjust the appearance of the grain individually in the highlights, mid-tones, and shadows, or the overall softness and saturation of grain in your image.
FilmConvert
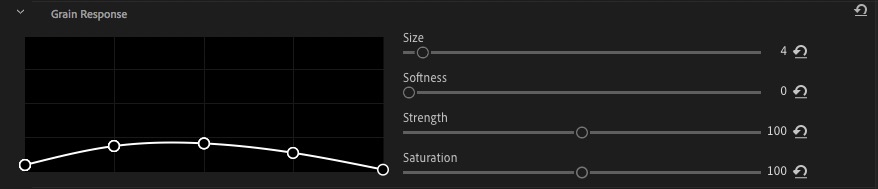
The huge benefit of using Nitrate’s grain curve is that you have complete control over how that grain is added to the image across the exposure range and that it is added in the right places based on your chosen grain size and film stock.
In this walk through of all of Nitrate’s grain controls, Nick from FilmConvert shares some insights on how these work together to naturally integrate and shape the grain within your image.
However, if you’re still working with the poor man’s version of adding film grain, then here are some places to download free film grain scans.
Why FilmConvert Nitrate is better than a LUT or PowerGrade
Because of Nitrate’s bespoke profiling process, and the fact that it is coded as a plugin, it can deliver far more nuanced results more efficiently, in comparison to trying to achieve the same results using LUTs or PowerGrades.
The reason for this is that a LUT is a 1:1 conversion matrix. This kind of pixel value in is translated to this kind of pixel value out. The translation is baked in.
To emulate Nitrate’s process, you would need to manually assign the correct LUT for the camera profile and film stock combination – which would give you hundreds of LUTs to wade through – for each shot.
Furthermore, if you didn’t create these LUTs yourself, or don’t know how they were created, you’re trusting that the person who did knows what they’re doing and got the math right.
Within a PowerGrade, which is only available in DaVinci Resolve, you do have a greater level of access to and control over the underlying processes but unlike with Nitrate, the controls you have to adjust your image won’t be altered to compliment the originating camera sensor/film stock conversion.
There’s just a whole lot less nuance! And that matters.
Lastly, under the hood, Nitrate is operating in the Cineon Log colour space, which means that you can retain and massage the full dynamic range of your footage, without clipping or crushing anything unnecessarily in the process.
Tips and Tricks for Cinematic Looks with FilmConvert Nitrate
A great place to start when trying to deepen your Nitrate film emulation prowess is to check out these two series of official tutorials when using the plugin in DaVinci Resolve (above) and Adobe Premiere Pro. (below)
Each tutorial is crisp and concise which means that learning everything you need to know about Nitrate, will only take a couple of minutes of concentration.
Here are the same 11 lessons in Adobe Premiere Pro.
TIP – Add a Free Print Film Emulation LUT
The wide variety of film stocks which Nitrate emulates are all film stocks that you would find in original cameras, as opposed to a print stock which the final output would have been printed onto, for distribution in cinemas. This stock would have also had its own specific characteristics too.
As an extra step you could choose to also add a print stock emulation LUT, like these free LUTs created by colorist Juan Melara. These include 3 print film stocks Fujifilm 3510, Kodak 2383 and Kodak 2393.
The only trouble with using these outside of Resolve is that they are expecting a specific colour space and gamma to work within.
It would be great if FilmConvert could add a Print film stock to their list of profiled stocks to allow you to complete the film emulation loop, from sensor to screen.
TIP – Double Up Your Nitrates
For a nice trick, apply two instances of Nitrate to a clip. On the first one, set the camera profile to a motion film negative stock, like Kodak 5207 Vision 3.
Then apply a second instance with the default preset, but select a still photo positive stock, like Fuji Astia 100.
Finally, tweak the colour settings to get the most pleasing look.
The result is designed to mimic a true film process where you would shoot a negative stock and then print it to a photograph or release print.
Oliver Peters
In Oliver Peter’s excellent review of FilmConvert Nitrate, he suggests using two instances of Nitrate on the same clip to attempt achieve this same negative to positive film emulation process.
The only niggle with this idea is that the photo positive stocks within Nitrate, aren’t the same kind of stocks that motion picture film is printed on. But why be a stickler for detail!
(Although hopefully FilmConvert will add a motion picture print stock!)
UPDATE – Nitrate does have a Print Emulation!
When you select a Log profile in your camera pack two different controls appear; Film Color and Cineon to Print Film.
The Cineon to Print Film slider allows you to adjust the strength of the print film application.
At 100 you’re getting the full projected film stock applied, at zero
you’re getting the Cineon Log film scan emulation which will look similar to your camera’s Log footage but still with the film stock’s colours applied.You could then apply your own print film look over the top or manually grade your way out of log by adding your own contrast curve
FilmConvert tutorial
The Film Color control allows you to adjust how much of the film stock colour profile is applied to your footage.
When you grade with a non-log profile you will see two different sliders; Film Luma and Film Chroma. These allow you to control how much of the film stock emulations luma curve is applied, or how much of the original footage’s curve is.
TIP – Export and Share a LUT of your Final Look
One of the problems that can arise when using a third-party plugin like Nitrate in a shared editing environment, is if the other editors and collaborators don’t also have Nitrate installed.
This is also true if you are moving between different computers while working.
A simple solution to this is to export a baked in LUT of your final look and share that with your colleague or collaborator.
The only downside to this is that grain isn’t carried in a LUT.
TIP – YouTube Vs Grain
If you’re going to use YouTube to show your work then we would recommend increasing the size of the grain within the grain controls and uploading using ProRes.
Nick, FilmConvert
One of the problems with YouTube’s encoding algorithm is that it is designed to deliver the best possible image for the least amount of bandwidth. This means it largely eradicates small details like film grain.
One of the benefits of adding grain, regardless of the aesthetic that you’re looking for, is that it can force compression encoding algorithms to work a bit harder and therefore reduce the amount of banding you might find in your images, especially around subtle colour gradients.
Take another look at my quick grain test and see for yourself!
Further Reading….
Tools and Training for Professional Film Colorists (2021)
Understanding FilmConvert’s New Nitrate Colour Grading Plugin (2019)
Creating a Real Film Look with FilmConvert’s Premiere Plugin (2016)


Do you add halation after Film Convert to further simulate film stock?? It seems that Film Covert does NOT do halation (but Resolve has a great effect for this…)
I didn’t talk about adding Halation with FilmConvert in the article, other than halation is a component of film emulation.
But I know that FilmConvert are working on further film emulation features, so maybe halation will be one of them? I can’t say.
But yes, there are lots of other ways to add Halation like you say with Resolve.