
Film Editing with a Razer Naga Chroma
Update 2021 – The Razer Naga Chroma has been superseded by the wireless Razer Naga Pro and wired Razer Naga Trinity – although the functionality is effectively the same. I’ve updated the following Naga Chroma links to the Razer Naga store page for ease of choice.
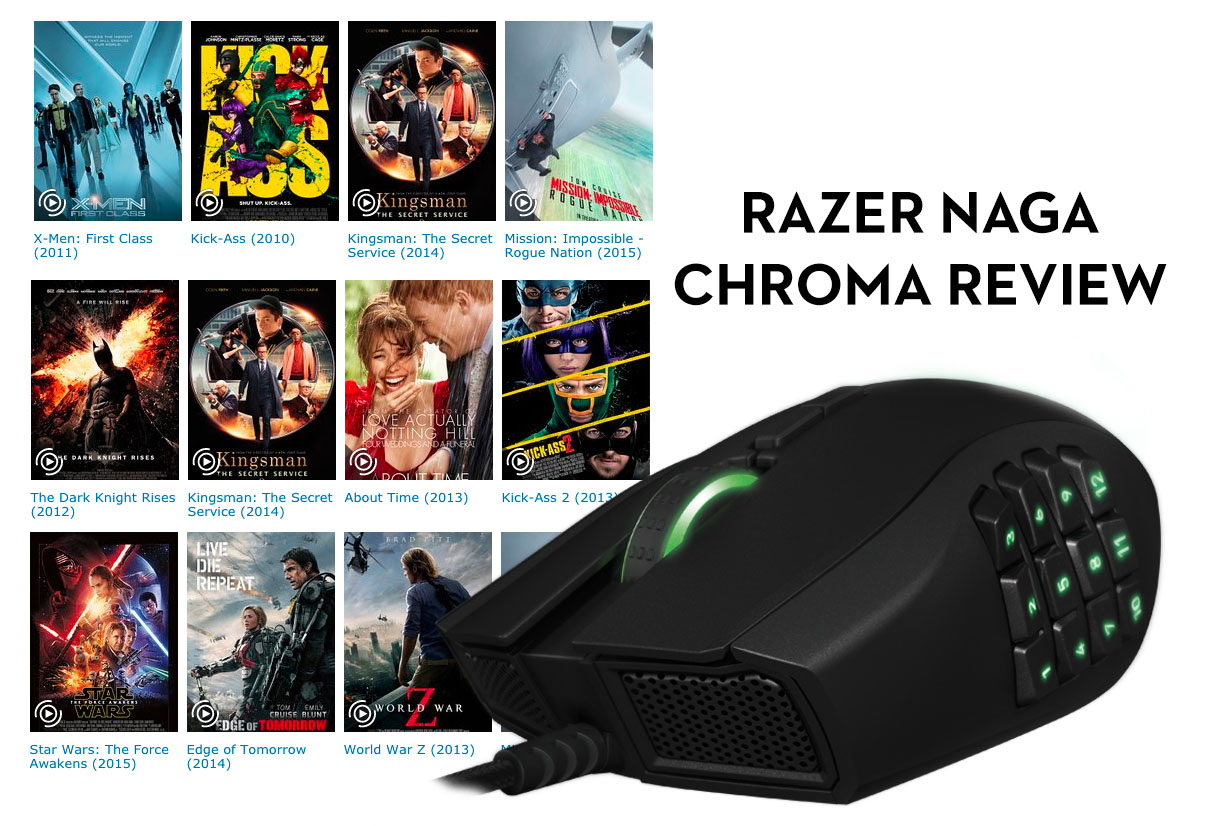
The Razer Naga Chroma programmable gaming mouse is a high calibre mouse used by post production professionals on Hollywood blockbusters such as Mission: Impossible Rogue Nation, Star Wars: The Force Awakens, Edge of Tomorrow, Kick-Ass 2 and many more. In fact, you can download the exact shortcuts and settings used with this mouse to cut those films!
If there is a mouse that can speed up your film editing and be a joy to use, this is it.
The generous team at Razer were kind enough to send me a Razer Naga Chroma for the purposes of this review, and I’m really glad they did!
As a long-time fan and proponent of the Wacom tablet I’ve avoided looking at mice, because I didn’t believe there could be a better option than my trusty Wacom. I even take one with me when I edit in client’s offices as I won’t edit without it!
That said, if there was a device that would make me switch back to a mouse, the Razer Naga Chroma would be it.

Buy on Amazon.com | Buy on Amazon.co.uk
UPDATE – September 2020
If you’re a Mac based editor you should know that Razer have dropped support for the Synapse software which enables the full customisability of the mouse and smooth operating.
I’ve updated this post on The Best Mouse for Film Editing, with some other options for this kind of mouse – featuring 12 button thumb pads – which you can check out here.
But do read the rest of this article to mine it for valuable insights on how to set up this kind of mouse for effective film editing!
The Conclusion before the Detail:
To cut to the chase of my overall thoughts, once you’ve got your shortcuts set up in an efficient manner, you can edit a lot faster using the 19 programmable buttons the Naga has to offer, as you’re moving your hands a lot less. In fact, you’re mostly just moving your thumb!
But compared to a pen and tablet, it’s not a real win from an RSI perspective as you’re still using the tiny muscles in your wrist instead of the much larger and more robust muscles in your arms and shoulders. So yes, it’s fantastic for speed but, due to my own RSI related tingles and pains, I’m going to stick with the Wacom for comfort.
Having said that, my caveat would be that because it is extremely portable, and because you can take settings with you via the cloud, (as long as you can install the synapse app on a locked-down corporate edit suite) it could be a very handy replacement for my G13 programmable keyboard, when out and about.
For example, I wish I’d had it with me during a recent multi-cam edit in a client’s suite as I could have cut between the angles with my thumb very efficiently, and set up a few options to toggle the viewer on and off etc for better playback performance. This would have been a huge timesaver.
Another great feature is the ability to record macros which can return dividends in terms of time saved and repetition removed. In particular my Pancake Macro is one I use all the time.
My only suggestion for improvement would be that it would be nice if it had an in-built physical memory card, to store the profiles and mappings on, like the G13 does, as this would make it easier to take them with you.
If you’re a mouse-based editor then you should seriously consider checking out the Razer Naga Chroma and it’s ‘Epic’ wireless counterpart. At just over $105/£114 for the wireless version and $79.99/£69 for the wired Naga Chroma, it’s comparable in price to a new Apple Mouse 2, but it can deliver so much more functionality and performance.
Buy Razer Naga Pro and Trinity on Amazon Global Stores
A Bit More Detail
The mouse comes in some nicely designed packaging that ‘welcomes you to the cult of Razer’ and definitely helps to convey the idea that this is a premium product.
An as soon as you get the mouse in your hand you get an immediate sense of both the build quality and thought that’s gone into the design. The 2014 Razer Naga Chroma is in fact the second generation of this mouse, and the dipped button pad and tilt-click scroll wheel are welcome refinements, along with a more ergonomic form.
The first thing you notice though is how freaking cool it looks! From the grilled fins on the front to the nicely illuminated ‘chroma lighting’ across the button pad, scroll wheel and logo. It’s ‘just’ a mouse but it’s got the styling of a sports car.
Also the way it feels in the hand (slightly plump, but pleasing) and the matt finish texture is also a really nice touch, especially compared to the slick gloss of an Apple mouse. It is designed for all those hours of sweaty game play, I guess.
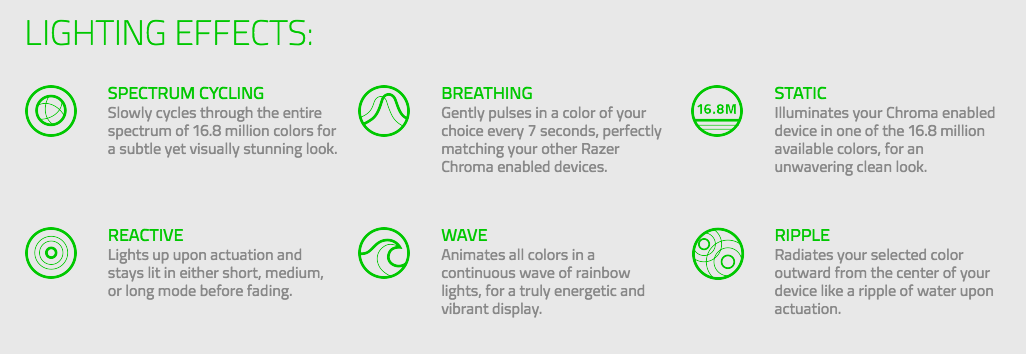
The Chroma element to the Naga is the 16.8 million customisable colours it has to offer, which can be separately configured in each of the illuminated areas (scroll wheel, keypad and logo) and these can even by sync’d across multiple Razer devices, for colour co-ordinated perfection.
There are six different lighting effects to choose from, as you can see in the image above, and you can also save a little energy by setting the lighting to turn off when the display is switched off.
One of the missed opportunities though is having the lighting match the profile you’re in. This is one of the most helpful features of the Logitech G13 as it helps you to keep track of which profile and subsequent key-map you’re in, given that so many permutations are possible.
The Razer does display an on-screen prompt when you switch between profiles though, in the top left of your display.
Another of the unique features of the Razer Naga Chroma mouse is the ’tilt-click’ scroll wheel. Which is something I’d never heard of before, but the FAQ has this covered:
What does a tilt-click scroll wheel do?
Aside from the standard scrolling and middle mouse button, a tilt-click scroll wheel gives you 2 additional mouse buttons: left tilt and right tilt clicks.
You’ll see this functionality used effectively in the three profiles from Editor Eddie Hamilton, First Assistant Ben Mills and Second Assistant Rob Sealey later on in this post.
Useful Razer Naga Chroma Tech Specs and Resources
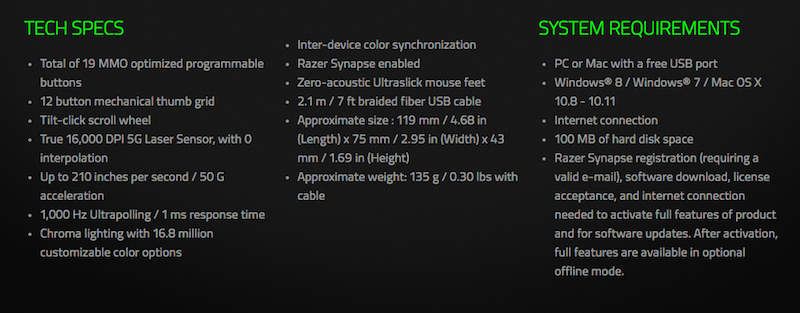
Boasting the world’s most precise True 16,000 DPI 5G Laser gaming mouse sensor, with 0 interpolation, the Razer Naga Chroma provides you with unsurpassable accuracy.
Basically this mouse is ridiculously precise and sensitive and cranked up all the way it’s unusable. But on my 4K display, set to around 8000 DPI (about half of what it can go to!) the sensitivity and response was pretty comfortable. You’ll want to try out a few different levels to get the right mix of speed and control.
Here are a few quick links to some further useful resources.
How to Set Up a Razer Naga Chroma for Film Editing
Here are some quick and easy instructions to get you set up in your favourite NLE in a jiffy. Watch the video to see this in more detail.
Step 1 – Download the Razer Synapse application and install it. This is the hub for configuring any attached Razer product on your system.
Step 2 – Create a free account and optionally register for the 2 year warranty. Your account with Razer lets you transfer your custom profiles two and from the cloud.
Step 3 – You might need to update the app, which I had to do for some reason the first time I ran it.
Step 4 – Configure the mouse buttons and keypad to your shortcuts or functions of choice by first creating a profile (eg Premiere Pro) and then clicking on the ‘Link Application’ button to bring up a window that will allow you to connect this profile to that application. Then whenever you switch into that application the associated profile will automatically activate.
Step 5 – Map the Razer Naga Chroma’s 19 programable buttons to keyboard shortcuts, system commands, mouse functionality, macros and more!
What becomes immediately obvious is that effectively setting up the Naga with the right combination of shortcuts and actions needs some serious consideration, especially when there are so many options to map.
Also with 8 key maps per profile and an infinite number of profiles (although only one profile can be directly linked to an application at a time) you can set your mouse up just how you’d like it.
Because you can switch between key maps (layers) within a profile you could have key map 1 set to all your editing shortcuts, 2 to all your audio needs, 3 colour grading or whatever.

When you switch between profiles you’ll get an on-screen prompt in the top left of your display for a second or two. You can also check what profile you are in under the Synapse app menu.
If you really want to, the Razer Synapse application will also track all of your ‘in-game stats’ and create heatmaps of your mouse movement. This could be handy to use while editing to see if there’s places you keep going to with your mouse (e.g a menu and sub-menu) that you might be better off creating a keypad shortcut for. But you might not want to go that deep with things!
Download Razer Naga Chroma Film Editing Profiles
First of all a huge thank you to Editor Eddie Hamilton, First Assistant Editor Ben Mills and Second Assistant Editor Rob Sealey for sending me their profiles to share in this post.
I once took a stab at guessing Eddie’s Razer Naga mappings in this previous post over on Premiumbeat.com, which also provides some useful tips on organising your edit like a pro, gleaned from Eddie’s Mission: Impossible – Rogue Nation Avid timeline.

Thankfully guessing can be put to an end as Ben sent me both his and Eddie’s profiles, as well as these detailed notes on his own use of the Razer Naga. I’ve previously interviewed Ben in his capacity as a VFX Editor in this extensive post, which includes some great tips and shortcuts too.
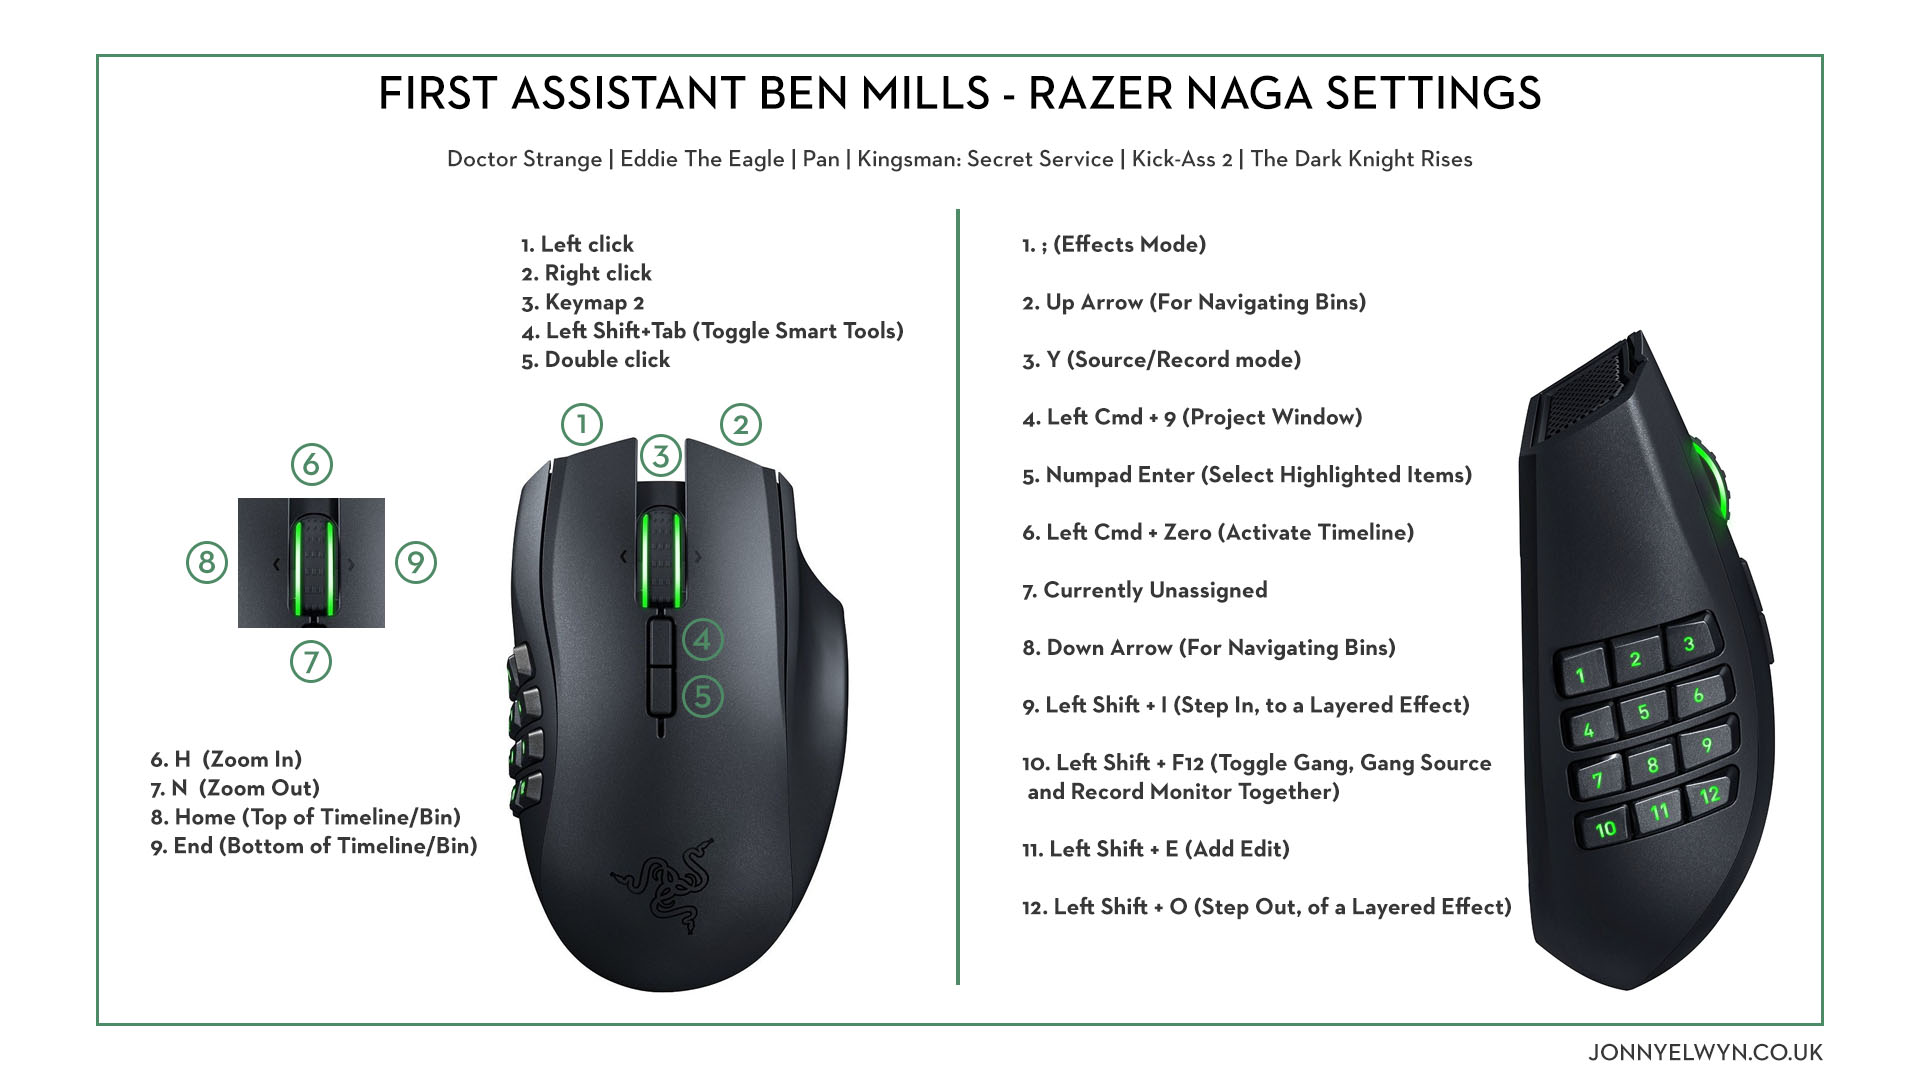
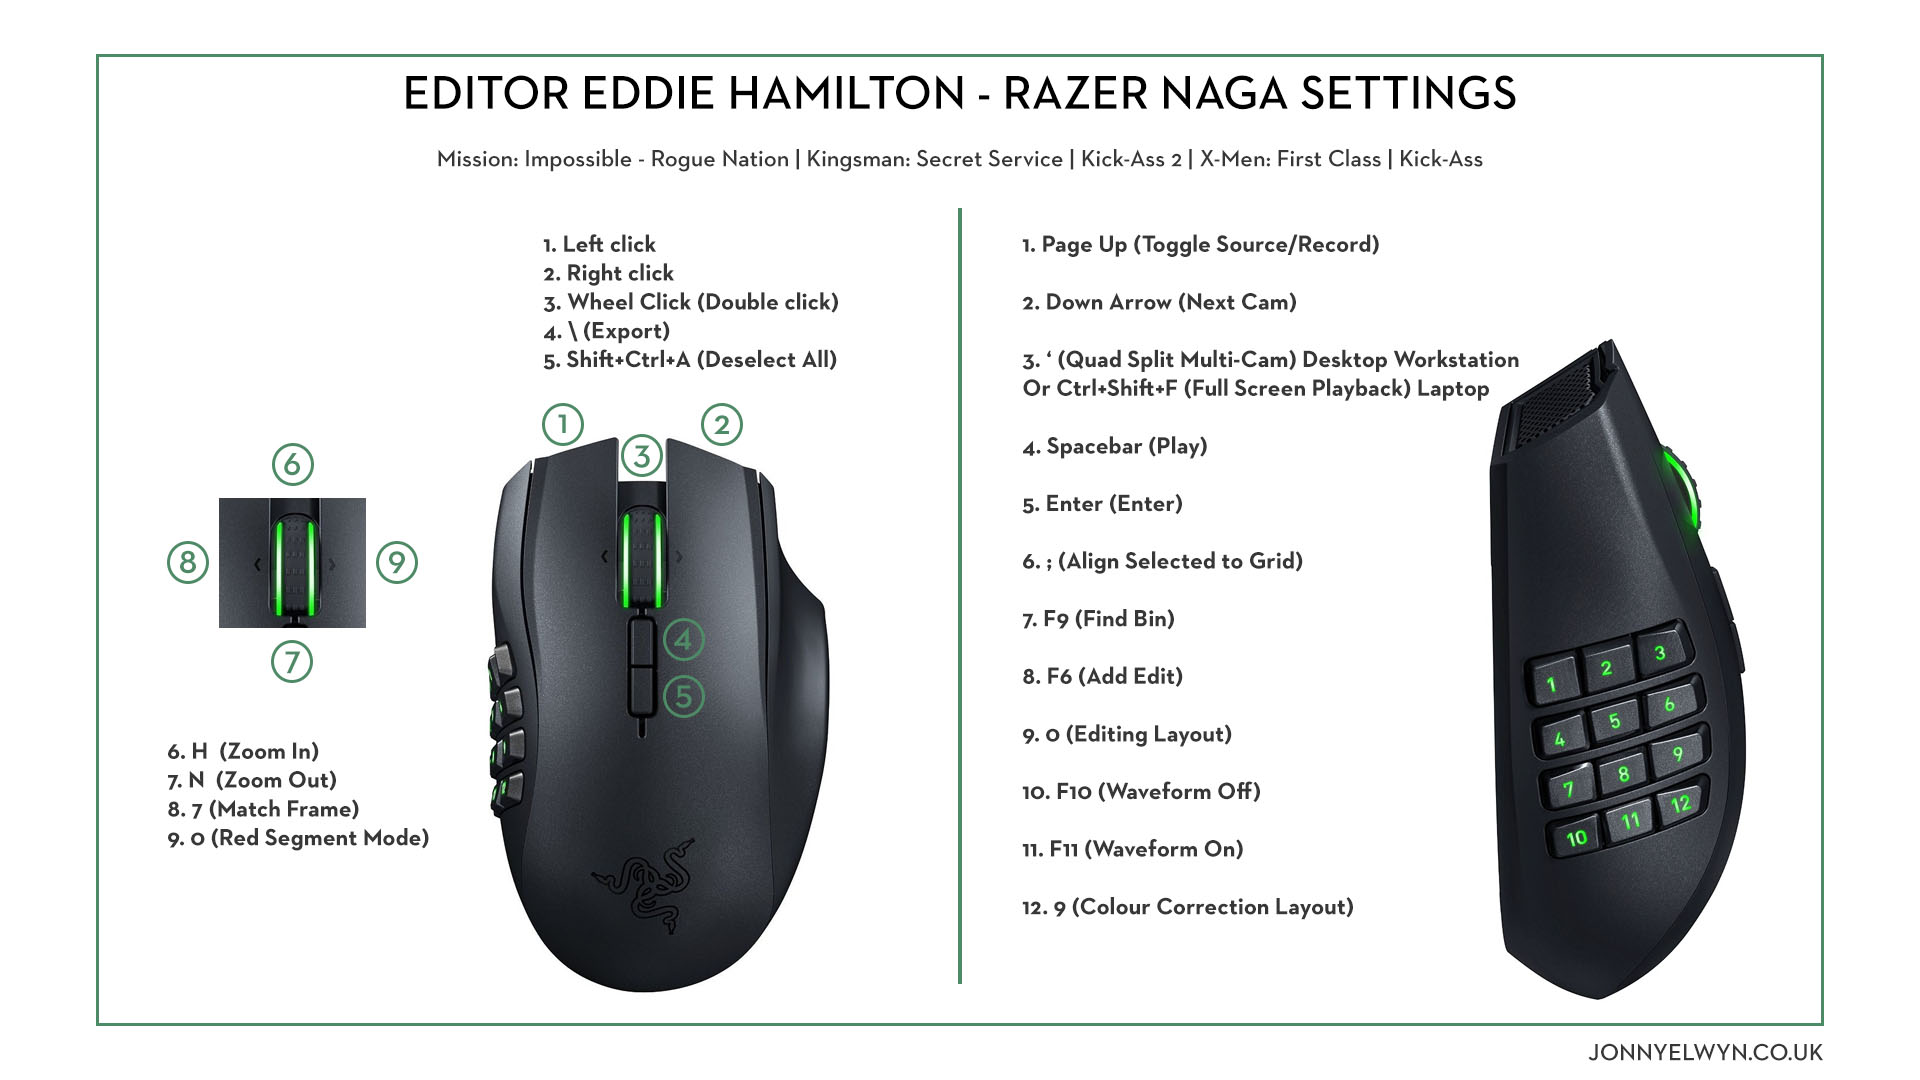
This is the first keymap that I use and it’s my main navigation around the Avid. I must point out one of my major flaws with Razer products, is that they allow you to have multiple keymaps but don’t allow you to change the lighting with them, or show an onscreen notification when you switch keymap, so I stick to just two key maps to keep it easy to remember which one I’m in!
Firstly, and this is an Eddie tip, I assign my scroll wheel to zoom in and zoom out of the timeline (so I can no longer scroll within bins) but it makes it incredibly quick for moving around the timeline.
Left click and Right click on the scroll wheel are set to Home and End allowing me to jump to the start or end of a timeline or top or bottom of a bin.
The additional function keys (4 & 5) give me a double click function and Toggle Smart Tools (Left Shift + Tab)
As you’ll see in the top view I have my scroll wheel click (3) to go to keymap 2 which allows me to have a second bank of keys assigned. My second top view keymap will take ALOT of explanation regarding macros and shortcuts. Razer allow you to have up to 8, but I’d be amazed if anyone could memorise that many keymaps let alone which one they’re currently in.
On the side view I do have a second keymap too which is more effects based so it contains shortcuts to activate the polygon tool, zoom in and out of the source window, reshape tool, add keyframe, open tracking tool, plus macro’s for copy and pasting information down a column of metadata for columns that don’t allow you to set an entire column in one go such as VFX numbers and also a macro that selects in to out based on a track on the timeline and then overwrite edit’s the item in your source window to track V10 on the timeline. I use this to quickly insert VFX titles on the timeline. – First Assistant Editor, Ben Mills
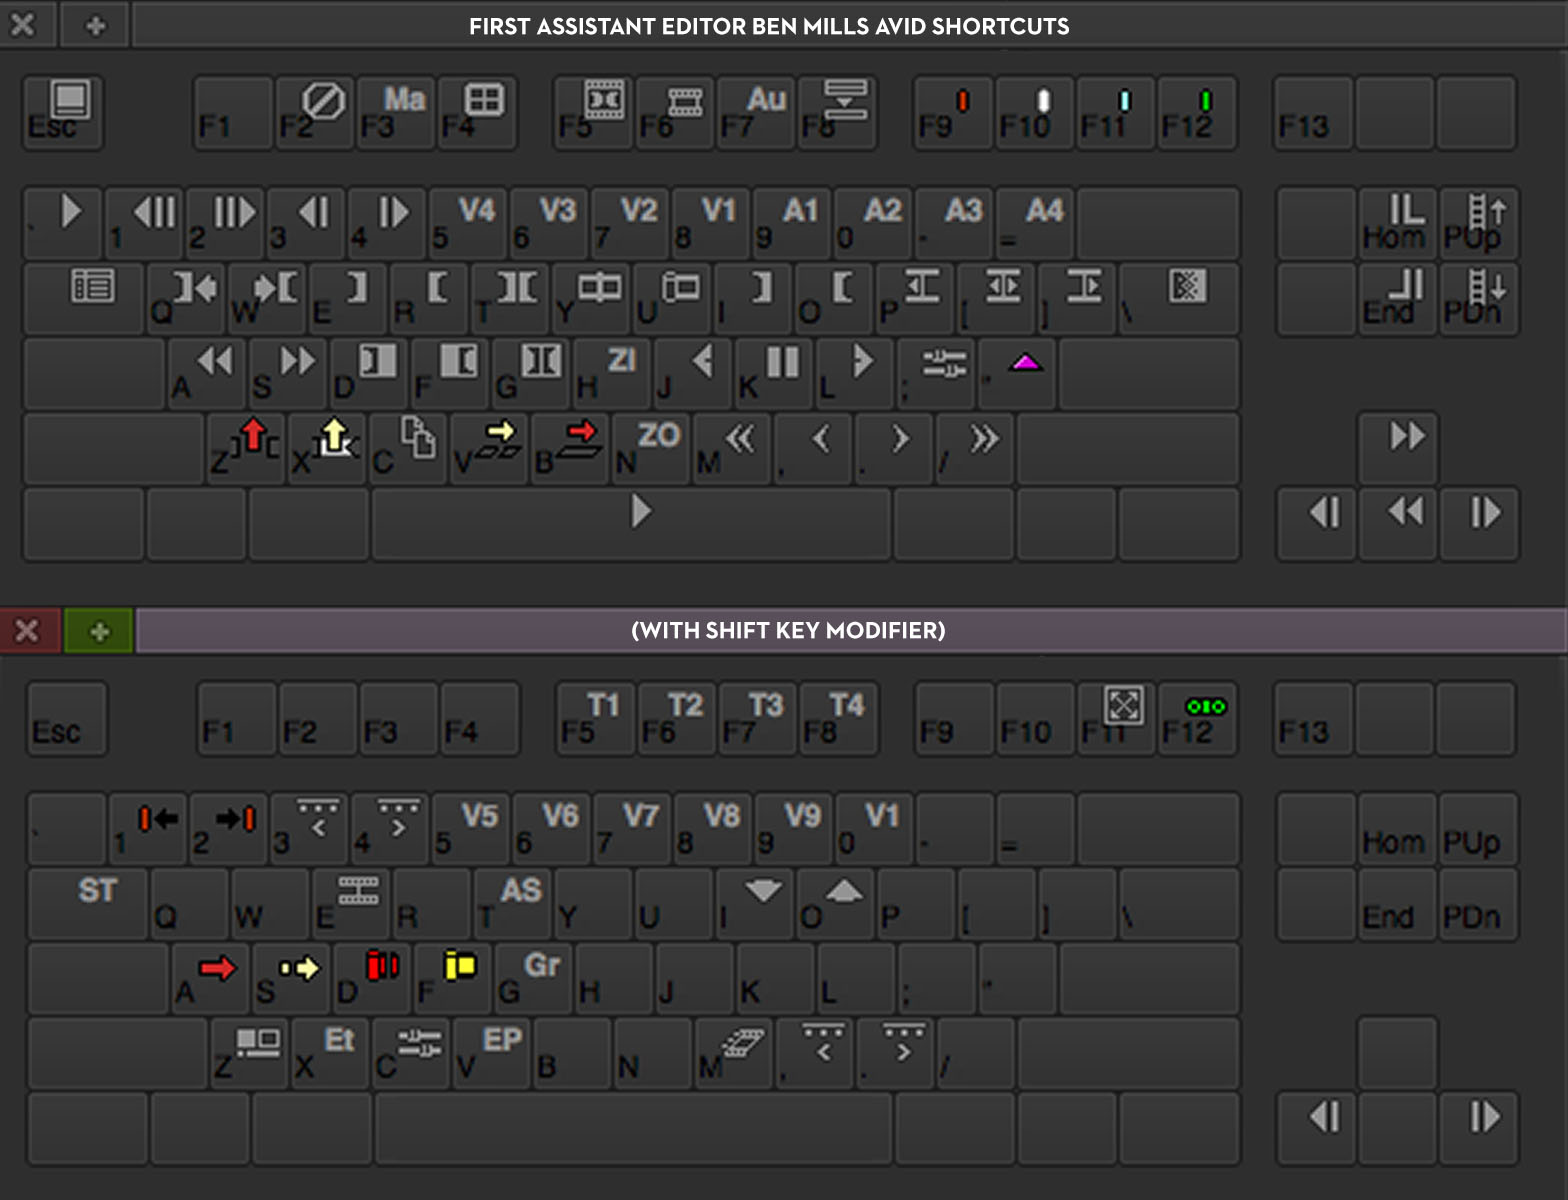
Ben also sent me over his Avid Media Composer short cuts as well!
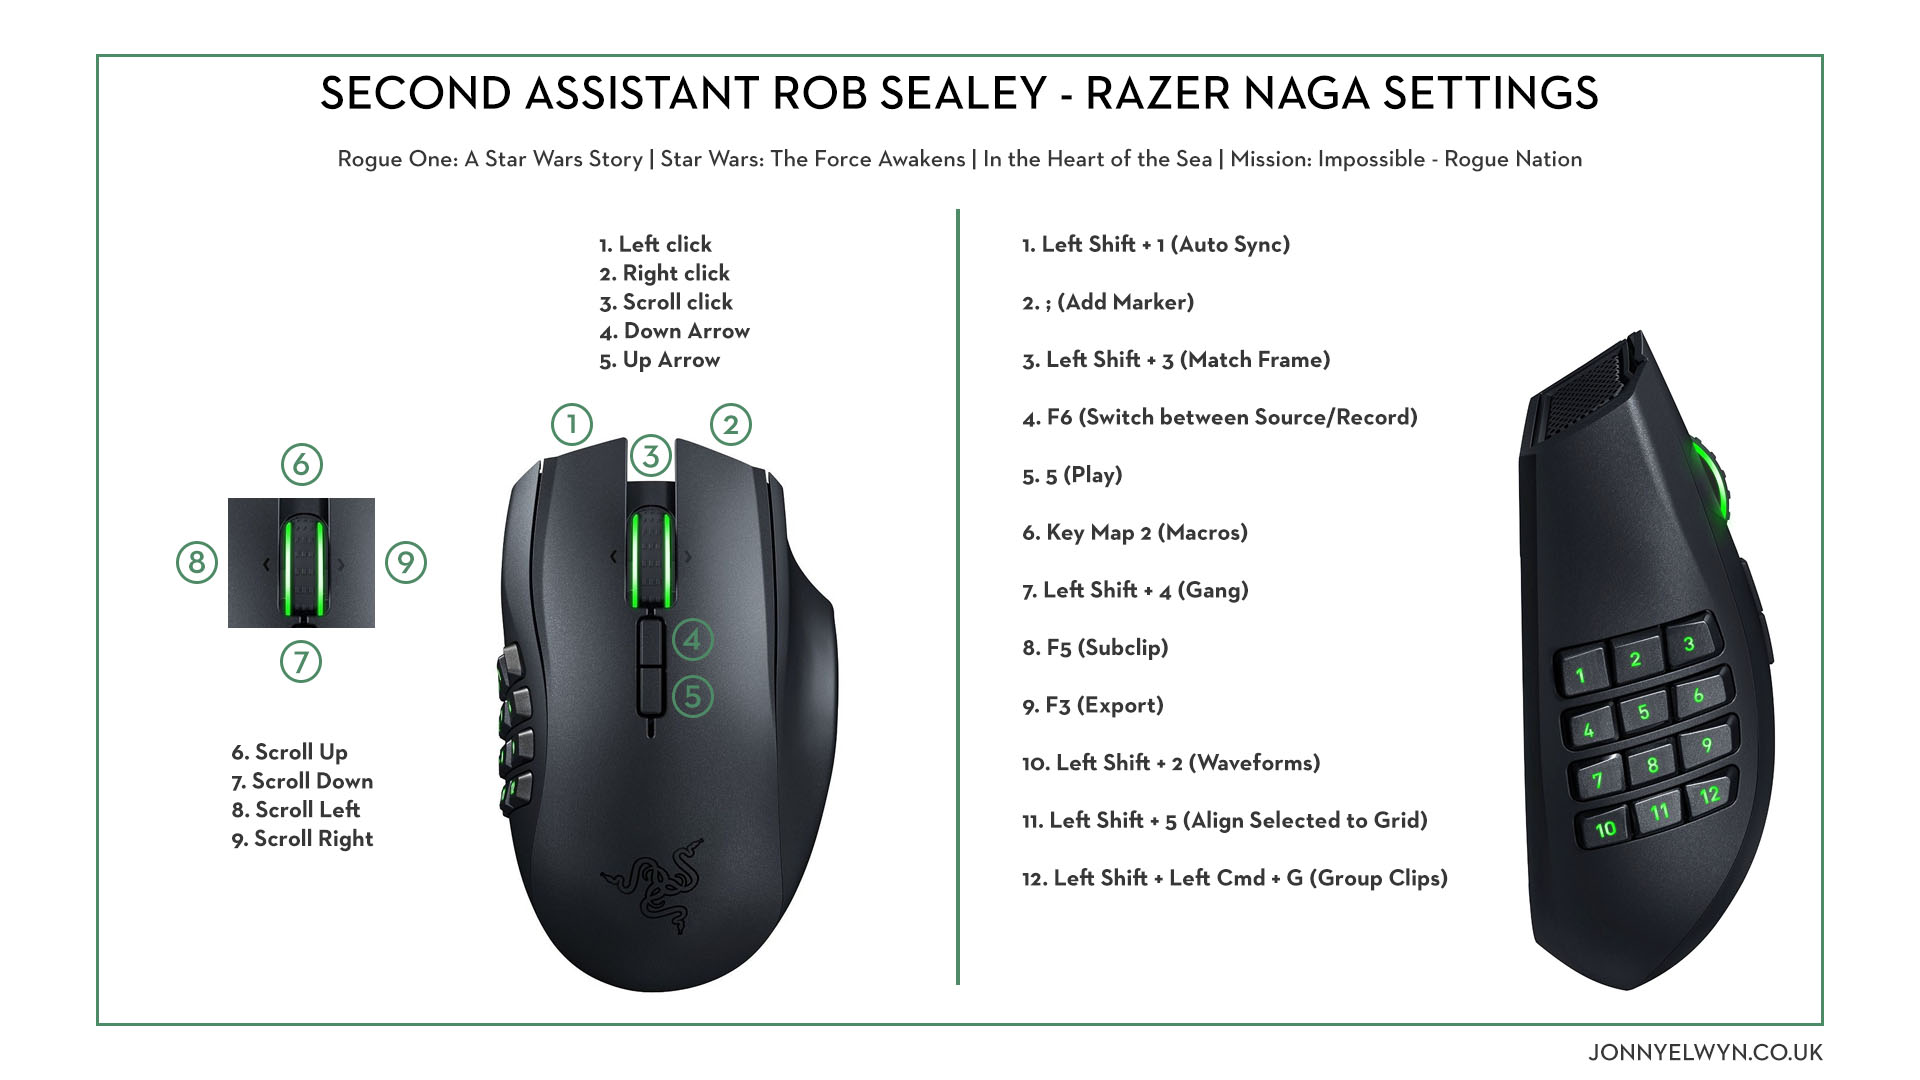
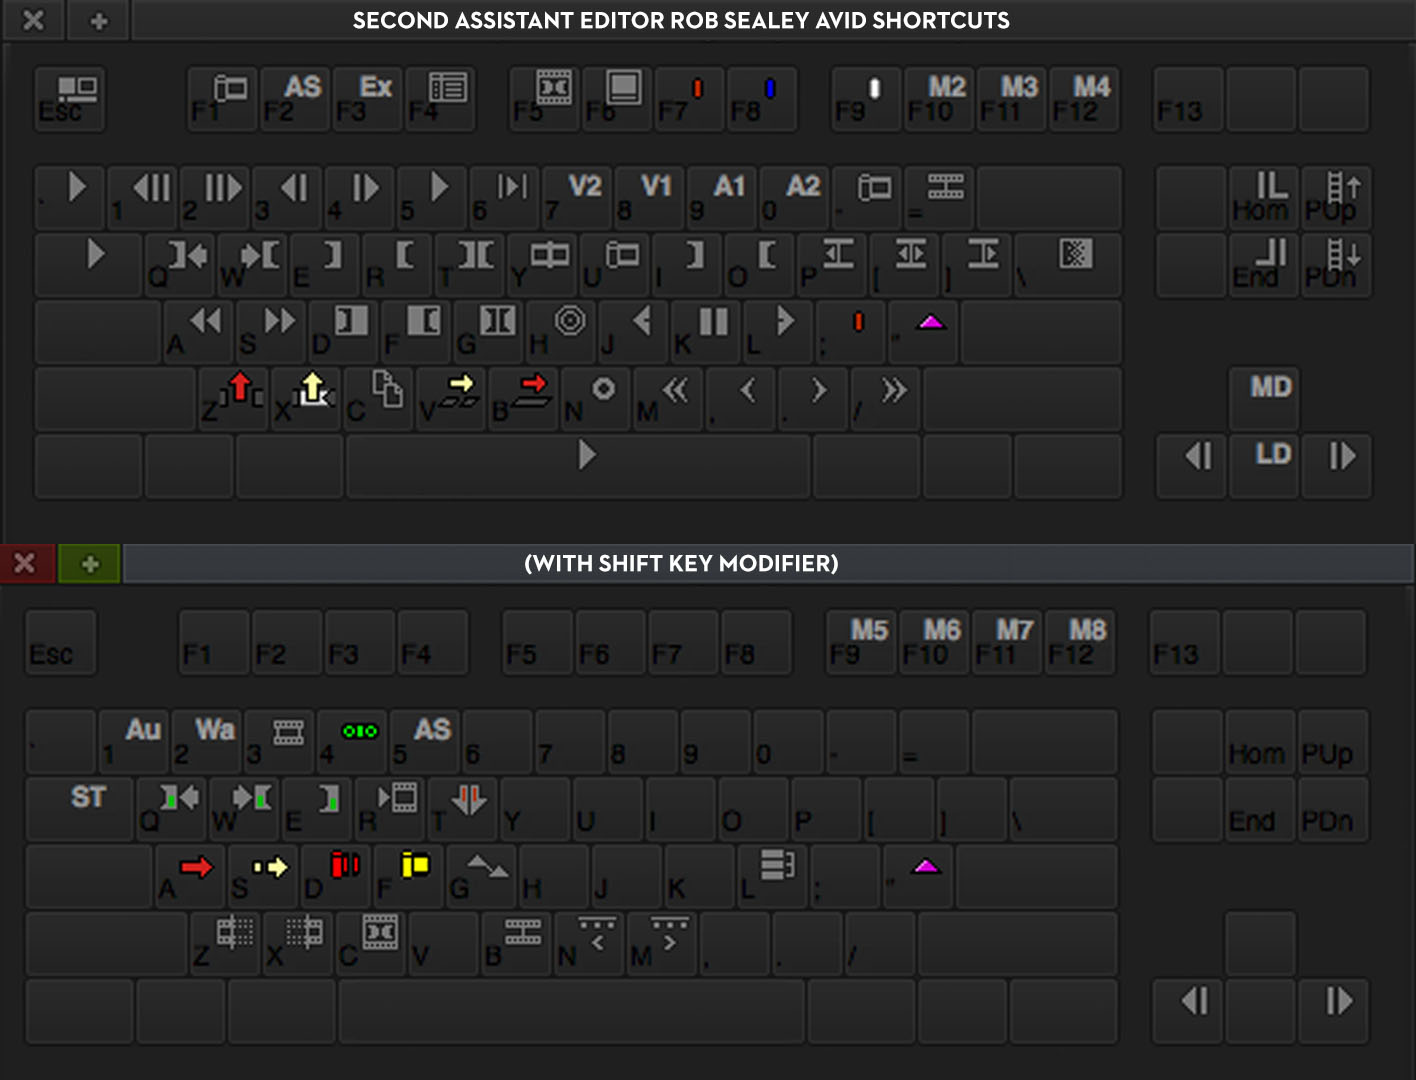
Rob was kind enough to send me not only his Razer Naga mapping but also this screen grab of his Avid Media Composer shortcuts as well. You can also download Rob’s settings for his Avid shortcuts and Razer Synapse file as zip file here too!
I’ve previously interviewed Rob a couple of times and both post are well worth checking out if you want to get started in the film industry as a Second Assistant Editor.
How to become a 2nd Assitant Film Editor | How To Be A Second Assistant Film Editor
More Insights from Top Hollywood Editors

If you want to get more profiles from top Hollywood editors, check out Alan Edward Bell’s (The Hunger Games Series, The Amazing Spiderman, 500 Days of Summer) Logitech G13 programmable keyboard mapping in this previous post on video editing with this keyboard.
The G13 is also featured in this round up of affordable colour grading control surfaces.


Thanks for the write up on this mouse. I decided to purchase one and am just starting to try it out.
Is there a way to get the Avid keyboard shortcuts on the shift level to work with the Naga mouse? ie, if I have the side buttons mapped to video tracks 1,2,3,4,etc and have audio tracks mapped to shift + 1,2,3,4,etc – currently the Naga will only recognize the main level command. It’d be a nice option to have since it would double the shortcuts available just by hold shift.
I like having the scroll wheel set to ‘more detail’ and ‘less detail’ but it’d also be nice to have a shift command to allow scrolling up and down in a bin or on the timeline.
Just wondering if there’s a setup or setting that I may not have come across, yet.
Thanks!
Adam
Is the chroma Mac compatible or just PC?
Mac and PC
I realise this is slightly off topic as the article is about the Razer Naga specifically. But, I just wanted to give a shout out to the Logitech G600 as an alternative to the Naga.
I’ve not actually come across the problem of not being able to install software on locked edit suites. Although I still carry round everything I need on a USB stick as there’s rarely internet access.
But, if you’re concerned about not being able to install drivers or just don’t want to when you’re on short gigs, the G600 is worth a look.
It has an onboard memory which you can save 3 banks of keystrokes to and run without installing software. I think it adds up to about 96 programmable buttons if you include the shift key combos. I just load up my MC settings and I’m running. Only thing you don’t have access to is macros, which you need the Logitech Gaming Software installed for.
Thanks Peter for taking the time to comment.
The ability to save your settings into the internal memory of the mouse sounds like a real plus. This is true of the logitech G13 too.
If you’re reading this, you can check out the G600 here on Amazon.com Logitech G600 where it is about half the price of the Razer Naga Chroma.