Editing Feature Films in Premiere Pro
In this post I’ve brought together a few resources that take a deeper dive into editing feature films in Adobe Premiere Pro.
If you’re spending your days editing in Adobe Premiere Pro then it’s always nice to read about other editors doing the same.
In this post you can learn about:
- September 2017 Premiere Update
- Cutting a RED RAW 6K Feature Film
- Editing A Ghost Story in Premiere Pro
- Change Lists, Workflow Tips and more

I’ve previously put together some epically long posts on some big films cut in Premiere including this post on The Making of Gone Girl and this post on the Premiere workflow for Deadpool and the Coen Brother’s Hail, Caesar!
If you’re looking for some further reading on feature film workflows in Avid Media Composer, FCPX and Premiere Pro check out this previous post too.
Adobe Premiere Pro September 2017 Update
As I was putting this post together IBC 2017 rolled around and Adobe announced new features coming soon to Premiere Pro. Several of these are actually incredibly helpful for feature film editors specifically.
We talk about the addition of shared projects, which act sort of like bins in Avid. These allow for different subprojects to all be stored inside of a master project. So let’s say you are an editor working on a film, and there are other editors working on different scenes, you can all have each other’s subprojects (think shared bins) with different permissions set for who can read/write vs. who can just read and refresh changes. – Josh, Retooled.net
In this 20 minute video demo from Josh from ReTooled.net, you can see many of the new editorial features in action. What’s great about Josh’s insights is that he not only demonstrates how the features should work, but the bugs, niggles and work arounds too.
Josh covers useful updates to the essential graphics panel before discussing the new ability to open multiple projects and project sharing at the 8 minute mark.
Some of the other really useful new features include more marker colours, close gaps and font previews. Scott Simmons from Pro Video Coalition has a great run down of some of these new features in this nice write up.
Scott also covers some of the new features coming to Adobe After Effects, Character Animator and Audition.
You can watch a dozen or so short videos on each of the new features coming soon on the Adobe Creative Cloud YouTube channel.
The Team Projects functionality is coming out of beta for collaborative workflows. It will also come with an additional price tag, on top of your Creative Cloud subscription.
This could be a ‘game changer’ for Adobe’s place in the multi-editor workflow of large feature films and TV shows, which Avid Media Composer has historically dominated.
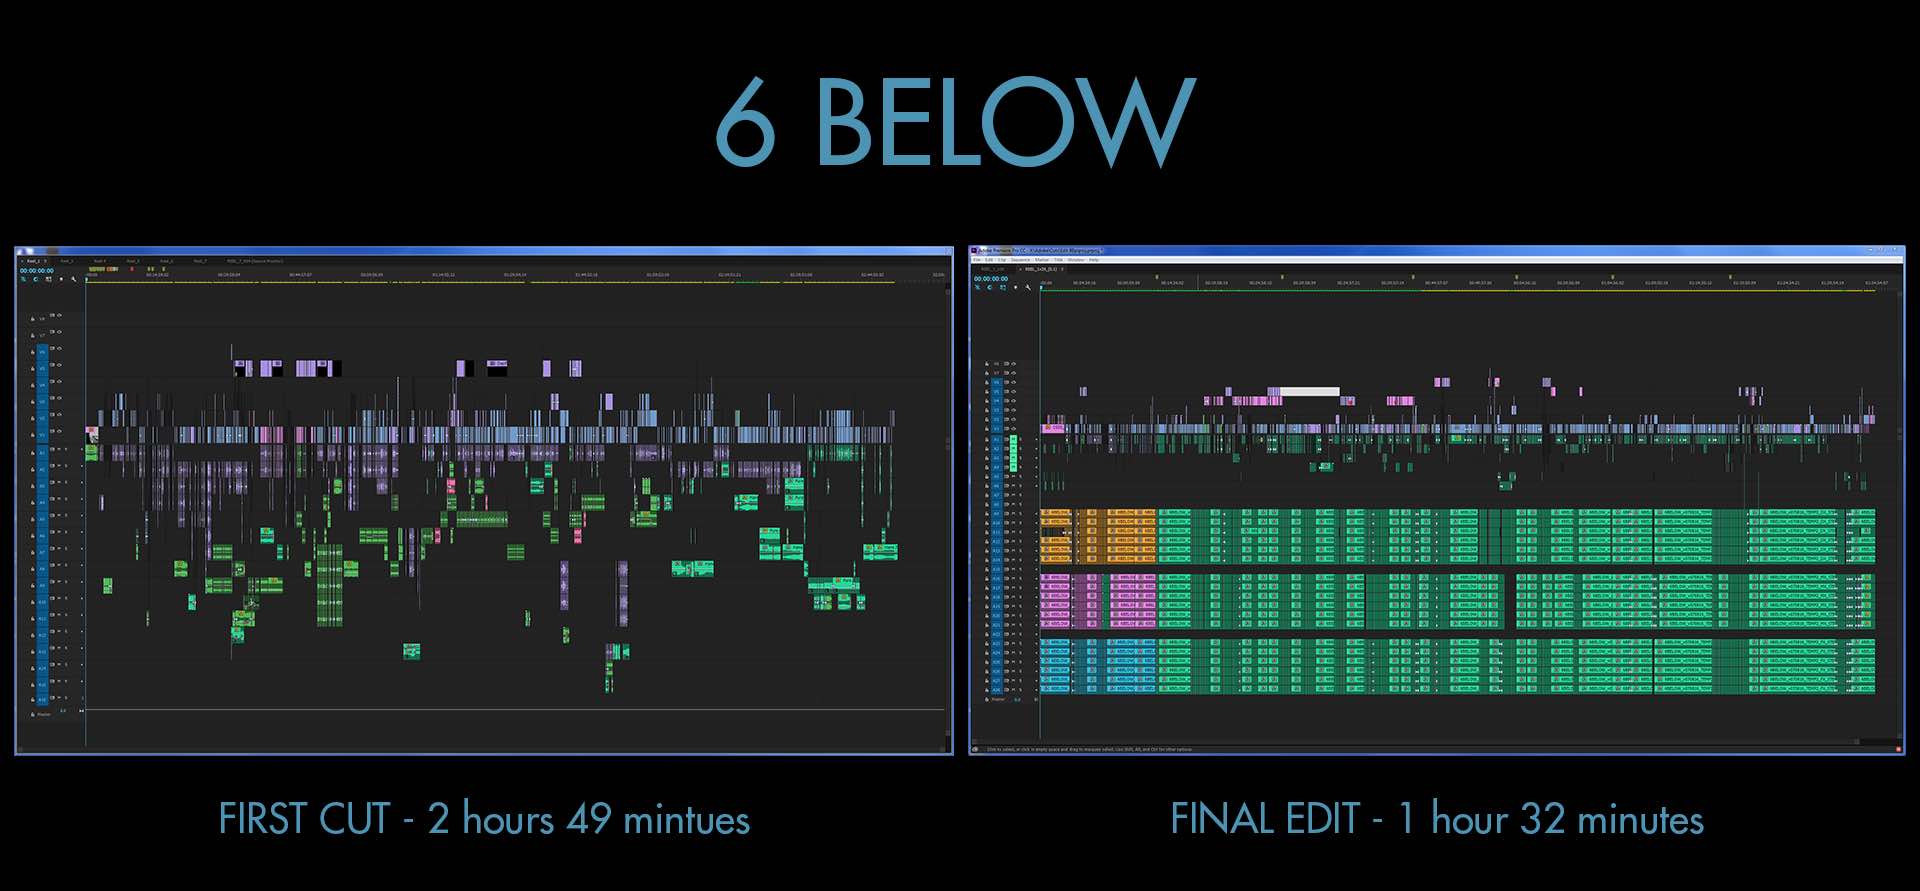
Editing a 6K Red Feature Film in Premiere Pro
Vashi Nedomansky is a talented editor and workflow consultant and also an all-round great guy (just watch his interviews, you’ll see what I mean!).
In this jam packed 35 minute presentation from the Adobe booth during NAB 2017, you can learn how he edited 6 Below the first ever natively cut 6K feature film and the first ever Barco feature film.
- 20 week editorial and VFX schedule
- 100 hours of 6K RED RAW footage cut natively – no offline!
- 205 6K VFX shots created in Premiere Pro & After Effects
- 4K DCP created in Premiere Pro with Wraptor Pro
The presentation is wall-to-wall wisdom on cutting a feature, from high tech systems to low-tech pen and paper systems. It’s an absolute must watch for anyone cutting in Premiere Pro.
To push all of those terrabytes of 6K pixels around in realtime, Vashi relied on a custom built PC featuring:
- 20 Core Dell Precision Tower 7910 x 2 with 128GB RAM* ($10,000? approx)
- NVIDIA Quadro M6000 12GB GPU ($3,400 approx)
- Dell U3415W 34″ curved monitor ($750 approx)
- Dell P2715Q 27″ 4K monitor ($380 approx)
- Sony 55″ 4K TV ($785 approx)
- 64TB RAID 5 storage over 10GB ethernet ($25,000 approx)
- 24TB RAID 5 Pegasus 6 over Thunderbolt ($3,500 approx)
A quick shopping trip on Amazon.com puts that main system at nearly $44,000!
Vashi mentions that they could only get playback with the Dell Precision Tower (compared to say a 2013 Mac Pro) and that was only at half res, but still 3K!
*In trying to work out roughly how much the system might cost I could’t find the “20 core monster” online except for this listing on ebay for about $12,000. The Amazon listing is for a 2 x 6 core rack mounted version. So in my ball-park figures I’ve just guesstimated at $10,000.
I listed a Luma Forge Jellyfish Tower for the 64TB RAID with 10GB ethernet.
UPDATE – Inside the 6 Below workflow and Edit Suite Build
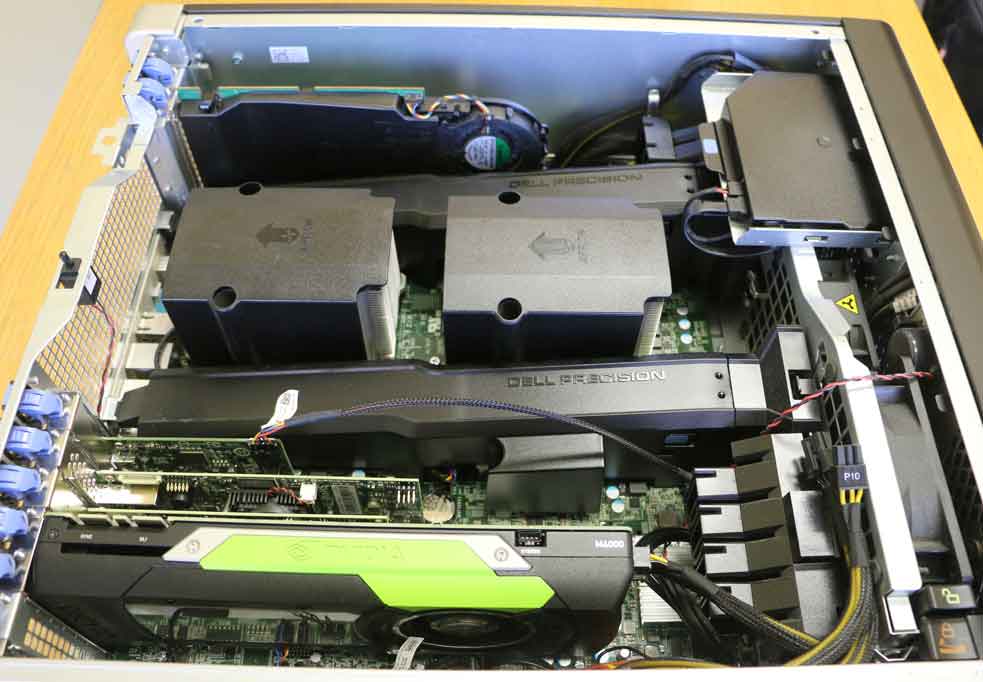
Image from Tech with Mike First
Vashi pointed me to two great posts from post production supervisor and workflow consultant Mike McCarthy, who not only built the powerhouse edit suites the team used, but masterminded much of the intricacies of the 6K native RED workflow too.
In the first post Mike shares the details of his 6K editing system, some of which I got wrong in my guesstimate above.
What’s great about Mike’s considerations behind the build is that he is both performance and budget conscious. So some of these tools are actually a good deal, all things considered.
Mike used two 32TB PROAVIO EB800MS V2 SAS arrays to handle the RAW footage storage, along with the Pegasus 8TB Raids to shuttle 8TB of DPX files to Technicolor for grading.
The 10GbE cards were the main way of sharing data, but without an expensive 10GbE switch, we had to use them as direct connect links. Each link had it’s own subnet, with a triangle of cables connecting our two edit stations to our VFX station. With some careful IP based drive mapping everything was running at top speed. We routinely get 800MB/s copying between systems, and occasionally over 1GB/s.
He also discusses the TVs and computer monitors he purchased, highly recommending the 34″ Ultrawide displays.
In the second article Mike covers more of the specifics of the workflow itself.
While the finished output for Escape is 6144×858, because we also have deliveries for 4K theatrical and UHD, we edited and colored the 6K-WS sized 6144×2592 files in their entirety. All VFX and other work was done at full 6K as well.
From that media, we created three separate extractions at 6144×858, 4096×1484, and 3840×2160. Escape uses all of the available width, and UHD uses most of the available frame height, so each version had to be framed and titled in separate passes.
He also includes some nice details about working to the unique requirements of the Barco Escape format.
Since the screens are angled towards each other [this] leads to reflections and glare washing out the darker portions of the image.
So we had to go into a full Escape theater to view in that environment, and selectively darkened the outer parts of the frame on a shot by shot basis as needed, to maintain the contrast of the center image.
Collaborative Feature Film Workflows in Premiere
As a quick aside, Independent filmmaker Valentina Vee, and Raibar Chenar from Lumaforge, have recently released this short but excellent demo, on how to work collaboratively with shared projects on a Lumaforge Jellyfish.
If you want to get started with Shared Project workflows in Premiere for the first time, watch this!

Now, back to the 6 Below workflow.
It’s also well worth jumping over to this blog post on Vashi’s blog dedicated to the 6 Below edit and workflow process. There’s a ton of interesting behind the scenes images and insights to hoover up including:
- 6K shot breakdowns
- Screengrabs of Vashi’s Premiere organisational structure
- Details of the edit suite build
- Progressive Timeline screenshots during the edit
Inside 6 Below on VashiVisuals.com
UPDATE – More Details on Editing 6 Below
Vashi has put together another detailed write up on his experience of editing 6 Below in Premiere Pro, which is worth checking out for a few further workflow details and insider snippets.
Adobe also put together a nice little behind the scenes video on the workflow too (above).

One of the tips I found the most interesting was Vashi’s re-mapping of the keyboard shortcuts to allow him to pull selects between pancake timelines in 5 keystrokes.
5 keystrokes arranged in a row on my keyboard “ I O P [ ] ” to non-destructively move my range of footage from one sequence to the other. No dragging full clips and trimming later after the fact. Just the exact chunks needed at that precise moment.
I’ve also used a similar technique in my own editing, but I’ve mapped the copy, switch timelines, paste, switch back timelines into one button push on my Wacom tablet, via a macro, which saves a few extra keystrokes.
You can read all about setting that up here.
This previous post has even more time saving Premiere Pro tips too.

There is another really nice write up of the 6 Below editing process by Mark Christiansen over on the Frame.io blog, which the filmmakers also made use of during the production and post schedule.
It allowed us to answer questions or share string-outs with people on set when they’re saying:
“…We’re shooting the other side of this conversation, we don’t remember what it looked like. Can you go into the office?”
So I pulled out my iPhone, sent the direct link of just that string-out and I said “Well, you can look at it on your iPhone, or your iPad.”
There’s some further details and stories in the rest of the post, as well as pictures I’ve not seen elsewhere, making it well worth a read!
The director and #VFX supervisor of #6Below working on #6K effects as we push to lock picture. #filmmaking pic.twitter.com/UZV9GGgIXK
— Vashi Nedomansky, ACE (@vashikoo) July 24, 2016
Vashi also shared a couple of behind the scenes images on his Twitter feed.
Picture is LOCKED on #6BELOW
20 weeks of editorial to finish the filmhttps://t.co/B87F2OYPNy#6K #filmmaking pic.twitter.com/WHDPqIlBAw— Vashi Nedomansky, ACE (@vashikoo) August 8, 2016
In case you’re wondering the midi keyboard was for recording temp drones and ambiences and the peanut butter is Jif Creamy.
What does a film editor do?
I just finished my 10th feature film
Here's what I've learned:https://t.co/jWwGFgbBA3 pic.twitter.com/PXYFKITpun— Vashi Nedomansky, ACE (@vashikoo) August 5, 2016
Vashi also has some solid gold advice to share on how to be a successful editor.
In this episode of Adobe’s new Make It interview show, Vashi and Jason Levine discuss how to break into the film industry and numerous valuable lessons and highlights from Vashi’s career so far.
Editing A Ghost Story In Premiere Pro
Filmmaker David Lowery shares how he used Adobe Creative Cloud apps to edit and composite A Ghost Story in Premiere Pro and After Effects.
A Ghost Story has some interesting editorial problems to solve, such as for example that whenever the Ghost character is on screen it’s a composite shot:
To overcome the naturally absurd depiction of a man wearing a bed sheet over his head Lowery shot the two main characters at different frame rates.
The living person was filmed at a normal rate, and the ghost was filmed in slow motion — 33 frames per second. Lowery then did basic compositing of the two takes of the same scene so the ghost had an other-worldly manner.
Nearly every shot that features the ghost is a split screen, in which at least two images are simultaneously displayed.
That quote is from this great article on the Adobe blog which has some other nice details in it.
David has 34 credits as an editor and 23 credits as a director on his IMDB profile, although he is most known for Ain’t Them Bodies Saints and directing Pete’s Dragon. He loves to edit and paid his way editing for other people early on in his career.
Natalie from Mentorless.com shares some great insights on how David brought Ain’t Them Bodies Saints to the screen as his second feature film.
I like editing, I love it, that’s like the most enjoyable part of the filmmaking process for me and I realized in the process of working with other people that part of the reason I love it so much is because it’s so solitary and you get really to kind of explore things on your own.
In this short interview clip David chats about making it into the Sundance Film Festival and using Adobe’s software to make his film.
He mentions that some of the split screen composites were so simple to do in Premiere that they stayed that way into the final cut. Other more complicated composites were finessed in After Effects.
If you want to take a deeper dive into David’s filmmaking process then this post-screening Q+A will give you 45 minutes to enjoy!
I came across this two minute animation called My Daily Routine from David, which artfully captures the hard work and self-sustaining spirit of being an indie filmmaker!
Change Lists in Premiere Pro
I just thought I’d round out this post with a few quick links to some useful tools for any editor cutting in Premiere Pro, but particularly those cutting feature films.
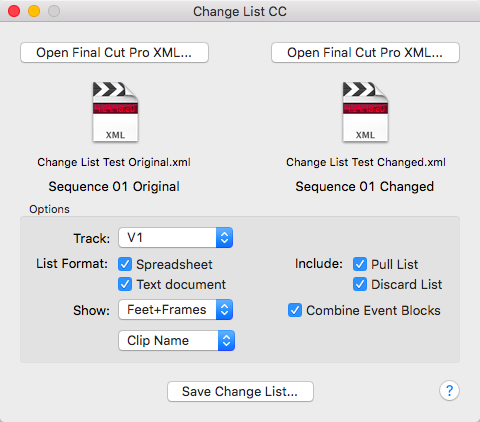
First up is Change List CC from Intelligent Assistance. This is a $199 app that was ‘battle tested’ on Gone Girl, Hail Caesar! and Deadpool (sound familiar) which allows you to compare two different sequences and produce a list of the change that need to be made to make them match.
This is how they describe what a change list is and who uses them:
What they need are the steps to convert the version they been working on, to the latest revision: how many frames trimmed here, or added there; which shots have been added, and which deleted or replaced.
The Change List is the step-by-step instructions to convert the current project to conform to the new edit. This is frequently a manual process but there are advanced tools that use the text-based change list to automate the changes.
Intelligent Assistance also make a version of the app for Final Cut Pro X.
Another app you might want to check out is Helpr from editor Bryson Michael, which you can preview in detail in the 7 minute demo video above.
It’s a Premiere Pro extension panel which allows you to customise markers and bins in an automated way inside Premiere Pro.
Bryson walks through all of it’s feature in the video above but in summary:
Markr – Easily create and modify clip and sequence markers. Save marker templates, adjust marker in/out, and use all of the supported marker colors!
Binr – Generate and save complex bin structures with one click.
Helpr costs $25 from brysonmichael.com/helpr
That would be critical…
— Vashi Nedomansky, ACE (@vashikoo) April 22, 2017
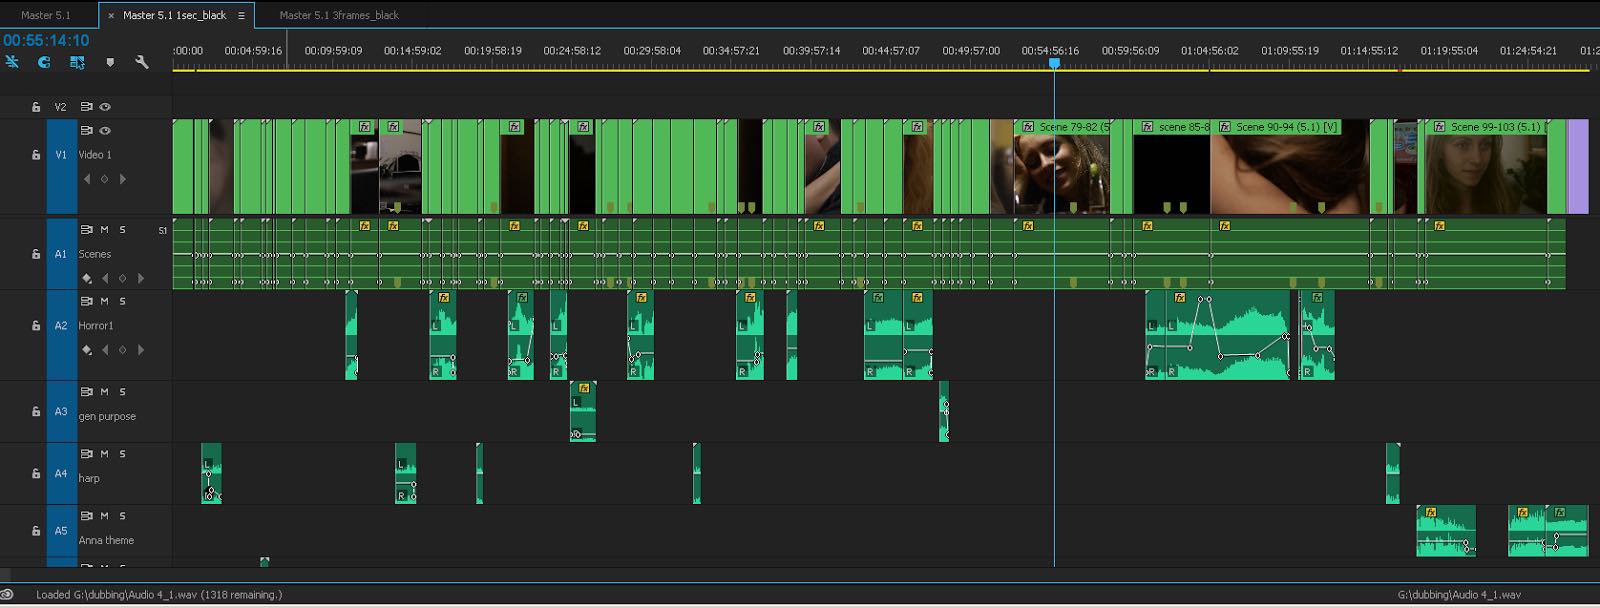
If you want some further feature film workflow tips, this time from the indie feature Anna Unbound, then head to the detailed behind the scenes blog post here.
There are some interesting details on everything from copying the cards through to editing the film entirely in nested sequences per scene.
The main timeline (again in 5.1) now contains every scene as a solid block. This has the huge advantage that the scenes are protected from accidental edits. The main timeline just contains the scenes and the score which often spans more than one scene.
Jump through to the blog post to see larger screengrabs and learn more about their process, which has some clever tricks to it including creating a separate project file for each scene during the shoot and rough cut and then using the media browser functioanlity to import all of those projects, as unique bins, into one main editing project.
Lastly I thought I’d point to this fascinating read from the Film Supply blog, featuring an interview with Saturday Night Live editor Adam Epstein.
The video above demonstrates what Adam goes through each week!
Every week, the Saturday Night Live Film Unit team pulls off a not-so-small miracle. They produce, shoot, edit, and broadcast a fully realized short film in less than four days.
For their editor Adam Epstein, that leaves roughly one day for post-production. One day. Sometimes less. And you thought your deadlines were stressful.
After eight years of editing SNL shorts — and having never missed a broadcast deadline — Adam has made a seemingly impossible task part of his weekly routine.
We asked him how the heck he does it.
The interview has some useful tips on managing the stress of incredibly tight deadlines and very quick turn arounds based on last minute feedback.
We use pre-set project structures that are always exactly the same. My Finder structure never changes. None of this is groundbreaking, of course. To me, the more you can do to prevent the nuts and bolts of editing from getting in the way of the more and creative aspects of the process the better.
The whole article is well worth a read, right to the end!
One thing that can really ruin the illusion that we spent more than a couple days on these things is the sound design. To me, that’s often really what separates projects that feel professional from projects that feel amateur.
You can watch more of Adam’s editing timelapses on his Vimeo channel here, or check out his work on his epically packed portfolio site.