Learning Media Composer – Doing Things Right From The Start
So this is my third instalment of my Avid Diary of a Switcher and thanks to the help of everyone who has commented I’m slowly learning how to do things properly in Avid Media Composer. Particular thanks go to Strypes In Post and Scott Simmons for patiently commenting and tweeting on my previous posts – which has led to straightening out a few things especially AMA.
AMA – Done Right

Ben Hershleder’s ever useful Avid Media Composer Cookbook was also very handy for spelling this out in detail. Essentially the steps are:
1. Get your project settings right for AMA. Go to Settings > AMA and chose who MC will work with AMA files. How it will create a new bin and what quality it will link to.
2. File > Link to AMA Volume. If you have a folder of QT files from a DSLR or some such this will link to your original media and they’ll rapidly appear in the bin. The responsiveness of these clips will depend quite a bit on the speed of your drive. H.264 files from a firewire drive wouldn’t play correctly.
3. If the codec of your original files will play nice with MC it will consolidate your files (re-wrap them into MXF and put them in the Avid Media Folder), if it doesn’t like the codec it will transcode them at the same time. So if I had Pro Res files it would re-wrap them because Pro Res is now native in 6.5. With H.264’s it will transcode.
To get Media Composer to consolidate/transcode your AMA linked files do the following. Select the clips in the bin you wish to work with. Then from the Clip menu choose:
Clip > Consolidate/Transcode… Then work through the settings and hit consolidate or transcode depending on which way you’re going. Then comes another pop up window in which you want to select the second option. This means that Avid will make your new media files and re-link to the new media for you and that way you’ll be working with your MXF files from then on.
Avid will then churn away doing your bidding. Here you can see the MXF 120 files I created and the original H.264. The MXF file has .new after it as well as a ‘normal’ clip icon. The AMA linked clip has the AMA chain icon. The paths are also different.
It all seems incredibly straight forward now but at the beginning I had no idea what I was doing. Thanks to all who answered my questions! For a video tutorial on this see below.
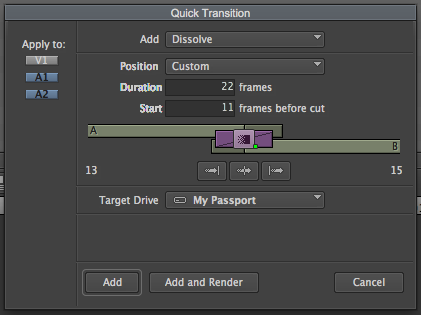
Timeline Transitions

Here are some further comments on this from Scott Simmons.
Batch Importing
This is a great tutorial from Michael Hancock covering lots of different scenarios in which you might need to batch import. Michael walks through how to batch import a new version of a file or logo etc and get Avid to update it in all iterations globally. Very handy.
Tricks for Trimming
Paul Del Vecchio has a brilliant 10 minute tutorial that is packed full of tricks for better timeline trimming. This tutorial also helped me map a few more keyboard shortcuts like trimming top and tail.
Twitter Tips for Avid Editors
Here are some great twitter sourced tips for Avid editors.
@avid #tip When video tracks mapped to KB, press ALT(OPT)+key, to change VIDEO MONITOR to that track #avid #postchat twitter.com/editorbelga/st…
— Wim Van den Broeck (@editorbelga) February 13, 2013
#Avid tip: If you use the SELECT tool to select a bunch of clips, and then double-click an effect, it adds it to all the clips.
— Shane Ross (@comebackshane) March 1, 2013
– Check out the replies to that tweet. Lots of extra tips.
@avid @_robdamico_ a handy tip is if you create a stereo mixdown & want to split it to separate tracks right click and split tracks to mono
— Panoptik (@PanoptikTV) March 22, 2013
– Check out the fantastic post from Rob D’Amico on working with the audio track panel.
Click through to the next post in the series – Part 4 – The Media Composer 7 Version.


It’s just that Avid is currently very much like FCP7. They’re both very competent (and similar) editing GUIs with mature feature sets, both hampered by an ancient engine. Sadly, it appears like neither one of them will be rebuilt for the future.
But knowledge is never a bad thing.
And I mean beyond just cutting RAW in an NLE or working with DPX files or polishing up fancy roto work in an NLE. Editing is about storytelling, and Avid has a well developed environment for that.
Of course, the salient question is, if FCP7 was the choice before, and Avid’s AMA feature doesn’t work, WHY switch to Avid?
A good question. I guess although I am ‘switching’ from what I know (FCP7) to what I don’t (Avid) – I am actually just trying to learn Avid (and eventually FCPX, Lightworks and Premiere) because I figure that its time (now more than ever) to get to grips with as many editing platforms as possible. I’d rather by the editor who edits than the one that can’t use X.
Avid has pretty good media management, and it is a very nice environment for editing. It also has very well developed trim tools. As much as I like real time native playback of everything including BMDCC RAW, real time playback is just one factor in considering the suitability of an NLE.