DaVinci Resolve 12.5 Training
DaVinci Resolve 12.5 is now out of beta (so go download it) and packed with hundreds of new features, improvements and updates. In this hour long demo recorded at LACPUG from Paul Saccone from Blackmagic Design, you can get a great introduction to using Resolve 12.5 for the first time.
If you want an even more in-depth guide to every new feature in DaVinci Resolve check out Alexis Van Hurkman’s superb 12.5 New Features Ripple Training course, reviewed further on in this post.
Alex from LearnColorGrading.com walks through one of the topics that can stump newer users to Resolve which is – how to save and move your project and working with Disk Databases.
Colorist Denver Riddle demonstrates how to create a popular ‘film look’ in this fast paced 1 minute tutorial, which is really a trailer for his up-coming webinar and giveaway. If you want to learn more from Denver you should check out these previous posts.
You should also check out a new post full of post production promo codes to get a 20% discount code for his recently updated FCPX grading plugin Color Finale.
In this 4 minute tip from Theo from Meisner Media, you can get a quick tour of using Smart Bins in Resolve 12.5. This allows you to rapidly organise your project based on creating bins through bespoke metadata rules.
Tristan Kneschke shares a detailed and very useful step-by-step guide to working with offline reference movies in Resolve over on Premiumbeat.com.
Using an offline reference movie will allow you to compare the offline edit to your grade and ensure everything has conformed correctly, as well as compare shot framing, effects and more. It’s a great guide to anyone look to do this for the first time.
Viewing the reference is useful at the end of the session for matching shot repositions and blowups. When working with oversized RED footage being mastered to HD resolution, it is standard operating procedure for the colorist to match the editor’s re-positionings.
Indiecolorgrading.com also has a useful round up of some of the most common keyboard shortcuts, which will help you get grading faster if you’re new to working in Resolve.
Training on Every New Feature in Resolve’s 12.5 Update
Colorist, Filmmaker and Author Alexis Van Hurkman‘s latest Ripple Training title – DaVinci Resolve 12.5 New Features, provides critical viewing for any professional colorist working in Resolve and an extremely valuable resource for any one looking to make the most of the 250+ new features in the 12.5 release.
In 4 and a half hours Alexis delivers a ‘lecture-based’ tour of every one of the new features in DaVinci Resolve 12.5 and how to make the most of them when either editing or colour grading. This means there isn’t any project media to download and follow along with, but you don’t need it anyway.
The best way to approach this course would be to download it and watch it across a week of lunch breaks (if you get those) and make a note of the updates and improvements that can help you the most, and then try and incorporate them into the rest of your day. That will help turn “I’ve always done it this way…” into “aha they’ve fixed that!” or “I didn’t even know you could do that…”
For instance, Alexis’ guide to something as simple as the improved Auto-save function is a small but pertinent example of why this course is so worth while.
A lot of current Resolve users turn Auto-save off because previous versions of Resolve tended to save pretty slowly and auto-save could easily interrupt whatever you happened to be doing. In this version of Resolve saving has been sped up – a bit – if you use Disk Databases and quite a bit, if you’re using an SQL database. You may actually want to consider turning auto-save back on.
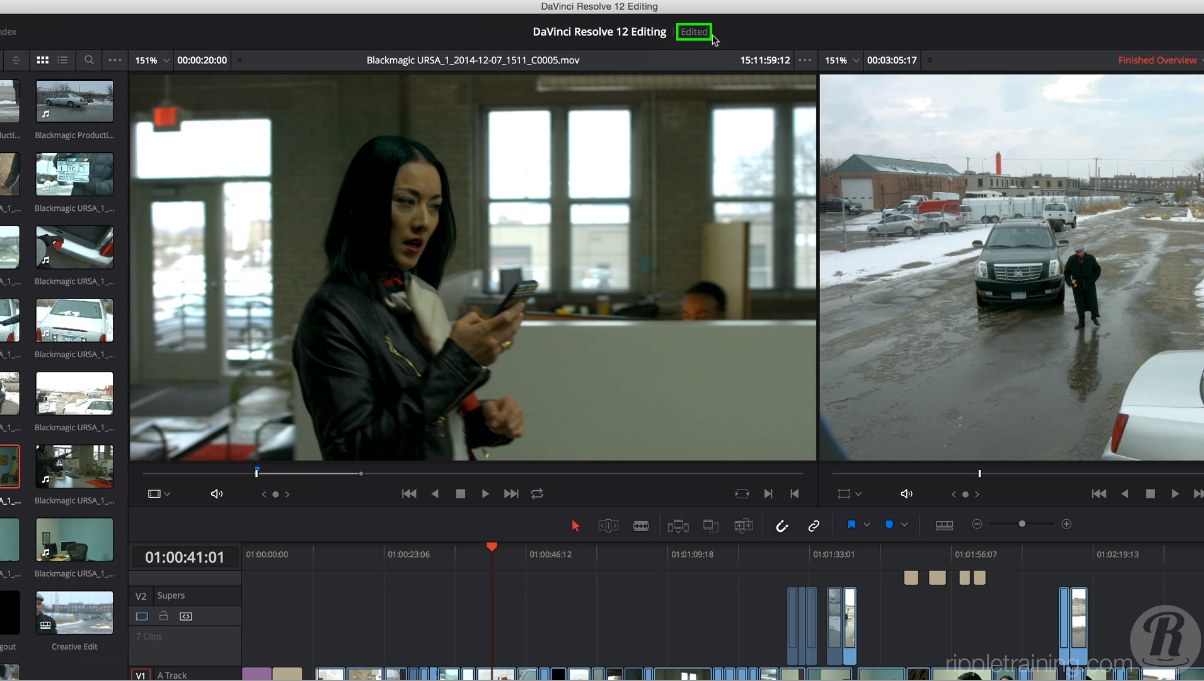
Whether you turn it on, or leave it off, there’s a slight change to the saving UI. At the top of the Resolve screen we see the name of the project and just to the right is this little word ‘Edited’. This is letting me know that I’ve made a change that I have not yet saved… if I don’t change anything for 15 minute this is going to turn yellow, and if I continue to wilfully not save for another half hour, then this is going to turn red.
Fairly, yelling at me “Please, god, I’m begging you save your project!
I’m not sure how else you would have learned about this or what was going on without a guided tour like this one. This is of course just one little example out of TONS of others. A personal favourite includes the new % driven metadata that can be used in numerous UI fields.
Alexis is fantastic instructor and it’s reassuring to be learning from someone who has not only been using the software for decades as a professional colorist, but also has the inside track with Blackmagic Design, as he is the author of the exemplary and ever expanding User Manual. All this adds up to a deep knowledge and keen ability to navigate the changes and understand how to best use them.
The course itself is nicely broken up into bite size chunks with each lesson running at somewhere between 5 and 10 minutes. Each lessons is pretty much a discreet unit and so you can either watch through it systematically or jump the parts that interest you most.
As you’ve come to expect from Ripple the audio recording and picture quality are impeccable. The on-screen highlights and ‘call-outs’ make it extra clear what’s being talked about.
You can download the course or stream it online in their Ripple Training web player, which is actually a great way to engage with the content because you have access to the chapters and sub-headings for even more refined content navigation.
You can also stream this on your mobile, but it might hammer your data bandwidth. For a full list of what the course covers hit the Outline tab, here.
If you’re a professional or frequent user of Resolve you’d be crazy not to the time in watching through Alexis lecture and making notes of the features that will benefit your workflow the most, especially given how huge the update is. In fact you’ll almost certainly benefit from repeat viewings as you commit more and more features to memory.
With so many new features, even if you carefully read through the entire feature list you wouldn’t fully understand what they are or how to use them. More importantly you’re only going to be looking for things you think you need rather than features that you’ve never thought of but that will make your life much easier. In watching this course you’re guaranteed to learn valuable new insights about Resolve 12.5.
Buy DaVinci Resolve 12.5 New Features on Ripple Training.com ($79)
80 Free DaVinci Resolve 12 Tutorials and more!
London based Goat’s Eye View (I don’t know what it’s called that) has a brilliant YouTube channel with over 80 free DaVinci Resolve 12 and 12.5 tutorials. If you’re a Window’s user tired of seeing every tutorial running on a Mac then this series will make you happy, although there’s little difference between them! Anyway the tutorials are well created and nice and short. Well worth a look!
Colorist Casey Faris reviews the new $350 Tangent Ripple, in this 4 minute run down of his experience working with it. Casey provides a balanced and detailed review concluding that the Ripple is:
“a solid unit that looks professional and has great controls with a few little quirks… for the price I’d give it 4/5 stars. If you’re looking for something to help you with an occasional colour grading project this is probably a good buy…”
Check out this round up of Affordable Colour Grading Surfaces for more details on the Tangent Ripple, and other affordable options.
You can download a short PDF user guide from Tangent to help you get up and running with the Ripple and Resolve here.
Whilst on the subject of control surfaces this thread on the Lift Gamma Gain forum has some useful tips for anyone using a professional (and BMD supported) control surface and Resolve 12.5
The right most of the three unlabelled keys below the left / first / shadow trackball toggles the fourth trackball in and out of offset adjust mode. AND the three keys above the fourth trackball function as resets, as per the ones above the other trackballs when used in conjunction with shift down.
There isn't, the main new thing is more knobs for custom curve contrast adjustments (0, 20, 40, 60, 80, 100% LUM).
— Alexis Van Hurkman (@hurkman) May 22, 2016
In Ripple Training‘s on-going free tutorial series Resolve in a Rush, you can pick up some great tips and techniques for improving your colour grading and speeding up your workflow. These tutorials are the latest in the series, but you can check out all of them in this Youtube playlist or this previous post on Resolve 12.5 Tutorials.
The whole series has been created by Alexis Van Hurkman, which gives you a good taster of what his paid Ripple Training is like.
DaVinci Resolve Twitter Tips
DaVinci #Resolve12.5 tip of the day:
Shift Up/Dn + Play Still to apply grade/display node graph for current still in gallery/timeline— Rohit Gupta (@rohit_bmd) May 27, 2016
To round out this DaVinci Resolve 12.5 training post here are a handful of useful tips from colorists who Tweet. As always click on the date stamp of each Tweet to open up the full conversation.
#Resolve 12.5 Tip (1/2) — Cmd-Opt-Up/Down Arrow moves Video destination control up & down 1 track at a time relative its previous position.
— Alexis Van Hurkman (@hurkman) May 18, 2016
If you have a clip with an embedded Alpha channel, just import it and edit it into a superimposed track, the alpha should just work.
— Alexis Van Hurkman (@hurkman) May 18, 2016
#Resolve 12.5 Tip (2/2) — Cmd-Shift-Up/Down Arrow moves Audio destination control up & down 1 track at a time.
— Alexis Van Hurkman (@hurkman) May 18, 2016
@hurkman What's the difference between the slider in primaries and the ring on the BMD panel. Surprised, they're different. @noahtt
— Jamie Dickinson (@dickij10) June 29, 2016
https://t.co/UNg4t3PKRK – the GTX 1070 with 8GB VRAM might be a great low cost option for DaVinci Resolve #resolve12.5
— Rohit Gupta (@rohit_bmd) May 19, 2016


