Audio Post Plugins for Film Editors
When it comes to improving the sound of the audio in your edits, there are some really useful audio plugins out there that can work wonders in just a few clicks.
In this post I’ll be taking a look at some of these audio plugins, sharing some tutorials on audio tips and techniques that you should really know how to execute and other resources for improving your abilities to master sound effectively as a film editor.
This post will cover:
- Editors recommend audio plugins
- iZotope RX7 Advanced Review
- Accusonus ERA 5 Review
- Free audio clean up presets for Avid Media Composer and Adobe Premiere Pro
- Basic Sound Design Tips
- Adobe Premiere Pro Essential Sound Panel Explained
- Alex Audio Butler Tested
- DaVinci Resolve Fairlight Tutorials and Training
I recently conducted a quick Twitter poll to see what editors considered the weak spots in their knowledge or abilities and was heartened to see that most people feel the way I do!
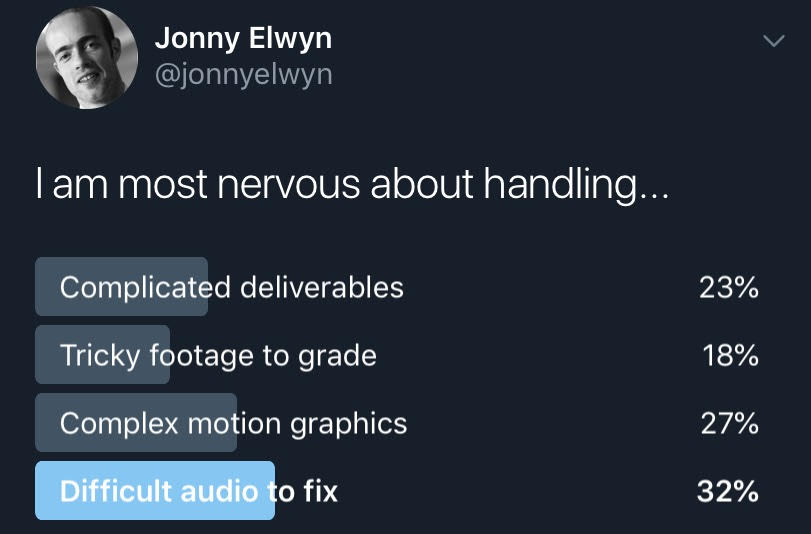
Improving my abilities with motion graphics and essential After Effects tasks was one of the reasons I started an on-going series of articles on After Effects for Film Editors – so I hope that helps out the 27% of you who also worry about it – but it was interesting to see that the biggest source of concern was how to fix difficult audio.
As a quick aside, it’s worth observing that three out of four of these tasks can be someone else’s professional role; colorist, motion graphics artist, sound editor/mixer.
It would be foolish to think that purchasing a few plugins, LUTs or templates will be able to replace someone else’s expertise. If you have the client budget to afford to hire a fellow professional to apply their talents to these areas, then obviously that’s a win for everyone!
But if you don’t then you still owe it to your clients to deliver in all these areas to the best of your abilities, and you owe it to your career to develop your abilities in as many areas as you can. Some people advocate for a T shaped skill base; breadth in multiple areas, depth in one.
Anyway, I hope I can draw together even more useful audio resources in the future!
If you’re after even more resources on the topic of sound design in film editing rummage through the entire sound design category here and then check out this previous post, Better Editing Through Sound Design, which covers:
- Film Editing Pro: Secrets of Creative Editing Review
- Three Simple Tips to Improve your Audio
- Music and Film Editing
- A Quiet Place Sound Design Case Study
- Sound Design Resources and Inspiration for Film Editors
In this post however I’ll try to keep things focused on the task at hand – audio plugins, native tools and other simple and effective ways to create better sounding edits.
As far as I’m aware the two main players in the audio plugin world are iZotope and Waves, although I’m sure the deeper you go, the more niche products you’ll find.
Popular Audio Plugins for Film and TV Post Production
A while ago now I posted this tweet and got some really helpful replies from other editors who tweet, including the hugely talented Joe Walker, Dune, Arrival, Blade Runner 2049, Sicario etc.
I’ve compiled the answers from that thread, thanks to all who contributed, into this list as a jumping off point for further investigation at your leisure.
Adobe Premiere stock plugins:
- Surround Reverb
- Studio Reverb
- Multi-band Compressor
- Lowpass
- EQ
- Loudness Radar
- Mastering
Adobe Audition: fft filter in audition is great for removing plosives and rumbling below a set frequency across the entire clip.
- iZotope RX – Lots of repeat recommendations for these, including RX Connect within Media Composer
- DMG Audio – EQuilbrium
- Waves Audio – RVox
- McDSP – de555
- Brainworx – bx_refinement
- Acon Digital -Restoration Suite
- Accusonus – Era Bundle
- LoudMax – brickwall limiter by Thomas Mundt (free)
- CrumblePop – AudioDenoise and EchoRemover
- Hornet Plugins – EBU R128 Loudness
- Fab Filter plugins
- Massey Plugins
Free Vinyl Sound Effect Plugin
Update November 2020 – iZotope have updated their powerful and free vinyl sound effect plugin, which, in exchange for your email address, you can download right here.
The plugin was first released in 2001 and now has an all new UI and ‘Lo-fi’ feature recreating that classic 80s hip-hop warmth.
iZotope RX7 Advanced Audio Plugin Review
iZotope makes a huge range of audio plugins, which I have been recommended by fellow editors more times than I can count.
iZotope group their offerings into three suites for different audio mastering disciples, largely music, audio creation and film post production.
RX Post Production Suite 4 is a $1999 bundle of 7 individual products, including RX 7 Advanced, Dialogue Match, Neutron 3 Advanced, RX Loudness Control and Insight 2 and more. This would give you a ton of metering and mastering tools along with a lot more.
Buying the bundle saves you about $1800 compared to buying each of these individually, that said, you could buy the iZotope Everything bundle for only $500 more ($2499) and own everything they make!
iZotope Dialogue Match is another plugin, in the Post Production Suite 4, which delivers audio magic.
iZotope were kind enough to supply me with a copy of RX7 Advanced, which is their ‘industry standard’ audio repair toolkit, which is what I’ll be focusing on in this quick review.
But just to give you some context there are three different editions of the RX 7 product; Elements ($129), Standard ($399) and Advanced ($1,199).
You can compare all of the features and tools you’ll get in each edition here.
It is worth pointing out that iZotope often run sales around NAB or Black Friday with their plugins on offer for very low prices, so next time you see that happen be sure to snap them up!
What is RX7?
iZotope’s RX7 is a powerful set of audio repair tools, which thanks to the power of machine learning, can help you turn terribly recorded audio into silky smooth sounds in just a few clicks.
To me this sounds like an ideal way to impress my clients with my ability to rescue their bad audio, without actually having to know too much about how to do it. I’m not an audio engineer, but I do want to get results, fast.
If you scroll down to the ‘Solving common audio problems with specific iZotope RX7 tools’ section below, you can see and hear some great examples of just what you can do with these tools.
When you install the suite you get both a standalone app and a subset of plugins that will work directly inside of your video editing software of choice.
Here’s a quick list of the main tools in RX7 Advanced, with those in italics also available as a plugin:
- De-click
- De-clip
- De-hum
- Voice De-noise
- Music Rebalance
- Breath Control
- De-bleed
- De-crackle
- De-Reverb
- De-plosive
- De-ess
- Interpolate
- Mouth De-click
- Spectral De-noise
- Spectral repair
- Dialogue Contour
- Dialogue De-reverb
- Ambience Match
- De-wind
- Deconstruct
- EQ Match
- Leveler
- Loudness
Check out this page for a more exhaustive list of every tool and feature in RX7.
How to install VST and AU Plugins in Premiere Pro, DaVinci Resolve and FCPX
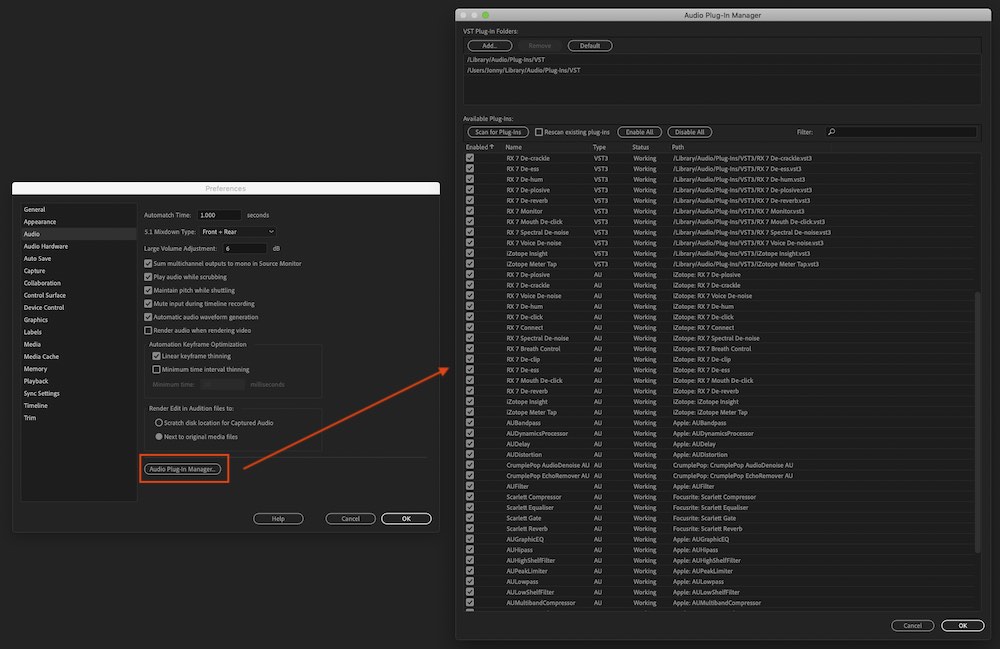
RX7 works on for both Mac and Pc as a standalone piece of software and as a set of AAX, AU, RTAS, VST and VST3 plugins which are accessible inside Adobe Premiere Pro, Final Cut Pro and DaVinci Resolve.
In Premiere Pro and DaVinci Resolve you first need to get the video editing software to add the source folder of your choice, or scan your system to make it aware of the plugins and bring them into the app.
Premiere Pro > Preferences > Audio > Audio Plugin Manager
DaVinci Resolve > Preferences > Audio Plugins (Add the VST source folder then restart Resolve)
You should then see a list of installed plugins, with a ‘Working’ status, which means they are good to go with a simple drag and drop from the Effects panel into your timeline or use in your audio mixer.
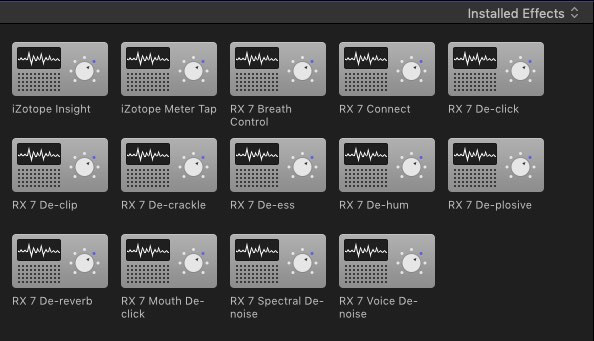
In Final Cut Pro X when you install AU (Audio Unit) plugins onto your Mac system they will also be installed in these folders, and therefore appear inside of FCPX’s Audio Effects tab.
You can always open any piece of audio from the timeline of your video editing software of choice (on a Mac) by right clicking and choosing ‘Reveal in Finder’ and then opening that piece of audio in the RX7 app. You can then save and replace that audio, or preferably as a new file that you bring back in to the project and re-sync.
Why you need this
If it isn’t already obvious, having these tools at your disposal and being able to apply them in just a few clicks, means that you stand a far better chance of being able to rescue poor audio, sweeten semi-decent recordings and deliver superior sounding mixes to your clients.
Regardless of the kind of projects you work on, at some point (and probably sooner than you think) you will need to be able to rescue some poorly recorded or damaged audio. Attempting that, without the help of a specialised tools, is going to be very difficult, if not impossible – and take a lot longer than it needs to.
A plugin suite like RX7 Advanced is a sound investment.
Repair Assistant – The Editor’s Best Friend
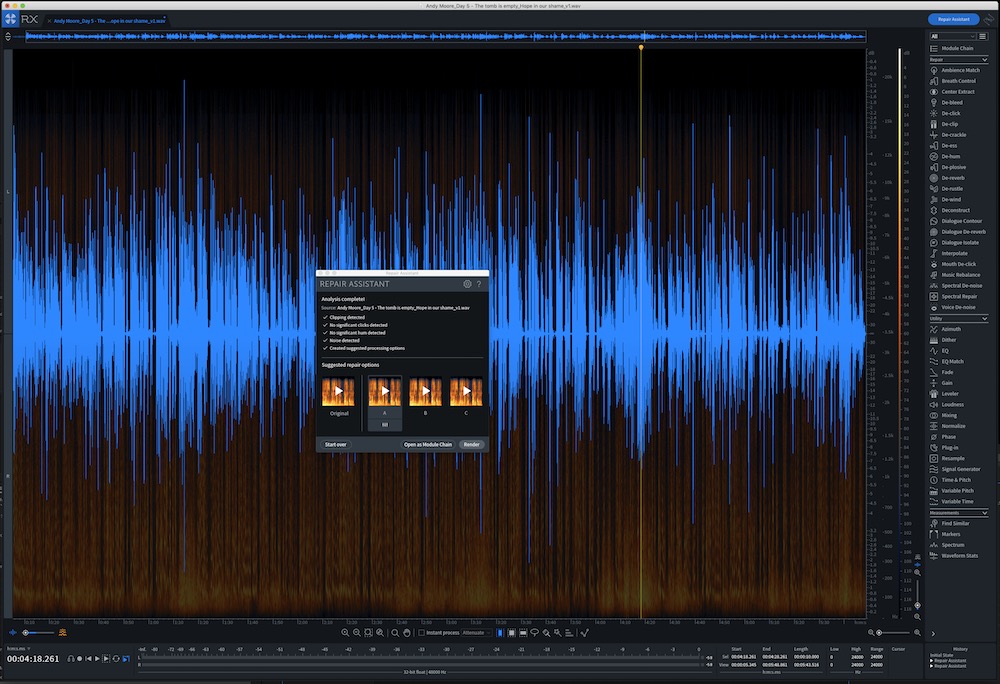
At the heart of the RX suite of tools in the standalone app is the Repair Assistant, which can do a lot of the heavy lifting for you by analysing your audio, creating three different repaired options to choose from and then allowing you to apply your preferred result in one click.
Or you can dig into the effects that were applied and tweak the parameters to your preferred settings to really finesse the repair, through clicking ‘Open as Module Chain’.
Importantly though, the Repair Assistant has already chosen and applied the modules you need to repair the audio you’re working on. This is a huge benefit to any editor who is unsure of which of the myriad of modules and effects at your disposal to use, to best repair the particular clip you’re working on.
In my own testing with a really windy dialogue clip the Repair Assistant did a great job of both identifying the audio issues and delivering fairly effective repairs of them. It’s really useful to have several different options to quickly preview and compare to the original to hear what the effective difference is.
I also tried to manually apply the ‘de-wind’ module to the same clip as well, just to play around with it, although it quickly became apparent that a) you need to know what you’re doing to get usable results and b) some audio is just too poor to rescue.
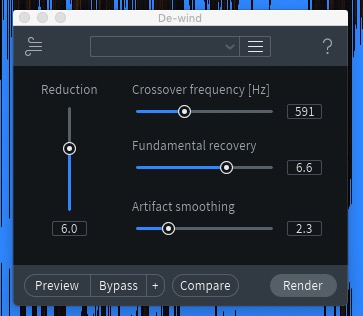
A couple of quick notes – the tool-tips that appear when you rest your mouse on a parameter are worth paying attention to, for example to understand that De-Winds ‘Fundamental Recovery’ slider will ‘Reconstruct lower speech harmonics’.
It’s also worth pointing out that if you click the little ? question mark in the top right corner of any module it will open up the help file for that tool, which includes a description of each parameter, tips, explains specific terminology and suggests alternative modules that you might want to try instead.
Final Thoughts
I’m just on the beginning of my journey with the RX7 Advanced, but it feels like a journey I really should have embarked on a long time ago.
I’m confident that the more time I invest in learning how to deliver cleaner sounding audio and better sounding mixes will pay off dividends on making each and every project look and feel far better as a result.
It’s clear that the RX suite will serve me well for years to come, both through its automated functionality – to help me wade deeper into the audio waters whilst also delivering quick results – and, in time, hopefully mastering the manual audio controls for a higher level of polish and finesse.
Check it out for yourself at iZotope.com.
Solving common audio problems with specific iZotope RX7 tools
I’ve included this collection of short tutorials on how to use the RX7 suite of plugins to repair all too common problems with audio so you can get a sense of just how much you can achieve with them and how easy it is to do so.
In this opening tutorial you can learn how to remove mic rustle from your dialogue recordings in just a couple of clicks.
Removing wind from your dialogue recordings is a tricky feat to achieve, but these plugins can help you remove ‘intermittent low-frequency wind rumble… while maintaining the intelligibility of the dialogue’.
The dialogue isolate plugin will remove ‘complex background noises’, in this case rocks crunching under foot and birds tweeting overhead, from dialogue tracks, giving you a clean source to work with.
All too often clients seem to record their dialogue in the bathroom, but with the dialogue de-reverb plugin you can leverage machine learning to clean up reverberant recordings.
Lastly the dialogue contour plugin works magic on your ‘frankenbite’ audio edits – chopping together disparate parts of a sentence to make a new one – by allowing you to re-shape the inflection and pitch of each word.
Accusonus ERA 5 Pro Audio Plugins
Professional audio plugin creators Accusonus got in touch after I originally published this article to see if I’d be interested in checking out their new ERA 5 Pro audio repair plugins, so here is a little update on my experience.
The short video above will give you a quick overview of what each plugin can do for you.
Accusonus Standard Vs Pro
There are two different plugin bundles aimed at editors who need to perform audio repair and polishing tasks without much effort or fuss; the ERA 5 Standard and Pro bundles.
The ERA 5 Standard bundle includes 9 plugins:
- Noise Remover
- Reverb Remover
- AutoEQ
- Voice Leveler
- Voice Deepener
- CleanUp Assistant
- De-Esser
- Plosive Remover
- De-Clipper
With the ERA 5 Pro bundle adding:
- Noise Remover Pro
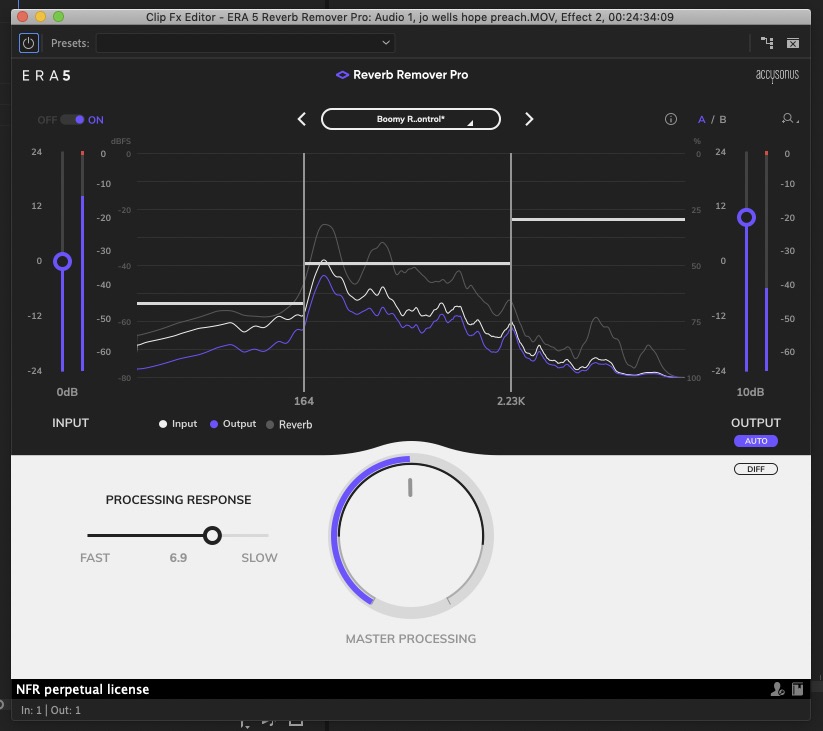
- Reverb Remover Pro
- DeEsser Pro
- RoomTone Match
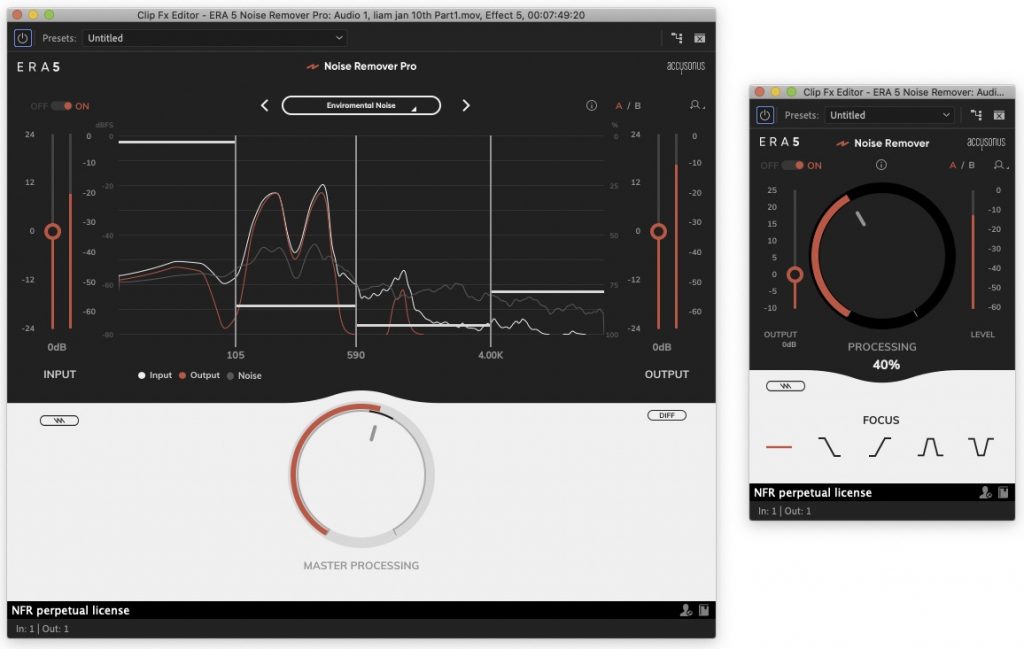
The main difference between the Standard and Pro versions of the first three of these plugins is the level of customisation you have when it comes to sculpting the spectral processing thats applied.
In the image above you can see this difference in the UI between the Pro (left) and Standard (right) versions of the Noise Remover plugins. While there is a great deal to be said for the simplicity of turning one big knob and adjusting the focus settings in the Standard plugin, it is far easier to see and control what is going on in the Pro version.
The interactive interface (moving the white bars up and down) also makes it easy to see in real time what impact your adjustments are making to each part of the frequency range rather than adjusting separate control knobs in a different part of the user interface.
The Pro versions of the plugins also come with handy presets to get your audio repair underway in a couple of clicks, which the standard versions do not.
The Room Tone match plugin in the Pro bundle is a great addition as it does a lot of otherwise fiddly work for you in just a few clicks.
The plugin works to get two different audio recordings of the same voice to match in their ambient surroundings, for example when trying to add in some ADR-style dialogue additions to a voice over track that have been recorded in different places on different days.
Another super useful tool in both bundles is the Audio Clean-Up Assistant which allows you to chain together all eight of the ERA standard plugins to solve multiple problems as once, and comes with some really helpful presets to get you started such as these, among many others:
- Audiobook Narrator
- Clipping Removal
- Deep Radio Voice
- Dialogue Levelling
- Reverb Removal
- Soothing Voice
- Two Speakers – Single Mic
For the editor in a hurry, newbie, or for those who frequently combine the same set of plugins and settings in their audio polishing working, this represents a huge time saver!
Compatibility
The Accusonus ERA bundles are compatible with the big four NLEs; Adobe Premiere Pro 2020, Apple Final Cut Pro X 10.4.5, DaVinci Resolve 15+ and Avid Media Composer 2019 (with a couple of caveats).
The audio plugins come in several formats (AU, VST, AAX Native 64-bit) and are easy to install. (see the install process in my iZotope RX7 review above)
You can check out a full list of supported NLEs and DAWs here.
This short video from Accusonus’ YouTube channel shares some really useful tips and tricks for getting the most out of these plugins, including simple things like denoising your audio before you edit or allowing the plugin ‘listening’ functions to complete uninterrupted for best results.
Although I’ve only scratched the surface of what these plugins are capable of in this quick write up, from my own testing on recent projects they deliver impressive results with very little faff.
The Standard suite of plugins would be ideal for editors who aren’t quite sure of the technical ins and outs just yet, although compared to the flexibility of the Pro versions I would find their designed simplicity a bit limiting. So personally, I would recommend opting for the Pro Bundle instead.
Subscription Pricing, or not
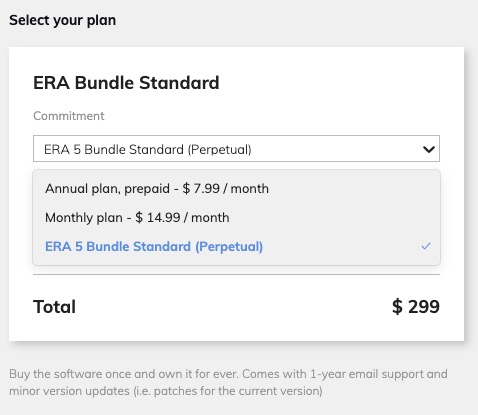
Unlike other audio plugins that are available as a single purchase, Accusonus have moved to a subscription model where the ERA Standard suite of plugins are $7.99 month and the ERA Pro plugins suite is $24.99/month, when paying for a year up front – which works out to $95.88/$299.88 per year.
You also have the added benefit of being able to cancel at any point and take advantage of timely updates instead of deciding whether to fork out for a complete upgrade.
When you come to check out you do actually have the option of buying a perpetual license if you wish at $299 for the Standard and $999 for the ERA 5 Pro bundles – which is about the same as three years worth of subscription but with only patch updates included.
It seems like the subscription model is a win for both Accusonus’ developers and for us editors given that these plugins are an affordable, effective and extremely easy to use audio repair toolkit for any editor tackling common audio problems on a regular basis.
Download a fully functional 14-day free trial to try them out for yourself!
Free Audio Clean Up Presets for Media Composer and Premiere Pro
When I asked the Twitterverse for recommended plugins, editor Dan Wolfmeyer replied to say that he uses John Wick 2 & 3 editor Evan Schiff’s free recipe for Avid Media Composer, having set it up as a template in his system.
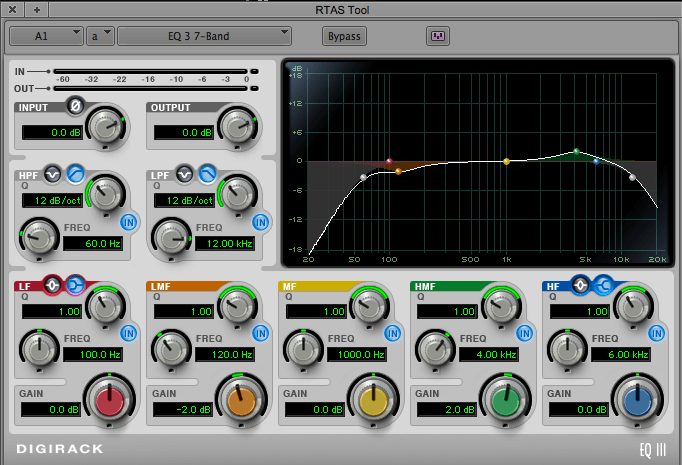
When applied to dialogue tracks, you can chain together 3 RTAS plugins that will make your dialogue much more understandable and leave more room in other frequencies for your sound effects and music.
Applied to your dialogue tracks, this recipe delivers audio clean up through a compressor, EQ and De-esser, which you can read all about on Evan’s excellent blog, and download a free preset to drag and drop.
The order in which you apply these effects will make a difference to the final sound.
Adobe Premiere Pro – Free Audio Presets
You could easily go into Evan’s blog post and copy the same kind of effects and settings into Adobe Premiere Pro’s mixer if you wish, or you could head over to editor Vashi Nedomansky’s superb blog and download his free pack of 12 audio presets for Premiere Pro.
These do a number of similar things such as boosting dialogue clarity and presence as well as providing presets for a ‘boom room killer’, to cut a hole in your music for dialogue, create a dirty phone sound and much more.
Before you run away with the presets though, it’s definitely worth reading Vashi’s 5 tips for better audio as these will teach you the thinking behind what these presets achieve, which is far more valuable!
Keith Alexander shares some really useful advice on how to use audio clean up plugins and presets and explains why it’s so important to understand what a preset might be doing, such that you don’t destroy your audio through over-processing more than you might need to.
This companion post to the video, over on Creative Cow, lists some of the plugins and free trials that Keith mentions.
Basic Sound Design Tips and Tricks
Improving the sound of your audio isn’t just about perfecting the internal frequencies of each clip, but also across your edits. In this section of the post I wanted to share some great resources to give you a foundational understanding of simple but highly effective techniques for basic sound design.
At a bare minimum you should be ensuring that you cover all these things in your sound edit and mix on any project:
- Removing any audio peaking/clipping
- Removing any pops and clicks on your audio edits
- Normalising and compressing your dialogue (a little) to even it out
- Carving out a hole in your music for your dialogue
- Mixing up your music to fill any gaps and keep the energy up (where appropriate)
For some tips and pointers on how to do this, check out the tutorials below and this previous sound design post Better Editing Through Sound Design.
In this excellent video (above) from This Guy Edits you can learn about to make your dialogue sound as good as possible, giving it a ‘grade’ like you would in colour correction.
The bulk of the tutorial comes from Mark Edward Lewis from CinemaSound.com, using DaVinci Resolve (the free version) but the concepts can easily be applied within any video editing software.
This Guy Edits has a superb editor training course called The Go To Editor, which I’ve reviewed in detail here and is made up of 46 lessons across six modules, which build on each other as you progress through the training.
- Editing Fundamentals (10 lessons)
- Advanced Editing and Storytelling (10 lessons)
- Personal Branding and Career Strategies (16 lessons)
- Genre Editing Exercises – Narrative Drama
- Genre Editing Exercises – Documentary Editing
- Genre Editing Exercises – Corporate and Branded Content
It’s a really great all in one course, especially for anyone looking to break into film editing or advance within the industry, as it covers both the business and craft of film editing.
In these free quick tips from Film Editing Pro, you can learn how to fix audio pops and add scene transitions with audio editing and sound design.
If you want to learn a ton about trailer editing, and the audio and visual skills required to pull off this specific kind of project, then you should sign up for their free 45 minute training course, which I’ve covered in more detail here.
In this Film Editing Pro tutorial they cover three different types of ‘sound bridges’ using dialogue, sound effects and music to move seamlessly between scenes.
Editor Vashi Nedomansky shared this quick 1 minute tip on carving out a hole in your music, to make room for your dialogue.
This reflects one of Vashi’s audio axioms of ‘before you boost something, consider cutting something’, which you can learn more about in this detailed post, packed with audio tips from Vashi.
Learn the Adobe Premiere Pro Essential Sound Panel
Often you can achieve great results with the tools you already have, which is why I wanted to include a quick section on the Essential Sound panel in Adobe Premiere Pro, the video editing software I spend most of my time in.
In the first video you can get a quick 5 minute introduction from YouTuber’s Becki and Chris on the Essential Sound panel, such as assigning tracks, using auto match and auto repair on your dialogue and ducking music under dialogue, among other things.
If you know nothing about the Essential Sound panel, these are five valuable minutes to invest in!
Adobe’s chief evangelist Jason Levine, delivered this hour long live streamed masterclass on fixing noise in your audio.
Jason discusses how you can use you eyes to ‘visually identify audio noise’ and learn how to fix that with Adobe Audition and Premiere Pro.
It’s a great lesson in learning what you can and can’t fix easily and what you can do to improve your audio with the tools you have. It’s also a great watch for anyone wanting to take their understanding of audio repair to a deeper level than just ‘click this, adjust that’.
Supervising Sound Editor Michael Cardillo recently re-shared this great guide to understanding audio levels and accurate metering in Adobe Premiere Pro, which is well worth watching, especially for any junior editors.
This is a shorter excerpt from a longer video which you can watch here. In the video you’ll see Michael add real-time effects on each of the master track. This is the same way you would add Evan Schiff’s recipe (above) to your dialogue tracks.
Alex Audio Butler – AI Powered Audio Mixing
Alex Audio Butler is a plugin I’ve been meaning to write about for some time, and now I finally am!
Essentially it’s an AI-powered audio mixer in your pocket, meaning that it will listen to your current sound mix and then intelligently adjust the volume and compression of the individual stems, dialogue, sound effects and music, and then aim to deliver a superior sounding mix with little effort from you.
More specifically it’s a VST3 audio plugin for Adobe Premiere Pro available on Mac and Windows and it is on sale at €79, down from €139, which is about $88/£71.
Early access is available for DaVinci Resolve right now, with a full release coming soon.
Alex Audio Butler was easy to install and simple to set up through the applying one of the four effects to the appropriate tracks in the Audio Track Mixer panel.
If you watch the detailed tutorial above, from Colin Smith of Video Revealed, you’ll see what I mean.
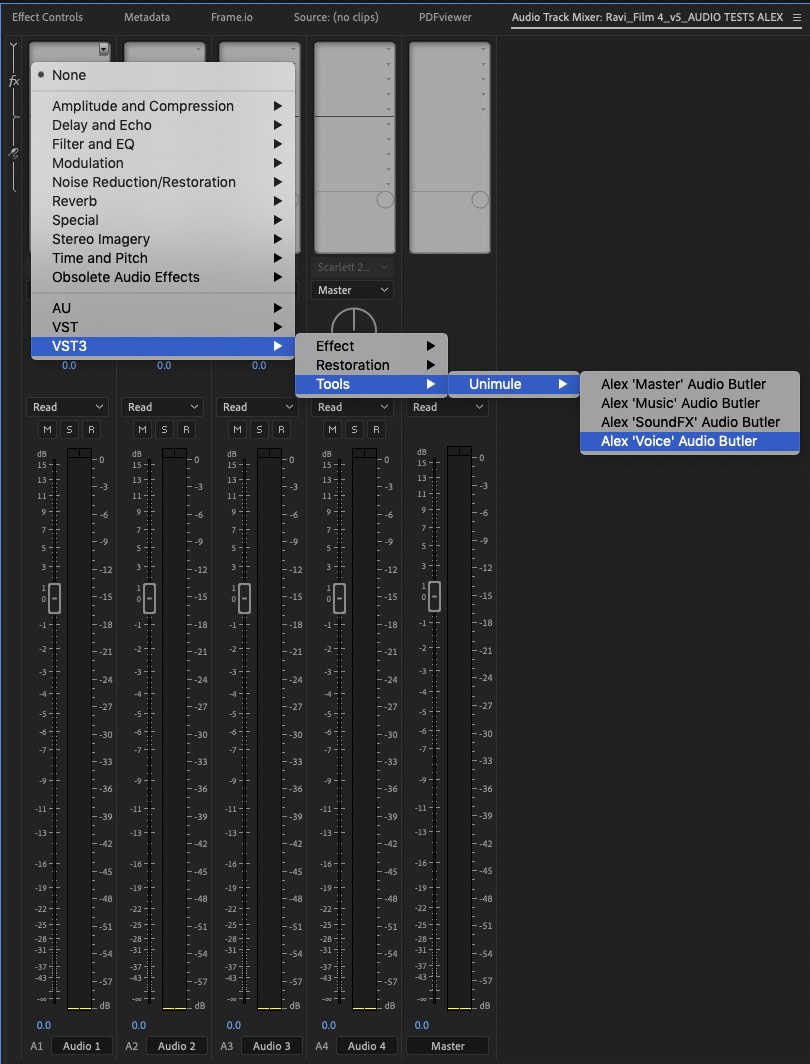
I ran a quick test to see how Alex Audio Butler would perform against my own manual mix and the auto-ducking and dialogue match in the Adobe Essential sound panel.
After ‘listening’ to my edit, Alex Audio Butler did a decent job of auto-ducking the dialogue under the music and the clear interface makes it easy to adjust the algorithm to your requirements with regards to the level of the music and the compression applied to the dialogue.
It also did a good job of levelling out my dialogue, even when I tried to ‘trick’ it by increasing the clip volume to a point where it should have peaked.
It would have been nice if the plugin would also add small fades in and out on the dialogue to create smooth transitions into and out of dialogue clips, but it doesn’t seem to be programmed to do this.
You need to apply a Master effect to your master track so that the plugin can ensure the final mix meets its delivery specification; whether for online, broadcast or archive.
As far as I understand, once the plugin is set up on your tracks (and assuming you keep your clips on the correct tracks) then it will continuously listen to your mix as you are working and update its analysis on the fly.
It wasn’t clear to me if you needed to run the analysis only when you have a locked edit’ or whether it would just keep up. The ‘floating robot window’ does alert you to the last analysis (e.g. 1 minute ago) so presumably I’m correct in my assumption of continuous listening and adjustment from the butler.
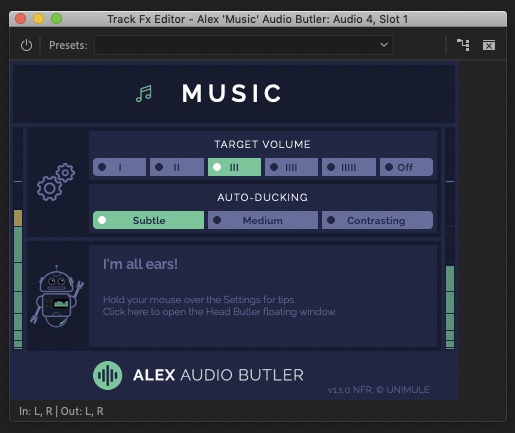
Alex Audio Butler definitely did a better job than the Essential Sound Panel in my very quick test and was much easier to comprehensibly adjust as well.
The native auto ducking inside Premiere didn’t really provide anything useful with regards to a workable mix, although the dialogue auto-match did a good job of evening out my source material.
One thing I liked, however, about the Adobe ESP approach is that it generates keyframes, so you can see what it’s doing to your levels on the timeline. Whilst with Alex Audio Butler you can’t see anything, as the plugin is applied inside the track mixer panel.
One problem that neither automated approach seemed to deal with was raising the music to fill silences, as opposed to just ducking down under dialogue, which helps to keep some energy in the mix.
Depending on your particular use-case and approach to editing, using an automated solution will undoubtably save you time and effort, but personally I prefer a more hands approach where I can see what’s happening on the timeline through the visual feedback of keyframes, as well mixing things to my liking.
That said, this application of machine learning/AI to this area of post-production will only improve over time so I’ll keep my ears open as to how things develop!
If you’re after a slightly shorter and newer tutorial on using Alex Audio Butler then this one from The Premiere Gal will do just fine.
Automatic Ducking in Adobe Premiere Pro Essential Sound Panel

It’s worth mentioning that you can do something similar to this in the Adobe Premiere Pro Essential Sound panel, which you can learn more about in this official Adobe tutorial.
Basically you tell the sound panel which clips are dialogue, SFX and music etc. and then you enable auto ducking in the music section. You have a few sliders to adjust which will help it to deliver sensible results based on the kind of content you’re feeding it.
DaVinci Resolve Fairlight Tutorials and Training
In some ways I’ve saved the best ‘plugin’ for last, which is DaVinci Resolve’s Fairlight page.
Now an integrated part of DaVinci Resolve, Fairlight was originally an industry leading standalone digital audio workstation delivering a full suite of tools for “recording, editing, mixing, sweetening, finishing and mastering.“
Of all the pages in DaVinci Resolve, Fairlight seems to get the least love from online blogs and YouTube channels that I’ve seen (or maybe that’s a result of my own search bias!) but it’s an insanely powerful place to work on your audio. And it’s free!
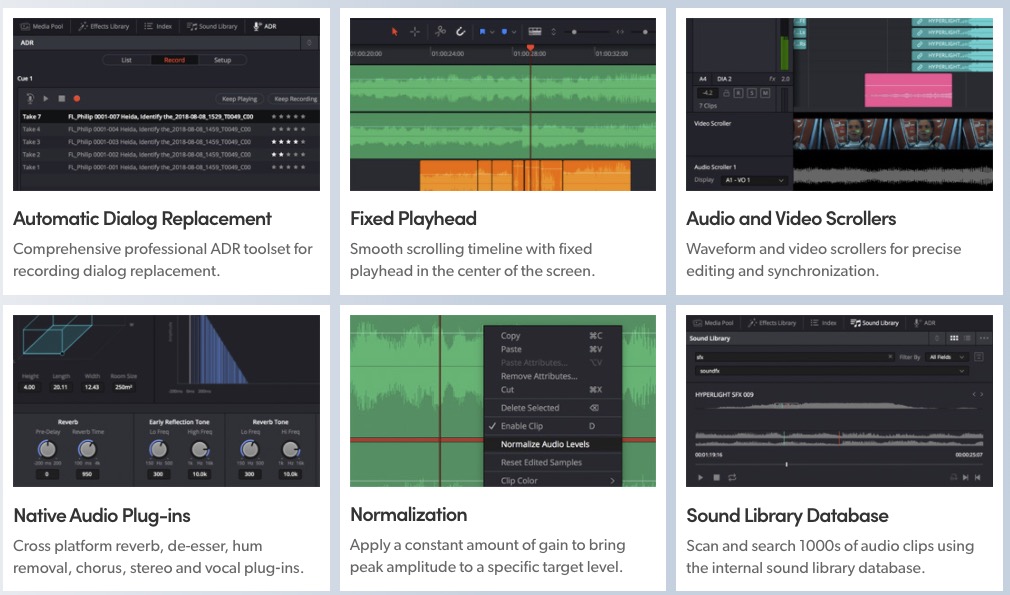
In the image above you can see some of the highlighted new features in DaVinci Resolve 16, and if you click through to these two posts, you can learn a whole lot more about them.
The official release of DaVinci Resolve 16 was back in August 2019, we’re now on 16.2.2 as of the time of this post, but not a huge amount has changed with Fairlight since then. Here are some of the headline new features and plugins added to Fairlight as of version 16.
- FairlightFX Frequency Analyzer
- FairlightFX Limiter
- FairlightFX Phase Meter
- FairlightFX Dialog Processor
- FairlightFX Foley Sampler
- Elastic Wave adaptive audio timing
- Support for importing AAF timelines with support for decoding embedded audio content
- New loudness monitoring standards – including ATSC, 1770 and R128 standards
- Improved clip normalization with an option to set loudness standards
You can also download over 500 free foley sound effects from Blackmagic Design, ready to use in personal and commercial projects, as part of their in-built free sound library. I believe this is available to both DaVinci Resolve Studio and DaVinci Resolve (free) users.
This short tutorial will show you how to download and install the library, as well as some really handy quick tips on finding your way around it too.
Free DaVinci Resolve Fairlight Tutorials
Blackmagic Design’s Mary Plummer delivers an extensive 140 minute two-part tutorial on using the Fairlight audio page in DaVinci Resolve. As far as I can remember this is probably the longest dedicated Fairlight tutorial for DaVinci Resolve that I’ve seen online.
Although this is for DaVinci Resolve 15, this is the most in-depth training you can get from Blackmagic Design.
I’ve included part 2 of the tutorial and all of the individual time-stamps for each section of the training in this previous post rounding up all of the free official DaVinci Resolve training from Blackmagic Design.
You should also download the free following along project files and assets here.
Mary Plummer’s 500 page training book on using DaVinci Resolve 16 Fairlight for audio post production is available for free from Blackmagic Design’s website, along with all their other training books.
Updates to Fairlight in Resolve 16.2
Mary recently showcased the new features in Fairlight 16.2 in a good amount of detail, during this Zoom edition of the April 2020 LACPUG meeting.
Travis from Ripple Training discusses some of the new features in the recent 16.2 update to the Fairlight page which includes a much improved Index, the new sound effects library and a new edit selection mode.
If you want to invest in some systematic training on DaVinci Resolve Fairlight, check out Travis’ course on Ripple Training.com, Sound Editing in DaVinci Resolve Fairlight. This comprehensively covers the process of working with dialogue, crafting sound design and exporting your final mix.
It’s an ideal course for any editor looking to get started with Fairlight but never having worked in a DAW before, as Travis not only covers the buttons and tool but also some of the creative principles undergirding correct sound editing and mixing.
Here’s a quick list of the chapters included in the nearly 3 hour training course, which includes follow along project materials.
- UI Overview
- Recording Voiceover
- Editing Voiceover
- Checker boarding Dialogue
- Adding Fades & Transitions
- Creating a Spotting List
- Sound Library & Power Bins
- Adjusting Clip Volume
- Working with Effects
- Automated Dialogue Replacement
- Applying EQ
- Applying Compression
- Mixing Track Levels
- Performing Automation
- Creating Stems
- Exporting
- DaVinci Resolve 16.2 Update
It’s worth mentioning that if you’re an existing LowePost subscriber (and if not, why not!) you can already watch Kevin P. McAuliffe’s four hour training course on the fundamentals of working in Fairlight.
This course covers similar ground to Travis’ tackling the following topics, with supporting downloadable project materials:
- Organization
- Understading the Fairlight interface
- The basics
- Recording Voice Over
- Working with audio track layers
- ADR basics
- Mixing
- Automation
- Working with busses
- Audio bouncing
- Setting up deliverables
- Exporting your master audio
- Working with EQ
- Limiters vs compressors
- Noise reduction
LowePost is one of my favourite online training sites as it simply represents such good value for money, and delivers new professional level training on a regular basis. This previous post details many of their existing courses.
More Free Fairlight Tutorials
You can watch two more free tutorials on working in DaVinci Resolve’s Fairlight page in these MacBreak Studio episodes, featuring Travis from Ripple Training.
In this first short tutorial Travis covers the basics of performing an ADR session in Fairlight.
In this second tutorial Travis shares a quick tip on how to use compression and ‘side-chaining’ to effectively automatically duck your music track based on the input from your dialogue track.



Great article.
I have a rather old (’70s) recorded dialogue which is pretty good but lacks ‘body/warmth’. It also has some slightly (though not deal-breaking) distortion (typical periodic grit associated with a less than perfect/aging analog recording) . Is there a plugin/plugins to add warmth (outside of EQ) and remove the periodic grit?
I’ve been working with Waves plugins for a while. Awesome.
Wooow!
Once again: thank you for collecting and sharing!
This is highly recommended and highly appreciated.