
The Best Colour Grading Plugins for Video Editors
If you’re looking for a way to expand the native colour correction toolset of your NLE of choice, then these colour grading plugins could be the solution you’re looking for.
Some of them offer a way to work with LUTs, look presets and film grain emulation, along side professional colour correction toolsets.
Which ever NLE you spend your time in be that FCPX, Premiere Pro, Media Composer or DaVinci Resolve, there’s something for everyone, and if that’s not enough you can also save money with these discount codes for Color Finale Pro and FilmConvert.
Save $20 off the cost of Color Finale Pro with the code: jonnyelwyn
Save 10% off the cost of any FilmConvert plugin with the code: Elwyn
That said, if you are an FCPX user you’re in luck as all of these plugins are fully compatible with FCPX, while Color Finale is only available for FCPX editors.
Color Finale Pro for FCPX
Color Finale Pro, the professional FCPX colour grading plugin developed by colorist Denver Riddle, offers you a way to turbo boost your FCPX grading workflow with a host of great new features.
This seven minute walk-through from Denver will guide you step by step through the full functionality of Color Finale Pro but you can find out more information and download a fully functional 7 day trial from the official site here.
Here is a quick summary of what’s new in Color Finale Pro:
- ACES Support
- White balance with a colour picker
- Group grading management
- Panel support for Tangent Element and Ripple Grading Panels
Having played around with Color Finale Pro for the purposes of this post, it’s a fantastic plugin that is incredibly intuitive to use and deceptively simple to look at.
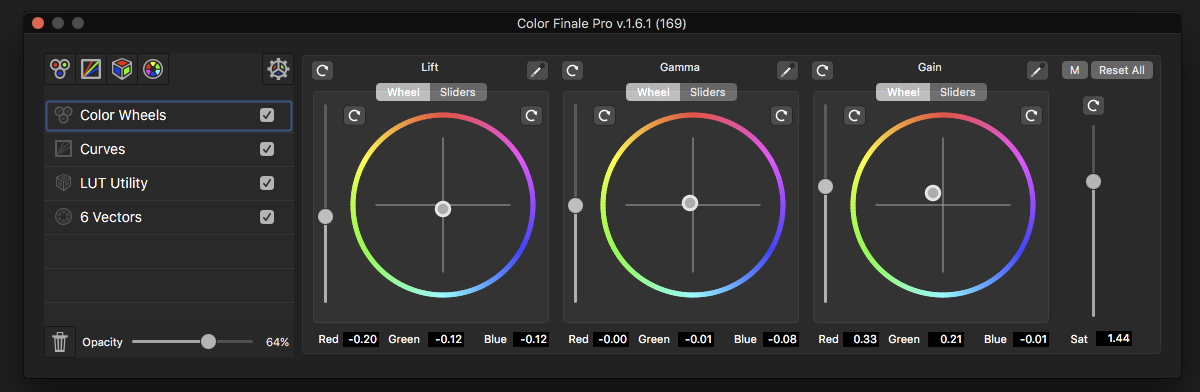
In fact, one of my favourite things about it is how clean the interface is and how well designed the workflow process is as a result.
There are four ways to manipulate your image, colour wheels, curves, LUTS and secondaries via ‘6 Vectors’ and the layers tab (far left) provides an effective way to (re)order your corrections.
Being able to jump between wheels and sliders for your Lift (Shadows), Gamma (Midtones) and Gain (Highlights) independently, makes it incredibly fast to make a hue adjustment in your Shadows wheel and a RGB channel isolated change in your Gain control, all in the same window.
One of the things that’s immediately apparent when of working in Color Finale Pro is that you are benefiting from the wisdom of an experienced colorist being behind the development of the plugin.
Everything works smoothly and efficiently – the hallmarks of experience, and that same wisdom also makes the plugin instantly accessible to someone who has never graded before.
In short, there is almost no learning curve when it comes to using Color Finale Pro’s standard features.
What’s the difference between Color Final Pro and Color Finale?
Price is one difference. The standard version of Color Finale costs $99 whilst the Pro version is $149.
The standard version includes everything I mentioned in this post (e.g. the control set, LUT Gallery etc.) but doesn’t have the more professional features that I’ve listed in the four bullets at the start of this review (AES, Groups etc.)
So with Color Finale you’re already getting a substantial boost over the native FCPX grading controls, but the professional features are almost certainly worth the extra cash. Group grading, colour management and better white balancing will prove their worth very quickly.
I believe if you’re an existing Color Finale user you can upgrade for $50. Also when you install the Pro version it installs along side Color Finale, so your previous grade and projects are unaffected.
Applying LUTS in FCPX
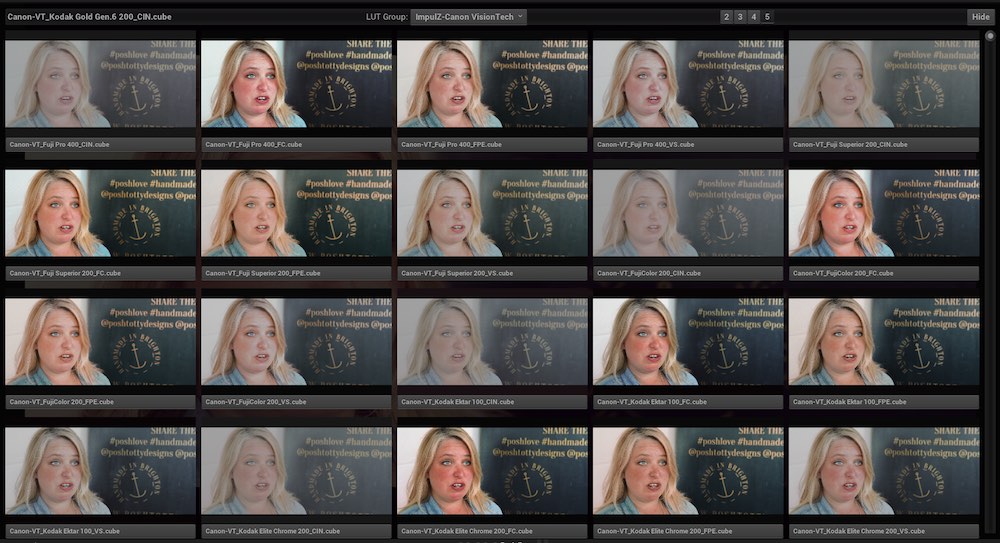
The LUT gallery functionality in Color Finale Pro is also very easy to use and makes browsing through a long list of LUTS far more comprehensible.
The simplicity of being able to view a labelled grid of preview images, of the frame you’re parked on in the timeline, makes selecting the look you’re after a breeze.
In this short tutorial from Casey Faris you can get a look at using another Color Grading Central tool, LUT Utility, to work with camera specific LUTS in FCPX.
LUT Utility is built in to Color Finale Pro, but is also available as a stand alone app for $29.
Denver also sells some very popular LUT packs – ASCEND, Osiris, Impulz and Hollywood – the freebies from which you can download from this popular post Free Film LUTS for Editors, Colorists and DITs.
So whatever you do next, at least you can get some free stuff!
All in all, Color Finale Pro is a powerful, effective and well designed colour correction plugin that takes colour grading in FCPX to new heights.
Save $20 off the cost of Color Finale Pro with the code: jonnyelwyn
For a more in-depth look at Color Finale Pro, check out this 20 minute demo from the FCP Tour at IBC 2016.
If you’re looking for more details on working with Tangent Element or Ripple colour grading panels and Color Finale Pro, head over to this post on Mixing Light.com which walks through working with Denver’s Pro plugin and setting it up for with a panel.
Christophe Delaunay’s post on Mixing Light is also well worth a read for some great tips on grading in FCPX with Color Finale Pro, such as adding the effect to every clip in your project, before you start grading.
Lastly, you can enjoy over an hour of Denver grading a feature film using Color Finale. Here is a breakdown of the topics Denver covers throughout the tutorial.
- 02:17 Color grading workflow
- 08:40 Balancing exposure
- 13:45 Balancing color
- 20:30 Shot matching
- 25:02 Mood
- 30:32 Hospital scene
- 34:51 Flashback look
- 40:14 Modern look
- 44:27 Expanding color palette
- 48:57 Day for night look
- 56:40 Finish grading
FilmConvert
I’ve previously reviewed FilmConvert in quite some detail in this previous post, Creating a Real Film Look with FilmConvert, so if you want more details, tips and tutorials check that out.
As I mentioned at the top of this post you can save 10% off the cost of any FilmConvert plugin with the code: Elwyn
The normal cost of the plugin for one host application is $149, while you can pick up a bundle for all host applications for $219.
For the purposes of this post I’ll quickly summarise that longer review and include a few updates.

Although FilmConvert has several common colour correction controls, its real power is due to it’s collection of 19 professionally emulated film stocks that match your specific camera profile and are combined with 6K film grain scans, that you can use to give your project a real film look in a jiffy.

Since I wrote my longer review, FilmConvert have released several new camera profiles including the iPhone, Canon C300 MkII and Nikon D750.
If the camera you most often use or end up working with, is not in this list, then email Filmconvert to alert them, but also download a free trial to test out a similar profile on your footage.
The process of creating a decent looking final result is based on:
- Selecting the correct camera profile to match your source footage
- Balancing the exposure and colour temperature of the shot
- Selecting your preferred film stock
- Adjusting the look intensity and grain amount and size to taste.
The key to getting good results is always to know before you start what kind of look will fit your story, and work towards that.
This might mean that you don’t need to tweak very much in the plugin, as the original look of the stock and the grain will take you a good long way towards a nice filmic look, but just because you can add loads of grain doesn’t mean you alway should, but don’t be afraid of it either!
Personally what I love about FilmConvert is the great balance between the level of control you have and speed of quickly you can get to a decent result.
If you want a ‘quick and easy’ creative solution, FilmConvert will definitely deliver.
Magic Bullet Suite 13
When I think of Red Giant’s Magic Bullet I mostly think of Colorista, but in actual fact it’s a suite of 7 unique applications that work inside of all of the major NLEs.
- Looks 4 – Over 200 preset looks to quickly apply to footage
- Colorista 4 – Colour Correction Panel
- Denoiser 3 – Video noise removal tool
- Cosmo 2 – Digital cosmetic clean up tool
- Mojo 2 – “A cinematic colour grade in seconds“
- Renoiser (New) – Adds realistic looking Grain to your footage
- Film 1.2 – Film stock emulator
If you buy the full suite of applications you’ll save yourself $394 over the cost of the buying each one separately but it still weighs in at a hefty $899.
There’s a lot of tools in this kit and so if you want to quickly find out more about each one, hit the links in this list above to jump to the official page, or watch through this 15 video tutorial playlist.
I was previously not really a fan of Colorista, because whenever I encountered a project from another editor in which they were using it, I either had to re-render the whole thing or delete all of the Colorista colour correction effects because I didn’t have the plugin installed myself and then re-build the look from scratch.
But I was happy to give it another look because the full suite now offers real-time performance thanks to new OpenCL support and because the new guided colour correction functionality looks particularly interesting.
So what’s new in Colorista 4?
- The UI is now a full fledged panel in After Effects and Premiere Pro CC, which means you can make the controls as large as you like and save custom layouts
- Support for LUTs and LOG footage
- Colour temperature and tint controls as well as RGB point-based curves
- Updated Keyer Interface – with a really nice set of controls and UI layout
I’ve not had time to test the plugin suite out on a proper project just yet, so here are my observations from a quick experiment with some of the key functionality.
I understand what Red Giant are doing with their colour wheels – in terms of having saturation and exposure controls around the outside – but these didn’t respond particularly well when moving around the ‘corner’ of a curve whilst using my Wacom tablet. I also prefer to have these separated out as that’s more how my brain works.
Any adjustments I made however were very responsive and all in real-time on my Mac Pro.

Click to view full size
The Guided Colour Correction was very intuitive and produced very good results when simply agreeing to all of the algorithms suggestions. These are of course just suggestions, and it does wisely advise you to use your eyes rather than blindly follow the computer, but either way it worked pretty well.
The tool takes you through a seven step process starting with the colour space of the original file (video, flat, LOG or ‘I don’t know’), then setting your black, white and mid tone levels and finally saturation and colour balance.
It’s nice that the interface starts out showing your image in black and white (with coloured clipping indications) while you’re adjusting your black and white levels helping your eyes to concentrate on the specific task in hand.
If I was new to colour correction this kind of tool would be invaluable for a couple of reasons. Firstly, because it’s working on the actual footage I have, which may well be fairly problematic, rather than professionally shot ‘follow-along’ tutorial footage.
Secondly, it means I’m learning the process of colour correction on the job and getting my grade done at the same time.
It’s a really helpful way to get started with colour correction for the first time, or to introduce a more organised approach into your existing workflow.
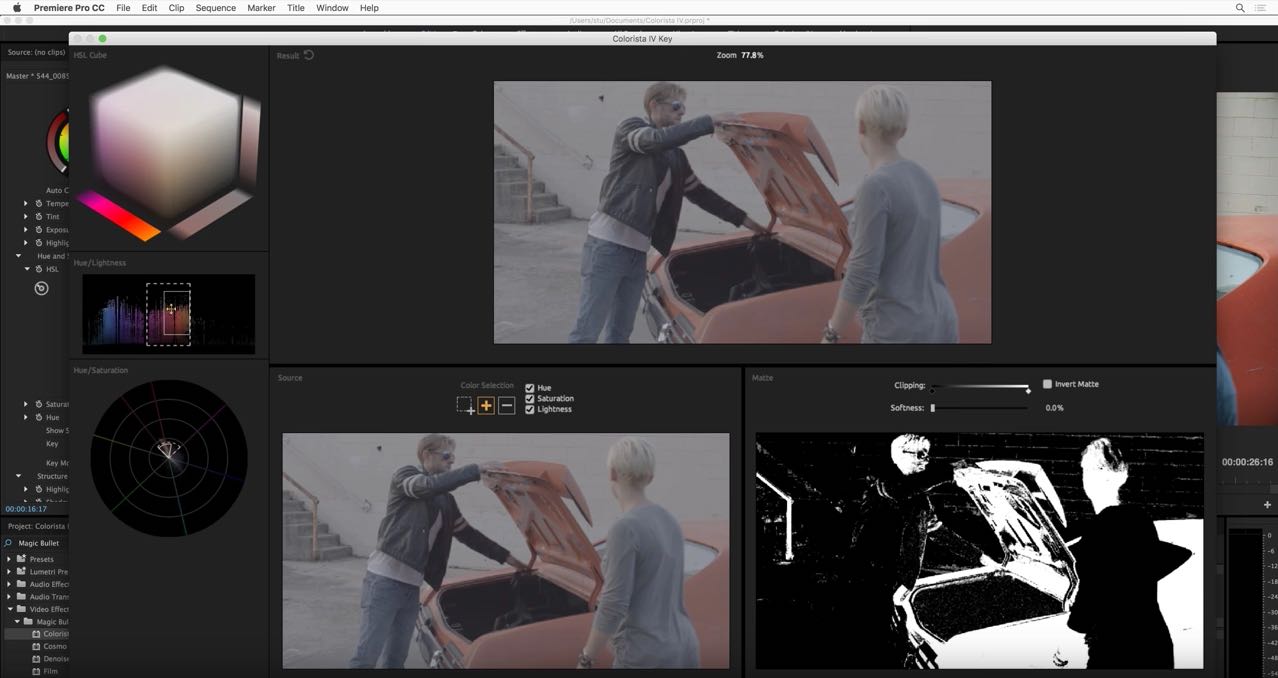
The keyer is excellent, incredibly easy to use and the user interface makes it very clear what’s happening at every stage. I particularly liked the ‘vertical lightness’ controls (top left) which help you to visualise the luma range you’re selecting in your key. These controls now work horizontally as well, helping you to expand your selection across a range of hues too. Somehow seeing it laid out like this was more intuitive than other keyers.
If you want a quick comparison of Colorista 4 and Color Finale Pro (FCPX only), check out this review from RedShark News.
Colorista 4.0 may lack some of the advanced capabilities of Denver Riddle’s plug-in, but it has some advantages the Color Finale system doesn’t have, such as built-in secondary colour masks and an idiot-proof way to correct your white balance, for example. In other departments, Colorista plays catch up with it, only now fully supporting Log footage and LUTs.
In this video you can get a sense of why you might want to add noise to your digital footage using the new Magic Bullet Renoiser including fixing overly denoised footage, adding back some texture after skin smoothing or adding grain/noise within visual effects composites and motion graphics.
It’s also a good idea to add little bit of noise/grain to your final project so that online compression engines like those behind YouTube and Vimeo don’t crush your video into a blocky mess.
If you want to take your ‘cinematic look’ a bit further than just adding some grain then you could turn to Magic Bullet’s Film plugin which gives you instant access to “22 negative stocks and 4 print stocks, giving you 88 possible cinematic combinations“.
If you spring for the full Magic Bullet Suite you’ll have a host of powerful tools at your finger tips, although it will be worth taking the time to explore the particular benefits of each to get the most out of the entire set.
In many ways it would be great if Red Giant rolled some of these tools together, for example adding film stock emulation or grain to Colorista so that you had greater functionality in one place.
That said, as an editor who spends much of his time in Premiere Pro I’m not sure I’ll spring for Colorista over Premiere’s native colour grading functionality, but I may well turn to the grain, denoising and digital touch-up tools as needed.
Why is that? Well, partly it’s habit and partly it’s because it feels like there is greater level of control available in the native tools than in Colorista. As a small example of this, Premiere’s vignette controls allow you to adjust most aspects of the vignette whilst Colorista’s options are baked in and reduced to more/less vignette.
Thankfully you don’t have to take my word for any of this as all of Red Giant’s plugins and applications come with a free trial, so you can check them out for yourself!
Also it’s worth mentioning that if you’re a student or teach you can save a whopping 50% off the normal price.
A free option – DaVinci Resolve
OK so DaVinci Resolve isn’t a colour grading plugin and it doesn’t fit inside your NLE.
But it is an industry standard colour grading application that’s expanded its powers into editing and VFX and it is also FREE.
So if you’re looking for a way to beef up your colour grading capabilities and don’t have (any) cash to burn, it’s a very viable alternative. The full Studio version is only $299 and all updates have been free so far.
I won’t get into much detail about it here, other than to say that the blog is PACKED with free tutorials, paid training reviews and other helpful resources to help you get started in DaVinci Resolve.
The video playlist above from YouTube video tutorial creator Goat’s Eye View offer’s bite sized training on over 100 topics within DaVinci Resolve 12/12.5 that will take you through using Resolve for the first time from starting the app to delivering your final project.
Download DaVinci Resolve 12.5 for free from Blackmagic Design here or jump into the following resources to take your learning further.
Every DaVinci Resolve related post on the blog (140!)
Paid Resolve Training Reviews – Ripple Training | Mixing Light


Just ordered three Red Giant plugins: Colorista, Denoiser and Renoiser, with their 40% off sale, plus a student discount! Score!
Stay away from Color Finale if you’re a pro working on a budget!
I had repeted errors using their own LUTs. Guess what Anatoly on their support says after hours of tweaking colors? “Try using other LUT files. If the problem persists, please contact us.”
I also had a lot of error messages saying that Color Grading Central is not activated. I was without network for a few hours while working on a boat when that happened.
So my conclusion is, stay away from this software until they use more time fixing issues than spamming my email with advertising for their courses.
Not a serious business, just after your money!
Great post. Color Finale looks great, but too bad no PC version.
I was curious under Film Convert, what is meant by Color Reversal and Negative. Is it just a look or is there some advantage to using them?
Thank you!
Hi Kevin, thanks for checking out the blog. FilmConvert is a film stock emulator so the colour reversal and colour negative stocks are just different types of film stocks, so effectively you could say they are just different ‘looks’ for your digital negative to emulate.
One item you may want to add to the list is the false color plugin from timeinpixels.com:
http://timeinpixels.com/false-color-plugin/
It works with Adobe After Effects, Premiere Pro (CC versions) and DaVinci Resolve.
Thanks David!