Proxy Workflows for Your Video Editing Software
The Offline/ Online workflow is back. These days this is mostly due to large file sizes and the computationally difficult nature of some camera negative high res media.
So having a robust and efficient proxy workflow, to be able to edit with smaller, faster files, is crucial for post-production.
Proxy workflows are also vital in colour grading workflows if you want to be able to go back to the original camera files for grading with full access to all of the dynamic range and raw controls. DITs also often bake a ‘dailies’ LUT into the footage for viewing during the edit, and so you’ll want to be able to go back to the original files for the final grade.
In most of the video editing software featured in this post, if you set things up correctly, toggling between the proxy media and original files should be a seamless toggle of a switch. Or at the very least a few clicks through an relinking dialogue box.
This post covers creating, working with and round-tripping from proxy media in:
Where I’ve found them I’ve also highlighted essential ‘gotchas’ that can trip you up if you’re not careful.
If you are running a lower powered system, and you’ve got a lot of media, it may will take a while to make the proxies on that same low powered system. Therefore if you have temporary access to a higher powered system you might want to create the proxies on that hardware instead or set things going over night.
If you want a bit more detail on the history, pros and cons of offline/online workflows, then Michael Kammes has you covered in this 5 Things episode.
Proxy Workflows in Adobe Premiere Pro
Creating and working with proxies in Adobe Premiere has gotten a lot easier since the 2015.3 update.
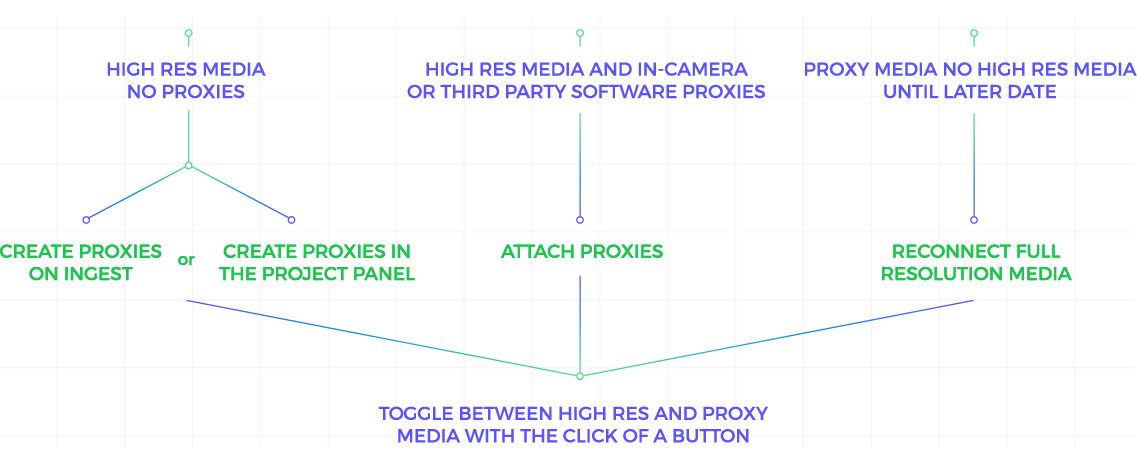
As things stand you can create, attach and toggle between proxies and original media with one click.
You can even create proxies into your creative cloud account, along with your project file and access your media from anywhere, via the cloud, if you want to.
In the excellent tutorial above, Colin Smith of Video Revealed runs through all the options in the Ingest feature set, how to create proxies and all the other things you need to know about the process.
It’s well worth sticking with for the 15 minutes, for the extra details and gotchas Colin covers along the way.
If you prefer to read your way through a guide then I can highly recommend Sofi Marshall’s superb post on Frame.io, 3 Ways To Work With Proxies in Premiere Pro.
Sofi is a features, shorts and commercial’s editor, whose work you can check out here.
She covers, in detailed step-by-step fashion:
- How to create proxies
- How to attach proxies
- How to reconnect full resolution media
The last two options aren’t covered by any of the video tutorials in this post, so this is well worth a read!
There are a few things that everyone recommends you to for a smoother proxy workflow. I would summarise them as:
- Adding two metadata heading in Project Panel – Proxy and Status column, and sliding them all the way next to the name column.
- Adding the toggle proxies button in viewer button bar. Blue is proxy mode, grey is full resolution.
- Turn on the rename option in the proxy generator tab with the suffix _Proxy, or make sure your file extension is different. (For example .mov for your proxy and .R3D for your original media).
Attaching in-camera proxies or those generated outside Premiere
It’s possible that you might have been delivered proxies already, or that the camera you’re working with might have generated it’s own proxies, that you want to work with, rather than creating your own from scratch.
Sofi Marshall’s epic post on Frame.io will walk you through this here.
If you’re attaching in-camera proxies, then Premiere Pro should automatically point you to the folder housing your full resolution media, which in most cameras is also where the corresponding proxy clip will be.
For example, if I choose to attach a proxy to a RED clip, Premiere brings me to the clip’s folder, and I can easily select the proxy .mov file right above the .R3D file and click OK.
Creating your Own Premiere Pro Ingest Presets
At 10.38 of his video tutorial Colin demonstrates how to create an ingest Preset. It’s essentially a two-step process wherein any custom transcoding you want to do in your ingest, will rely on making a custom Encoding Preset, that your custom Ingest Preset uses.
Any transcoding preset you want to use for your media ingest in Premiere Pro will need to be created before hand in Media Encoder and saved as a setting.
You then reference that in your Ingest Preset, export it from Media Encoder and then import it in the Ingest Preset dropdown menu list in the Ingest Preset panel in Premiere.
Just watch Colin’s or Dylan’s (below) video tutorial for a full run through!
You will also need to create your own presets if you’re working with anamorphic footage, so that the proxies aspect ratio and Pixel Aspect Ration (PAR) match the original footage.
For creating proxies in @Adobae, is there a fastest-performing format that 's good to use? DNx? DPX? PNG? Lossless AVI?
— Chris Colton (@Chris_Colton) June 26, 2017
This thread has some useful advice for choosing codecs your computer will like.
Solving Common Premiere Pro Proxy Problems
Seemingly Premiere has the most idiosyncrasies of all the NLEs, so there are ‘a few things you should know’, before you get started.
1. If Ingest is toggled on in the media browser window, or the Project Settings tab (it’s universal), Premiere will apply the settings you have last set, to any video file you import.
Whether that’s through the media browser or the import window, so only toggle it on when you do your original import. Unless you want proxies created all the time.
2. The Progress Window lets you keep an eye on your proxy transcodes that are being created in the background.
These are all happening in Media Encoder, but if you’re scrubbing or playing back that file in the Premiere timeline then proxy transcode of that file will pause in Media Encode. So you might want to set this up ahead of your scheduled edit session.
Well, sh*t, all that time transcoding only to find out Premiere Pro proxy workflow needs to have the same amt of audio channels as original.
— Michael Kammes (@michaelkammes) March 2, 2017
3. The number of audio channels in your original media and in your proxies must match, so it’s best to leave these alone in the ingest presets you might create, so that they will match up. Otherwise your proxies won’t link up correctly.
4. You will ideally want your proxies to have the suffix _Proxy added to the name as having the exact same file name in the workflow can cause problems for Premiere.
Having the Proxy and Full Resolution clips in the same directory can result in incorrect auto association. Also having the exact filename for the clips is not recommended, as the filenames can get associated with incorrect clips if there are any other clips with the same name on your system (similar to Link Media relinking).
If you want to attach clips one by one, do not select the Relink others automatically option.
5. As Colin Smith points out at the start of his proxy tutorial there is a major caveat with proxy workflows in Premiere, in that, if you use any of the interchange options the proxy information in gone.
These include using:
- The Project Manager
- Render and Replace
- AAF, EDL, FCP XML
- Merge clips
- Sync secondary sound
This official Adobe document has some really useful notes on what will and won’t work with the currently supported proxy workflow.
It covers how to attach new media to existing proxies/full resolution media (say if you need to update a shot), the fact that proxies can’t be detached (you either need to move them or delete them), along with many other useful pointers.
The very last note on the page is also worth careful attention:
The supported workflow allows Proxies with other frame sizes and combinations that are divisible by the full resolution clip (for example – 1920 x 1080 1.0 full resolution and 960 x 540 1.o PAR Proxy or 1440 x 1080 1.33 PAR Proxy), but other parameters such as fielding, frame rate, duration, and audio channels must match.
The only enforcement of matching parameters for Proxy or Full Resolution clips is for the audio channels. When there is an audio channel mismatch Premiere Pro shows an ‘Attach Failure’ dialog. If you dismiss this dialog, it takes you back to the Attach dialog to choose a clip with matching audio channels.
If the other parameters do not match between Full resolution and Proxy: frame rate, duration, fielding and/or non-divisible frame size/PAR combination, then these are allowed with no warning and result in several issues.
Creating Premiere Proxies with the correct Frame Size, Aspect Ratio and PAR
One of the most common problems when creating proxies with a preset in Premiere is basically not choosing the right one when it comes to matching the proxy properties to the original footage, especially with regards to the frame size.
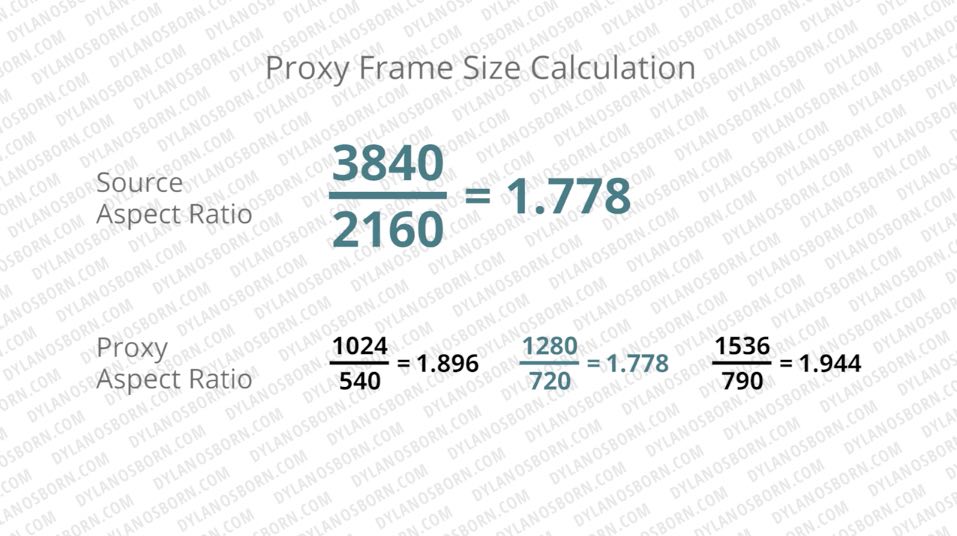
In this 3 minute tutorial from Dylan Osborn, you can get a fast and effective primer on picking the correct frame size, aspect ratio and pixel aspect ratio (PAR) for your proxies.
To make sure the aspect ratio matches divide the width of your image by the height and do this for your proxy preset frame size too. (The green highlighted text above.)
Dylan makes a good point in part 1 of his tutorial that Premiere will always export your high res media, even if you have proxies enabled, unless you only have proxies available, or what is called Online.
To see this enable the status metadata column in your Project Browser.
Dylan smartly sets these two columns next to the name column so you can always see what’s where, at a glance. So… Name | Proxy | Status |
In part 2 Dylan also demonstrates how to create an Encoding Preset and Ingest Preset for formats that aren’t covered by the defaults. Dylan goes into more detail than Colin, so if you’re going deep with this proxy workflow, definitely watch these two tutorials.
Super helpfully Dylan has created a free Proxy Frame Size Conversion Chart, which you can download for free from Dylan’s site.
It covers a huge number of source media frame sizes for cameras from Arri, Blackmagic Design, Canon, DJI, Go Pro, Panasonic, Sony and Red.
Dylan has also created some unobtrusive proxy watermarks which you can also download for free. You might want to use if you want to always know that you, or your client, are looking at a proxy.
Adding more complex watermarks is also useful if you need to add further metadata information for editorial purposes.
Premiere Proxies – Working with Interpreted Footage
If your footage requires interpreting, so for example, having slow-motion footage that you need to tell Premiere to interpret at a different rate frame rate, then you’ll want to watch this tutorial from Scott of Blink University, which tackles the problem of proxies and original media falling out of sync, because interpret footage is not officially supported.
Scott’s work-around involves interpreting the clip in Media Encoder, before running your Proxy encode. But it involves a few manual steps along the way.
Using Proxies in Final Cut Pro X
FCPX has several different media management/transcoding options; Proxy, Optimised and Camera Native media.
In this short webinar excerpt Larry Jordan walks through the scenarios in which you would want to consider using each one. This helps to lay the foundations for understanding FCPX’s media management philosophy.
In probably the single best place to go to FCPX editors looking to learn a proxy workflow, Editor Sofi Marshall shares her second excellent and also exhaustive guide to working with proxies in FCPX, in this detailed post on the Frame.io blog.
What’s great about her FCPX guide is that she not only covers everything in detail, and within numerous workflow scenarios, but she does so from the ground up, so if you are new to FCPX you’ll also be able to follow it all the way through.
By the end of this article, you’ll have a complete understanding of how to manage your FCP X library for proxy success, how to create proxies during or after import, and how to take your portable proxy media on the road. – Sofi Marshall
Her main proxy workflow is a combination of a managed and external media workflow – in that the camera original files stay in their original location and the proxy media is transcoded into the Library itself.
Sofi shares her rationale for this process, as a way to protect against FCPX hamstringing itself:
FCPX has two serious limitations that when combined, form a perfect storm that can destroy its own proxy workflow.
First, while it has tons of options for moving and copying media, events, and projects, FCP X has no option to move or copy ONLY proxy media. The only way to move or copy proxy media from within FCP X is to move or copy the original camera media along with it – something we’d almost never want to do.
Second, FCP X has no option to relink offline proxy media. That means that if we try to circumvent the above issue by managing proxy media externally (outside of the library), and we copy that proxy media to a portable hard drive, FCP X will not be able to relink to the proxy media in its new location.
To keep things as simple as possible, while leaving as little room for error as we can, we keep our camera media as external and our proxy media as internal.
That way, we prevent proxy media from going irreparably offline by letting FCP X manage it inside the library, and we bypass copying over original camera media by managing it ourselves, outside the library.
She does however share several other FCPX workflow possibilities when using proxies at the bottom of the post, so do be sure to check those out too.
One other thing to note about creating proxy media within FCPX is there is no way to customise the frame size or codec of the proxy. It’s always going to be Pro Res Proxy and at half the original frame size.
It also doesn’t have a way to ‘attach’ proxies created by other apps, like you can in Premiere Pro.
Ben Halsall demonstrates how to set up a proxy edit within FCPX in under 5 minutes. Even though this is an older tutorial using an older version of FCPX the workflow and processes are exactly the same as for in the current version 10.3.4
The only differences are where some of the buttons and menu items might be located, so for example the ‘Background tasks’ button has moved from the centre button panel to the top left.
In this older (2014) MacBreak Studio episode the boys from Ripple Training cover how to move just your proxy media onto a portable drive so that you can take your proxies on the road, and leave the original media elsewhere.
There are a few hoops to jump through, that you need to understand to make this work, but Steve and Mark cover these gotchas too. It’s another great example of their superior insight into FCPX’s inner workings!
Ripple Training has an in-depth FCPX Media Management training course, which you can check out here. Chapter 10 covers proxy workflows thoroughly:
- Proxy-Only Workflow
- Scenario Overview
- Starting Without Proxy Media
- Moving Media Externally
- Creating Proxies After Import
- Moving Audio & Stills
- Copying the Library
- Viewing Proxies
- Editing with Proxies
- Transferring the Proxy Edit
- Proxy-Only Workflow Summary
Avid Media Composer Proxy Workflow
Avid Media Composer is most often the go-to NLE for broadcast and feature film work. It’s media management systems are considered rock-solid, which is why it’s so often relied upon for high-end work, that and it’s the entrenched system.
In the third instalment of detailed proxy workflow posts Sofi Marshall has once again delivered an excellent primer on how to create and work with proxies in Avid Media Composer.
When working with high-resolution camera media, it’s generally best practice to maintain the original folder structure, especially if you’ll be colour correcting in another application like DaVinci Resolve.
In some cases, linking also provides more control over your media, like with RED footage, where linking with AMA allows you to access and edit colour profiles for the raw media.
The basic process is:
- Install AMA plugins for the source media you are working with
- Link to original media via the AMA plugin
- Transcode AMA linked media in your bin to proxies
- Tidy up your proxies so you keep track of them
- Relink to your high res media from your final timeline for export
If you’re after an illustrated, step by step guide to proxies in Avid Media Composer then Sofi’s post is perfect, but if you want a more ‘wholistic’ view, then check out the video tutorial series below.
In this 5-part video tutorial series from Kevin P McAuliffe, (who must have created more Avid tutorials, than any man alive!) he tackles High-Res projects in-detail. This tutorial series is from 2015, so a few things ‘might’ have changed a bit but little does change that quickly in Media Composer.
Kevin covers several other useful topics like using FrameFlex, applying camera specific LUTS and making use of the proxy timeline along with many other things, throughout the series as he goes so it’s worth watching through them in order.
High-Res Projects in Media Composer Episode 1 | Episode 2 | Episode 3 | Episode 4 | Episode 5
Corey Tedrow shares some tips and tricks on proxy workflows in the latest version of Media Composer.
DaVinci Resolve Proxy Workflow
Daria Fissoun from the Goat’s Eye View YouTube channel, shares how to complete and 4K original to HD proxy round trip in this short tutorial, which builds off the information she shares in the other tutorials below.
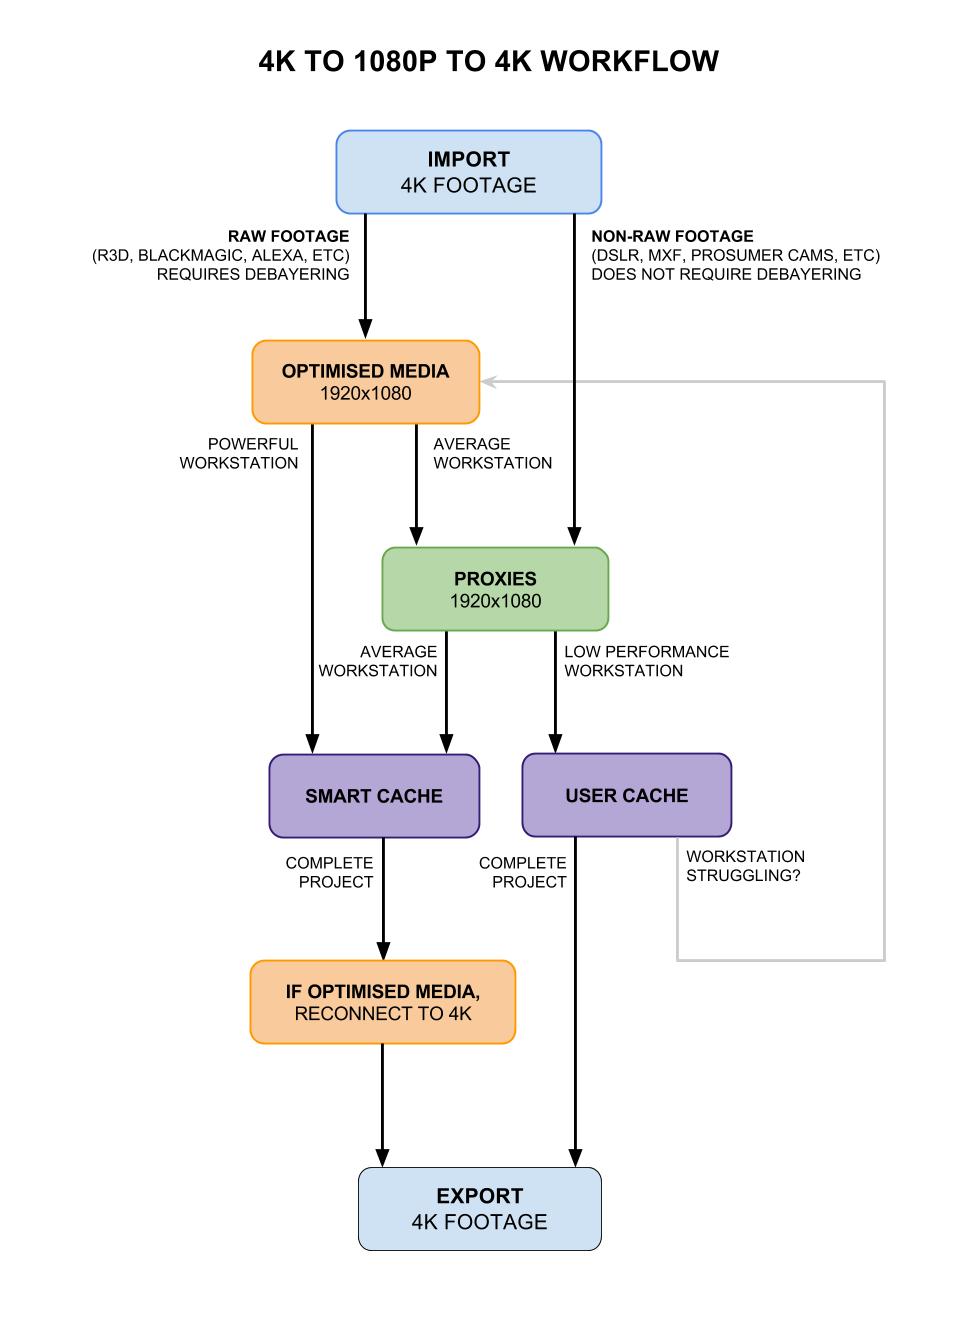
In part Daria is also teaching you how to get the best performance from DaVinci Resolve, depending on the kind of media you are working with. She’s created this flow chart to help you navigate what to do, depending on your given scenario.
Just to summarise a few things:
DaVinci Resolve can create optimised media (like FCPX), just to work with for improved playback, or to even export from. But you’re better off returning to your camera original formats for the final grade and export.
DaVinci Resolve has a Proxy Mode, which uses Resolve ‘resolution independence’ to create these proxies on the fly. They aren’t new media files that are generated like proxies in every other offline/online proxy workflow we’ve looked at. It’s a bit like lowering the playback resolution in Premiere Pro. You’ll get better playback, but a lower resolution image to look at.
To use Proxy Mode in Resolve go to:
Choose Playback > Proxy Mode > Half Resolution, Quarter Resolution, or None.
Turning on one of the proxy resolutions reduces the working resolution by either half or a quarter of whatever the current Timeline resolution is for your project. Working at a temporarily reduced resolution increases your workstation’s real time performance, while the resolution independence of Resolve guarantees that every window you draw and sizing operation you make scales correctly to the actual resolution of your project. – DaVinci Resolve Manual p.113
You can off course create actual proxies and relink these as needed, like in any other proxy workflow.
Now that we’ve seen the overview of how the whole process works, here are the foundational tutorials that will guide you through the process from a much wider view point.
In this tutorial Daria demonstrates how to get unsupported file types into DaVinci Resolve, by using a third party app (Moavi) to transcode them into a format Resolve can work with.
In this tutorial Daria demonstrates a simple offline/online workflow by creating proxies outside of Resolve and switching between the proxy and the full resolution media by keeping the file names and extensions exactly the same but telling Resolve to look in different folders on her hard drive.
I’m not sure why she doesn’t use DaVinci Resolve’s own export system to do this, but rather Adobe Media Encoder. But after looking at the YouTube comments it seems like it’s because she is using a Resolve incompatible format for her source media.
In this follow up tutorial Daria shows you how to perform this same workflow, using proxy and original media where the file names are the same but they have different file name extensions.
In these DaVinci Resolve 12 tutorials, Daria walks through some different methodologies for relinking media. These will give you a wider context for some of what you’ve just seen and a bit more depth too.
In this final tutorial Daria covers some common relinking issues that you might face, and how to fix them.





Thanks for this super useful article. I’m working on a feature documentary with a lot of media and I was following this workflow. However, it seems like the Premiere project file is very big even if I attach and only work woth proxies. The file is 70MB, while if I create a new project with only proxies and production audio the project is under 1MB. This could really slow down my workflow during the edit so I’m wondering if I should start the project importing just the proxies.
Hi Pilar
What footage are you working with? Sometimes with ARRI Alexa (and others) footage, Premiere auto adds an instance of Lumetri with a default LUT on each clip.
This bloats the project file hugely.
See the section on it here:
https://blog.frame.io/2018/04/02/arri-workflow-premiere/
The proxies probably aren’t auto adding the LUT hence the smaller file size when you import them alone.
If this is the case I would build an effect to remove them all in one go so your connection to the full res files is still intact. (Rather than editing from a proxy only project).
Thanks Jonny. Most of the footage is ARRI and we discovered the LUT was adding some weight to the project, but it only went down 6MB after we removed it. I did a test bringing in just the RAW footage and after attaching the proxies it doubled in size. This is a feature documentary and we have a lot of footage and a very tight schedule, so I’m worried the proxy workflow might slow us down in the future and I have started a new project just with the proxies. I would love not to loose the ability to connect to the raw footage, but thinking my project might slow me down after we start the edit worries me. The project with just the proxy files is only 6MB, while the project with the RAW media attached to proxies is 26MB. I know that 26MB might not be that big of a deal, but that is before creating any sequences.
I guess a structural approach to getting small project files would be to create “reels” and just have a small(er) amount of footage in each one per each section of the doc. If that’s possible with the content.
Look on the blog for articles about Vashi Nedomansky who has cut whole features in 6k Raw (no proxies) but he had a really beefy machine. Can’t remember if he had multiple project files though.
A great insight in to the proxy workflow. Very much helpful. Thanks very much for this article.
Thanks for the shout-out!