
DaVinci Resolve Tools and Tutorials

Click to see full size
If you’re looking to improve your colour grading skills in DaVinci Resolve, then this post is packed with great tutorials, tips and tools to help you do just that.
The most recent, previous, tutorial round up I put together on Resolve can be found here. It’s packed with even more tutorials and resources than in this post, so be sure to check it out.
It also includes information about the most recent update to the software 12.5.4. This update includes support for the Touch Bar in the new Macbook Pro 2016. The images of the Touch Bar in Resolve were originally shared by editor Brady Betzel in this tweet.
If you don’t have a Macbook Pro, but you do have an iPad you can simulate the Touch Bar using the Duet screen-sharing app.
This previous post focusing on Resolve also takes a deep dive into ACES, so if you’re looking to learn more about that, then check that post too.
I think that the one of the best ways to improve your grading skills is through picking up tips from professional colorists like Alexis Van Hurkman.
The Ripple Training.com trainer, author and colorist delivers a useful tip each and every week, so subscribe to the YouTube channel.
In the tutorial above you can learn a useful technique to select clips in the timeline based on clip colour, flags or markers. So for example, if you wanted to select all music tracks, and you had marked them all as purple, you could use Timeline > Select Clips with Clip Colour > Purple.
#Resolve grading tip: Flag example shots for client, render filter individual clips, now you can join them & compress them in Media Encoder
— Jamie Dickinson (@dickij10) January 17, 2017
If you stay organised in your edit and in your grade this could be a huge timesaver, especially as you progress through a grade, for example if you flagged all VFX shots to be replaced, or signed off shots etc.
Being able to compare two shots at the same time allows you to more easily match grades, as you wipe between them. In this tip Alexis shows you how to using the sizing controls to make your graded still match the size of your ungraded shot for a better side-by-side comparison.
In this quick tip you can learn how to turn on the high visibility mask outlines in Resolve, which actually reverts them to the way they used to look in previous versions of the program.
False Colour Plugin For Premiere Pro and DaVinci Resolve

Tom Hucszek’s False Colour Plugin is now available in version 2.2 and comes with a bunch of great features, for a very reasonable price.
For only $8.99 you can download the highly customisable plugin for use in both DaVinci Resolve or Premiere Pro (among other apps) and it works on both Windows and Mac.
What does a False Colour Plugin do and why would you need it?
False Color is a technique used in video cameras to map the exposure levels to a specific color ranges. The purpose of the false color is to identify the brightness levels and differences between them easily while still being able to see the source image outline
This means you can more easily see the precise range of luma values in your image, layered over the image itself, rather than looking over at a separate scope. This can help you fix peaking problems as well as craft your contrast ratios.
What’s the difference between the free and paid for versions of the plugin?
The free version only ships with the RED preset and has a watermark on the image. Given that it’s only $8.99 for one plugin, you may as well pay for it and get all 8 presets and a fully customisable functionality of the plugin including the colour ranges and IRE ranges.
For $14.99 you can buy a bundle version that works in all the supported apps.
Patrick O’Sullivan of WanderingDP has a really in-depth article covering lighting ratios and using a false colour effect to analyse them easily. If you want a deeper dive into this topic, that’s a great place to start. Although Patricks’ article is aimed at cinematographers, the principles apply directly to colour grading too. (Ps. if you like Patrick’s work check out this post!)
In the post Patrick is referring to the False Colour tool on his Flanders Scientific monitor which he has set up as follows. Give the customisable nature of Tom’s plugin you could copy Patrick’s settings if you wanted to.
- RED = 3 Stops Over
- Yellow = 2 Stops Over
- Light Green = 1 Stop Over
- Grey = Key
- Teal = 1 Stop Under
- Light Blue = 2 Stops Under
- Dark Blue = 3 Stops Under
- Black = 4 Stops Under
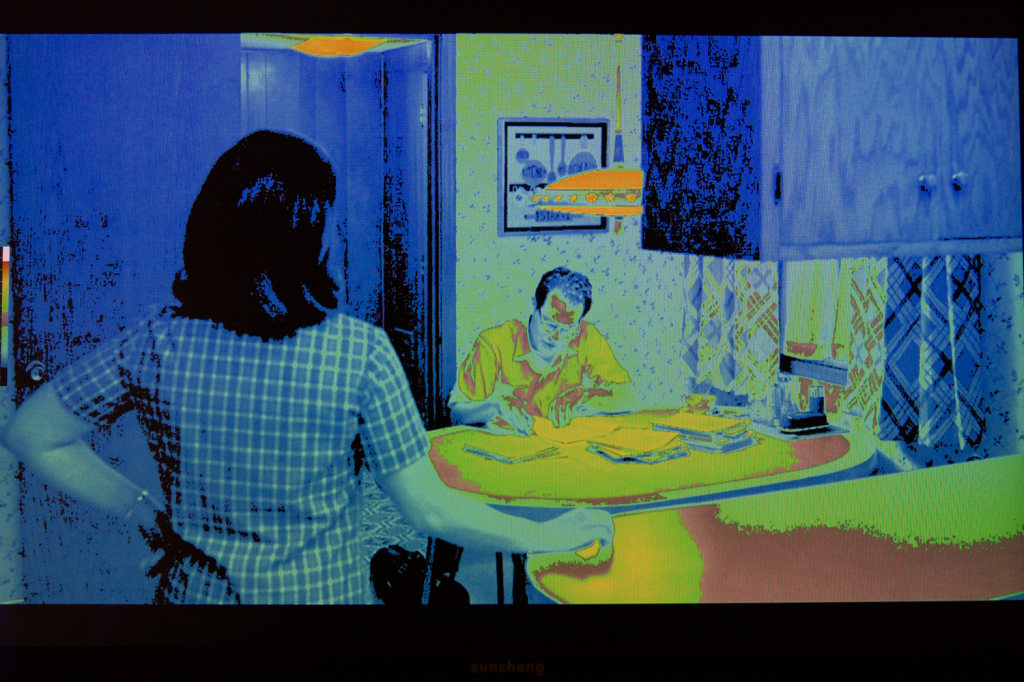
If you apply this to the false colour image above you can learn the following:
You can see that the Key light is coming from the light over the table. The light is the hottest thing in the frame. It is 2.5 stops over. The Table itself is 2 stops over. The main character seated at the table is at Key for his skin and his face fades into about 1 stop under. The background is all 2-4 stops under which helps to focus the attention of the view. We aren’t looking at anything hear but ratios remember.
For three tutorials on using the false colour plugin from Time in Pixels, you can check out these tutorials by Aram K. In the first, shorter tutorial, Aram looks at using Tom’s plugin specifically.
In the second and third tutorials Aram seeks to replicate a 16mm film look and the look of Mad Max: Fury Road on some ungraded behind the scenes footage, assisted by the false colour plugin.
Download the free version or buy the plugin at Time in Pixels
More Free DaVinci Resolve Training
Daria Fissoun from Goat’s Eye View continues her tutorial marathon unabated in these latest episodes. To check out the previous 100+ bite size tutorials check out this previous post, or subscribe to her excellent YouTube channel.
In these episodes she walks through layout of the Deliver page and what each element does. In the next two follow on tutorials Daria demonstrates how to set up your render settings and navigate the render queue.
YouTuber and Colorist Casey Faris shares some useful tips in these three recent tutorials. In the first one he tackles a relatively simple subject – moving your project file to another computer, that you just might not know how to do it Resolve.
In this quick tip Casey shares some thoughts on creating better Day for Night looks, using a few different tricks in Resolve.
In this longer tutorial you can see how Casey fixes a problem shot to cover up some blemishes on a fake handgun. These kind of spot fixes are bread and butter for any working colorist.
White Balancing and Using a X-Rite Colour Chart in Resolve
Ollie Kenchington got in touch with me to share this helpful post he’s put together on using an X-Rite Colour Chart in DaVinci Resolve, FCPX and Premiere Pro.
If you’re lucky enough to have footage with a colour chart in it, it will definitely speed up your colour correction process. In Ollie’s detailed step by step post he covers shooting with the chart and shares some really helpful tips on getting the best out of it.
The first thing to get right is the placement of the chart. If you are shooting an interview, for example, do not move the chart right over to the camera, as the lighting that is falling on your subject is what should be measured, not the lighting near your camera. The other thing to bear in mind is that you want the glossy black strip at the bottom of the chart to be free of any reflections, as these will artificially lighten the black strip and render it useless when gauging contrast in post.
In the rest of the article he also works through referencing the chart in post production in DaVinci Resolve, FCPX and Premiere Pro.
You can grab a passport sized X-Rite Colour Checker from Amazon for about $100, which doesn’t make them cheap, but they will save you a ton of time and help you create better looking images.
Casey Faris also shared this tutorial on fixing a badly white balanced shot in a number of different colour-cast scenarios. Casey demonstrates how to use the scopes to balance out your image correctly, which is a fundamental part of establishing a foundation from which to grade.
DaVinci Resolve Colour Grading Tips
Today's #Resolve tip – can't find a keyboard shortcut? Export shortcuts as a .txt & the using cmd F in text edit.
— Jamie Dickinson (@dickij10) October 26, 2016
Twitter tips from colorists who tweet. Compiled for your learning pleasure…
Looks like the RX 470 will be a great low price GPU option for DaVinci Resolve 12.5 moving forward, 4GB VRAM https://t.co/c4o1ay9PDI
— Rohit Gupta (@rohit_bmd) July 29, 2016
#DaVinciResolve performance under CUDA and OpenCL. pic.twitter.com/SZ4imopt4i
— Marc Bach (@marcplanb) August 26, 2016
#postchat #Resolve tip – if you want to turn on a node and ripple it to group/selected, use KeyGain 0/100 instead of disable
— Jamie Dickinson (@dickij10) November 19, 2016
#Resolve Tip (1/2)–Rt-click any rendered job in the Deliver page render queue & choose Clear Render Status to make the job unrendered again.
— Alexis Van Hurkman (@hurkman) November 19, 2016
#Resolve Tip (2/2)–Rt-click any rendered job & choose Reveal in Media Storage or Reveal in Finder to locate the rendered files.
— Alexis Van Hurkman (@hurkman) November 19, 2016
#Resolve Tip–If you have a DaVinci Control Surface, pressing SHIFT DOWN and ADJ WINDOW resets JOYBALL OFFSET adjustments made w/trackball 4.
— Alexis Van Hurkman (@hurkman) November 15, 2016
Something I've been wanting to do forever – get a little display for my scopes and do dual monitors in Resolve. Works great! pic.twitter.com/Xbg6qsmA7j
— Alexis Van Hurkman (@hurkman) December 18, 2016
#Resolve, create LUT, New Fusion Connect Clip. Load LUT to Fusion, comp, LUT off, render. Reapply grade in Resolve pic.twitter.com/exqvFZlX1Z
— Jamie Dickinson (@dickij10) November 5, 2016
#Resolve tip – drag/scroll the edit page with the middle click.
— Jamie Dickinson (@dickij10) November 16, 2016
Today’s #ColorGrading tip: Snow and ice appear white when in fact their highlights or shadows are a tad blue, otherwise they seem polluted.
— LUTwig van Gradehoven (Phil Strahl ???) (@PhilStrahl) January 5, 2017
#Resolve grading tip: Shift select clips in edit page and changes to Inspector values are relative, i.e. -3 from all opacity values
— Jamie Dickinson (@dickij10) January 18, 2017
#Resolve Tip 1/2—Turning on “Selection Follows Playhead” shows parameters of the topmost clip at the playhead in the Inspector if it’s open.
— Alexis Van Hurkman (@hurkman) January 26, 2017
#Resolve Tip 2/2—Turning auto select off on a track prevents clips on that track from being automatically selected by this setting.
— Alexis Van Hurkman (@hurkman) January 26, 2017


