
Assimilate SCRATCH v9 First Impressions

I recently shared a post on Assimilate SCRATCH’s latest release, version 9, which includes a host of great new features and improvements, particularly for dailies and 360/VR video workflows.
The post also included an extended interview with professional colorist Tobias Wiedmer C.S.I. on how he uses SCRATCH at Cine Chromatix in Berlin.
In this follow up sponsored post, I’m going to deliver my own impressions on what its like to work with Assimilate SCRATCH for the first time, as a complete beginner with little to no prior experience in the app.
For the purposes of this post I’m simply going to bring in a project via XML, conform and colour grade it and then roundtrip it back to Premiere Pro.
Hopefully what you and I will both gain from this, is a better look at just how easy (or difficult!) SCRATCH is to use, some key lessons learned and a sense of what can be done in this powerful onlining tool.
Ed. Note – There are a couple of shots in this reel that are NSFW.
Just to catch you up on the what’s new in version 9, here are some of the headline new additions:
- New User Interface and tabbed ‘room’ workflow
- Faster read/rendering/transcoding speeds for specific file formats
- Read and write support for H.265 media
- Apply 8 stored grades from memory with Alt+1-8
- Apply default review notes with Shift+F1-F8 (e.g. a red note for False Starts)
- Audio capture for live streaming
- Manual audio sync through waveform markers
- Set defaults for the automatic creation of clip metadata on import
- Set interactive ‘hotspots’ for a VR story framework
- OpenVR headset support on Mac
As part of my previous post, I also broke down the 4 applications that make up the Assimilate SCRATCH suite, which also might help set the scene a little.
Before we dive into my own experiences here are some useful links if you want to try SCRATCH out for yourself.
- Download Assimilate SCRATCH version 9
- Assimilate SCRATCH official tutorial library
- Assimilate SCRATCH online Knowledge Base / Help Files
- Assimilate SCRATCH 8.6 User Guide PDF
UPDATE – Free Assimilate SCRATCH Training Course
LowePost.com is partnering with Assimilate to offer 3 months of free access to their Assimilate SCRATCH Essential Training. This is a brand new, 15 lesson course, from instructor Kevin P. McAuliffe which will guide you through working in SCRATCH for the first time.
You can check out the full contents of the course here, or watch the introductory lesson in the video above.
If you’ve never heard of LowePost before you can check out my detailed review of their DaVinci Resolve training here.
How to use Assimilate SCRATCH for the first time
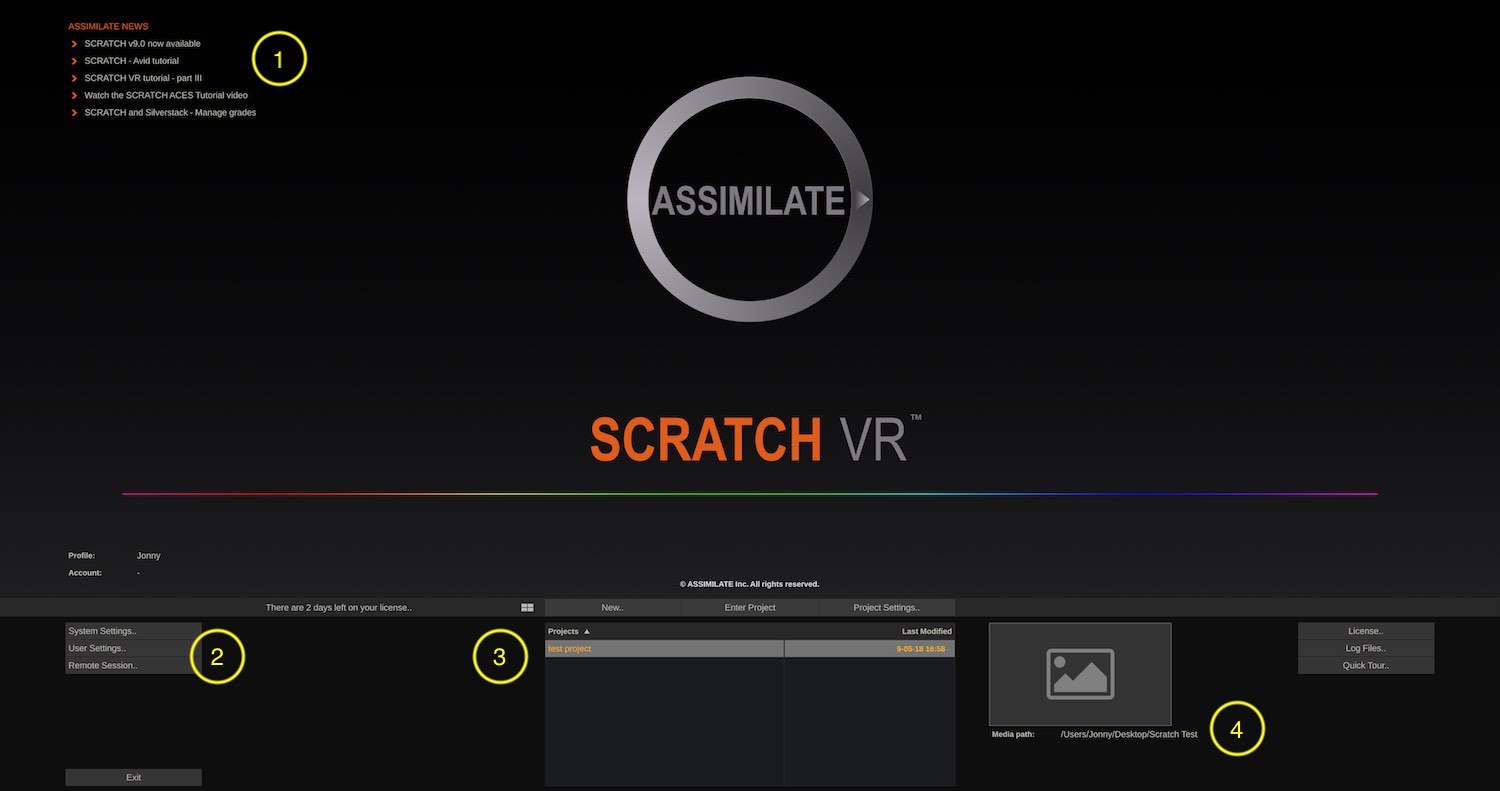
Once you have installed SCRATCH and launched it for the first time you’ll be greeted with this home screen. There in a new Quick Guided Tour video will pop up the first time you use the app, but you can always launch it again from the Quick Tour.. button on the far righthand side.
I’m going to presume that if you’re reading this, on my blog, then you’re an editor with at least some substantial experience in at least one NLE, if not a few different post production apps. You’d be able to find your way around much like I have by just doing the things you’d expect to be able to do.
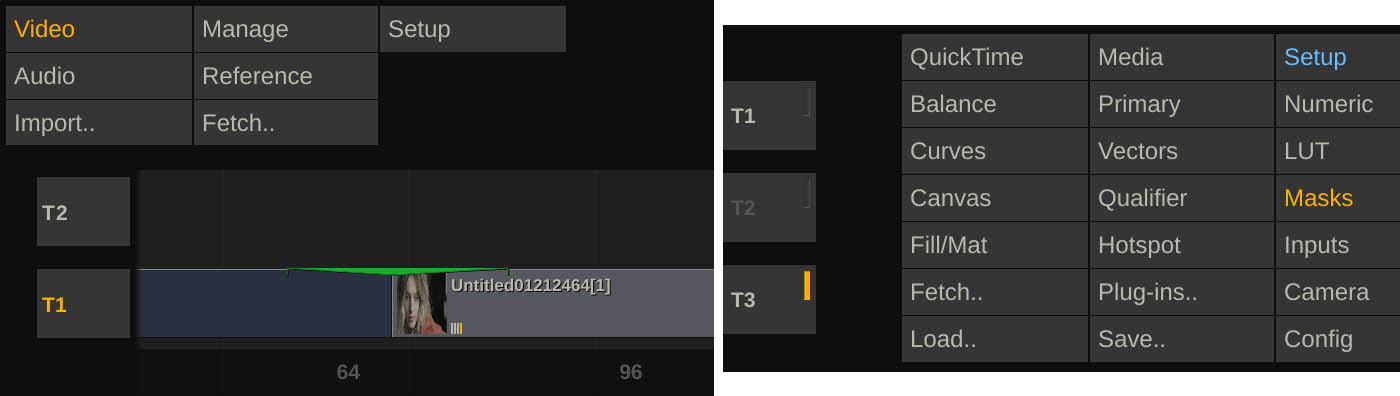
On the homescreen I just wanted to highlight 4 things.
The first thing I noticed was the Assimilate News (1) in the top left corner. This updates with links to online resources or information to keep you up to date with what’s happening with SCRATCH or the latest training resources from Assimilate.
If you click on the small quad icon (above the number 3) you can toggle between an thumbnail view of your saved projects, or as I have it, a list view, which personally I preferred.
The media path (4) is where SCRATCH is anticipating your media to be.
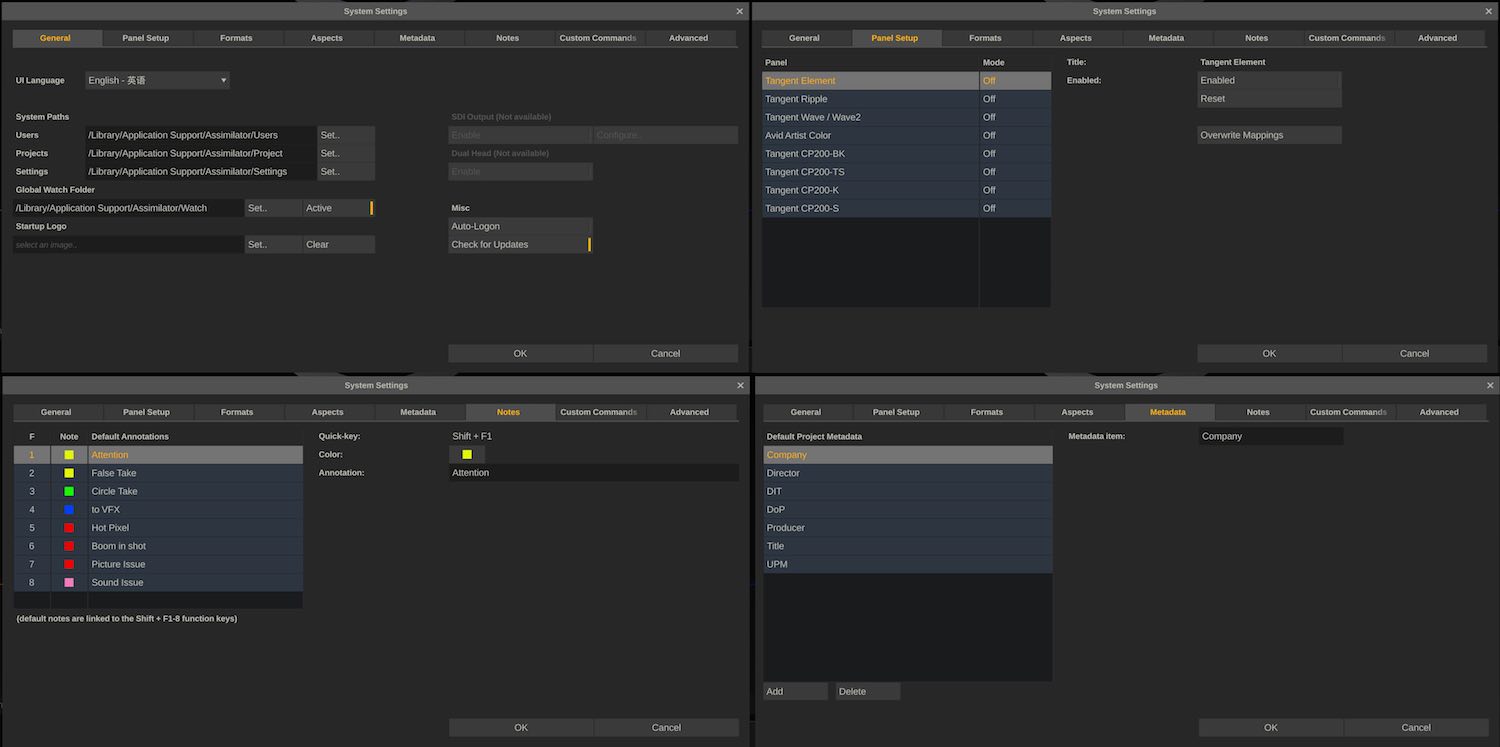
The System and User settings (2) are as you’d expect. In ‘General’ you can see where Assimilate saves project files and even change the start up logo to your own.
It’s also nice to see that all of Tangent Wave’s panels are supported, and it’s well worth considering using a panel for faster more tactile grading.
The new Notes feature lets you use the function keys (1-8) to apply default notes to shots, or your own custom annotations.
Under Metadata you can input information on the key collaborators involved, which is also included in the Render section of SCRATCH.

Creating a new project is easy just click on it in the list, or hit ‘New…’
What’s nice about Assimilate is that you have very clear control over the particular set up of any given project, including how it will handle Gamma levels in different colour spaces (Jump here for a big post on Colour Management for Film Editors, if you don’t know what that means) frame size and your default export settings.
You can, of course, change these settings at any time and set up different defaults for new timelines too.
Inside of SCRATCH there are four rooms; Construct, Edit, ColorFX, Render.
You move through these much like similar rooms in say, DaVinci Resolve (Media, Edit, Fusion, Color, Fairlight, Deliver) performing different tasks in different rooms.
The Construct is where you start and where you construct your project. It’s effectively where you import your media, arrange it into an edit (conform) or work from a string-out of the media itself.
Assimilate SCRATCH uses a few different editing paradigms, which aren’t often combined in the same app, such as both layers and nodes. They also make heavy use of timelines with stacks of versions built in.
Edit allows you to check your conform has been re-created correctly, check sync, move clips around or trim them and do basic editing tasks.
ColorFX is where you get into the meat of what SCRATCH can do with regards to colour grading and visual effects (see Tobias’ excellent show-reel for some examples of relighting shots)
Render uses a node-based schema to set up all of your exports in a way that makes creating multiple deliverables of the same project a breeze.

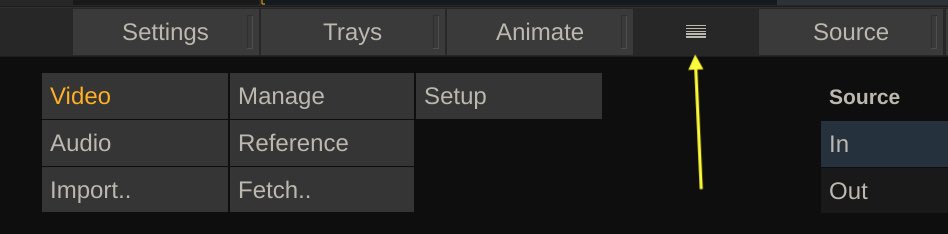
Within SCRATCH you can also adjust the layout and toolset available to you through a drop-down menu (‘spanner icon’ – Toolset:) in the control bar at the bottom of the screen.
So just how easy is it to bring a project into Assimilate SCRATCH for the first time?
Mostly really easy, with one big ‘gotcha’.
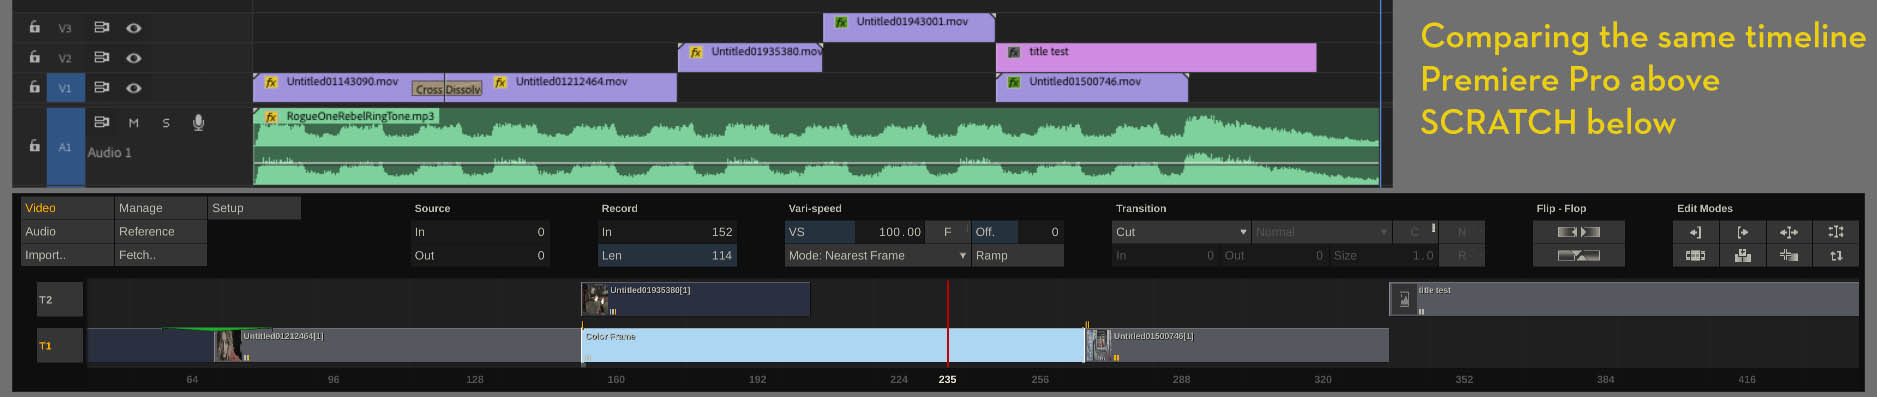
Click to enlarge
For the purposes of this post I created a very simple ‘edit’ in Premiere Pro, including multiple tracks, audio, speed changes and effects. I then exported an XML (select the sequence in the Project pane, then File > Export > XML)
In essence the Adobe Premiere Pro project moved fairly seamlessly into SCRATCH in just a few clicks using a traditional XML handshake to rebuild the edit, this included frame re-sizing, speed changes, dissolves and placeholders for the Title text which isn’t readable by any application outside of Premiere.
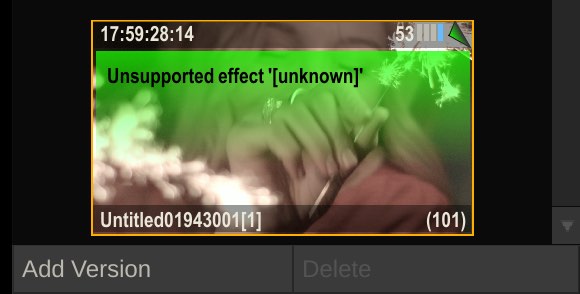
One effect I had added in Premiere (Horizontal Flip) didn’t copy over – which I entirely expected – I just wanted to see what would happen to it in SCRATCH. I’m not sure how you turn this off?
UPDATE – In a Q+A with Assimilate’s Product Manager, Mattias Aderhold (see the bottom of this post for the rest) I discovered the answer:
How do you remove an unsupported effect flag?
That is just a colored note. You can remove it by clicking the little note icon in the upper right corner of a clip thumbnail, or by clicking the note in the metadata stack (when inside Edit, or ColorFX, swipe right and change the version stack to the metadata tab) or even in the Media Browser => Metadata tab.
Edit timeline on the left, ColorFX on the right
I’m not sure why in the ‘Edit’ page/room there are only two tracks shown, with the highest track number at the top, whilst in the ColorFX page three are shown although with the tracks descending rather than ascending.
Maybe this is to reflect the common ascending order in an NLE, whilst in a grade you’re usually working with a flattened timeline, whilst VFX composites or titles might be above track 1 and slightly less consequential than your primary timeline. Or maybe it’s a UI bug (doubtful!).
UPDATE – Another answer from Mattias:
Why can you only see two tracks in the Edit page?
Because there’s just so much room 😛
If you look up a bit – between the “Settings – Trays – Animate” buttons and the playback controls, there’s a little gripper. If you drag this up, you can make the menu space bigger, and that will reveal more tracks.
At the same time, you can hold down space and drag across the viewport to pan around. You can do the same in the timeline area in Edit – then just drag down to see the other tracks.
Obviously, if you’d rather see all your tracks at once, the gripper is the way to go.
Click to enlarge
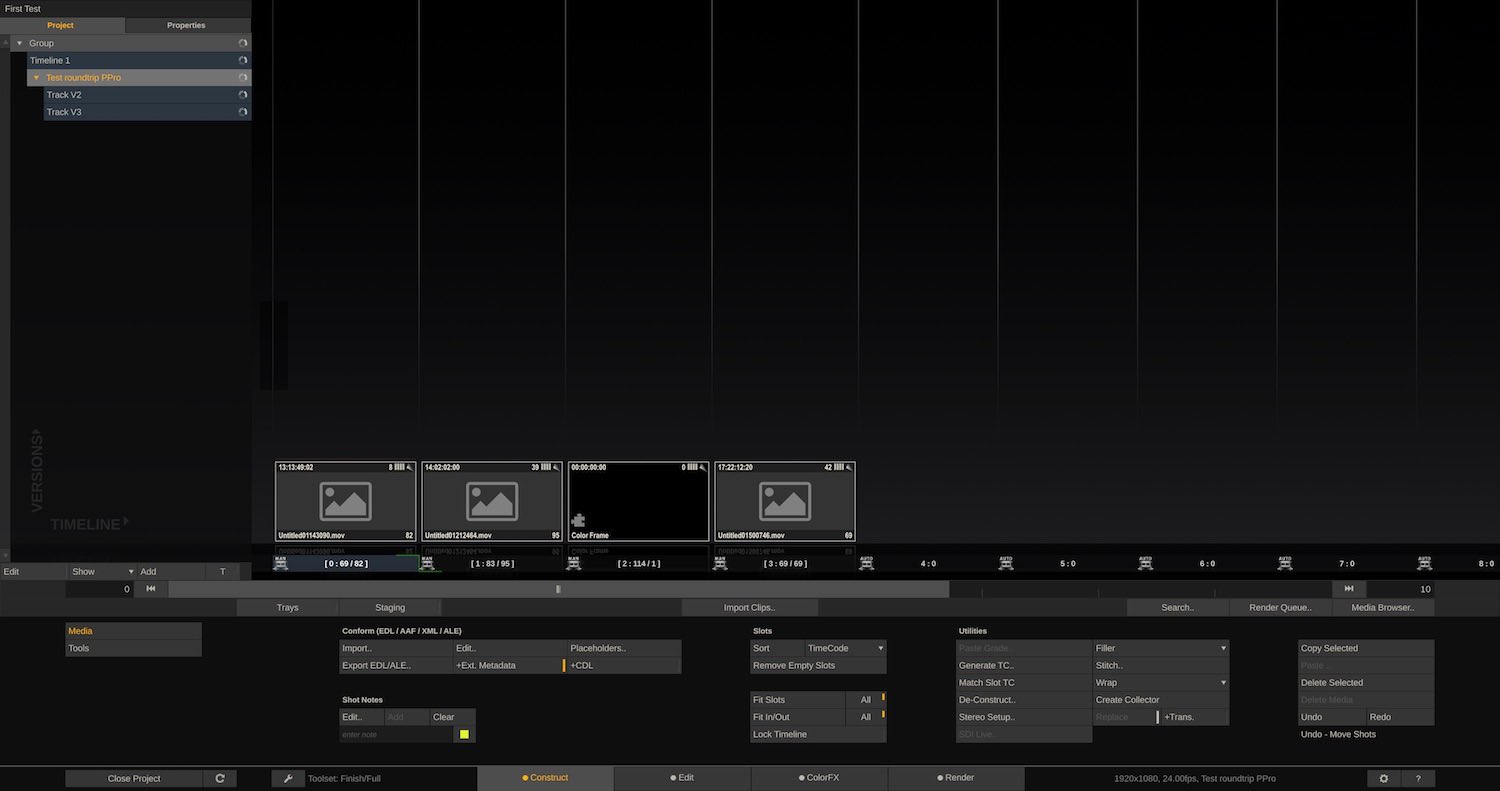
To import a project into SCRATCH is very easy. Looking at the Construct page the place I headed to was ‘Conform (EDL / AAF / XML / ALE)’ and clicked on ‘Import…’ I then navigated to my Premiere Pro exported XML, what I thought was successfully navigated a window detailing the process of the import, and hit ‘Assemble’.
This process produced what you see above, which is the same Premiere Pro project, but with no footage connected. Something has gone awry.
After much Googling, reading of the manual and trial and error, without any apparent success, I reached out to my contact at Assimilate for some help, here’s what Mazze had to say:
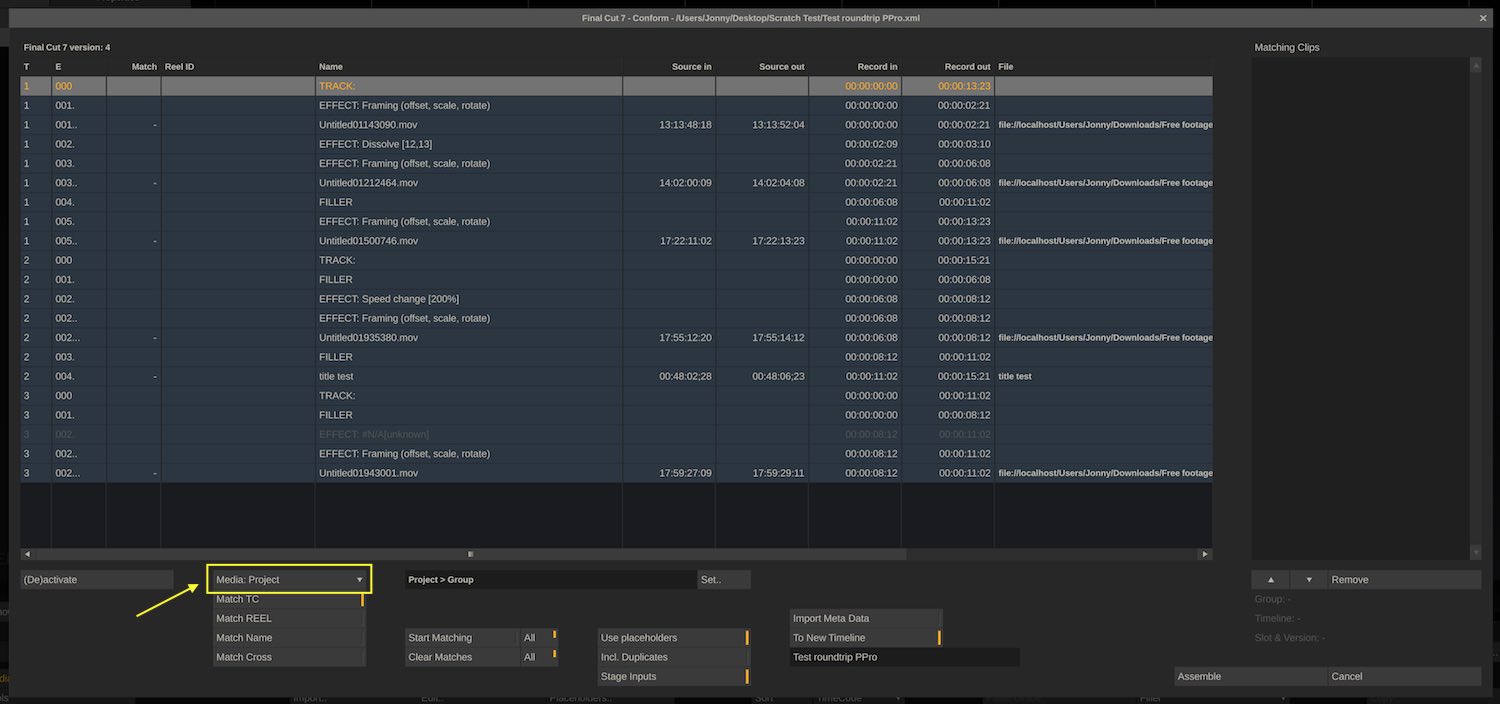
When you import the XML, the conform window opens. Inside there you have a dropdown to choose where to conform from: Folder, or Project.
With folder, you point it to a folder on disk containing the footage.
With Project, you will get a different dropdown, where you can select the project/group/timeline containing already imported footage.Next, below that, you select the matching criteria (e.g. Name and TC) and hit the “Start Matching” button.
SCRATCH should then list all the matches it found (ideally one per event in the xml) in the Matching Clips section to the righthand side.
You can select every event and see the found matches (and possibly remove unwanted matches, if there are multiple).
Then you can hit Assemble (ideally to new Timeline) and SCRATCH creates the timeline.Every clip that it couldn’t match, it creates a placeholder (with all the metadata that it could pull out of the XML)
If you now click the “Placeholders..” button (in Construct => Media => in the conform section of the UI), it will list all remaining placeholders of the current timeline and again, you can match those (if, for example, footage was missing before and has now arrived, etc.) in the same fashion as before during the initial conform.
So I had essentially performed the correct steps, I just didn’t have the media connected up correctly, even though the XML was pointing to the correct file path for the media. This had made me assume SCRATCH could also see the media file path.
As I had imported all the clips into the Project during my own attempts, much like Resolve’s Media Pool, I was able to then connect from the project once I told SCRATCH to look at Timeline 1, which contained a string-out of my footage.
I suppose this goes to show that using SCRATCH is very intuitive, (I had basically gotten to where I needed to be) but that there are a few quirks that can stop you in your tracks, if you don’t know what you’re doing. I had looked in the help files and at several official SCRATCH tutorials, but they didn’t seem to cover this particular topic.
UPDATE – In response to my feedback on this experience the Assimilate team have since changed this to make this much easier for future users. It’s great to see user feedback incorporated so quickly!
The new default conforming location is now the Folder, showing the media directory where it’s currently looking for the media. Hopefully this will make it clearer what you need to line up to make this work.
Another issue I encountered was that in my test edit I had included an .mp3 file as test audio, but this is not supported by SCRATCH, where as aiff, wav, amb and w64 files are. That said there aren’t any real audio tools in SCRATCH anyway, so it’s more a case of being able to check and maintain sync.
When it comes to playback in the Edit page it is slightly frustrating that simple conventions like J K L or even Spacebar for play/pause don’t work. Instead you need to hit the up and down arrow keys for bi-directional playback.
When you do find small shared commonalities like these, they really help you to feel at home more quickly in a new piece of software, and when they don’t exist, it’s all the more alienating.
UPDATE – In response to my comment about the J K L shortcuts these have now been added to the Edit page! Another win for editors using SCRATCH for the first time.
How to Colour Grade in Assimilate SCRATCH
Click to enlarge.
Colour Grading in Assimilate SCRATCH is where the fun really begins, and there’s a lot of great tools to play with.
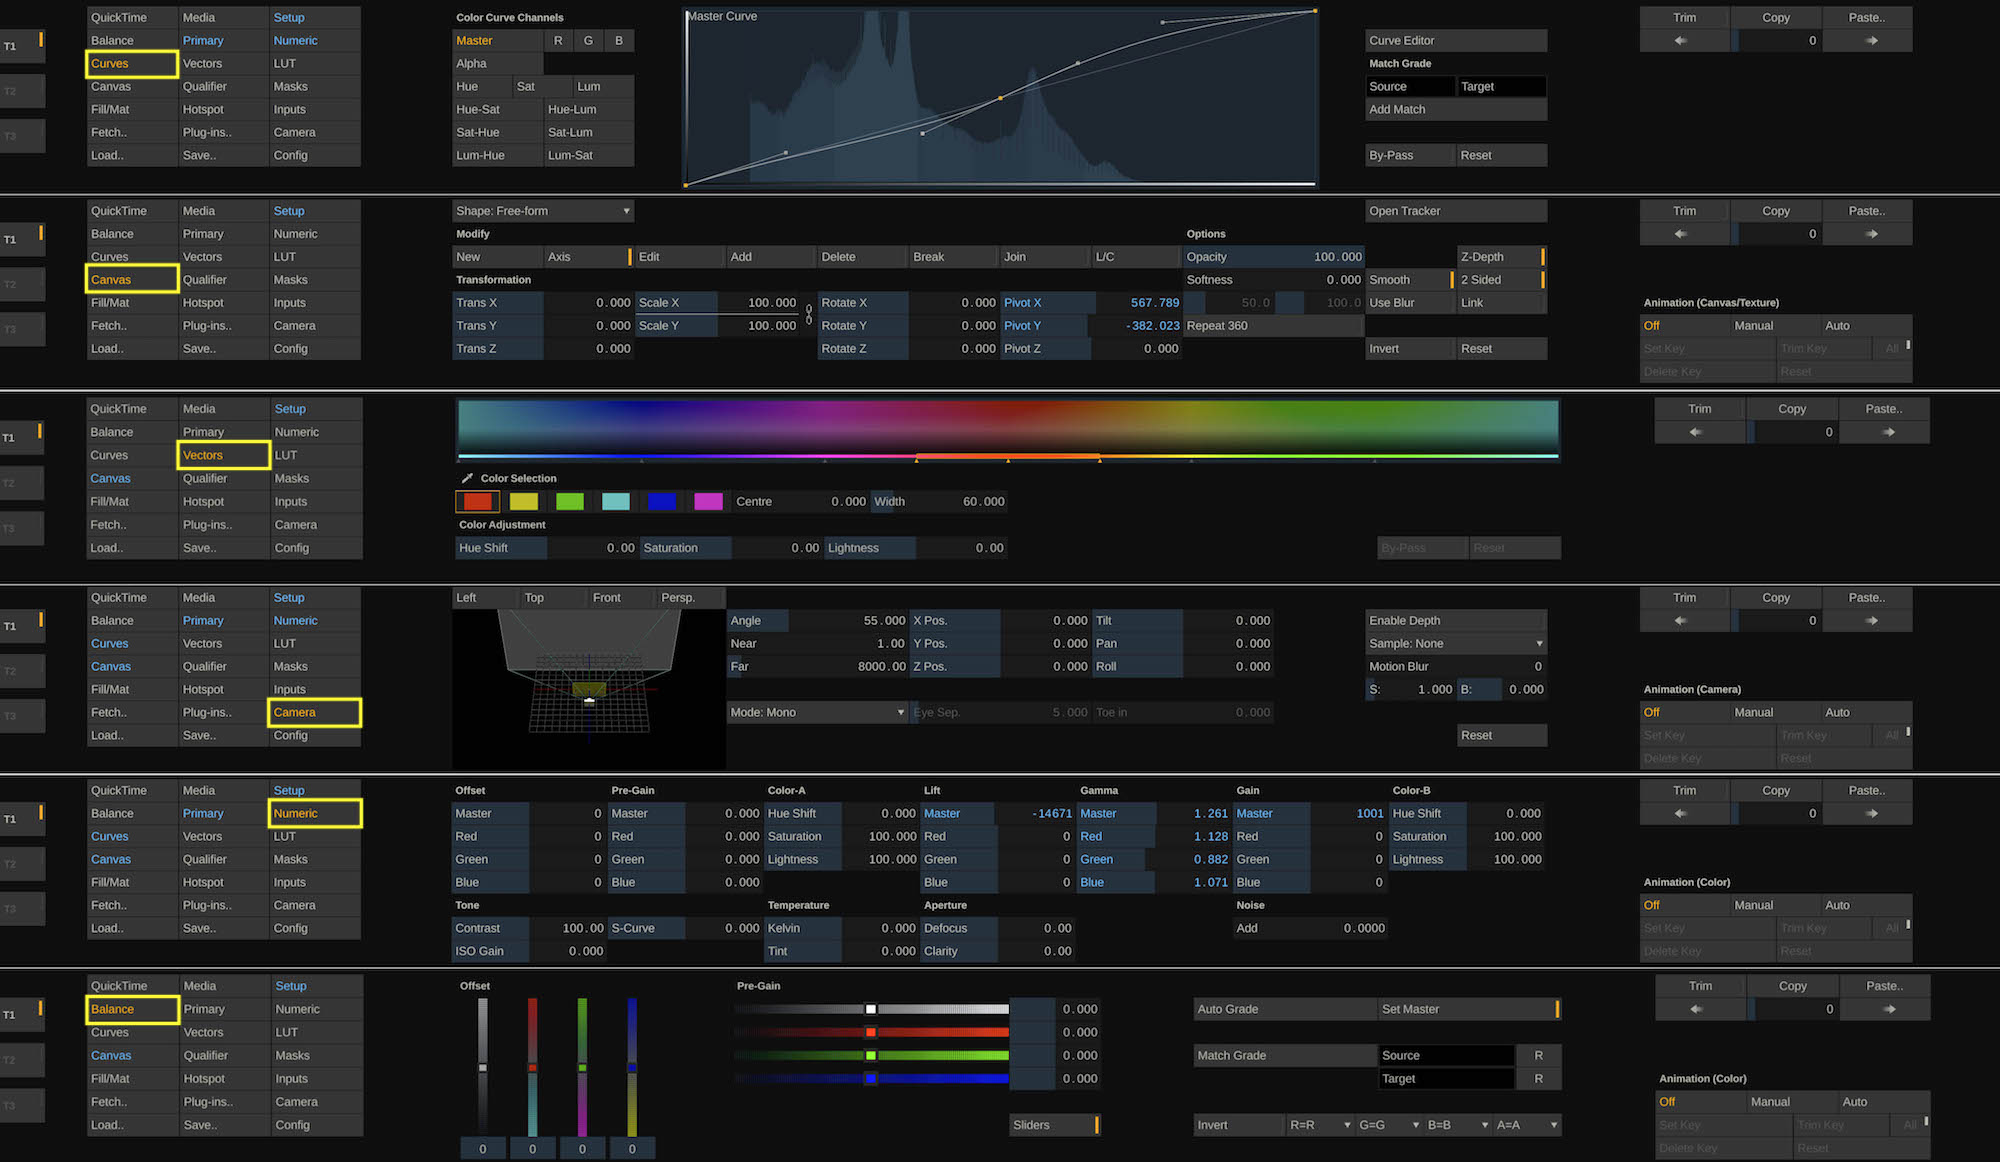
In this screengrab of the ColorFX page you can see the full set of tools as buttons on the left, these open up different controls in the centre of the screen (see below). On the right are buttons for copy and pasting grades and adding keyframes.
If you’re wondering what Color-A and Color-B do:
For Color-A and Color-B, the Tracker Balls represent Hue and Saturation adjustments.
Clicking inside the color wheel area allows you to adjust the Hue offset by rotating the color wheel in the desired direction. The color offset is shown as a separate ring inside the color wheel area.
The outer ring around Color-A and Color-B control the Saturation adjustment for each. You can click on the hash mark indicator and drag the ring clockwise or counterclockwise to increase or decrease the Saturation.
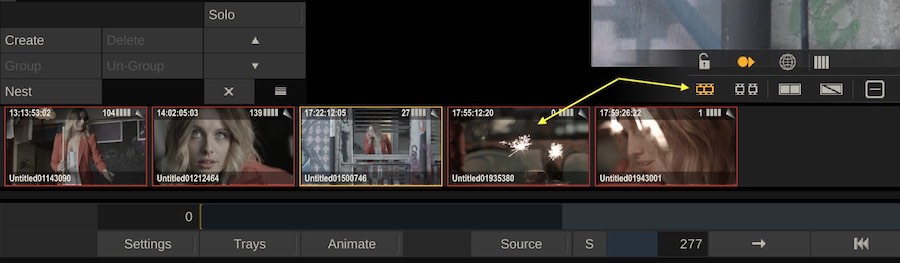
The dark blue/light blue bar in the centre of the screen above the transport controls, is the mini timeline. Personally I would prefer a little more delineation between clips. You can toggle on a much more helpful ‘filmstrip view’ of with actual thumbnails of the clips by pressing the far left button in the row of controls above the mini timeline. (Under the padlock symbol).
There are parts to the SCRATCH UI that just feel a bit too cluttered to me. It would be nice if you could turn off the transport controls (if you’re going to use keyboard shortcuts anyway) or hide some of the buttons under the viewer.
I would say that in some ways, even more so than DaVinci Resolve, SCRATCH’s colour wheels feel like they’re designed to be used with a colour grading panel – partly because adjusting the Lift Gamma and Gain requires you to spin the outside rings a fair amount to effect much of a change.
Although I’ve just seen in the User Manual that holding down SHIFT will produce larger adjustments.
On the other hand, being a Wacom tablet user, I was delighted with how well SCRATCH works with a pen and tablet, especially compared to the mostly ineffective Premiere Pro colour wheels. Crafting free-form shapes for power windows is a joyfully fluid experience in SCRATCH.
Click to enlarge!
Here is a compilation of some of the excellent grading tools in SCRATCH including:
- Curves
- Canvas
- Vectors
- Camera
- Numeric
- Balance
The canvas is where you draw power windows to help shape your look. The curves controls are superb and I actually preferred using them in SCRATCH, rather than the wheels or ‘Balance’ bars (bottom of the image), which is odd, as I often prefer to use the RGB sliders in Resolve.
For VFX work using the 3D Camera toolset could make compositing easier as you can set objects up in 3D space.

Adding a shape in the canvas toolset is very easy.
Just click on Shape: None and choose from Free-Form, Rectangle, Circle or Bicubic. (see controls image, one above). In this image you can see that the layers system within SCRATCH kicks in, where in each new shape is created in it’s own layer (which can be renamed, grouped, deleted etc.). I’ve added in a crop of the Layer tab UI onto the viewer so you can see how things match up.
Each layer then allows you to use the other colour correction tools within that shape.
If you’re in the Primaries grade then using the Primary tool and curves won’t create a separate layer for each, although you could do that manually if you want to keep your correction discrete.
In the Layers tab the grey square toggles the layer on and off. The R stands for Recursive, which toggles on/off, and “determines whether a Layer will interact with the layers below it or if it will take the base image as its starting point.”
In some ways this is why a node based system is easier to visually interpret as you can see the connections to previous nodes before it, or whether it’s directly connected to the first node. But either way it’s great that you have the choice!
![]()
Tracking these shapes to your shot is also super easy and works in basically the same way as any tracker you’ve used before. It’s also just as good as the best trackers that I’ve used.
![]()
Actually applying the tracking data you’ve just created to your shot is however, momentarily confusing.
The button you press is ‘Exit Tracker’ which brings up this confirmation choice. Without the tooltip it’s not immediately obvious that this will actually apply the track data to the shot, and confirm you want to leave the tracker. But that’s what you need to do.
UPDATE – Again in response to my experience with the tracker Assimilate have changed to wording of the button to ‘Apply Track’ which will now apply the tracker and exit from it.
https://youtu.be/bHxATfdmf1o?t=8m21s
This older tutorial on SCRATCH for Resolve Users demonstrates how to create and track a shape within the Canvas toolset.
Exporting a project in Assimilate SCRATCH
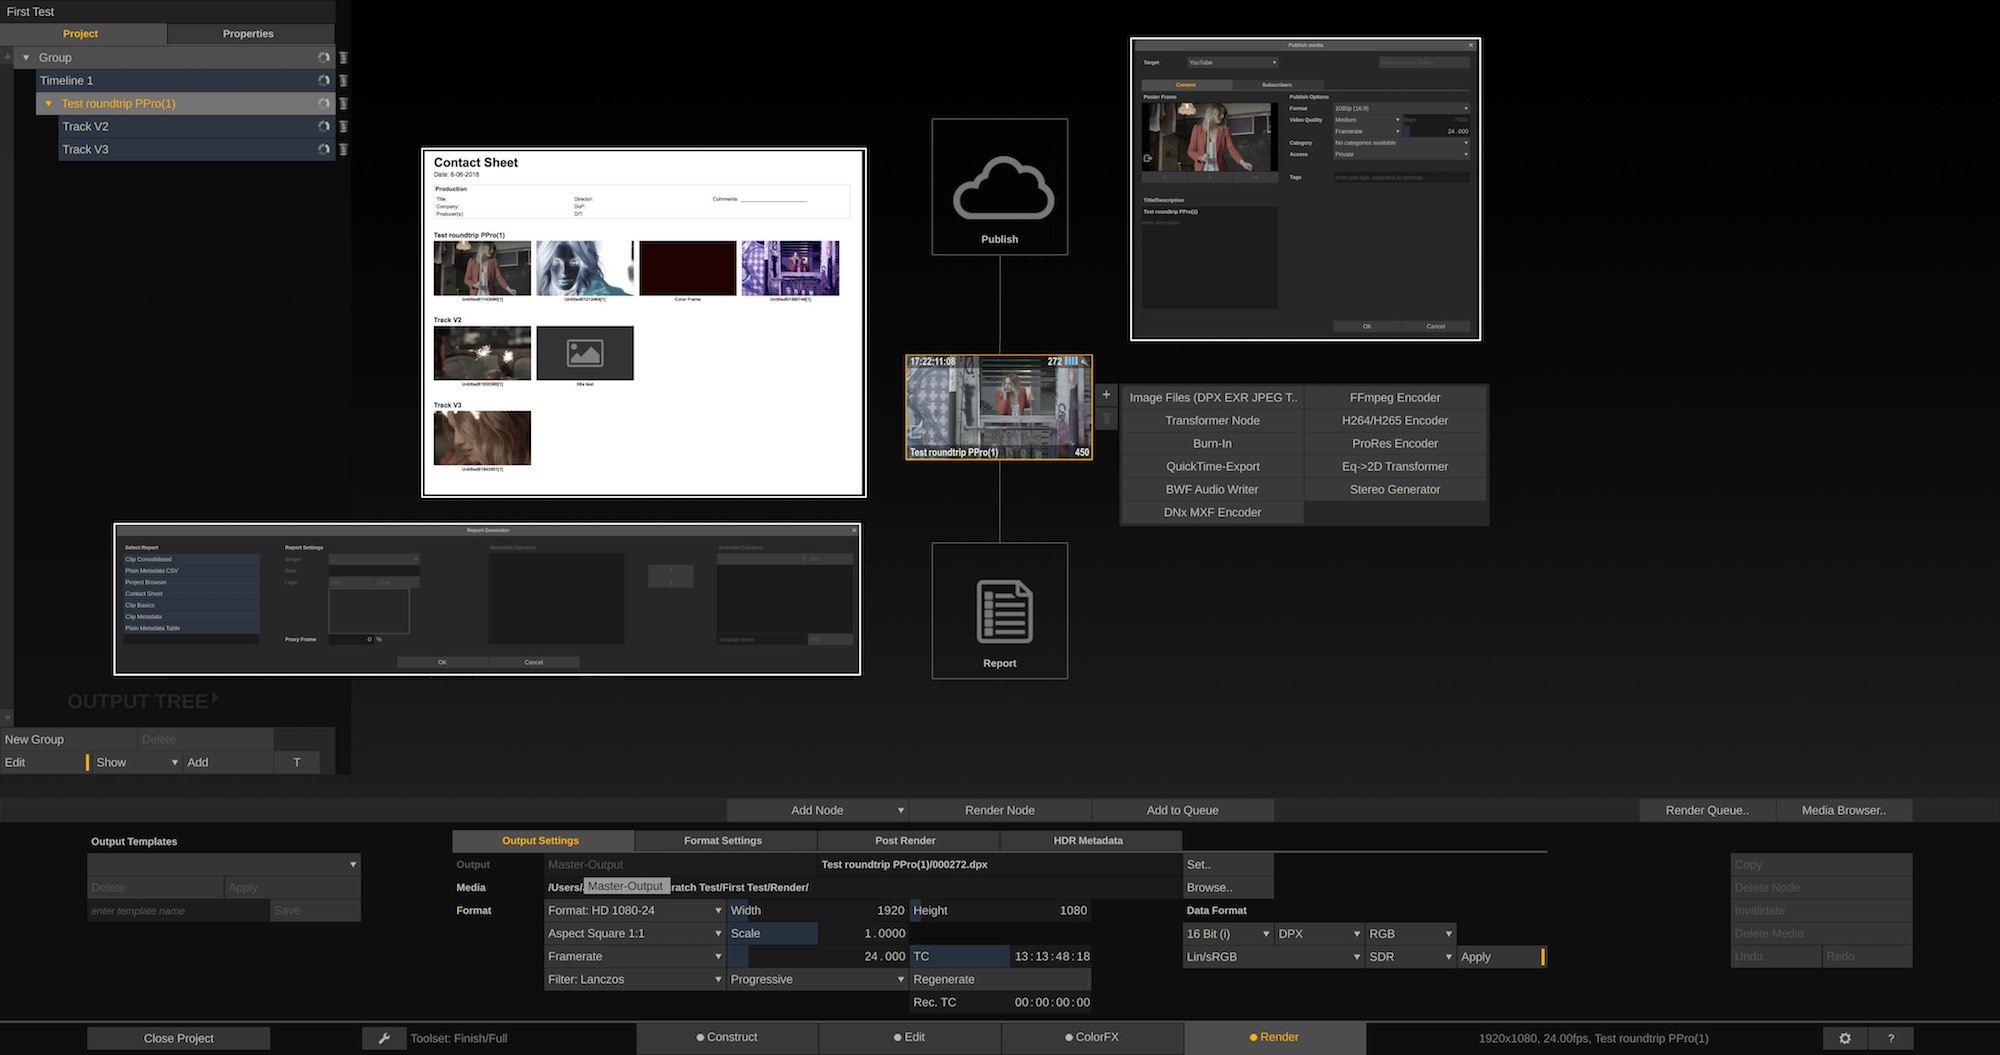
Click to enlarge
The final step in the process is obviously getting your work out of Assimilate SCRATCH and either delivering your final file, round-tripping back
Here I’ve put together a composite image of some of the export settings. It’s interesting that SCRATCH diverts to a node based workflow for creating your outputs (while DaVinci Resolve doesn’t?!). When creating multiple exports I can imagine that it is really helpful to be able to see how they are connected, which version was BITC, frame sizes, codecs etc. and lay them out in something other than a list.
SCRATCH also has two useful options; Publish and Report.
Publish directly connects to Vimeo, YouTube, Facebook or SCRATCH Web for instant uploads. Reports creates thumbnail reports, ideal for DITs and turnovers to other departments.
Here the metadata you can input for your SCRATCH project is also exported, along with a variety of options of file-based metadata too.
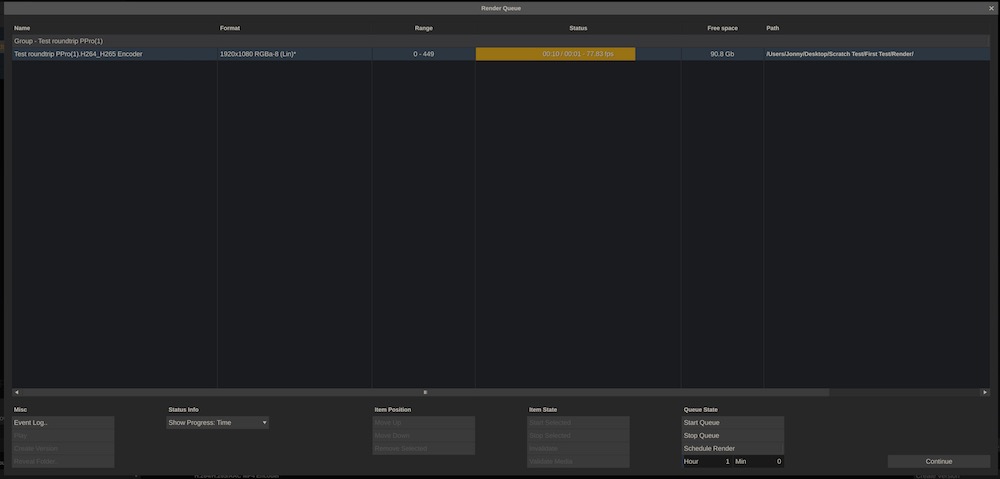
I exported a quick H.264 mp4. Using the Render Queue it’s nice to see that you can schedule renders, easily re-arrange the order of items in the queue and keep track of progress by frames, time or percent.
You can also set up post-render actions and control HDR metadata. The output templates section allows you to save your custom output presets.
Exporting your project is exceptionally easy, whilst giving you access to a lot of options in an intuitive manner.
Final Thoughts on Using Assimilate SCRATCH for the first time
Coming to Assimilate SCRATCH as an editor, colorist or DIT will be a fairly painless experience.
Most things are very easy to figure out and intuitively designed. There are (as with any app) a few quirks and things you just have to learn how to do, but for the most part it’s fairly easy to navigate.
Some elements of the design could do with a bit more feedback/user input if Assimilate want to make it more accessible to a broader market, even simple things like adding in J K L or Spacebar shortcuts would be helpful!
Once you get underway though SCRATCH is an incredibly powerful and versatile tool for colour grading and visual effects (which I didn’t really touch on). If you’re looking to become an online editor, or need a post-tool designed with dailies in mind then it would be well worth your time to give it a thorough examination.
Check out Assimilate SCRATCH version 9 here.
Q & A with Matthias Aderhold from Assimilate SCRATCH
Mattias Aderhold, Assimilate SCRATCH’s product manager, was kind enough to answer some of my nagging questions that my first foray into SCRATCH threw up with some detailed answers.
Shortcuts
The standard J K L shortcuts are now available in the Edit page. In the ColorFX page there is a really cool alternate functionality:
If you hold down JKL (and whatever is right from it) they will highlight the color wheels on the Primary menu inside ColorFX.
Then you can just drag across the image to adjust the colorballs (and use the mouse wheel to turn the corresponding ring).
Furthermore, if you hold down shift, or control and click one of the reset buttons of the color wheels, you can reset either luma, or chroma individually.
On holding down SHIFT to increase control gearing, you can actually set it up to your liking:
On the startup screen, go to User Settings. There you have “normal” control gearing (usually set to 100). And “SHIFT” gearing (normally set to 25, making it more sensitive/increment slower).
You can obviously dial in whatever you want and make normal be 50 and shift be 100 or so.
New Spacebar functionality:
We’ve also now changed the spacebar behaviour: Tapping the spacebar now activates play/pause, whereas holding it down and dragging across the viewport pans the image (which is the old, ever-existing functionality).
Where does SCRATCH save projects?
Set the path up in the System Settings. The default is
PC: C:\ProgramData\Assimilator\Project
Mac: /Library/Application Support/Assimilator/Project).
This location can very well be on a shared network storage where everybody can access it (only the first one has read-access, though).
Can you change the Layout of the UI controls in ColorFX?
You cannot change the layout of the menu in ColorFX. However, you can change all UI colors and text.
When in Construct, or Edit/ColorFX, press Ctrl + U to bring up the dialog – switch the dropdown from “Color” to “Custom” and you can modify any element in SCRATCH to your liking.
How can you roundtrip back to your NLE?
SCRATCH does not export an XML/AAF (yet), the only option in that direction is an EDL. However, without EDL, you would export individual clips again and relink to those in your NLE.
Therefore, Resolve has made it easier (there is just that little checkbox “individual clips”) – however, SCRATCH has a cooler and more flexible way.
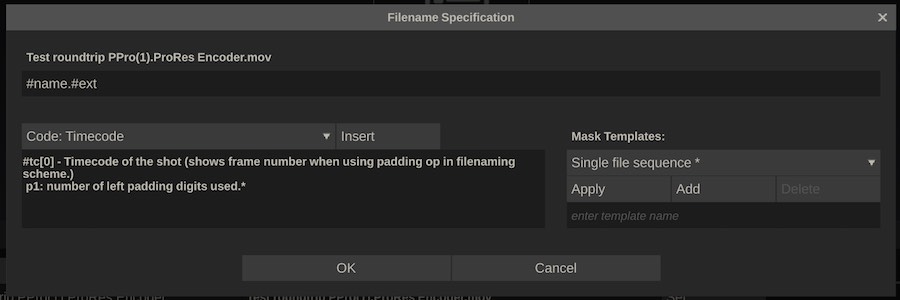
You would select the output node (e.g. ProRes) and click the “Set” button below to enter an export filename. Usually that uses #name, which is the output node’s name and exports one big file.
Now as soon as you add a #-code to the export filemask, that is different from shot to shot, you are forcing SCRATCH to export individual clips.
E.g. add #sname (source name) – that now basically changes the export filename with every clip and SCRATCH will export individual clips.
If you have the same source clip twice in your timeline (which is quite common), you need to add another criteria (otherwise SCRATCH would overwrite a just written clip with it’s source name the next time it comes across that clip (just a different portion) in the timeline).
You would then add #eventno – that is the slot number and that is individual for every clip inside the timeline. Your filemask would then look like this: #sname_#eventno.#ext – fairly straight forward.
Note, that you can also put in slashes. For example, #reelid/#sname.#ext. This would create a folder based on the reel-id of a clip and put in all clips (source-named) of that reel-id, etc.
Lastly, you can save this filemask as a template, so you can recall it on other output nodes.
Then you can build your output tree, save that again as a template (lower left corner of the render tab) to recall it on other timelines, and then, if you *always* need that output tree on all Timelines, you can even define this output template as the default in your project settings, so it gets attached automagically to each new created timeline (very helpful for dailies!).


