DaVinci Resolve 12 Tips and Demos
The big news of NAB 2015 was Blackmagic Design’s epic list of announcements, three of which were of particular interest to me, the first of which was DaVinci Resolve 12. The latest update brings an epic list of 80+ new features or improvements (which you can check out in full on possibly the longest features list page ever) including a new 3D tracker, 3D keyer, multicam editing, automatic clip colour matching, aaf export, an updated user interface look, even more editing and audio features and tons more. A list of only the new features can be found here.
The best place to get a decent overview of what’s new in Resolve 12 is on the updated Blackmagic Design site where there are 4 new videos highlighting the updates to the editing feature set, colour grading feature set and the general workflow pipeline. Well worth the time. At some point the Supermeet demo will make it online, and I’ll update this post with that too. Below you can enjoy a quick overview from the show floor courtesy of NoFilmSchool.com
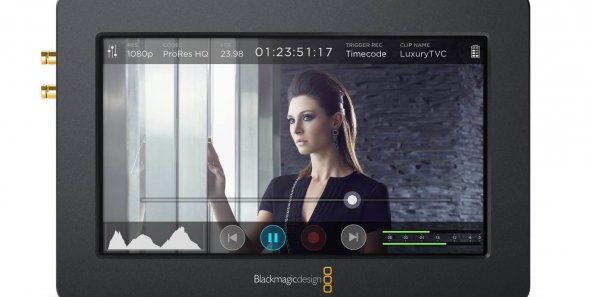
Resolve 12 is available ‘in July’, so you’ll just have to whet your appetite with these details until you can download it for free if you are an existing owner or as a new Lite user. The other two announcements from BMD that were really interesting to me the release of Fusion on Mac (coming in ‘Q3’) and the new $495 5″ HD video assist. This is interesting because it will take in video from any HDMI source and record it to SD cards in Pro Res and DNxHD.

The Blackmagic Video Assist features a bright, 5 inch high resolution 1920 x 1080 HD monitor and touchscreen with a wide 135º viewing angle. Customers can record broadcast quality 10-bit 4:2:2 video onto fast, inexpensive and widely available SD cards in Apple ProRes and DNxHD file formats… The Blackmagic Video Assist includes 2 standard LP-E6 battery slots allowing hot swapping of batteries while in use, and it can be powered using the 12V DC input.
The reason I’m interested in the Video Assist is because I think an affordable device like this (Atomos’ similar products aren’t this good at this price!) will really help a lot of my lower-end clients to escape the limitations of their C100 (or similar) cameras and record some decently encoded material, with timecode and unique file names. Plus it’s more likely to be in focus when they can see it on a decent screen!
Colorist’s on DaVinci Resolve 12
The Coloristos (3 professional colorists) sit down for nearly two hours (in this only part 1!) to dissect the news from NAB, largely focussing on DaVinci Resolve 12 (29 minutes in), discussing things from as small as how the new user interface will help colorists work faster and more efficiently to bigger things like the 3D tracker (apparently 2 years in development) and colour management system improvements. It’s a long, detailed and insight rich discussion.
“You have the DaVinci YRGB colour science, you have the and ACES colour science and ACES LOG colour science and then you also have this (new) DaVinci YRBG colour managed colour science. And when you’re in the colour managed colour science mode, what happens is you then basically apply transforms on the input for your various clips, so you can mix and match clips work with clips from various sources, and then you set a working timeline colour science, an output/monitoring colour space.
So your system is automatically doing transforms from one colour space to the other all the way through the pipeline. So what this means is you can work in any colour space you want and the system will automatically transform your clips to that space… You know when you’re grading your camera footage and you right click and navigate the LUT menu for each shot, that’s over.” (43:40 mins)
Patrick Inhofer, colorist and trainer over on Mixing Light.com and editor of the magnificent, and free, Tao of Color Newsletter, shared his thoughts on his memorable trip to NAB in a blog post that’s well worth reading from start to finish. I’ve pulled out a few key Resolve focused quotes…
When evaluating new versions of DaVinci Resolve I always ask myself:
- Did they remove mouse clicks (streamlining the interface)
- Did they give me new tools enabling new creative possibilities?
My first impression: Yes on both counts…
A 2-year feature request of mine was finally implemented! We now have endpoints on curves! And thanks to all of our Mixing Light members who tweeted me about this long-time complaint of mine finally being addressed. This means Avid Symphony colorists can now manipulate curves the way they expect… and those of us exploring the LAB colorspace can make ‘cleaner’ AB contrast adjustments. Thanks Team DaVinci Resolve!
Here are a few more colorist’s thoughts on the new features in Resolve 12.
Tips on Resolve 12’s New Features
Helpfully a couple of Twitter friendly colorists shared a plethora of tips on some of the new features in Resolve. Major thanks to @jasonmyres and @robbessette!
Resolve 12 curves are now overlayed together, and include Bezier handles. I like this better although I know some might not. #nab2015 A photo posted by Jason Myres (@jasonmyres) on
Resolve Color Management. Select clips in a bin, right-click, input colorspace. No more shot by shot LUT menu. 🙂 #nab2015 A photo posted by Jason Myres (@jasonmyres) on
Compound nodes in Resolve 12: highlight nodes, right-click, create compound node. Nice way to manage and bypass complex node trees. #nab2015 A photo posted by Jason Myres (@jasonmyres) on


gosh I can’t find keyboard or keyboard stickers for windows davinci resolve 12
Anyone know something ?
Regards CB