
Using an OLED TV for Film Post Production
When you spend all day looking at images, as I do as a film editor, you really want to look at them on the best possible display you can, or at least the best that you can afford.
A professional broadcast OLED monitor, like the Sony BVM-X300 30 inch 4K TriMaster EL OLED, will set you back around £35,000, which is certainly more than I can afford, and far more than I require.
But consumer grade OLED TVs that costs a 10th of this, have come on in leaps and bounds in the past few years. Manufacturers like LG have been especially cognisant of the professional consumer by, for example, providing greater access to internal calibration controls, making top of the line OLED TVs a very viable option for your editing and colour grading suite.
It is worth pointing out that the underlying OLED panels in a £35k broadcast monitor and a £3,500 OLED TV are made from different technology (RGB vs WRGB OLED), hence the huge price differential, but let’s not get into that for now.
In this extensive post I’m going to discuss three areas of using an OLED TV for post production work:
- Understanding why you should consider an OLED display for post production
- Understanding how to connect and calibrate your OLED TV for colour accuracy in your edit suite
- My personal perspective on what it’s like to use an 55″ LG E8 OLED in my edit suite
LG were kind enough to send me a 55″ OLED E8 (2018) TV for the purposes of this article, which is also being published on their brand new community site OLEDSpace.com, which is a great place to learn more about OLED technology and the latest industry developments.
I am reviewing the 2018 model as the 2019 model wasn’t quite available in the UK, at the time of writing. But, from what I can tell, the major differences between the 2018 and 2019 models aren’t huge.
Although there were certainly beneficial upgrades from a post-production perspective, such as:
- Second generation Alpha 9 Intelligent Processor
- Improvements in the fine grain picture controls
- Easier access to Peak Brightness controls
- Custom HDR Tone-Mapping and Enhanced Calibration Tools
- HDMI 2.1 features including eARC support
But as we’re on the cusp of the new models being released around the world, this is actually an excellent time to snap up a bargain, as the previous year’s models are often heavily discounted.
For example, the popular LG 55″ C8 OLED is only $1599.99 where as the 2019 model (C9) should cost around $2,499 new. In the UK those prices are pretty much the same just switch the currency symbol!
It’s also worth mentioning that the panels in OLED TVs from brands like LG Electronics, Sony, Panasonic or Philips are sourced and created by LG Display. So the main differences (and there are plenty) between consumer OLED TVs will be in the processing that the TV does to the image on the panel.
In writing this post I found three main sources incredibly helpful in bringing me up to speed on a lot of the technical details surrounding OLED TVs.
- Professional TV calibrator and reviewer Vincent Teoh’s HDTVTest YouTube channel is a gold mine of technical comparisons between TVs and models, as well as deadpan comedic delivery style.
- RTings.com provided some great insights on the LG C8/E8 models specifically as well as a really interesting results from their extended ‘burn-in’ test, in which they’ve been running 9 TVs for 20 hours a day for a year.
- Mixing Light.com’s interviews with Portrait Display’s Tyler Pruitt were especially helpful for the calibration section of this post. The team behind Mixing Light also recently created an excellent 12-part series of free training for creating in Dolby Vision.
Using an OLED TV for Film Editing
In this first section of the post I’m going to lay out what the benefits of using an OLED display in your suite are, and explain some of the technical terms and procedures you’ll need to understand to get the best results.
So why would you want to consider using an OLED TV in your editing or grading suite?
Here are some compelling reasons, which all apply to the LG 55″ E8 OLED I was provided:
Quality of the image – Perfect blacks, vivid colours, wide colour gamuts, high contrast ratios and High Dynamic Range (HDR) support.
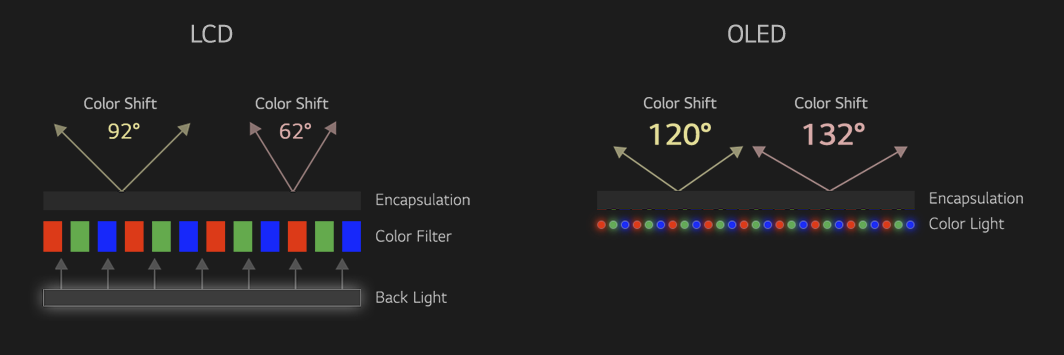
An OLED is able to deliver perfect blacks because when each pixel is off, it emits no light. This is the basis for it’s ability to deliver a visually delightful contrast ratio, which is the range between the darkest pixel and the brightest.
Per-pixel dimming also means that you don’t get a halo effect around the brightest parts of the image because, unlike a LCD TV which relies on ‘local dimming’ which occurs at a block level, each pixel is it’s own light source. Overall this results in a much richer image with finer details.
The LG E8 OLED is also able to display a wide colour gamut covering almost all of the DCI-P3 digital cinema colour space, although technically the highlights will desaturate slightly at the highest levels of luminosity the display can produce.
(Colour Gamut is the breadth of colours a display can reproduce, and colour volume is how well the display can reproduce them across a range of brightnesses.)
This means that the colour reproduction will be extremely vivid and strong across the spectrum.
Obviously this also depends on what you feed the TV. The higher quality image you provide, such as masterfully produced UHD or 4K HDR content, will enable the display to really show off it’s capabilities.
Size and Resolution of the image
The LG E8 is a UHD 4K TV which means that it has 3840 x 2160 pixels, so it’s perfect viewing UHD 4K HDR content (Blu-ray is only SDR HD at 1920 x 1080) available from streaming services like Netflix, Amazon Prime, Apple TV or on UHD Blu-rays.
Given the physical size of these TVs, ranging from 55″, 65″ to 77″, they’re ideal as a large client monitor, or large grading monitor when you want to view your high resolution images closer to (or at) their native pixel spec. Also viewing your project on a larger display will also help you pick up on details that you might have missed on a smaller screen.
Personally, I can’t fit a 65″ or 77″ TV into my editing suite, but if you’re working in a larger room, with comfortable client seating a distance away, they’ll love seeing their work on a high quality display.
I also own the LG 31MU97 which is a true 4K monitor with 4096 x 2160 pixels, which I love editing on, all day long. This will also show me full 4K images, pixel-for pixel, in fullscreen, but having a second large display to view my creative work on will be a great asset.
Wide Viewing Angles
Most often in an editing or grading suite the room is set up so that everyone is facing the display directly, but any ‘off-axis’ shifts in colour or contrast from a lesser display will soon become apparent and sow doubt in the mind of your client that they can really trust what they are seeing and the creative decisions they’re making. One of the additional benefit of an OLED TV is that the image looks great from a really wide range of viewing angles, without these kind of problems.
This also helps to keep everyone happy if the TV is in the living room and not everyone can sit right in front of the TV.
Ease and Quality Calibration in the TV
One of the things I’ve heard time and again from listening to colorists like those behind MixingLight.com, is that, when properly calibrated, the LG C8 and E8 monitors can stand up very well next to far more expensive broadcast monitors, in terms of displaying an accurate and pleasing image.
One of the benefits of a correctly calibrated monitor is the confidence it delivers to you as a creative professional that what you are seeing is correct, even if the client feeds back that things don’t look quite right to them when watching the grade on their iPhone in the back of a taxi under phosphorus street lights.
One of the benefits of LG’s partnership with Portrait Displays (owners of SpectraCal), the maker of calibration software CalMAN, is that the software can now directly access the 1D and 3D LUTs on the TV ensuring accurate calibration. This removes the need and expense of running your image through a separate LUT box.
The 2019 LG C8 and E8 models are now also capable of running their own test pattern generators which also removes the need and expense of using a hardware-based pattern generator.
I’ll get into calibration in more detail in the next part of this post.
Broad Picture Format Support – SDR, HDR (Dolby Vision, HDR10, HLG Pro)
If you’re still not 100% sure what HDR is and how it works, then this very clear 4 minute video from Ripple Training’s Mark Spencer will give you all the salient details.
Not only does HDR support allow for images with a higher dynamic range to be displayed on your screen, Dolby Vision also allows for further metadata to be add on a scene by scene (or shot or frame) basis, to instruct the TV how to handle the dynamic range at that point.
This is as opposed to static HDR metadata which is a one size fits all approach throughout a film or TV show.
There is an ever-expanding range of HDR formats, with no clear winner just yet (LG TV’s do not support the newer HDR10+ for example). I found this helpful tidbit of info in this helpful primer on HDR from What Hi-fi:
Another advantage of Dolby Vision is that the metadata is embedded into the video signal, meaning it can run across ‘legacy’ HDR connections as far back as version 1.4b.
Despite only using static metadata, HDR10 requires HDMI 2.0a compatibility.
Burn In
One caveat to add to this list is that of ‘burn-in’. This is where static elements, such as ticker-tapes on news feeds, logo bugs or channel ids, or video game HUDs etc can be permanently burned into the panel.
From everything I’ve read and watched in the course of researching this article it seems that burn in is both a real issue and an internet myth.
It is a real issue in that it can happen, but it is not really an issue if you use your TV in, what would be for most people, a normal fashion. So if watch a variety of content, don’t watch your TV for 5-8 hours in a stretch every day, and switch on certain useful functions such as Pixel Refresher, Logo Luminance Dim and Screen Shift.
But it’s a bit of an internet myth, in that it’s seemingly fairly over-blown compared to ‘normal usage’. I’m also assuming that older panels may have more issues than newer ones as the technology has improved over time.
If however, you’re leaving your TV permanently on a news channel like CNN, constantly using subtitles and have everything set to max brightness, then yes an OLED TV isn’t going to be an ideal choice.
This detailed longitudinal test from RTings.com provides some really helpful results on the issue of burn in across a range of TVs and underlying technologies, which is worth a watch if you want to dive into the issue further.
Conclusion
In conclusion, I hope it is obvious that there are a substantial number of reasons for adding an OLED display into your post production environment, especially if you’re doing work that reaches audiences via broadcast TV, streaming services or theatrical release.
The high quality of the images will definitely impress your clients, and the ability to professionally calibrate your display will give you both creative and technical confidence in what you’re viewing.
Make sure you’ve also properly considered your video pipeline (more on that below) and how you will physically fit the TV into your existing creative space for best results.
For a short example of a creative use-case for LG’s OLED TV in professional creative workflows, watch this short promo video from LG and Technicolor.
Technicolor’s senior colorist Tony Dustin shares why he and cinematographer John Toll, ASC and director Lana Wachowski all purchased LG OLEDs whilst finishing the remote colour grade for Netflix’s Sense 8, in order to accurately view and collaborate on crafting the same image as each other, and (potentially) the end viewer.
Correctly connecting an OLED TV to your Computer

Another important thing to get right is connecting your new OLED to your editing system in a way that provides the cleanest video signal path from the clip on the hard drive through to the monitor itself.
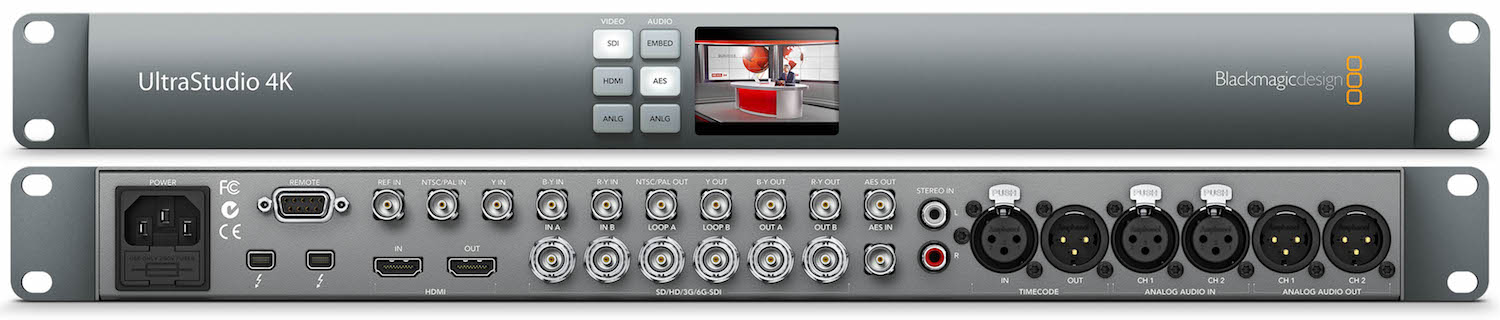
In this image from the Blackmagic Design DaVinci Resolve Configuration Guide you can see that they recommend connecting the 2013 Mac Pro via Thunderbolt to an I/O box like the UltraStudio 4K and from there via HDMI 2.0 to the OLED.
Although the Mac Pro has an HDMI port built in, (1.4b UHD) the reason that you need to use something like the UltraStudio 4K ($995/£785) in between, is so that the video signal goes directly from the software to the monitor and by-passes the GPU (and it’s drivers) and the operating system ICC profiles.
I’ve written another extensive article on Colour Management for Video Editors, which goes into using IO devices (and many other topics!) in a lot more detail, which you can read here.
Although I’m talking here about the 2013 Mac Pro, which is what I’m still running as my desktop machine in my home edit suite, the principal is the same regardless of your system.
To use the Blackmagic Design UltraStudio 4K with a MacBook Pro Thunderbolt 3 laptop, you will need a Thunderbolt 2 to Thunderbolt 3 adapter.
With HDR, every bit counts. Since HDR is about smooth gradation in an expanded luminance range, you need at least 10-bits to properly display HDR. – Patrick Southern, Lumaforge
The need for an external IO box is especially true when working with HDR material as it requires all the bit-depth and bandwidth you can give it, you can read more about this in the ‘What About HDR?’ section of my Colour Management for Video Editors post.
Here are a couple of quotes from my article on Colour Management for Video Editors to explain the basic details.
Understanding Colour Pipeline Management
Video Signal Chain: Source Footage > Video Editing Software > OS > IO/GPU > Cable > Monitor
Video Processing/Viewing Chain: Source Footage > Video Editing Software > Export Codec/Bit Rate > Viewing App > Web Service Compression > Web Browser > Monitor
Let’s say you want to get a Rec.709 10bit video image to your eye-balls the whole time, what would you need to do?
You would need to take a Rec. 709 10bit video file, edit it in your video editing software maintaining that bit depth and colour space, output that video signal to your external monitor in 10bit and in Rec.709 and view it on a monitor with a 10bit panel, calibrated to Rec.709.
The reason to use a dedicated IO card (like the UltraStudio 4K) is that it gives you a properly managed colour pipeline that by-passes the operating system’s GPU and colour profile settings and gets you straight from the video editing software to your monitor without alternation (unless you’ve got some hardware calibration going on too).
That way, if you know you’ve got a 10bit Rec. 709 video file and you’re outputting it via the IO to a 10bit Rec. 709 calibrated monitor you should be good to go.
Understanding OLED TV Specs and Technical Terms
With all these terms floating around I thought it would be worth quickly summarising some of the salient points for each.
The biggest competitor to OLED tech is that of QLED, which is essentially just “an LCD TV with a quantum dot filter which improves colour and light management“, as you’ll hear in this useful breakdown of OLED Vs QLED and the likely use cases for each from Trusted Reviews.
Essentially QLED displays are able to present much brighter images (over 2000 nits) and are therefore more suitable for brighter viewing environments, but they (as yet) cannot match the deep blacks or viewing angles of OLED TVs. OLED’s are better suited to darker, more cinematic viewing environments and are usually rated to achieve a maximum brightness of 1000 nits
OLED TVs, which stands for Organic Light Emitting Display by the way, are also running on completely different technology where-in each pixel can light up individually or turn off – hence the deep blacks – without a separate light source. Where as QLEDs have a back or side lighting layer, which also leads to other side effects such as haloing, grey-blacks and loss of detail.
The main thing to understand is that our viewing experience is based on contrast ratios.
So an image that has deep blacks, but doesn’t go ‘as bright’ can still present a beautiful image with a high contrast ratio, compared to one that has lifted blacks but is also much brighter. In the review’s I’ve seen the LG OLED E8 goes to about 750 nits, whilst other QLED TVs can hit 2000 nits.
These brighter QLED TVs may be better suited to sun drenched day-time TV viewing on your sofa, but won’t deliver perfect blacks in a dimly lit editing suite. This is why so many post professionals are using OLEDs.
For an accessible explanation of nits (and lumens) check out this article on lifewire.com.
LG OLED TV Model and Spec Explained

The LG series of OLED TVs come in a variety of models and sizes where the higher the letter the more expensive, and the number references the model year.
These are the B9, C9, E9, W9 (Wallpaper) and 88″ only Z9 (8K!) OLED TVs.
So the TV I have is the 55″ OLED E8 (2018), whilst the most popular model for price/spec balance seems to be the C8 (or in 2019, the C9), which features the same panel and processing as the more expensive E8, but with a different design aesthetic and slightly different speaker set up. The C8/9 has down-facing speakers which are ‘scooped’ forward by the stand, while the E8 has smaller front facing speakers.
Here is a quick run down of the E8 technical specifications:
- UHD 3840 x 2160
- HDR support for – Dolby Vision, HDR10 Pro, HLG Pro, Advanced HDR by Technicolor
- Dolby Atmos
- 60W, 4.2 channel
- 4 x HDMI
- 3 x USB
- LG webOS Smart TV
Tips on Calibrating an OLED TV for Post Production
Display calibration is an essential consideration for creative professionals using any kind of display in their post production workflow. If you’re making creative choices based on what you’re seeing in front of you, you want to know that what you’re looking at is an accurate image.
You also want to be confident in the accuracy of your display, should the client look over and ask “Is this monitor calibrated correctly?” or if they complain that it ‘looks different” on their own monitor.
Fortunately most high-end computer monitors and OLED TVs have the capability of being calibrated with professional software, and maintaining that calibration over time and across the whole of the panel (uniformity).
In the video above, Tyler Pruitt, Portrait Display’s ‘technical evangelist’, provides a great overview of what calibration is, how it works and why you need it. So if this is all new to you, it’s well worth a watch.
In this section of the post I’ll cover two different ways to calibrate your TV.
The first is by eye using the on-board controls and picture settings and the second is with professional software and hardware, which both the 2018 and 2019 LG OLEDs support.
Also be sure to regularly run firmware updates on your OLED to ensure you’re working from the latest version, although these can sometimes introduce problems of their own.
Update February 2024
Filmmaker Sidney Baker Green walks you through everything you need to know about setting up an LG C series (C1, C2, C3) monitor as a mastering monitor with DaVinci Resolve in this detailed 16-minute tutorial.
The best settings without professional calibration
Out of the box the LG 55″ E8 OLED comes with a variety of very solid picture profiles to choose from, which will have been calibrated at the factory.
These include:
- Vivid
- Standard
- Cinema
- Sports
- Game
- HDR Effect
- Technicolor Expert
- ISF Expert (Bright Room and Dark Room)
If you want to read through LG’s official definition for each of the terms in the Picture Settings menu, what these settings actually do and their recommended settings based on different viewing environments, check out this regularly updated article.
Here’s what it has to say about the Backlight / OLED Light:
Controls the level of screen brightness by adjusting the back light. The closer to 100 the brighter.
For those who have their TV in a dark room or basement, this setting won’t need to be terribly high. For those in brighter rooms, more backlight intensity will be desired.
Try to avoid making this adjustment while the sun is shining directly on the screen, as this will result in an unnaturally high setting.
Instead, make your adjustments when the room light is at its average for when you watch, and pick a program or movie scene with a lot of white in it, a daylight scene on a snow-covered mountain, for example.
If after watching the scene for 10 minutes you begin to squint, the backlight is too strong.
In this section of the post I’ll break down some of the other settings that you might want to explore to get the best out of your OLED, even without further professional calibration.
To start us off, in the detailed video above Daniel from RTings.com talks you through how to connect your TV correctly to both source and audio devices, as well as how to set it up correctly, including when connecting to a PC.
If you want to replicate these settings yourself, for both SDR and HDR content you should read through this detailed article on the LG C8 settings on RTings.com.
This largely involves turning most of the pre-processing settings to ‘off’, which is also a good foundation for later professional calibration anyway.
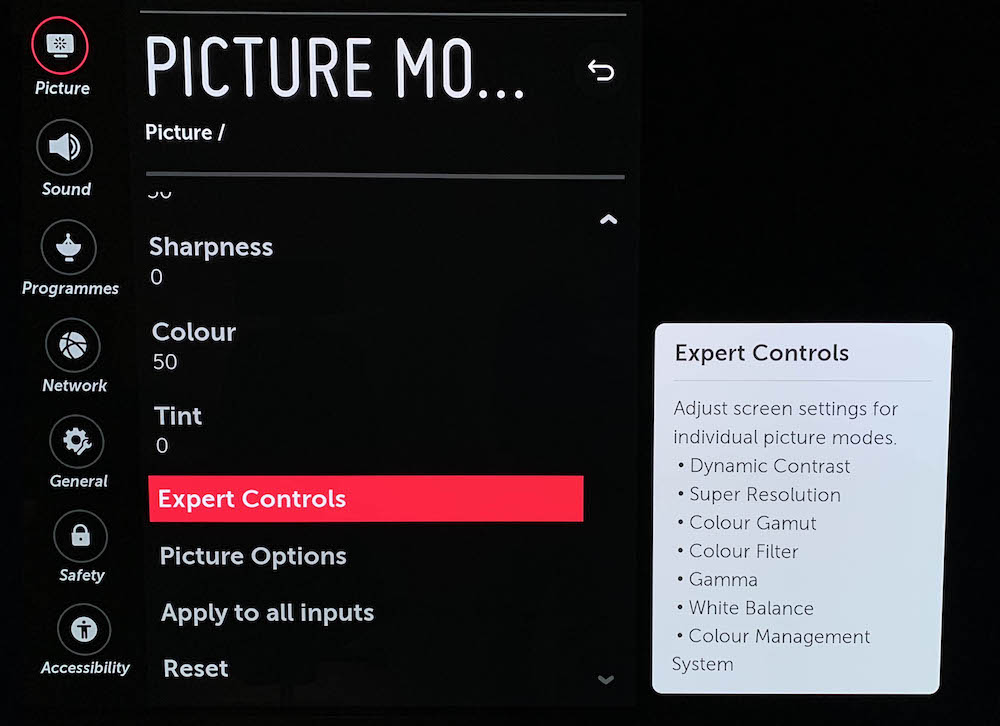
For SDR content, settings you might want to turn off under Picture Settings include:
- Energy Saving
- Sharpness – 0
- Tint – 0
- Expert Settings > Dynamic Contrast
- Expert Settings > Super Resolution
- Colour Filter
- Picture Options > Noise Reduction
- Picture Options > MPEG Noise Reduction
- Picture Options > Motion Eye Care
- TruMotion
Settings you might want to leave on are:
- Colour Gamut – Auto
- Gamma 2.4
- OLED Light – 19/20 for 100 nits
- Real Cinema
There are also some useful settings you might want to leave on, such as the Pixel Refresher, Screen Shift and Logo Luminance Adjustment (low) under the OLED Panel Settings Menu, which will help to prevent burn in issues.
Although you might want to turn the Logo Luminance Adjustment to off when using the monitor for grading in certain situations, otherwise it will automatically dim your static client logos etc.
As a quick aside if you want to understand when to use Gamma 2.2 and when to use Gamma 2.4, check out the section on ‘grading to a standard’ in this post on Colour Management for Video Editors and the quote and full article from Mixing Light colorist Patrick Inhofer.
In my own personal testing, I preferred the ISF Expert (Dark Room) picture mode with all of the noise reduction and motion smoothing options turned off. It’s also worth testing out the various white balance options to see which you prefer, especially if you don’t calibrate the unit using a colorimeter.
If you’re watching older content such as SD DVDs and low-res TV you might want to turn Noise Reduction and MPEG Noise Reduction to low for a better looking image.
RTings also have a very detailed review of the LG E8 OLED, including calibration results out of the box and after professional calibration which is well worth reading here.
You can read more about RTings.com’s tests and why they matter in this detailed article on colour accuracy.
How professional calibration works and why you need it
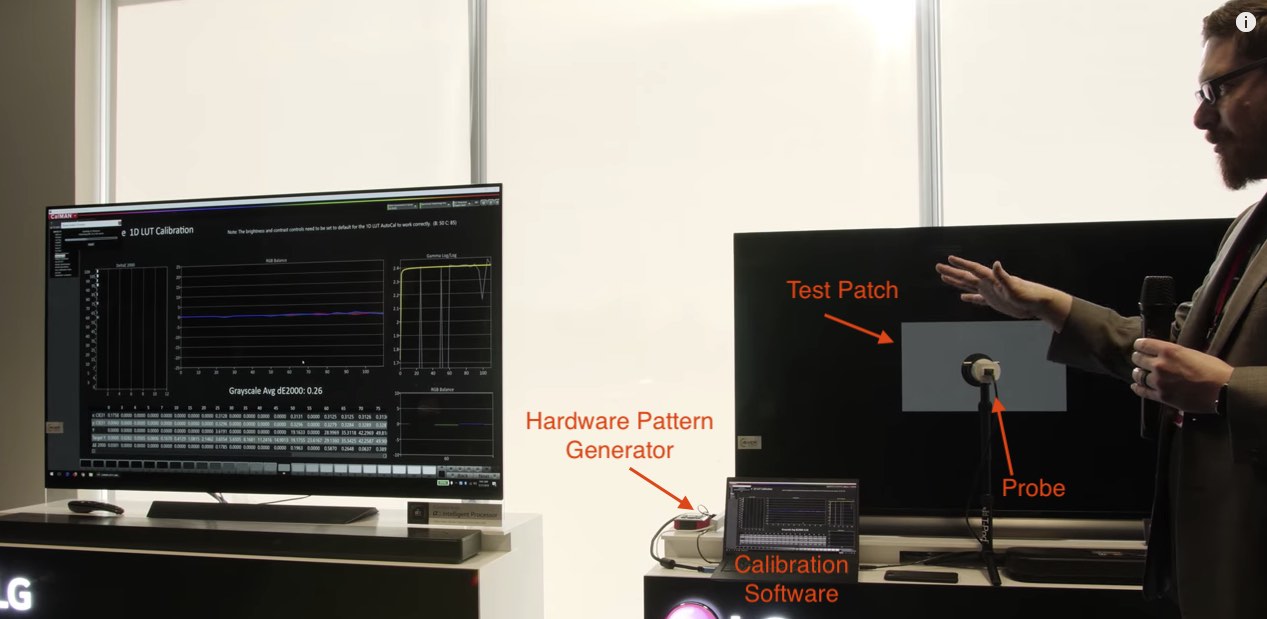
Professional calibration requires three things to work:
- Software/hardware to generate the correct colour and test patterns
- Hardware probe to measure the light coming from the screen
- Software to compare the signal sent with the light measured
The idea being that you can then create a Look Up Table (LUT) to sit in between your input and your output to make sure that the colour represented onscreen are as accurate as they can be.
If you want to calibrate your OLED TV to get the best out of it, LG’s partnership with Portrait Display’s CalMAN Home software makes that easier and more affordable than ever.
As of 2018 onwards, the LG OLED line up has direct access to the onboard 1D and 3D LUTs (33 point LUT with 12 bit precision) that calibrate the panel, which also removes the need to insert a hardware 3D LUT box between the source and the monitor.
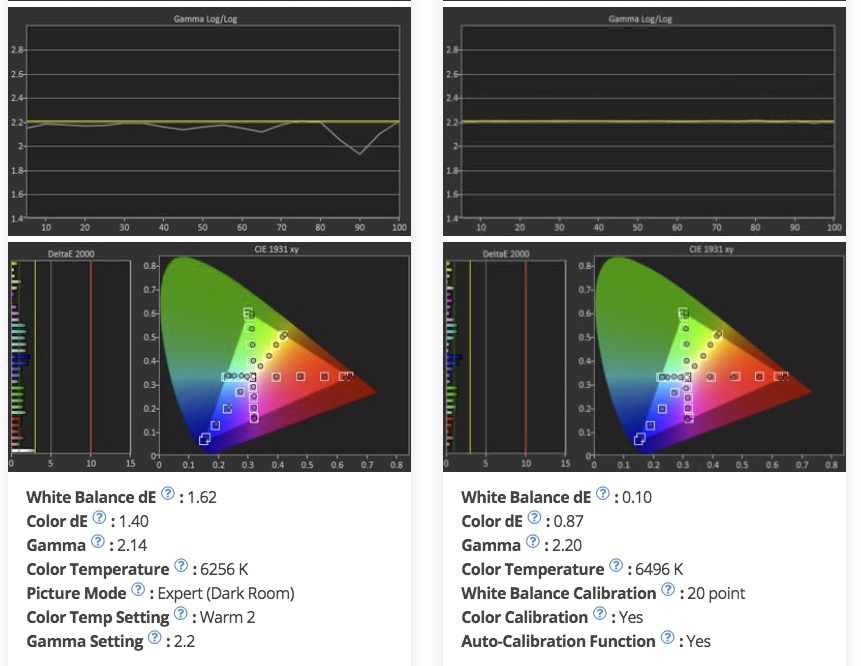
One LA-based professional colorist got in touch with me to say that applying a CalMAN generated calibration LUT via the USB port has allowed them to get very good results without the need for a LUT box. “Our local calibration engineer has got the deltaE down to .4%, which is extremely good. (Anything below 1% is considered practically perfect in many ways.) It’s not the equal of a Sony BVM, but it’s the next best thing for SDR.”
He also mentioned that the calibration engineer had said that you’re likely to get better uniformity from a 55″ display than a 65″, but clients tended to prefer the larger display.
The 2019 line up of OLED TVs now also include a pattern generator built in, which removes the need to purchase a separate hardware generator, further reducing the cost of professional calibration.
Also in further extending their partnership with Portrait Displays, CalMAN Home, a $145 version of their software (which normally costs $1,995 for the full suite) will be released in April 2019.
So in 2019 all you will need to calibrate your own OLED TV to a professional standard will be $145 for calibration software, providing both SDR and HDR manual calibration and AutoCal functionality, and an affordable colorimeter, such as the X-Rite i1 Display Pro which costs about $260/£170.
This is pretty amazing and it’s a huge benefit to anyone who cares about viewing colour accurate images, whether in a professional or personal context.
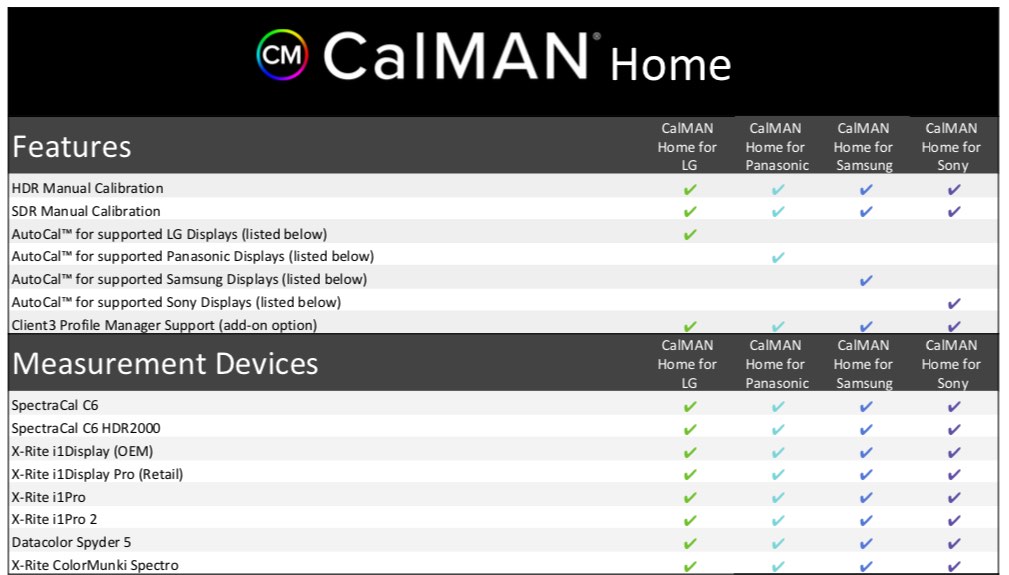
You can read through a full list of all the displays that will be supported by CalMAN Home, including those from Panasonic, Sony, Samsung and LG, as well as a complete list of supported measurement devices, in this official PDF.
Note that CalMAN software is Windows only, but I am curious to know if it will run on Bootcamp on a Mac?
It’s also worth mentioning that you can also use DaVinci Resolve as a free pattern generator too, with the added benefit that it is providing patterns generated along the same video signal path as your grade will be (instead of an external hardware box).
In one of the Mixing Light ‘Mail-bag’ episodes, co-founding colorist Dan Moran mentioned that he’d heard of less uniformity issues on the 55″ displays, compared to the 65″ or 77″ displays. So if that tidbit is to be believed it might be worth sticking with a smaller size screen too.
In this screencast tutorial from Portrait Display’s Tyler Pruitt, you can get a deeply technical, guided walkthrough of using CalMAN on a 2018 LG OLED, to perform SDR AutoCal calibration.
Update July 2019
CalMAN have just released a new SDR calibration tutorial for working with the 2019 LG C9 OLED and CalMAN Home AutoCal, which also makes use of the built-in pattern generator in the TV.
Multi-Monitor Environments
One consideration to factor into your thinking is that of using more than one monitor in your grading environment.
Now most colorists have one monitor situated close to them for their colour grading software interface (GUI) and another monitor for seeing their correctly calibrated image. This is usually a smaller, more expensive broadcast monitor off to the side where both they and the client can see it, who is most often sat behind them.
The colour grading suite might also then have a much larger ‘client display’ mounted on the wall, to view the images at scale and on a display more common to the end user. (Unless you’re watching all your movies on a broadcast display?)
The introduction of multiple reference points can cause confusion if they don’t look the same. Is the image correct on the broadcast monitor, but the client likes the look of it better on the ‘client monitor’? Any discrepancies will cause confusion and potentially sow a lack of trust in the client’s mind about you and your professional capabilities.
To get around this issue, and the fact that different human beings visual systems perceive things in different ways is a technique called perceptual matching.
The idea is to sit all the displays next to each other and, based on the collective opinion of several creative professionals, tweak their calibrations so that they match each other as closely as possible and in such a way that everyone agrees they look the same.
Of course, if you just have one big monitor in your suite as the reference point, then this issue goes away!
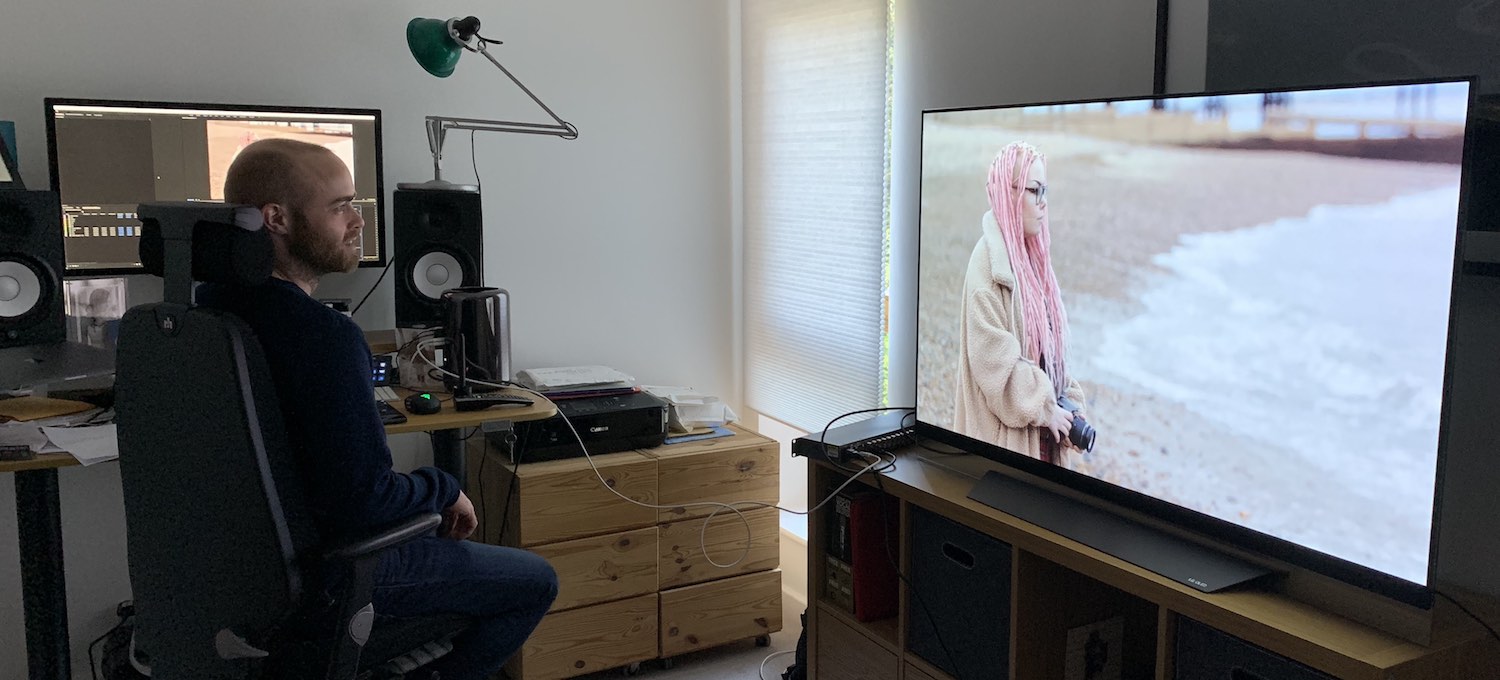
The LG 4K OLED E8 – A Film Editor’s Review
In this last part of this (now) extremely long post, I wanted to share a few personal observations on what it is actually like, as a film editor, to work with an LG 55″ E8 OLED, for both business and pleasure.
First of all I just want to say that it is one thing to see an OLED in a busy shopping centre, with it’s brightness, saturation and sharpness all cranked up to 11 and think that it looks maybe OK, but it is quite another to bring one into your own home or edit suite and get it set up just the way you like it, either by eye or with professional calibration, and stare at it for hours on end.
Once you turn off most of the pre-processing settings, such as motion smoothing (the soap opera effect), noise reduction, sharpness etc. and set the picture mode to Cinema, Technicolor Expert or ISF Expert, then the images really do come into a league of their own.
Whenever anyone talks about OLEDs they naturally gravitate towards the incredible inky blacks. And it’s hard not to. They are just so much deeper and ‘blacker’ than any TV or monitor I’ve used previously and it’s the foundation of their uniquely pleasing images.
These ‘perfect blacks’ drive much of our human visual perception for contrast, perceived detail and saturation and so the OLED display’s strength in this area drives some spectacular images.
When I first set up the TV I experimented with the various picture profiles whilst watching Netflix’s Our Planet nature documentary series, which features a vast array of phenomenal nature photography, and the quality of the images from the tropical ocean scenes was breathtaking.
What always delights me about really great technology is when it can make an old experience feel new again.
Thats how I felt the first time I tried nuraphone headphones, which create a tailored audio experience that matches how you personally experience sound – and it makes your favourite songs feel brand new and alive again.
I once again had the same feeling the first time I sat in front of the LG E8. I keep wanting to watch different films on it just to see how they look. Mad Max: Fury Road looks incredible in either colour or ‘black and chrome’!
One of the things that I really appreciated about the LG OLED E8 was the breadth of controls available to you to calibrate the image to your own taste and viewing environment. These controls go well beyond a simple ‘brightness, contrast and saturation’, as you can see in one of the sub-menu previews, above.
If you’re going to invest the substantial required capital in acquiring one of these TVs, you’ll definitely want to have as much control over getting the best images out of it as possible, so it’s worth taking your time to work through some of the more detailed controls buried in the picture settings menus.
My hope is that the even greater depth of control that was added to the 2019 line up of LG TVs will be rolled out in a later firmware update to the 2018 models too, as these enhancements appear to be software related, rather than hardware dependent.
But, I’m also keen to get the OLED professionally calibrated in the near future, or to do it myself using the new and far more affordable CalMAN Home calibration software too.
This will definitely strengthen my confidence that I’m truly getting the best out of the display in terms of colour accuracy and quality.
Using an LG OLED TV in the Edit Suite
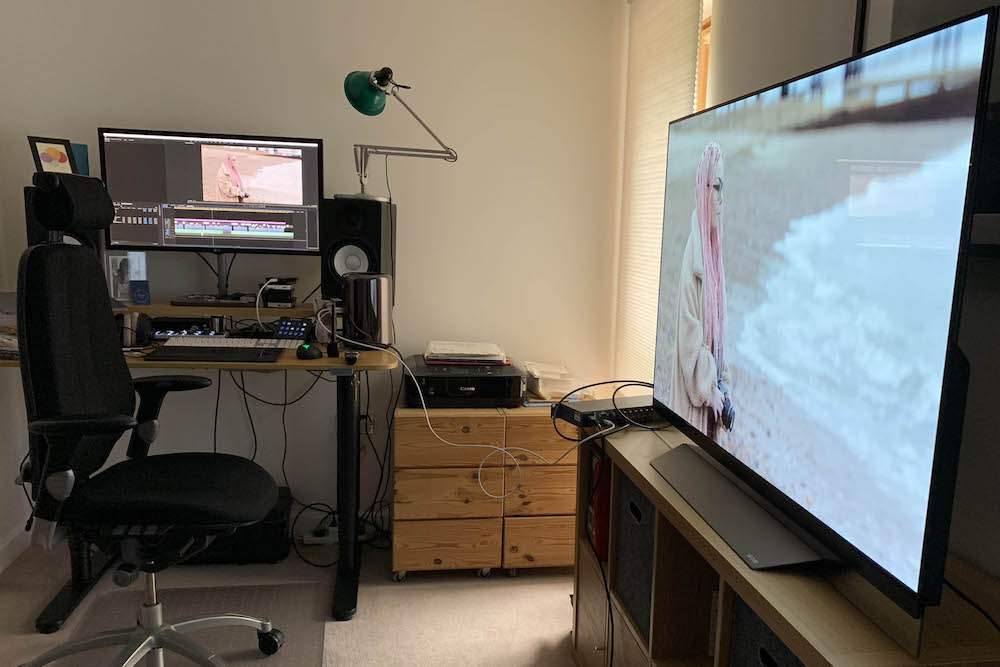
Unboxing and setting up the TV was pretty straight forward, and the instructions easy to follow. Although given the physical size of the display you’ll definitely need another person to help you manoeuvre it around safely.
Connecting the TV to my Mac Pro, via the Blackmagic Design UltraStudio 4K was also very straightforward via the Thunderbolt 2 out from the Mac Pro to the UltraStudio 4K, and then an HDMI cable from the UltraStudio to the TV.
The first time I ran the UltraStudio 4K its fan was incredibly loud, but after updating the Blackmagic Design Desktop Video Utility software to the latest version the fan noise dropped to a very discrete level.
The picture quality looked fantastic, even when up-scaling lower resolution and quality footage. There was also no discernible lag.
You’ll need to configure a few settings in your editing software of choice to feed the UltraStudio 4K with an image out, but the manual for the Desktop Video Utility software covers all the major applications.
The whole thing is pretty much plug and play.
From a film editors point of view, having a second large monitor in my suite helped to re-shape the way I tend to work for the better.
After editing for a few hours, or at key stages in my progress I used to put the image up in full screen on my computer monitor and stand at the back of the room, watch my current cut.
This context switching helps me to get a little distance from the edit and see it with a fresh perspective (both figuratively and literally) – to critically evaluate what’s working and what’s not.
Having the LG E8 OLED just to my right meant that I would turn and watch edits back more often, and get a real sense of how the project is coming together more frequently.
Another huge benefit of the technology behind the OLED is that it seems to readily swallow up reflections from windows and lights with ease. When I first set up the TV in my living room, which has a wall of glass on one side, and the unit was off, I could see most of the room reflected in the screen.
As soon as I switched it on and began watching a show, the reflections vanished from a fairly direct viewing angle.
I think it’s also worth mentioning that in numerous reviews and articles that I’d consumed as part of my research for this post, the constant comparison with QLEDs was that they can go brighter than OLEDs – reaching well beyond a 1000 nits.
From my personal experience, in a dimly lit edit suite, or a darkened living room for an evening movie viewing, I just don’t know why you would want it to be that bright. I adjusted the OLED light down by about 50% of the default setting on the ISF Expert Dark Room picture mode.
Now obviously greater brightness levels can lead to far more realistic looking images, and in the real world our eyes are used to seeing objects at well beyond 10,000 nits! But if you’re considering not buying an OLED due to another TV ‘being brighter’, I’d really recommend checking out an OLED first. There’s a lot of numbers in marketing and not all of them are helpful indicators.
The sound quality of the built in Dolby Atmos capable front-firing speakers was also excellent, although I’m sure adding a purpose built (and physically much larger) sound-bar speaker system would elevate things even further.
In comparison to the more affordable LG C8 OLED I believe the speakers are larger in that model, but also down-firing – which is why the curved speaker stand is designed to scoop the sound towards you, but personally I prefer the design and functionality of the E8.
Although the LG E8 OLED is entirely capable of supporting HDR workflows (as well as high refresh rate gaming inputs), this isn’t something I’ve really worked with and so I’m not really going to cover these topics here.
However, one of the tips from RTings.com was that if you find the HDR content too dim on your uncalibrated TV, you can “set the Dynamic Contrast setting to ‘High’ and the Dynamic Tone Mapping to ‘On’. These settings will raise the EOTF and brighten most HDR scenes.“
If you are starting to create HDR content and want to get some free training on creating and delivering Dolby Vision projects, I’d highly recommend checking out Mixing Light’s 12 part series created for Dolby here.
Final Thoughts
If you’re a colorist or editor who does a lot of attended sessions with clients, and you want to strike a strong first impression, then having a correctly calibrated OLED on your wall will go a long way to presenting their projects in the best possible way.
The clarity, resolution and sheer beauty of the images an OLED can display is something that really transformed my own personal expectations of what a TV should be able to do.
I can already anticipate spending more money on high resolution versions of some of my favourite films, just to see how they look on this screen, and experience them a new, once again.


Hi guys – is there a reason using the i1 Profiler software that comes with X-Rite colour checker isn’t an option here for calibrating the LG Tv? We were hoping to use this software instead of Calman
Hi,
thanks for this amazing source of knowledge! This year, LG released the A1 model. As far as I can tell it’s the same specs on color accuracy and such, just lower Hz (capped at 60 hz), slightly lower brightness, etc – but generally speaking it should be a decent budget choice to the C1 for rec 709 work, right? Will 60 Hz be a problem in your opinion? And also, if I get the UltraStudio Monitor 3G, technically it will downscale all footage fed to the screen to HD, I assume. I haven’t seen anyone discuss this anywhere, but will the TV then upscale to 4K again? Doesn’t seem to be proper way to go about it, if you want a true signal.
Hi Chris, thanks for checking out the blog. I’ve not looked into the A1 model so I can’t speak to that. But with your question over the Ultrastudio, you would need to buy the 4K version (UltraStudio Mini 4K) so that the picture isn’t downscaled and then upscaled as you mention. It’s a fair bit more expensive though at $995.
Hello, so im trying to do a simple grading home setup for myself and my work. Im doing my work on Macbook Pro 16 running Davinci 17. Looking to buy LG 65CX OLED and UltraStudio Monitor 3G. Will that combination work? I read somewhere that there were some problems connecting USMonitor with LG”s
Hi Jux, thanks for checking out the blog. I’ve not tested this set up so I couldn’t say for certain, but I wouldn’t think this would be a problem? One thing to check is that the HDMI cable you use is the latest generation.
Hi Jonny, thanks for this very helpful post.
In the 2019 I’ve buued a 55 E8 model for my first editing room.
Now I could another E8 for the second room but it’s no longer on the stores. (as the same with x9 series)
BX, CX, GX, WX, is the new 2021 LG series, what do you suggest me?
Thanks
I would suggest the CX as most colorists that I’ve seen talking about using LG OLEDs have the C8/C9 etc. So the CX is a safe choice. The C8 and the E8 are the same spec screen but with slightly different speaker set up and aesthetics.
“The TV I have is the 55 OLED E8 (2018), whilst the most popular model for price/spec balance seems to be the C8 (or in 2019, the C9), which features the same panel and processing as the more expensive E8, but with a different design aesthetic and slightly different speaker set up. The C8/9 has down-facing speakers which are ‘scooped’ forward by the stand, while the E8 has smaller front facing speakers.“
Hi Jonny,
I have my eye on a Sony OLED monitor (A9G) because my friend has a few on hand Incan get real cheap. How would this compare to LG? My objective is to have a client viewing monitor.
Hi Jared, best bet is to check out some of the reviews from HDTV Test on Youtube for direct comparisons of the specific models you likely have in mind.
https://www.youtube.com/user/hdtvtest
I’ve not had any hands on experience with the Sony OLEDs myself.
Thanks for checking out the blog!
Hi Jonny, I’m trying to get my home colour grading setup sorted but am having trouble getting the calman software to work on my operating system. I’m running Mac OS Catalina 10.15.7
Both Calman and display cal seem to have issues with the latest OS as far as I can see. Do you have any other calibration software you could recommend?
Hi Greg, thanks for checking out the blog. As far as I know Calman calibration software is Windows only? And as for Display Cal I’m not familiar with it I’m afraid.
Lightspace’s ColourSpace is also Windows only – although they say they might make a Mac version. https://www.lightillusion.com/colourspace.html
If you don’t have access (even for a few hours) to a Windows PC to run the calibration then you might have to ask on some colorist forums like LowePost or on Mixing Light?
Sorry that’s not much help!
Jonny
About the burn in, it would seem plausible that for an editor who works in a single piece of software for 8-12 hours a day, day after day, burn in of static areas of the editing software could be an issue. So probably this screen would be better used as an output device to see the image / video in its richest possible presentation, rather than an editing monitor. This is the best _second_ video editing monitor, not the first.
The whole premise of the article is that the OLED would be an output monitor for watching full-screen playback, not being used as an GUI monitor for editing. But just to make it abundantly clear to all readers, yes.
Hi! Do you know if the LG OLED65B8SUC model works as color grading monitor client? The spechs are the same as LG E8, but the processor is 7 instead of 8 or 9.
Thanks!
Blackmagic has confirmed that the UltraStudio 4K Mini does indeed support 10-bit HDR in both Final Cut Pro and DaVinci Resolve.
Let’s suppose I don’t want to go through the UltraStudio and use my GPU directly. I know there’s a debate of whether this is right or not. Let’s leave it aside for a moment. How do I feed an HDR signal to this OLED TV? Windows understands HDR and it will provide an HDR signal out the HDMI connector, but I’m pretty sure it’s not doing HLG, Dolby Vision or HDR10/HDR10+. So I’ve been scratching my head about this. What does the OLED TV expect coming to its HDMI connector to display and HDR picture and how do I get that on any of the supported standards at all?
I must say Rec. 709 is not the right colorspace for HDR. But other than using Rec. 2020 to embed a DCI-P3 picture in it and feeding it out the HDMI port, I don’t know that the TV will expect.