Editing in FCPX Like Thomas Grove Carter

Thomas Grove Carter is an editor currently cutting commercials and music videos at Trim, here in London. He’s also a brilliant ambassador for the use of FCPX.
In this post I’ve brought together all of the best resources I could find on how Thomas leverages some of the unique functionality in FCPX to edit high-end commercials, music videos and short films, and extracted some of the key learning points he shares along the way.
If nothing else hopefully Thomas’ work and workflow will inspire you to edit better, whatever NLE you happen to use!
I first heard about Thomas when I saw the Honda Type R film The Other Side which was an exceptionally well-executed, yet stunningly simple idea of allowing the viewer to cut back and forth, at will, between two symmetrical storylines whenever they wanted.
Effectively creating their own edit in real-time.
Sadly the interactive version of this doesn’t appear to still be available, as it was on a standalone dedicated site.
Thomas wrote up his workflow for this commercial, in detail over on FCP.co, which is still well worth a read.
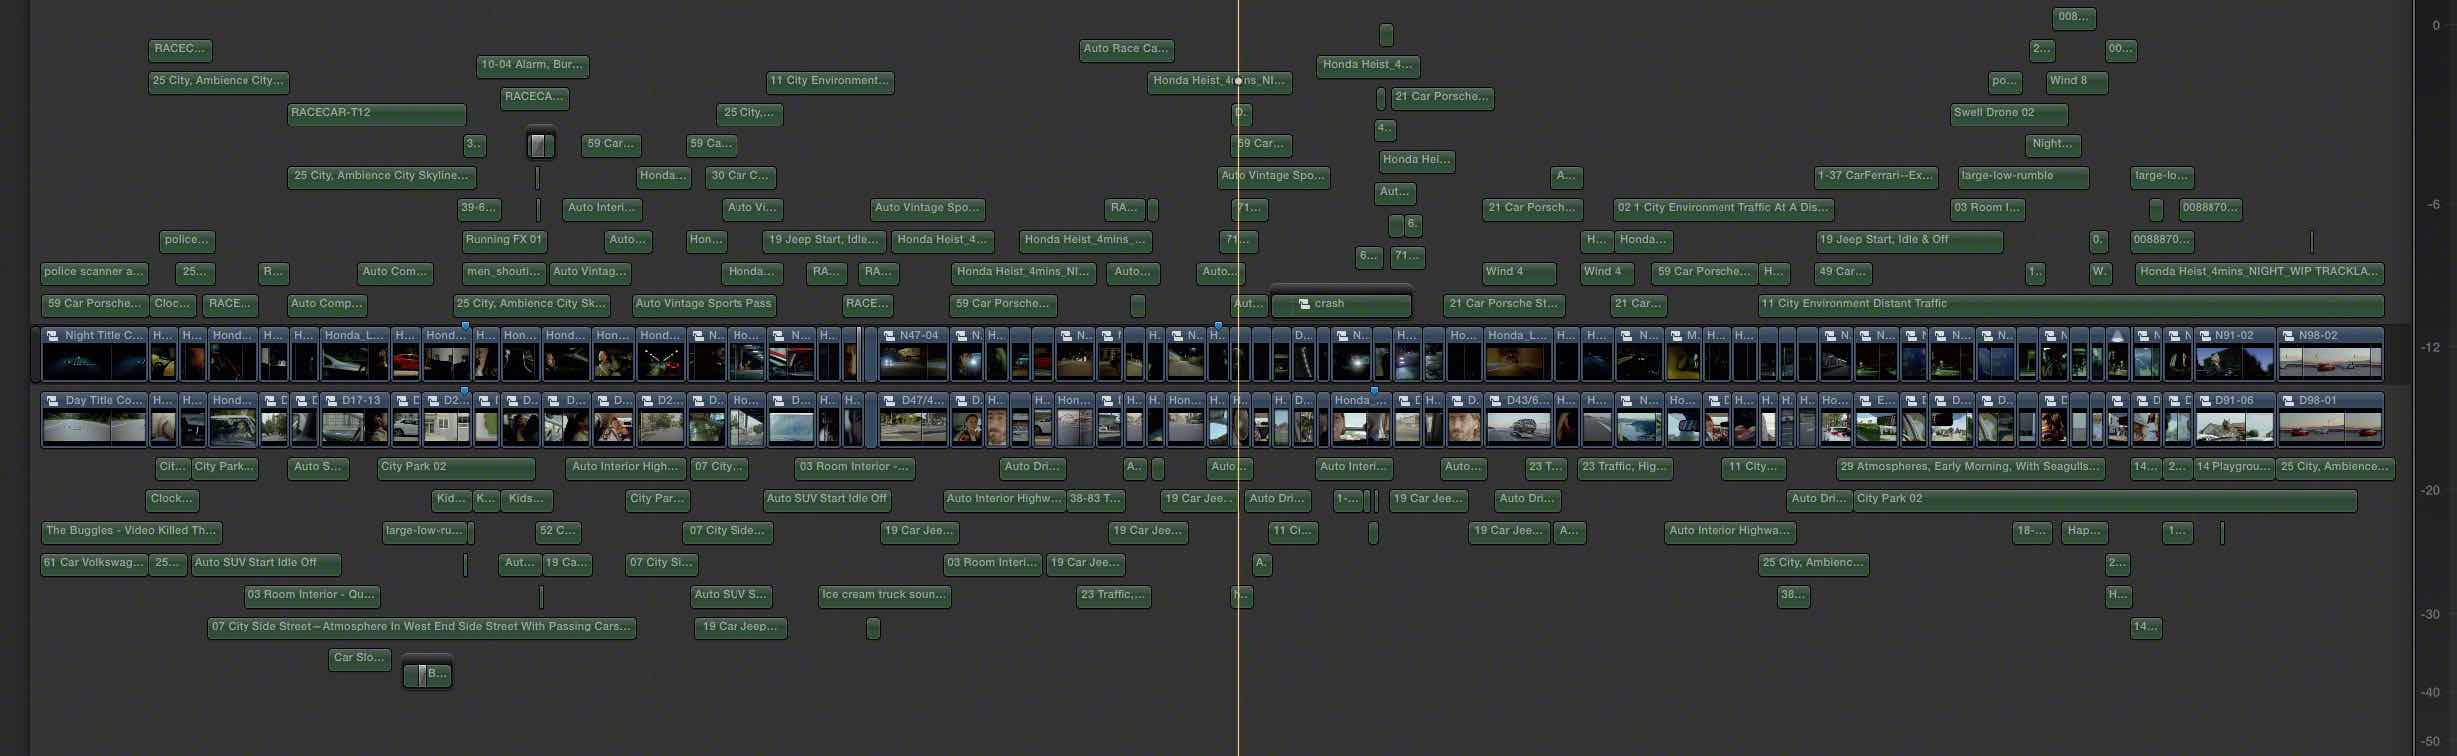
One of the many interesting things that he did was to divide the timeline visually, night above and day below, using clip connections to keep everything in sync, using the power of the magnetic timeline.
It made for a strangely beautiful timeline in my eyes, and one with which I could easily lasso one ‘side’ of the edit and enable or disable it.
Once again the Magnetic Timeline was wonderful. Because each connected clip is associated with a particular shot, or part of a a shot, they were always in the right place. A tire pop sound, for example, can be connected to the exact frame where it visually explodes.
So whatever I do with the video clip, it’s always in sync.
Unfortunately with the new audio lanes functionality in FCPX you can no longer put audio above the timeline in this way.
You can check out many examples of Thomas’s work on his Vimeo Channel here, you can also follow him on Twitter here. Also be sure to check out some of the short films he’s edited like Italy, Texas and several others showcased on his site.
How to Edit like a Commercials Editor
In this section of the post I thought I’d pull out a few of the techniques that Thomas uses on a regular basis and often demonstrates in the public demos he’s done. (See the next section for those.)
Helpfully he made this series of short tutorials back in 2015, which actually breakdown most of the techniques I was looking to highlight! Although I’ve added further notes and tips that Thomas also shared during his trio of demos.
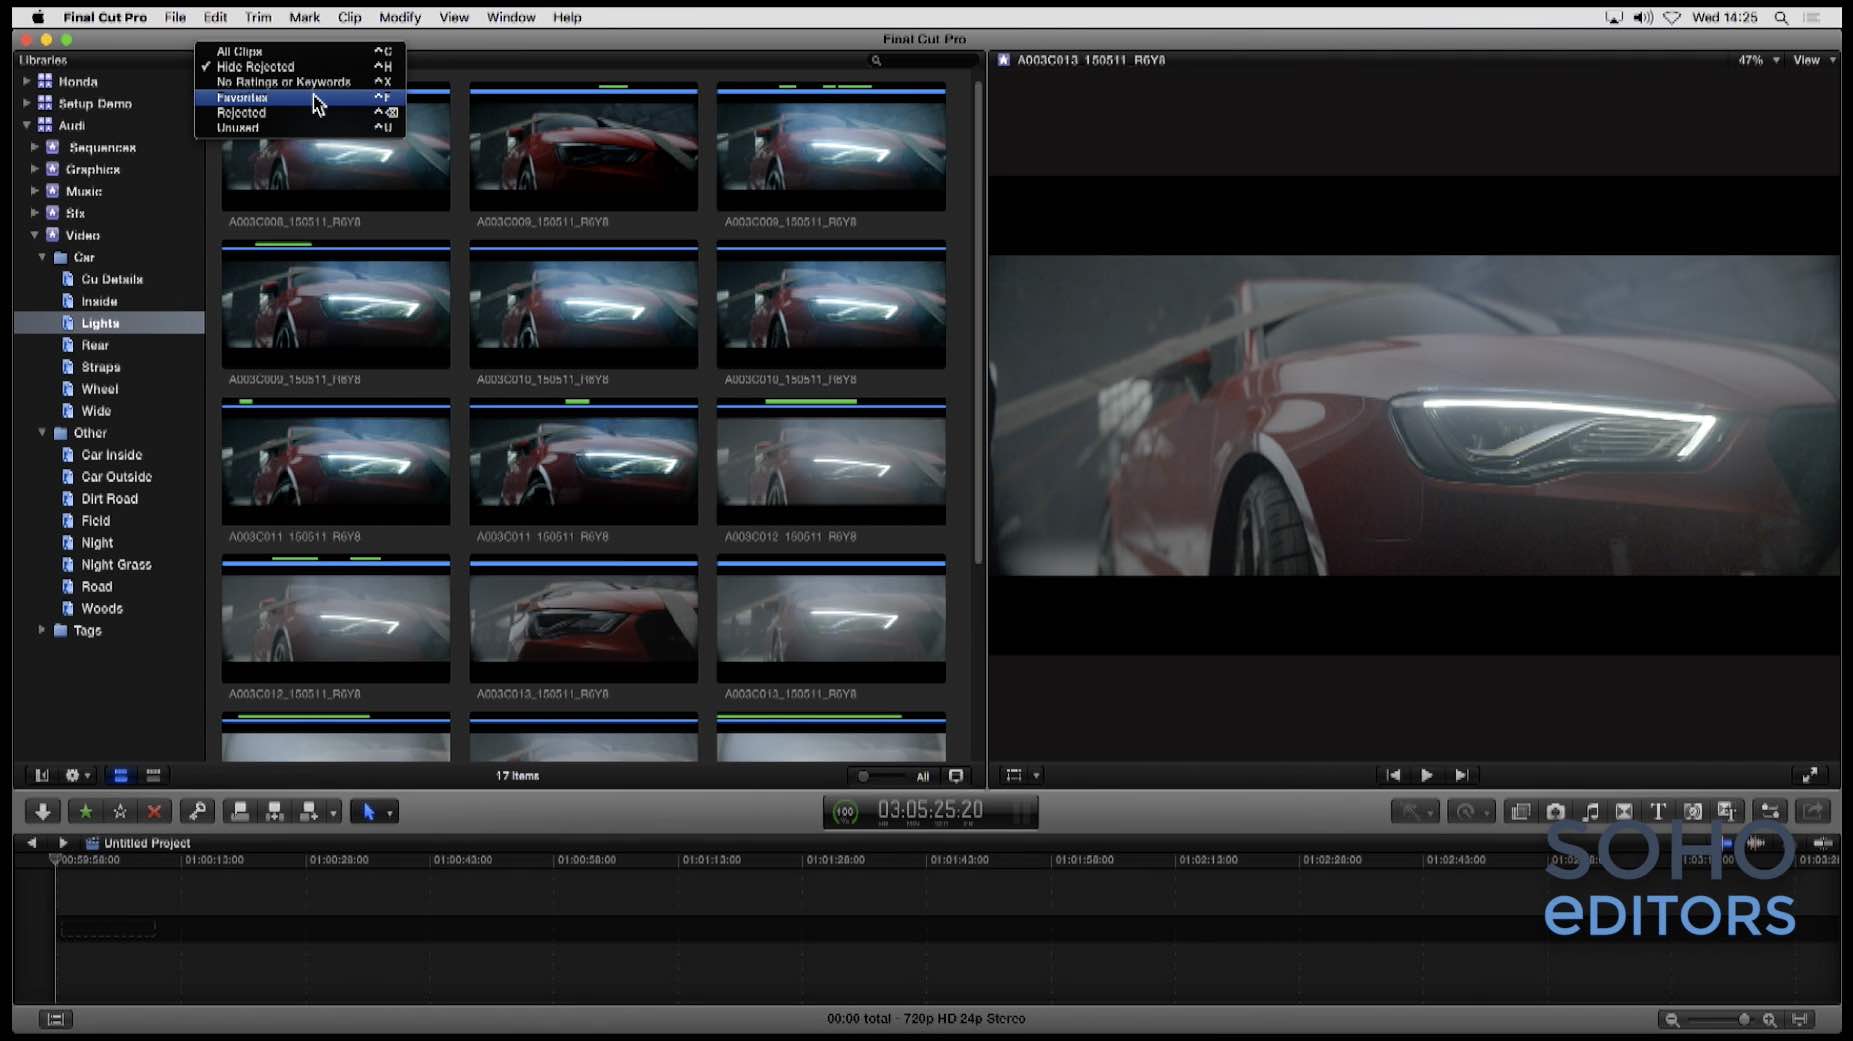
When it comes to organisation and selection Thomas uses FCPX’s keywords to do top level organisation of shots by topic (eg. car, wheel, straps).
He also uses metadata tags/keywords for things like frame rate variations, agency circle takes and more to keep track of what’s what, and find things quickly.
Thomas also uses smart collections in a basic way to keep track of his various iterations of edits under 30 second, 60 second searches.
String outs with Favourites and Rejects
One of the FCPX tools Thomas relies upon in all of his editing is to create ‘string outs’ using FCPX’s Reject and Favourite tools.
Personally, I’m used to creating several ‘string outs’ in every projects. Strings outs are a sequence of all your footage back to back, then trimmed down to just the bits you want to use, which allows you to skim through a whole timeline and find what you need.
This then is often trimmed down again to selects, narrowing your selection of usable material even further. But you do end up with several sequences to open or jump to. This is sometimes called Pancake Timeline editing.
Thomas effectively does the same thing by using FCPX’s Rejects and Favourites tools, but with arguably greater visual clarity.
Using the range tool he (or his assistant) will work through all the footage getting rid of top and tails of shots etc., as rejects (Shortcut: Backspace), and then he will select his favourite (F) parts of the footage.
By toggling on Hide Rejected, (Control+H) this view gives him all the usable bits of footage, and then by viewing only Favourites (Control+F), this effectively gives him his ‘selects string out’. All within the source browser.
One of the benefits of this is that directors can instantly see what he has and hasn’t selected in a clip, due to the red (rejected), green (favourite) and blue bar colour coding, above each clip in the browser.
In this tutorial Thomas demonstrates how he uses clip connections for faster and more efficient sound design work in FCPX.
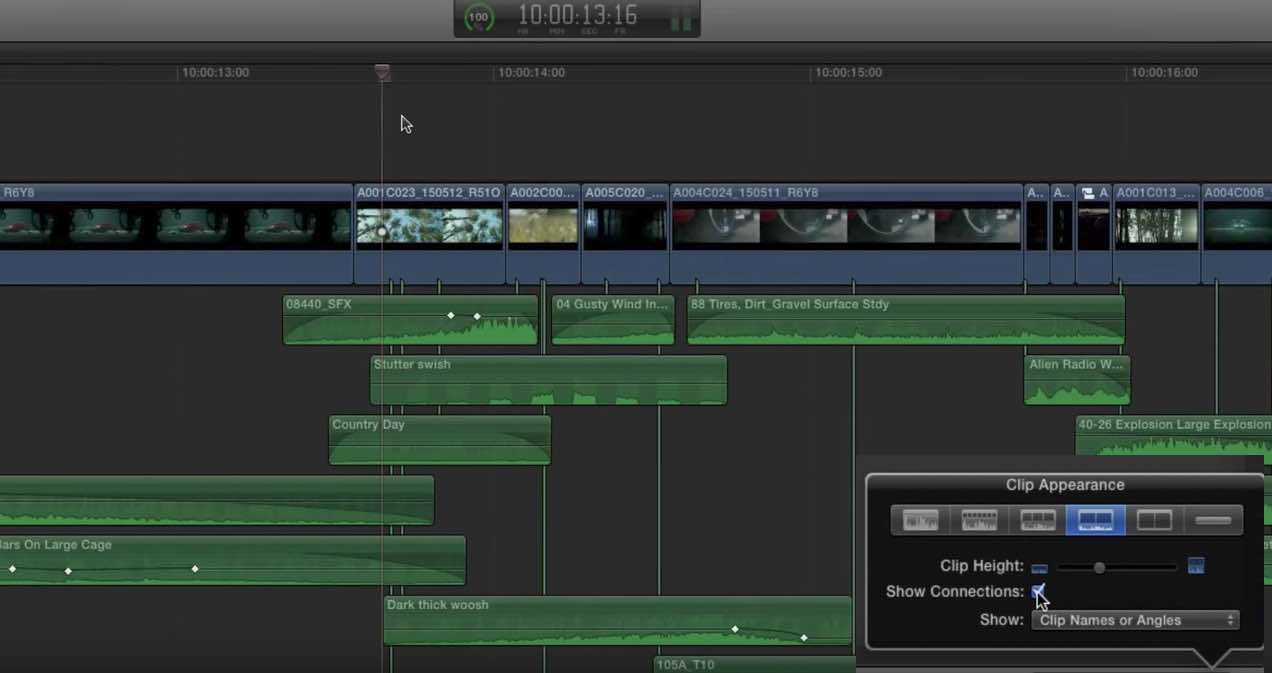
You can turn on the visibility of clip connections under the Clip Appearance menu.
Then by holding ALL+CMD when clicking on an audio clip, you can assign the specific place in the clip that the audio sync point is connected.
He also makes frequent use of ALT+S to solo specific audio and video clips so he can see or hear just what’s happening with those clips.
The main point of all this is to ensure that you keep your audio design work, however simple or complex, in sync with carefully placed connections, especially if the ramps in and out of shots need to be perfectly timed.
These kind of connections are best made with a ‘tidy as you go’ approach, rather than leaving it all to the end.
In this tutorial you can see Thomas demonstrate how easy it is to make speed changes in FCPX.
The use of frequent speed ramps is more common in promo, trailer and music video work, so it stands to reason that Thomas would have these set up as specific shortcuts. (see below for these)
It’s also worth pointing out that these keep to whole-multiple value increases, for example 200% or 400% rather than a random number like 358%, which will keep the time scaling relative to whole frames.
In this final tip Thomas demonstrates how he edits video and audio whilst having clients in the room and without stopping playback.
This is a pretty flashy trick, but it definitely speeds things up if you’re in a hurry, or your clients don’t have long attention spans. Either way, it’s great to see how much can be done in FCPX if you’re willing to give it a whirl.
Mastering FCPX Keyboard Shortcuts

A huge part of Thomas’ speed when editing, even in these pre-prepared demos is his mastery of the keyboard shortcuts, both for editing in the timeline, but also moving around the user interface, organisational tools.
Another interesting thing to note is that Thomas doesn’t change the default keyboard shortcuts, but he simply adds to them, with functionality that he uses most often.
In these tweets you can get a look at some of the custom shortcuts Thomas has added to his FCPX keyboard shortcut layout.
I don't change default shortcuts in #FCPX. I add.
These are for Retiming…
2x Speed ??R
4x Speed ??R
Reverse Clip ???R
Optical Flow ??O— Thomas Grove Carter ?? (@thomasgcarter) November 27, 2016
More #fcpx shortcuts I add…
Copy Timecode ???C
Paste Timecode ???R
Open Clip ?ENTER
Export XML ??
Join Clips ?/— Thomas Grove Carter ?? (@thomasgcarter) November 27, 2016
In the thread of this tweet Thomas shares his further rationale for having copy and paste timecodes, which he finds helpful on jumping to frame specific notes from clients, particularly on VFX jobs. The new shortcut also doesn’t require activating the playhead.
These are the #fcpx sound shortcuts I add
Silence Clip ?-
Reset Vol ?+
Toggle Fade In ?H
Toggle Fade Out ?J
Align A/V ?
Add to Soloed ??S— Thomas Grove Carter ?? (@thomasgcarter) November 27, 2016
and the final few keyboard shortcuts I add in #fcpx …
Show Audio Lanes ?S
Edit Roles ??S
Toggle Continuous Playback ?SPACE— Thomas Grove Carter ?? (@thomasgcarter) November 27, 2016
If you want to take your command of FCPX shortcuts up a notch you can always invest in a silicone skin or printed keyboard from LogicKeyboard or EditorsKeys this way you’ll always have them at your fingertips.
How to Edit Commercials and Music Videos in FCPX
In this section of the post I’ve brought together the three main presentations Thomas has delivered (that I know about!) and their associated creative project. They are also in reverse chronological order (newest first).
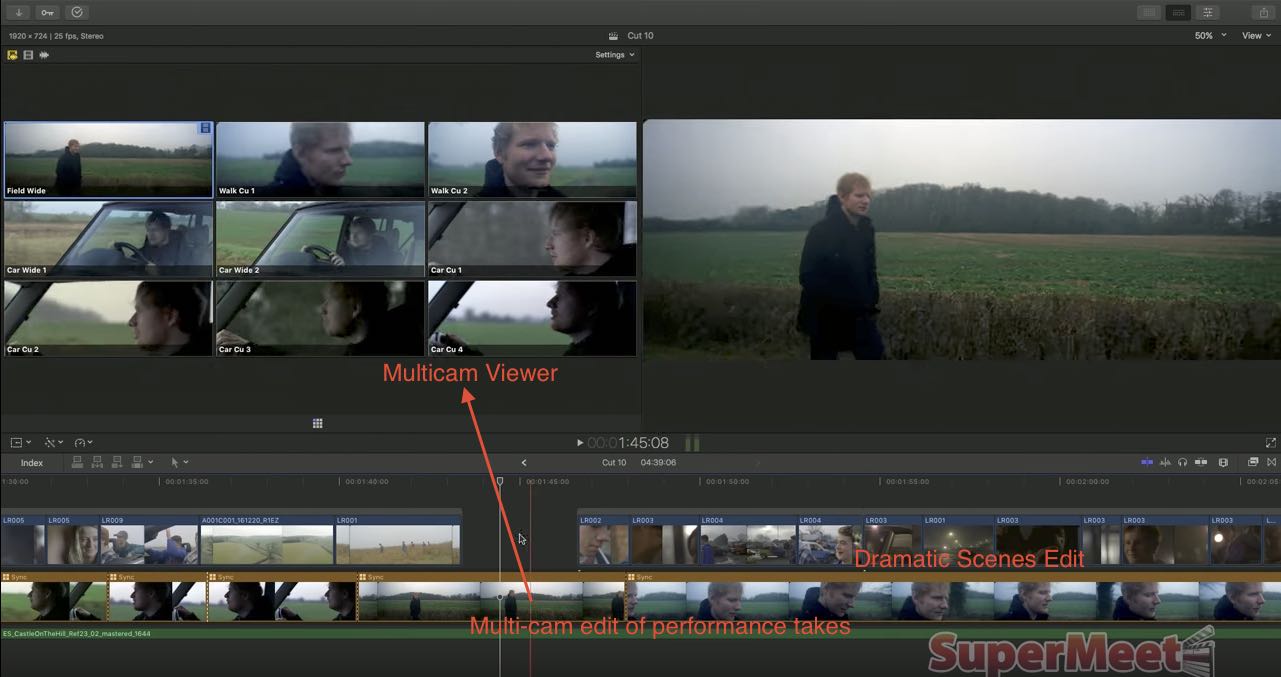
At about 5 minutes in Thomas shares a useful tip when cutting music videos that have both performance spaces and dramatic scenes.
By creating a multi-cam clip of all of the performance elements, sunk to the music track, he can always cut back to this multi-cam edit of the performance, at any point during the duration of the music video, say for example a dramatic scene is swapped out or removed.
Then when he’s editing the whole music video he can open the multi-cam viewer to see all of the performance angles, and swap between them in the cut, in the context of the whole project.
He also keeps those dramatic scenes in separate connected storylines such that he can edit those in their own magnetic timeline block, moving them around the main timeline as a group, or re-ordering and trimming shots, without having to mess about with the rest of the edit.
Again he uses clip connections to keep certain visual elements in sync with musical hits in the track.
Here you can also watch the full length music video or commercial Thomas is editing with during his demos. Ed Sheeran’s Castle on the Hill music video has, at the time of writing, well over has 190,600 million views!
How to Edit a Commercial in FCPX
In this presentation from FCPX World in London, organised by Soho Editors, Thomas is editing another Audi commercial, and at about 17 minutes in Thomas demonstrates how quickly he can cut down a 60 second ad to 30 seconds.
Here is the Audi commercial Thomas is working with in the FCPX World demo.
In this presentation from BVE 2016, Thomas demonstrates many of the same techniques and tips, this time whilst editing the densely sound-designed, Born Restless commercial for Audi.
Here you can see a 46 second edit of the commerial. For my money, it’s worth downloading this and watching the cut through frame by frame, as well as just with the audio, to really digest everything that’s happening here!
Thomas Grove Carter on FCPX
I’ve previously posted these two FCPX videos, which Thomas has shared on his Youtube Channel, but it’s probably worth bookmarking it for the future, as hopefully he will make more of them.
I previously posted this video in my massive FCPX 10.3 new features round up, which has a lot of detail on working with audio roles.
[OP]: Are you primarily working with proxy media? [TGC]: Not ‘Final Cut Pro X proxy media’, but we use ProRes Proxy or LT files, which are often transcoded by a DIT on set. They look great, but the post house always goes back to the camera originals for the grade.Sometimes if it’s a smaller job – a low budget music video, for example – I’ll get the ARRI files if they shooting ProRes and just take them into Final Cut straight away- just to get working quicker.
Thomas also been interviewed by Oliver Peters, in this post, on a range of topics from his own career progress, to hardware configurations at Trim as well as working with high-flying clients and agencies and high-end finishing houses.
It’s well worth a read!
In this cheeky little video Thomas demonstrates the benefits of the magnetic timeline over a track-based NLE, like FCP7.
The boys from Ripple Training give a shout out to Thomas in this tip which involves adding a hold frame to audio, in order to add reverb effects to a clip, so they ‘ring out’ at the end.