Download Colorist Walter Volpatto’s DaVinci Resolve Feature Film Node Structure
Hollywood colorist Walter Volpatto shares his DaVinci Resolve fixed node structure which he has developed while colour grading feature films and TV series such as Star Wars: The Last Jedi, Dunkirk, Green Book, The Beach Bum, Hustlers, Midway, Homecoming (TV), The Hateful Eight, Interstellar and many, many more.
In fact, Walter has over 133 colour grading credits to his name on IMDB going back nearly two decades, so when LowePost.com shared a 15-minute video of Walter walking through the fixed node structure that he used on Midway, people got excited.
Especially given that Walter has generously allowed LowePost members to download the node structure to use themselves!
I’ve been a huge fan of LowePost since they launched – mostly because they offer a constantly expanding array of excellent post-production training on colour grading, editing, visual effects and more from some of the industry’s top instructors and professional artists, all at a very affordable price of $79/year which works out to about $6.5 a month.
In this previous post on learning high-end finishing techniques in DaVinci Resolve Fusion I’ve discussed several of their best courses and listing many of the features of the rest of their library, so that’s a good place to look for more info.
Anyway, back to Walter, who by the way works at Company3 in Los Angeles.
What is a Fixed Node Structure and Why Should You Use One?
While many colorists grade each shot from a blank slate, simply adding nodes as they go to solve specific problems or to apply a consistent look across a scene, a fixed node structure, like Walter’s, is added to every single shot in the project before any creative colour grading work begins.
Every time Walter starts a new shot the empty node structure is there waiting for him.
I don’t want to share too much from the video because it’s behind the LowePost paywall – and it is just another great reason to join LowePost as a paying member – but here is just one of the several reasons Walter gives as to why you would want to work with a fixed node structure:
To me a node structure that is fixed, it gives me discipline, so I don’t leave underwear around.
It gives me a means to open a shot five months later, look at what I did and I know exactly why I did what I did, based on where my corrections are.
But having the complexity solved at the beginning, it means that later on you don’t have to think about it… It solves complexity. That’s what you want. You want to be able to focus on the image not focus on the complexity when you’re colour correcting with five people in the room.
Walter Volpatto
In the video Walter walks through what each and every node does, how they interact, where other layers of complexity can be contained and why working with a fixed node structure creates a robust and efficient colour grading workflow that is pretty indestructible.
Check it out for yourself at LowePost.com
How to Import a .DRX file into DaVinci Resolve
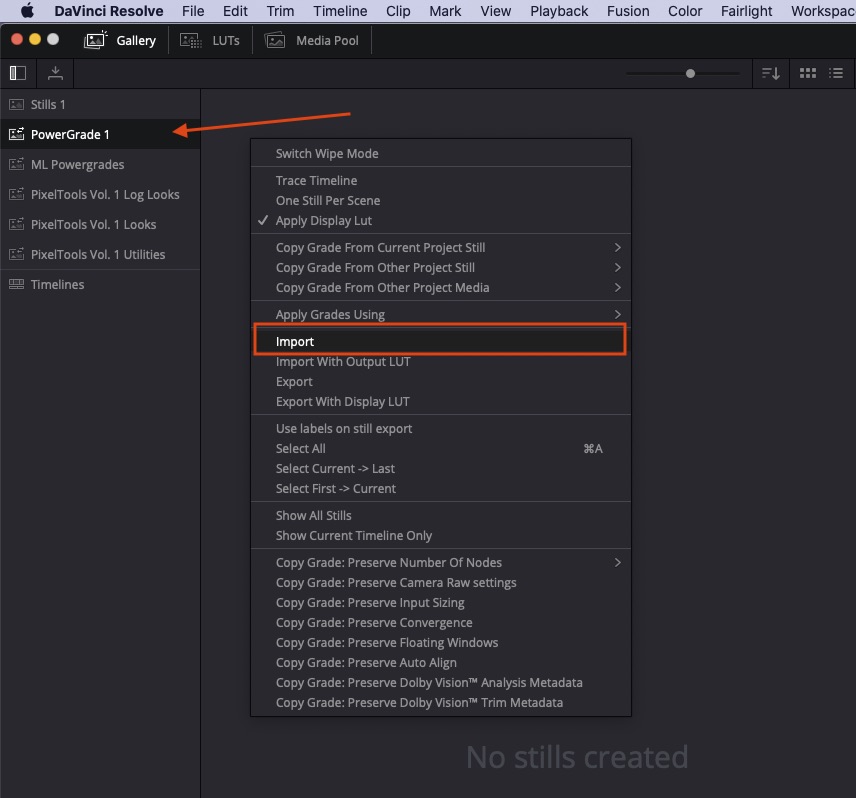
If you’ve downloaded Walter’s .drx file from LowePost and are wondering how to get it into your project, it’s very simple.
- In the Color page open the Gallery pane and select the PowerGrade 1 PowerGrades folder.
- Right-click in the space that says ‘No Stills Created’ and select “Import”, and select Walter’s .drx file.
- Then to load the node structure onto your footage just double-click the PowerGrade icon, or drag it to the node tree, or right-click on the PowerGrade icon and choose ‘Apply Grade’.
Automatic node renumbering in DaVinci Resolve 17
A new ‘feature’ in DaVinci Resolve 17 is that it automatically re-numbers nodes in a tree, which breaks the fixed node tree workflow, especially when rippling grades.
Hopefully this will be ‘resolved’ with an option to turn this off in a future update!
They’re fast those DaVinci Resolve developers!
Q&A with Colorist Walter Volpatto
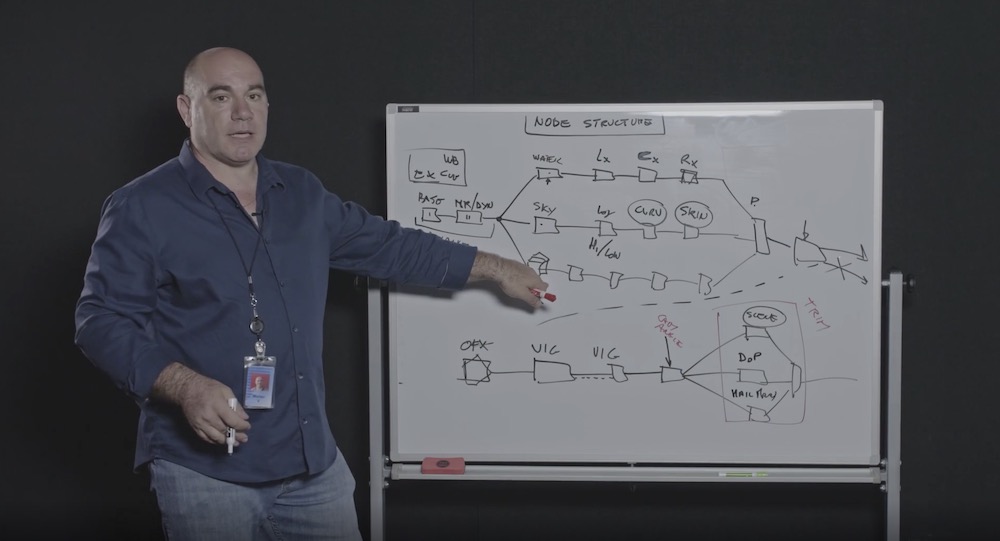
Walter’s video has generated a lot of comments and a decent number of questions on the LowePost site from other colorists, which Walter has taken the time to reply to, so I thought I’d compile the best of those here, to help make even more sense of his fixed node structure.
Q – Are you ever using camera LUTS on node one?
A – Never. I work in LOG space and my main look/LUT whatever, is in the timeline node.
Q – Do you often start work with a LUT (LOG – REC709) in the Timeline when you do the base grade?
A – LUT, Look, whatever is appropriate for the project.
Q – For your trim nodes wouldn’t it be easier to use shared nodes?
A – Yes, if you want, of course. It’s just time and I started when there was no shared nodes, and I’m used to it.
Q – In the base node, do you often use the printer light or Curves? What do you prefer?
A – The basic idea is that the main tonal mapping is done at the Look level: LUTs, curves, look whatever you want it to be.
At the node level, you are in the LOG of the camera and printer lights simulate close enough exposure and white balance as if it is done in the camera. Therefore I use almost exclusively Printerlights/Offset. Luma mix at 0. Gain, if I need more contrast.
Q – Why do you set the luma mix at 0? It doesn’t seem to affect offset settings, only LGG?
A – I like the math with luma mix at 0, especially when I need to use LGG controls (rarely)
Funny enough, in ACEScc/cct the logarithmic is such that an offset is really mathematically equivalent to an exposure change.
Q – You said that you never have to key skin if you’ve done the balance and scene node right. Can you please expand a bit on this? I am learning color grading and I thought when pushing a look far it’s often the habit to key skin?
A – When I do the balance of the shot, I look at the subject: usually the subject is a person, hence skin tone.
I want the subject to be right after exposure/balance. I don’t give a rat about the background shadow not being perfectly black. If I have to change the background shadow, that will be a secondary correction.
so: balance for the skin/subject.
Secondary on the “secondary” parts of the image.
Q – If I am correct you also make adjustments to the look at the “trim” node?
A – The idea is that at the trim node you are doing a “scene” look (if any) or client trims: it is not uncommon that after a scene is done, you need to do a small exposure adjustment or make it warmer or overall less contrast or whatever. Treat that as an overall.
Q – After the primary node, did I understand correctly that you skip right to the scene node, adjust for the ‘look,’ and then go back to work on the L-C-R and other nodes?
A – Roughly speaking, yes, just basic balance on the shot, then scene look, replicate the look to the scene, then matching the shot to the hero one.
Q – How do you go about (if even) node caching? Depending on the footage and grading system, playback after heavy noise reduction in particular benefits from a cached node, which is why one might want to put that as the first operation on the tree.
A – I have lots of space and I turn on [smart caching]… usually it works…
Q – Did you have the chance to play around with Resolve 17? Any new tools that piqued your interest?
A – The color warp interest me, I played with the Nobe plugin and I can do things that are difficult in a normal situation, but it is more for either repair a shot or create a look…
Q – I’d love to know your approach for using a Film Emulation LUT such as the Kodak 2383 provided in Resolve.
Do you use those LUTS at full opacity and do you do a Color Space Transform to Cineon Log for instance in order to match the Gamma the LUT is designed for? Overall how do you work with such LUTS?
A – I do use them at full opacity, they are designed to work in that way, but you need to transform the color space LOG you have in cineon log/709 primaries (that is what the LUT is expected for my understanding)
Q – Are you often using the standard LUTs in Resolve like Kodak or I heard you guys making your own LUTs.
A – I used Resolve LUTs in the past, as well as we do our own LUTs from analytic data from film.
At Company3 we have a proprietary system for film profiling, in the past at fotokem I used the Truelight profiling system.
“Hustler” look was initially modelled to a Resolve film LUT (modified to taste).
Q – What is the great secret of luminance compression?
A – There is no secret in “compressing the luminance” the idea is to build a tonal curve that has a good “S” curve.
You want to preserve in a linear fashion the 7(ish) stops around the 18% grey, then gently push toe and shoulder to flatten the extra black and whites, the more gently you do it, the softer the image is, the harder you do it, the more contrast the final image has.
Q – When using the build-in grain, do you put it on the ‘OFX’ place or before / after the LUT or look on the timeline level?
A – There is the philosophical approach and the practical one.
If I want to emulate negative film grain that modifies with the color, it should be before the balance node. Nobody does that really, but it is a thought.
If I want to emulate as if the negative was perfectly exposed, then it will go before the LUT/Look/main tonal mapping, usually for me that is in the Timeline node before the “look”.
If you want to emulate print grain, it should go after the main look.
But, all of this is purely academic: ALL of your material will pass through a compression pass to be able to be seen: from theatrical (low) to streaming (technical term is “shit-ton of it”).
So, the compression will attack the high frequency of your signal first, if you have light grain it will be gone, if you have a lot, it might reduce the efficiency of the compression algorithm.
It is a losing battle.
I still like to see grain, Resolve OFX is good for me, and it is mainly before the main LOOK in the timeline, if a shot or a scene needs more, it will be in the shots.
For a movie where two different worlds LOOK were created (Bliss, on Amazon this coming February) the look and grain was moved at the group/scene level, so each set of scene had its appropriate look. But it was a bit of an odd ball… the fact that I did not use the group for anything (not corner yourself if you don’t have to) allow me to do that.
Q – Do you most work in YRGB or Color Managed? Or maybe ACEScct?
A – If the client has no preference, I work in YRGB and i manage my own color.
Q – I think you usually work with a timeline set to Ari LogC so that the tools behave closely to how they behave with Cineon log film scans? Where do you do the color space transform for clips that are not in Ari LogC (other camera types, VFX shots etc)?
In a pre-group node perhaps? And the final color space transform is on a timeline node probably?
A – Either as DCTL on the media page (preferred) or it depends.
If the shot is already in a LOG like I usually put it on the first node, an OFX Color Transform will act before the primaries in a node (order of operations) therefore your correction will still be in LogC.
If the shot needs some hard transform, I might put it in the second node, (repurposing) so i can color some in the original space and then transform it.
Q – What is your workflow if you have a DCP and a Rec.709 version to deliver and you’re not working color managed?
A – Using OFX color space transforms, you can pretty much do the same math that is is in RCM. It is identical…
So it is a matter of knowing how to do it and where to put it.
Q – How would you work when there’s an ACES-workflow demanded? Or you have to work with HDR and SDR deliverables?
A – The basic idea works in HDR/SDR/and ACES…. there will be appropriate transforms either at group level, timeline level or ODTs.
Q – Do you using Calman to calibrate your monitors?
A – At home I use Light Illusion, at work I have to ask the engineer team, but the most difference is fine by the probes we use, those are $20k…
Q – Do you use REC 709 Gamma 2.4 in the Timeline Color Space in Resolve?
A – Yes REC.709/2.4 for TV, P3 D65/2.6 for cinema (usually), p3PQ for HDR.
Now, if you’re talking about the setting in the Resolve color management, that matches the logarithmic hero camera (the log space I’m working on).
Q – Please clarify how you propagate/ripple the changes. The way you describe it seems a very fast operation: Perform the change, select the shots to modify, propagate. But since you don’t use pre/post groups for this, neither shared nodes, how do you concretely copy and propagate the changes that fast on so many shots at once?
A – In the color menu you have two ways to propagate:
- ripple colour change to current group
- ripple colour changes to selected clips
Q – You talked about using Group Nodes as a place for HDR trims and looks in case there isn’t a timeline look. Could you elaborate more on the node structure you’re using in Groups and Timeline? I reckon you don’t use Pre-Group that much, but I’d be interested in your Post-Group trim node structure and your Timeline node structure.
A – I think is too long of a discussion to be put in few sentences (I should do a colour space/workflow with Lowepost…) but the general ideas are that either (or) in the timeline and POST groups, you want to put two things:
- the main look of the movie
- plus any transformation to adapt the master to a different spec, like HDR.
If you do a HDR mapping per scene, then it goes into the POST group, if you do globally, then it goes in timeline.





[…] As a quick aside, respected feature film colorist Walter Volpatto shares his rationale for working with a fixed node tree structure in this popular tutorial. […]
I just went through all the comments in the Lowepost post to check all that extra information Walter gives in there.
But now I’ve discovered you already did a nice and tidy transcription of all that!
Thank you very much for such dedicated work on sharing incredibly valuable knowledge. I’ve been learning a lot from your site and can’t thank you enough.