
Colour Management for Video Editors

- Which colour profile should you set your monitor to for video editing?
- What’s the difference between sRGB, Adobe RGB, DCI-P3 and others?
- What colour space is my video editing software using?
- How do I correctly colour grade for internet delivery?
If you’re an editor looking to colour grade your own projects what are some of the technical things you should be aware of, to ensure your images look as good, and as consistent as they can?
How should you be managing your colour pipeline for the challenging multi-screen viewing environment of today?
Latest update: February 2023
I set out to answer these, and a whole bunch of other questions, to finally get to the bottom of how to properly manage my colour pipeline. (Or at least double check I was still vaguely doing the right things.)
This endeavour raised questions such as;
- How do you know what colour space to be working in?
- How does Premiere Pro handle colour differently to FCPX or DaVinci Resolve?
- What Colour Profile or settings should you have your monitor set to?
- Do you need to have an external video I/O box between your computer and the monitor?
- Why does the colour look different in Quicktime vs VLC vs YouTube vs Vimeo vs Chrome vs Safari, all on the same monitor?
If you’re wrestling with some of these questions too, then hopefully I can provide some answers, or at least an interesting technical read.
As I wrote this post I soon discovered that when you really dig into colour management it’s one of those technical rabbit holes that some people love (people who comment in forums) and some people don’t have time for (getting into the depths of nuance). I think I’m somewhere in between.
Of course, the kind of work you’re doing and the resources you have at your disposal will somewhat dictate how far down the rabbit hole you need/want/can go.
When I’m researching something like this I prefer to hear from professionals who demonstrate that they know what they’re talking about – both in theory and real world applications.
In putting this post together the excellent content created by the three professional colorists behind MixingLight.com (Robbie Carman, Patrick Inhofer and Dan Moran) was instrumental to defining my answers to much of this, as well as some key insights from Michael Kammes and his 5 Things Web series and Samuel Bilodeau of Mysterybox.us.
You would do well to check them out too!
That said, any errors in here are entirely my own and I’ll happily be corrected and informed by more learned opinions, in the comments.
I don’t want to read all this – just give me the answer!
The crux of post is to set your monitor to the calibrated colour profile that matches the standard you are delivering in. Grade within the spec of the standard and then anyone who sets their monitor/TV to the same standard, should see it as you intended.
Switch between calibrated profiles depending on the delivery requirements of the project. For example, if you’re delivering for web to sRGB or if you’re delivering for broadcast Rec. 709.
So if you’re grading on a computer monitor, delivering for the web then set and calibrate the monitor to sRGB Gamma 2.2.
To ensure a reliable colour pipeline from the software to the monitor you are advised to use an IO device, like an AJA T-Tap or Blackmagic Design Mini Monitor (or greater if you need 4K), so that your operating system or graphics card aren’t interfering with delivering a clean signal from the footage to the monitor via SDI or HDMI.
You also need a monitor that is reliably capable of displaying the full colour gamut of the colour space you are working in.
Before you jet out of here, scroll to the very bottom of this post to read the ‘One last thing’ section, on why you really do need a large external monitor.
The Goal of Colour Management in Post Production
Netflix’s own Calibration Best Practices document spells out the goal of what we’re trying to achieve quite nicely:
The wide variety of display types and viewing environments can lead to inconsistent quality results, unless a set of guidelines is put into practice which adhere to a common standard.
The guidelines provided below will need to be adopted by each contributor to the Netflix Digital Supply Chain, to ensure consistent quality.
If we all agree on a standard and stick to that standard throughout the process, then how I choose to make the picture look at my end, will be the way it should look for you at your end. And we’ll all be happy.
Grading to a standard
In television broadcast this process was pretty straight forward.
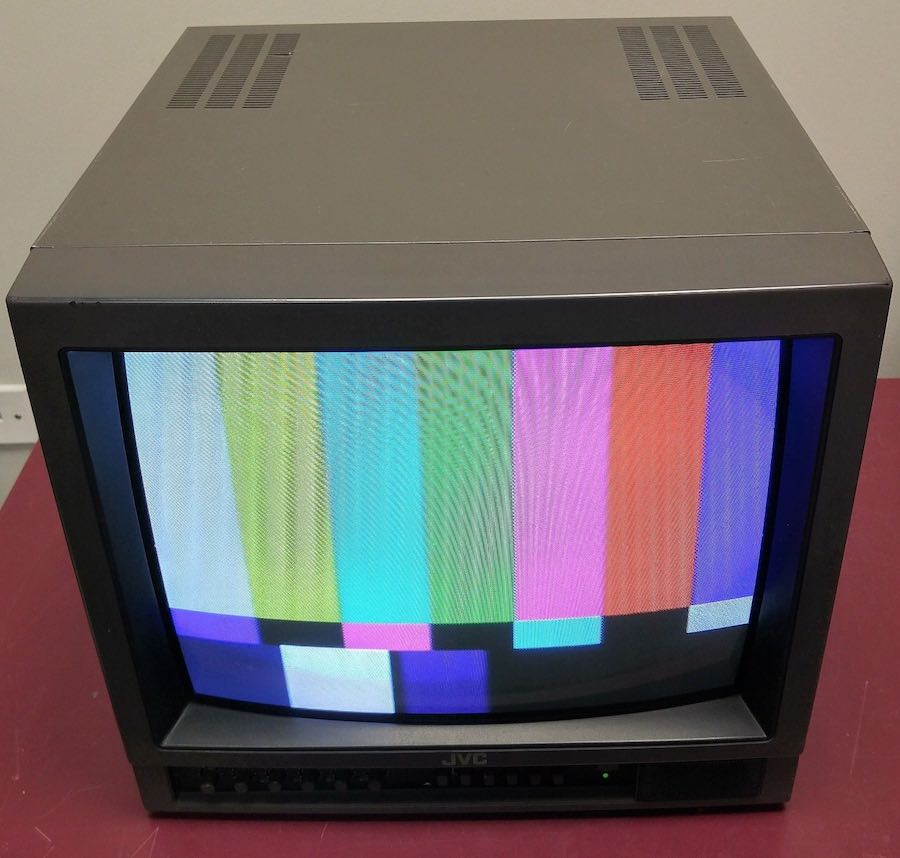
Rec. 709 was the standard colour space with a white point of D65. This was what everyone worked to, and why post suites had a big fat CRT monitor calibrated to this standard to view their images on. It was also what your TV at home should have been working to as well.
The agreed standard for the Web is currently sRGB.
This closely resembles the very similar specification to Rec. 709 although the difference between Rec. 709 and sRGB is that the Gamma curve changes from 2.4 for Rec. 709 to 2.2 for sRGB.
What this means in practice is that they’re basically ‘close enough’ to each other to work with and you shouldn’t worry too much.
The main difference between the two, is that a lower gamma number (2.2) produces a brighter image.
The theory being that most people looking at computer monitors are doing so in a brighter, day-time environment. Or in the street on their iPhone.
Whereas broadcast TV standards expect you to be watching TV in the evening in a darkened environment, so the Rec. 709 broadcast standard is Gamma 2.4.
This matters because our perception of the image within the screen, relative to the environment around it, changes depending on the level contrast between them, as in the image below.

This post on Mixing Light was super helpful, on the difference between 2.2 and 2.4 Gamma and how to choose between them.
It’s also worth a read to understand the human visual perception of contrast happens in relative terms, rather than absolute, and why the monitor and viewing environment you’re grading on and in, is more likely to effect your choice of Gamma setting.
In my grading suite, I have my room’s viewing conditions set for broadcast mastering. All exterior sources of light are blocked, and I have dim (but not completely dark) and controlled sources of light. Therefore, I always set my entire workflow for gamma 2.4.
The delivery destination makes no difference when I’m color correcting! I set my gamma appropriate to my viewing conditions, not my delivery specification. – Patrick Inhofer, colorist
So for example, if you’re grading for TV at Rec.709 you should have your monitor set to 2.4 and be grading in a ‘dim surround’ environment.
Also just to say Rec. 2020 is coming which has a much wider colour gamut that Rec. 709. Adobe RGB also provides a wider colour space than sRGB and is more for professionals working with print. I’ll leave them there for now.
That’s not to say that once you’ve carefully set up your system and graded your project that the end viewer won’t whack up the brightness of their TV, add more contrast and boost the saturation. The web equivalent might be a producer critiquing a grade late at night on their iPhone with Nightshift turned on.
Understanding Colour Pipeline Management
Video Signal Chain: Source Footage > Video Editing Software > OS > IO/GPU > Cable > Monitor
Video Processing/Viewing Chain: Source Footage > Video Editing Software > Export Codec/Bit Rate > Viewing App > Web Service Compression > Web Browser > Monitor
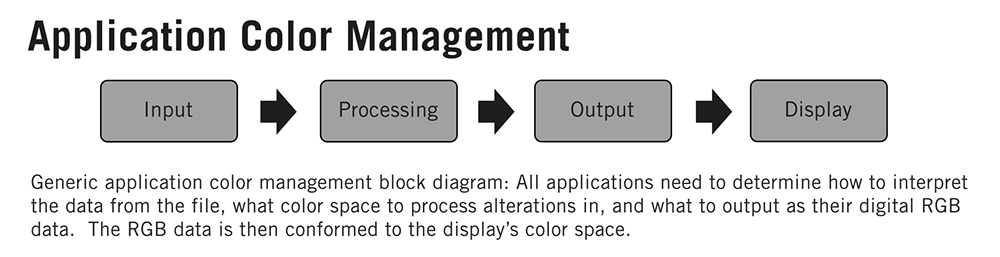
To understand all of the steps that your video image will go through to get from a digital file to your eye-balls it’s worth breaking down all the parts involved in the journey.
Depending on your particular set up, things will be a little different so I’ll try to describe the general theory (as I currently understand it) and then get into some of the specifics of my own workflow.
Let’s say you want to get a Rec.709 10bit video image to your eye-balls the whole time, what would you need to do?
You would need to take a Rec. 709 10bit video file, edit it in your video editing software maintaining that bit depth and colour space, output that video signal to your external monitor in 10bit and in Rec.709 and view it on a monitor with a 10bit panel, calibrated to Rec.709.
Now that Mac OS X displays native 10bit video, does this mean I no longer need an I/O box to get the signal from the software to the monitor faithfully in 10bit and Rec. 709?
Well it depends on what’s happening in the video editing software.
If the video editing software Viewer is displaying 10bit video in the UI/viewers then I think so (?). (See “Do you still need a dedicated I/O box for Video” below for more.)
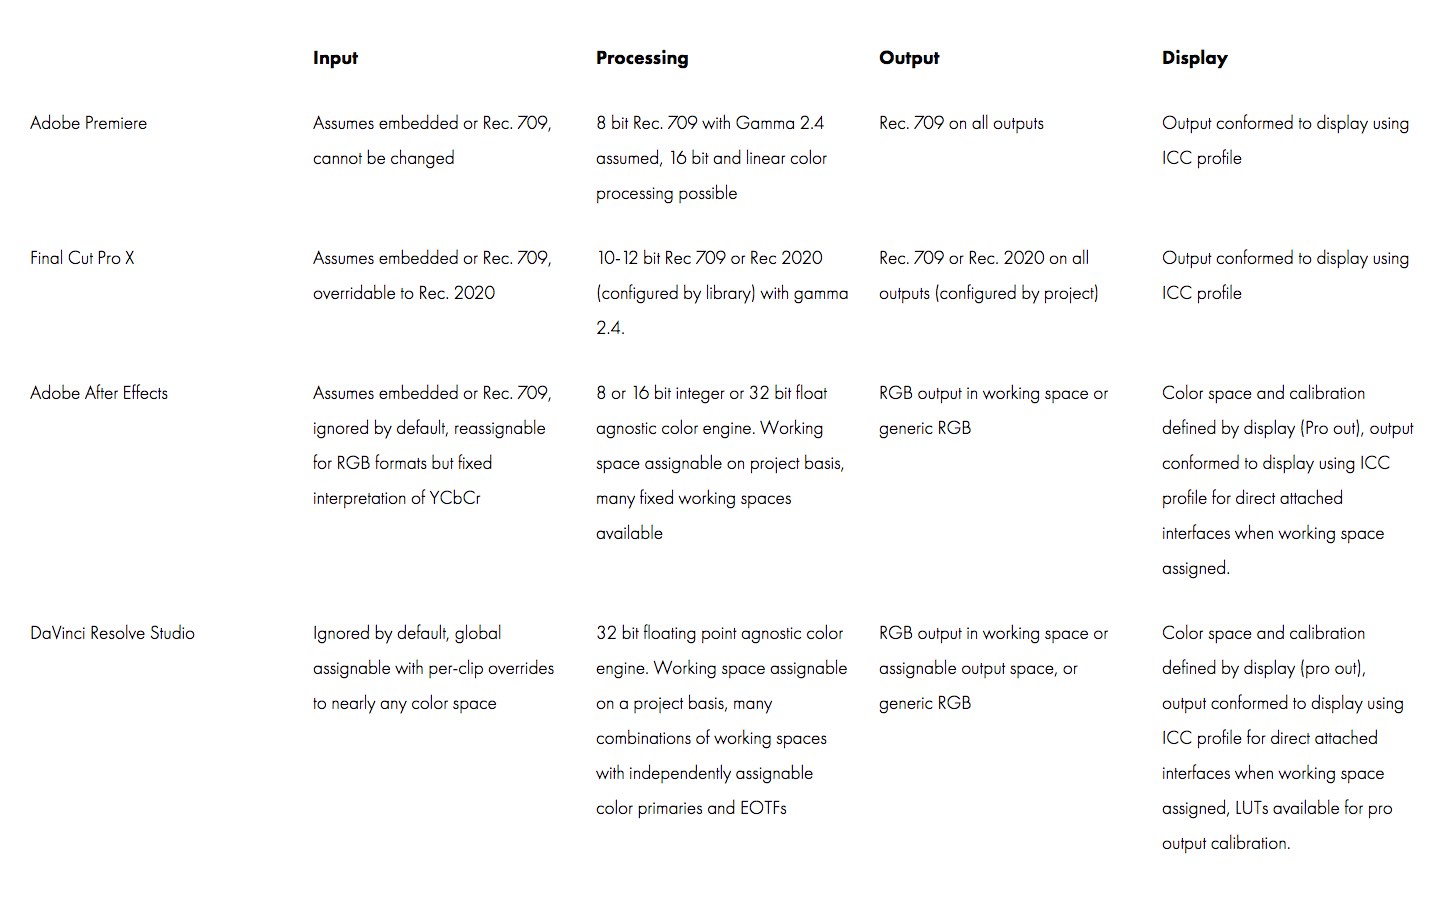
So let’s take a quick look at what Premiere Pro, FCPX and DaVinci Resolve are all doing in the timeline viewer and on export.
This detailed post from Mystery Box was exceptionally helpful in answering my questions on this topic. I would highly recommend reading it in full!
Both Adobe Premiere and FCPX work on a “what you see is what you get” philosophy. If your interface display is calibrated and using the proper ICC profile, you shouldn’t have to touch anything, ever. It just works.
Colour Management in Adobe Premiere Pro
As the Mystery Box post makes clear, Premiere Pro is anticipating you to be working in a Rec. 709 colour space all the way through. This makes life fairly straight forward if you’re delivering for broadcast or the web.
Further googling uncovered these interesting tidbits;
Colorist Jason Myres shared this breakdown on what Premiere Pro is doing, during a discussion on Lift Gamma Gain.
Premiere processes everything in 4:2:2 YUV, but converts to RGB 4:4:4…
a) For GUI Display
b) For RGB-based effects (then back to YUV again)
c) For outputs if export settings or the target file format require itCUDA effects are always processed in 32-bit float.
Colorspace and Gamma are defined by your display.Bit depth:
The timeline processes in 8-bit, but maximum bit depth is ultimately limited by your source footage.
Checking Render at Maximum Depth in the Video Previews or Render dialog will promote either one to 32-bit float to take advantage of source footage over 8-bits.
Therefore two crucial things to make sure you have checked on every export from Premiere Pro are:
- Render at Maximum Depth (otherwise it will default to 8-bit)
- Max Render Quality
This post from Patrick Inhofer on MixingLight.com was again very helpful for clarifying numerous things about grading in Premiere, not least what Max Render Quality actually does.
Apparently this setting is actually about the quality of the scaling of images between their original resolution in the footage and the timeline frame size. Patrick says this is actually weighted more towards down-scaling, than up-scaling. So if working with 4K footage but delivering in HD then you want to make sure this is checked!
UPDATE – Premiere Pro – June 2019
Jarle Leirpoll, who absolutely knows what he is talking about, suggested some corrections to this information on Premiere Pro that I thought were worth sharing here:
“The timeline processes in 8-bit…“
No. Premiere Pro works in 32-bit float by default if you have a GPU accelerated system. And I can’t imagine that more than maybe 5% of users are editing in Software Only mode.
“Max Bit Depth is limited by your source footage.“
No. We can, will, and should, process all sources in 32-bit float, which eliminates rounding errors. Source, internal processing and output are three very different things.
“Checking Render at Maximum Depth in the Video Previews or Render dialog will promote either one to 32-bit float to take advantage of source footage over 8-bits.“
Only true if your timeline has red render bars, and not even in all cases with a red render bar.
Jarle has also written a must read article on understanding the new colour management functionality inside of Premiere Pro as of the October 2018 update (version 13).
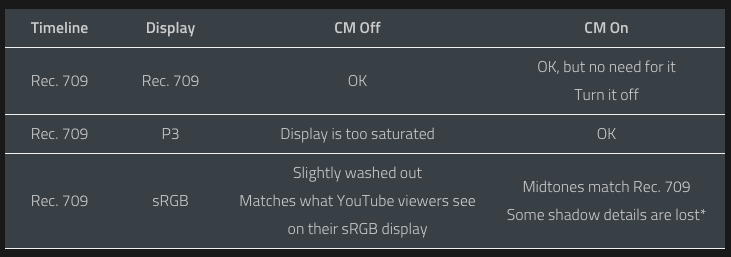
Whether you should turn on the new “Enable Display Colour Management (requires GPU acceleration)” checkbox or not, depends on the colour space of your timeline and your display, as Jarle explains.
Should you turn Display Color Management on if you edit Rec. 709 on an sRGB display?
If the destination for your video is YouTube, Facebook, Vimeo, etc. or will be played back on an sRGB display: NO!
If the destination for your video is a broadcaster: YES!
Read the article in full, to understand how and why you should and should not turn this function on.
Update – August 2019

In this excellent and free tutorial from MixingLight.com, Neil Haugen walks through everything you need to know about colour management in Adobe Premiere Pro (as it currently stands in mid-2019) to get correct results. He busts a few myths, highlights some specific options that you need to set correctly, and what you need to do when working in a Rec. 709 workflow.
If you use the proper options and follow the proper workflow, Premiere Pro works internally at 32-bit float, honours the bit-depth of your source footage, and exports at the highest bit depth of the codec you’ve selected.
BUT – if you misconfigure a few settings (some of which are named in a way that confuses) or don’t pay attention to the plug-ins you’re using then your final renders won’t have the final quality you expect. It’s also important you understand how to view your images since Premiere Pro’s default assumption is that you are following a broadcast delivery (and viewing) pipeline.
Neil highlights that Premiere assumes the following things:
- Video sRGB color space (sRGB color primaries and white points match the SMPTE Rec. 709 specification)
- 2.4 gamma
- 100 nit peak brightness
The whole video is well worth your time and note taking abilities, especially given the quality of the material and that it’s normally behind the Mixing Light paywall. It’s probably also worth having Premiere open at the same time to see what your system is currently configured to!
If you need to create 2.2 and 2.4 gamma deliverables there are a couple of really useful comments that are also worth your attention:
Patrick Inhofer: Premiere will assume a 2.4 gamma unless the codec informs otherwise.
My advice in this workflow if I were the post supervisor: The colorist grades and renders at 2.4. But they put an adjustment layer at top for a 2.2 gamma correction. They can toggle it on / off for a final trim pass to make sure the grade works in both situations. The finishing editor takes the 2.4 render, finishes the show, and ‘burns in’ the 2.2 gamma adjustment as the final deliverable.
Since PrPro is built around a 2.4 assumption, I’d keep it 2.4 through as much of the pipeline as possible.
Scott Stacy: I consulted with Nick Shaw about this and he had a very novel and non-destructive way of mathematically converting gamma 2.4 to 2.2 with an adjustment later via the ASC CDL effect whereby you adjust the power level of the RGB channels to 1.090909. Works great.
Colour Management in FCPX
By default, [FCPX] processes colors at a higher internal bit depth than Premiere, and in linear color which offers smoother gradients and generally gives better results.
You also get to assign a working color space to your library and your project (sequence), though your only options are Rec. 709 and Wide Color Gamut (Rec. 2020).
This quote comes from the Mystery Box post, and makes it clear that working in FCPX is also relatively straight forward, and the default is Rec. 709 again.
More rummaging around on the internet turned up this nugget in the comments of a post from Larry Jordan explaining the Wide Colour Gamut in FCP 10.3 (which is worth a read too, as is this one about P3 on the new Macbook Pro).
Question: One thing I’m curious about that Apple doesn’t include in their white paper is whether macOS internal color management is flagging and adjusting gamma along with color gamut. Rec. 2020 specifies 2.4, the same as Rec709 did, but Apple displays, including the new P3 ones are all 2.2 gamma, while all digital cinema projection (the viewing environment where most of us can actually see P3 content for the foreseeable future) is 2.6 gamma.
LJ Answer: “macOS internal color management does adjust gamma along with color gamut based on the color profile of the display. When viewing Rec. 709 or Rec. 2020 footage on an sRGB or Apple P3 display, the gamma adjustment is controlled by ColorSync. To view footage on a broadcast or studio display with 2.4 gamma, an external video out device, like an AJA or Blackmagic Thunderbolt to SDI device, can be used.
Colour Management in DaVinci Resolve
By default, on a Mac it applies the monitor ICC profile to the interface viewers, with the assumption that your input footage is Rec. 709.
Fortunately, changing the working space is incredibly easy, even without color management turned on – simply set it the color primaries and EOTF (Gamma curve) in the Color Management tab of the Project Settings.
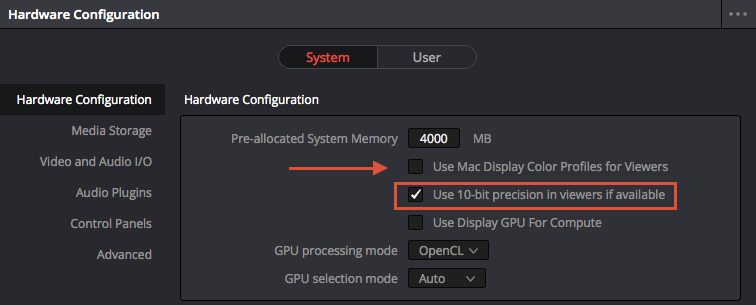
With color management off, this will only affect the interface display viewers, and then only if the flag “Use Mac Display Color Profile for Viewers” is set (on by default, MacOS only.) [Arrow in image above.] – MysteryBox
Of all the applications in this list DaVinci Resolve has by far the greatest level of customisation and control over what’s happening internally with the video processing, what’s sent to the monitor and your project’s working colour space.
This also means that to get the most out of it you need to know a little bit more about what you’re doing. Luckily, chapter 6’s of the manual (Data Levels, Color Management, ACES and HDR) provides you with 31 pages of details on this in various scenarios.
It’s particularly worth reading the section on Resolve Colour Management (RCM) which aims to make life much easier for everyone when working with different kinds of source footage.
Here’s a quote on how it makes life easier for editors in particular.
Resolve Color Management for Editors
RCM is also easier for editors to use in situations where the source material is log-encoded. Log-encoded media preserves highlight and shadow detail, which is great for grading and finishing, but it looks flat and unpleasant, which is terrible for editing.
Even if you have no idea how to do color correction, it’s simple to turn RCM on in the Color Management panel of the Project Settings, and then use the Media Pool to assign the particular Input Color Space that corresponds to the source clips from each camera.
Once that’s done, each log-encoded clip is automatically normalized to the default Timeline Color Space of Rec.709 Gamma 2.4.
So, without even having to open the Color page, editors can be working with pleasantly normalized clips in the Edit page.
I had read that DaVinci Resolve only supplied an 8-bit preview in the viewer window but thanks to Alexis’ tweet this isn’t the case under Mac OS.
Check what you’re set up as under DaVinci Resolve > Preferences > Hardware Configuration. (See the red rectangle in the image above)
How to Colour Grade for the web in DaVinci Resolve’s GUI
Editor and Colorist Jamie Le Jeune has consistently sought to educate other editors on the best way to set up DaVinci Resolve’s colour management and export settings in order to get consistent results when using DaVinci Resolve’s viewers as your main ‘grading monitor’.
This tweet thread will walk you through how to set up your project settings and answers some common questions.
Advanced Training on Colour Management in DaVinci Resolve
For a deeper dive into colour management in DaVinci Resolve, LowePost.com have an excellent and concise training course, as part of their annual subscription, taught by Lee Lanier which covers everything you need to know to about working with both display-referred and scene-referred colour management including getting started with ACES.
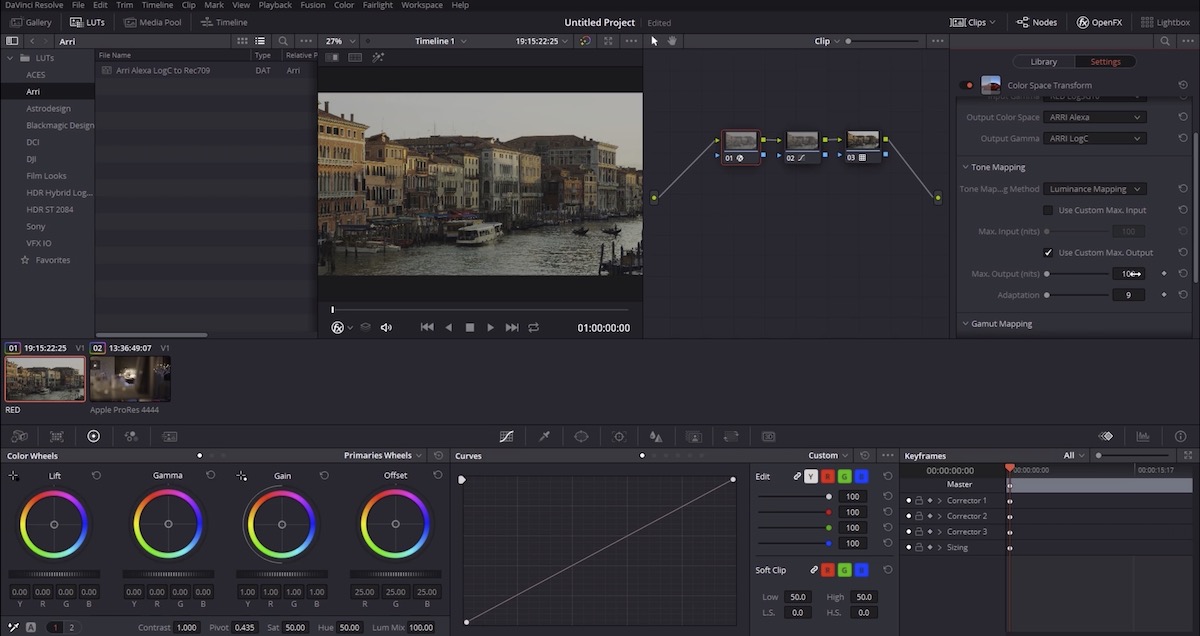
For example, in the lesson on using a display-referred workflow to match cameras with colour space transforms, Lee matches an Alexa shot with a RED RAW Mysterium shot using the in-built DaVinci Resolve OFX plugin to perform the colour space transformation. Knowing the intricacies of setting all of this up correctly, is well worth learning to ensure a smooth grading experience down the line.
The training lasts just over an hour but delivers a lot of practical wisdom on the following topics:
- Color spaces, colour models, and bit-depths
- Display-referred vs. Scene-referred management
- Display-referred workflow – Using LUTs
- Display-referred workflow – Matching cameras with DCTLs
- Display-referred workflow – Matching cameras with Color Space transforms
- Display-referred workflow in Fusion
- Resolve colour management (RCM) workflow
- ACES colour management set-up
- RCM and ACES inside Fusion
- Adding Color Space Transforms in Fusion
- Adding LUTs, DTCLs, and using OpenColorIO
Check it out for yourself at LowePost.com.
For a more detailed run down of everything LowePost has to offer, check out this previous post.
Do you still need to use a dedicated I/O box for video?

If all of this sounds like too much trouble then you might just want to make your life easier by using a dedicated I/O device to send the signal from your software of choice, direct to your monitor.
The reason to use a dedicated IO card is that it gives you a properly managed colour pipeline that by-passes the operating system’s GPU and colour profile settings and gets you straight from the video editing software to your monitor without alternation (unless you’ve got some hardware calibration going on too).
That way, if you know you’ve got a 10bit Rec. 709 video file and you’re outputting it via the IO to a 10bit Rec. 709 calibrated monitor you should be good to go.
That’s the gist that I picked up from this conversation from the MixingLight.com Mailbag podcast, anyway.
Patrick Inhofer, of Mixing Light.com, kindly read through this article, and pointed out that in the table above (from the Myterybox article) neither Premiere Pro nor FCPX by-passes the ICC profile used by the OS.
When you use an I/O card you also install drivers that plug into your video editing software. Those drivers help the video editing software bypass OS-level color management and output a standards-compliant image that shows you what the actual bits and bytes on your hard drive represent. – Patrick Inhofer
So do you still need an IO interface?
I was hoping with 10-bit output and newer 10-bit monitors with 14-bit luts & rec 709 settings (BenQ PV3200 or EIZO CG318-4k) that we could finally bypass using SDI breakout boxes.
Displayport has 10-bit 4:4:4 as well as YCbCr. These new monitors should be able to produce an accurate image over the Flanders or Sony 1080 panels i’ve been using as reference monitors for the past six years?
I thought all we were waiting for was proper 10-bit color from the OS and video cards? – MrCdeCastro
This quote from the egpu.io forum basically raises the question fairly succinctly.
However, this thread on the BMD forum seemed to have some very knowledgable folk putting forward solid arguments for and against this kind of workflow, depending on the specifics at play.
I’ve quoted representative snippets here, but be sure to click through to check out the full posts from this comment from Davis Said:
- Signals sent out via GPUs to monitors may not be representative of an actual video signal.
- I would agree with others who’ve said that using a BMD video output device to a properly calibrated (and suitable) external video display is the only guaranteed way to know that the signal path is one that is proper for previewing video. Also, having a display that can show all the pixels from a video frame without any scaling is very valuable when scrutinizing the effects of filters and other grading choices.
- (Edited/Added for clarity) As Andrew K. mentions a bit further down in the thread, it is possible for a monitor directly connected to a computer via a GPU to display a proper image (with a valid signal path). As Andrew also mentions, a benefit would be not having to convert from RGB to YUV/YCbCr to RGB. It’s more of a software issue than a hardware issue nowadays. – Davis Said
and this comment from Craig Marshall (quoting colorist Jason Myres):
GPU output (DP/HDMI) and a Decklink/mini monitor card output) … are two very different things and it goes way beyond whether they are 8 or 10-bit.
The first one is a standard graphics card output, the second (Mini Monitor) is a Baseband SDI/ HDMI video output.
The difference comes from the fact that one is intended (and modified) to suit a computer display, and the other is a fully legitimate video signal intended for broadcast monitoring.
They are two different signal types with different color spaces and signal paths. Don’t try to compare them, as they literally have no relation to one another.
and then this comment from Andrew Kolakowski.
Well- this is bit of myth and legacy approach. Here is another view which is adjusted to current technology possibilities.
Resolve and other grading tools work in RGB and use GPU to do its magic. The GPU is connected directly (in typical case) to a monitor. This is all what we need.
This link is actually more accurate and better than using video card because:
– data goes directly from GPU to monitor without any additional delay
– it’s rather always 4:4:4, where probably 80% of typical studio setups still uses 4:2:2 YUV path (to save bandwidth)
– it avoids RGB->YUV->RGB conversion (which is never 100% lossless)- this happens on every YUV video chain
– it uses less resources- no need to copy data from GPU to card
– saves money and slot (no need for any additional card)
– it can be even 16bit pipe, where most video cards can do max 12bit
– it can use V-sync to guarantee proper sync, like video chain does
– it actually avoids problems on wrong conversion between RGB<->YUV (it’s 1:1 RGB pipe from GPU to monitor)
– it’s not restricted to specific refresh rates (just by connection bandwidth limits, e.g. HDMI 2.0 ect)- it can do about everything what your monitor will accept, e.g. 120Hz
– it’s the only easy solution which allows atm. to monitor 8K (or 4K 50/60p 4:4:4)Accuracy- it’s just a matter of software.
It’s fairly easy to separate preview from any OS influence. There are software which already do it – just not Resolve.
When we talk about grading software which works in RGB and then about video pipe (which in most cases is YUV) then whole point of video pipe almost loses sense. An RGB pipe to the monitor is what you ideally want. The YUV pipe is juts a compromise to save bandwidth.
If we were talking about some broadcast chain which operates in YUV then yes – you don’t want to go to RGB anymore (we already left RGB world when YUV master was made).
In the case of Resolve, compositing, finishing tools you want RGB preview to your device and GPU is ideal for providing it.
Issues with GPU monitoring:
-because it uses HDMI/DP technology cable length is limited (use converter to SDI to gain distance if needed)
-maybe interlacing issue, although it can be sorted and it’s soon will be gone anyway.
It seems to me that there is an emerging case, with the latest technology and calibration at all points, that you *might not* need an external monitor and IO card – but pretty much only if you’re never going anywhere near broadcast.
Obviously this is only feasible if the monitor you’re viewing it on is capable of accurately maintaining it’s colour profile and the software is set up to give you accurate video in the preview window. Apparently this is may not the case with DaVinci Resolve due to scaling issues and other things.
I’ll leave you to wade in and make up your own mind.
If you’re specifically using DaVinci Resolve it’s well worth reading their latest Configuration Guide to see their recommended hardware set up for desktops, laptops and so on.
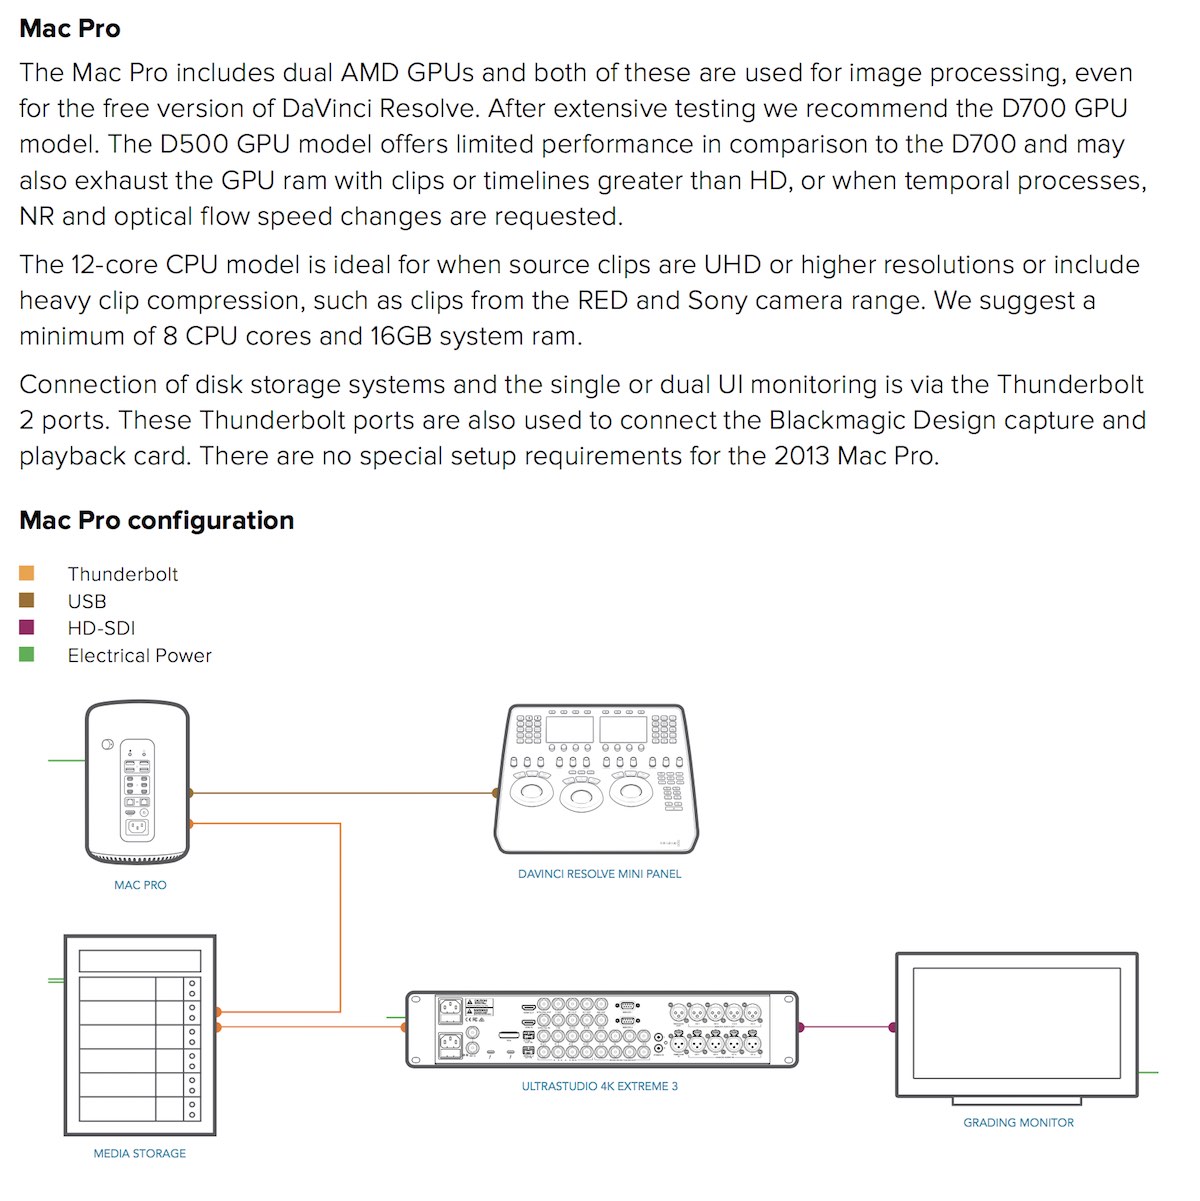
Here’s what Blackmagic Design recommend for a 2013 Mac Pro.
It’s also worth pointing out that on page 660 and 661 of the DaVinci Resolve manual you get this information on the ‘Limitations When Grading With the Viewer on a Computer Display‘:
Most computer displays do not operate at the color critical tolerances or specifications required for broadcast or theatrical delivery.
An additional issue, however, is that the Viewer does not necessarily display each clip’s image data as it is displayed by the calibration that your operating system applies to your computer display, depending on which OS you’re running DaVinci Resolve on.
This makes your computer display potentially unsuitable for monitoring projects destined for the sRGB standard of the web in its default state.
For example, if you grade a project using the Color page Viewer on your computer display, the resulting clip may not look the same in the QuickTime player, or in other post-production applications.
You can address this in one of two ways:
1) If you’re using DaVinci Resolve on Mac OS X, you can turn on “Use Mac Display Color Profile for viewers” in the Color Management panel of the Project Settings.
This lets DaVinci Resolve use one of the pre-existing profiles in the Color tab of the Displays panel in the System Preferences, thereby taking advantage of ColorSync on Mac OS X to let DaVinci Resolve display color the way your computer monitor does.
NOTE: custom calibrated .icc profiles are not supported at this time.
2) Alternately, you can apply a dedicated Color Viewer LUT for calibration, using?the 1D/3D Color Viewer Lookup Table pop-up menu that’s found in the Color Management panel of the Project Settings.
This lets you analyze your computer display for calibration in the same way you would calibrate an external display, using a probe and color management software, and apply the resulting calibration LUT in DaVinci Resolve.
Keep in mind that monitor calibration can only make a high-quality display standards-compliant, it cannot make up for a display gamut that’s too small.
For more information, see the “Look Up Tables” section of Chapter 3, “Project Settings and Preferences.”
Strictly speaking, if you’re doing professional work, you should restrict your grading to a calibrated, 10- or 12-bit class-A external broadcast display of some type, connected via a Blackmagic Design video interface.
Assuming everything is running properly, an image output to video from DaVinci Resolve should match an image output to video from any other post-production application you’re using, and this should be your basis for comparison when examining the output of two different applications.
What about HDR?
I’ve chosen not to get into HDR in this post for simplicities sake and because I’ve personally not worked in it, but as a starting point here is an excellent short video from Ripple Training explaining what HDR is and how it works in FCPX.
To add to this here is a quick word from Patrick Southern of Lumaforge, on working with it in relation to IO boxes:
You have to use an AJA IO 4K or IO 4K Plus with Final Cut Pro X to output proper HDR. You’ll only get an 8-bit image with a Blackmagic box out of FCPX, and you’ll only get the proper HDR metadata to the display using AJA.
Resolve, on the other hand, must use one of the Blackmagic IO boxes to properly output HDR.
In neither case will HDMI direct from the computer work.
With HDR, every bit counts. Since HDR is about smooth gradation in an expanded luminance range, you need at least 10-bits to properly display HDR.
That’s why it matters which IO box you use with each application.
Mark Spencer and Steve Martin from Ripple Training and MacBreak Studio have recently released this 15 minute primer on working in HDR, and doing so in FCPX specifically.
A helpful watch to get your head around the concepts and considerations.
Colorist Marc Bach does a great job of explaining what HDR is, how it works technically and creatively and in relation to the human visual system! A great presentation from the LumaForge ‘Faster Together’ booth at NAB 2018.
Colour management workflow when delivering video for the Web

So if you’ve made it this far into the post (congrats) but you’re thinking “but I’m an editor who is only editing projects for YouTube or Vimeo or other places”, what do I need to do?
Well, as you’re not delivering for broadcast, there will be no Quality Control rejection of your file by the powers that be. You can upload whatever you like and only your client’s opinion will really matter. If they’re happy and you’re happy, then what’s to worry about?
Personally, that’s not enough for me.
I want to know for sure that I’m getting the best out of the equipment I have and that what I’m looking at is an accurate representation of the file I’m working on. I also want to have some kind of fall-back position if the client says “Hey it looks kind of …. to me.” (On their screen.)
I’m on a 2013 Mac Pro with an LG 31MU97 4K monitor set to it’s sRGB profile. This is hooked up with a Display Port cable feeding a 10bit signal. I do most of my grading in Premiere Pro or DaVinci Resolve.
I’ve also got a new 2017 Macbook Pro 15″ laptop and an iPad which I can use as some basis for comparison to my image on screen. I’ll also upload a test file of my export to YouTube (if that’s where it’s going to be delivered) and see how that looks on various screens.
Sometimes I’ll add a 10% contrast and saturation bump adjustment layer to the whole thing and see if that ‘looks better’ in the final viewing conditions.
What I’m painfully aware of is that I need to get my screen re-calibrated in all of it’s various profiles, just to give it a ‘spring-clean’.
I also should probably fork out for a 4K I/O box. Although that’s a fair amount of money for someone who actively avoids being booked to do colour grading specifically, it feels like an important next purchase.
Dealing with QuickTime, VLC, YouTube Vimeo and Browsers
One of the most perplexing things is when you export your final file and open it in QuickTime, VLC, DaVinci Resolve, Final Cut, Premiere Pro, YouTube, Vimeo, Safari, FireFox and Chrome all at the same time and it looks different in each one.
This is because each one does it’s own thing when interpreting the image. Some refer back to the system wide ColorSync ICC profile, some don’t. Some refer to the display. It’s a mixed bag.
I’ve read different opinions about it online, but other than calibrating your monitor to the correct spec, I’m not sure there’s much more you can do, depending on the innumerate variables that could be in play in your specific circumstances.
Or follow the advice of Alexis Van Hurkman in the Resolve manual, quoted in the last section above. (p.660)
In the Mixing Light post I referenced above, colorist Patrick Inhofer, answer this question in the comments:
Do platforms on the internet adjust gamma at all?
Gamma adjustments happen all over the place; on your computer, in your browser, when uploading to a video sharing service, when displaying from a video sharing service.
You can, and should, expect your gamma will get bounced around once you’re outside a carefully color-managed room, like in digital cinema or a grading suite. That’s why we grade to a standard… the standard is a center-point around which all our devices will orbit.
Update – July 2019
In this easy to follow and essential viewing video, Danielle Siragusano from FilmLight demonstrates how to solve some of these ‘it looks different in different players’ problem by explaining how QuickTime colour management works on a Mac and how you can ensure your QuickTime deliverables look correct.
In about 15 minutes Danielle breaks down the colour pipeline and the various colour transformations ColorSync performs at each stage, demonstrates the reason for the ‘gamma shift’ problem and provides a few solutions for Baselight users. He also shares how you can view and adjust the NCLC metadata tags to ensure you get the right result even if you never touch Baselight, in your post workflow.
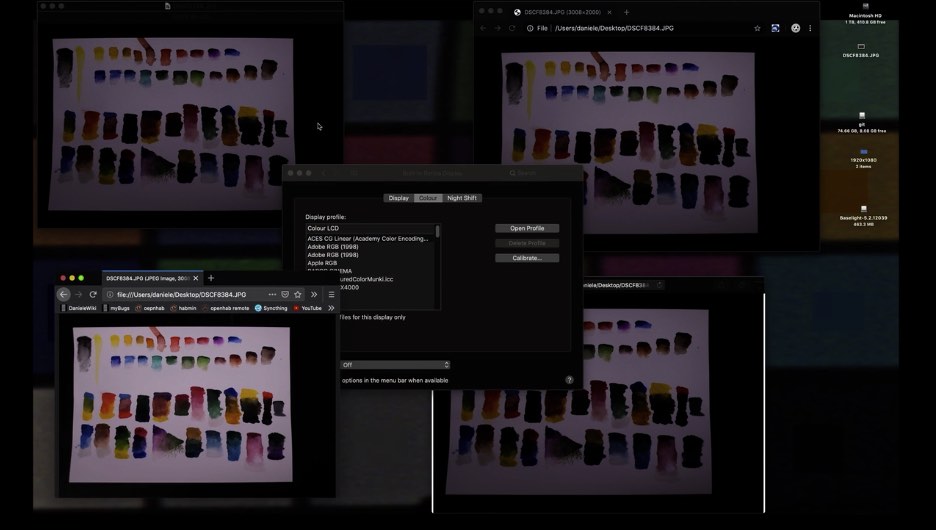
He also shares a nifty trick for checking which of your apps or browsers is correctly colour managing your video and which are not. Danielle also points to a free open source qtff editor from the BBC which will allow you to edit the NCLC tags in existing QuickTime files, which might come in handy!
Ultimately Daniele concludes that the best strategy for internet deliverables is to:
a) make sure clients use colour managed viewers and b) to render to SRGB, simply because there are more SRGB displays out there and if the player is not colour managed and just streams the native RGB values you’ve got a higher chance that the colours will look right.
This is true for internet deliverables, not broadcast deliverables.” – Daniele Siragusano
One Last Thing – Why you really do want an external display
In emailing with colorist Patrick Inhofer about this article, he made a really astute comment on this whole topic of monitoring, which I felt was worth quoting at length here:
The value of a large dedicated external display. That value isn’t just a color managed image… it’s an emotional value.
I can’t imagine judging an actors performance, the effectiveness of my edits, or the quality of my color corrections on 1/3 of a 27″ computer display – surrounded by distracting User Interface elements of my software.
A full-time dedicated display is essential to judge the emotional effectiveness of the work we do – in real-time.
But, if part of your ‘pitch’ to your clients is that you can do color correction and that’s part of what they’re buying from you – then you’re selling them (and yourself) short if you try to get by making color-critical decisions on a cheap display with terrible characteristics through an ICC pipeline that has problems of its own, in regards to professional video.
In the end, spending a few thousand dollars on a pro display is about integrity, doing great work, and having atomic-level self-confidence in what you do for a living and your confidence in selling your skills and the final, emotional product you’re producing.
This is a hugely important point and definitely something to consider when you’re making your next monitor purchase.

As I said, within my home edit suite, I have a large 31″ 4K display which allows me to work, I feel, in an uncluttered way with a 1:1 1920 x 1080 HD image, which is what 95% of the projects I work on are delivered in.
But I’ll always review my work by standing at the back of the room and watching the edit on a full-screen preview to make sure everything is working as it should.
If I had the space for a second display I would definitely seek to make that happen for the reasons Patrick has made clear.


I’m pretty sure this quote is misinformed:
“Resolve and other grading tools work in RGB and use GPU to do its magic. The GPU is connected directly (in typical case) to a monitor. This is all what we need.
This link is actually more accurate and better than using video card…”
Just because the video is being processed on the GPU doesn’t mean that it gets to the monitor without modification by the OS. Modern operating systems limit software’s access to hardware for many reasons, most notably security. The order of operations for an application to display itself is as follows:
1. App requests a window to be made by the operating system
2. OS creates the window, and returns a buffer for the app to draw in
3. App draws to buffer
4. OS does NOT send this buffer to the monitor. Instead, compositing takes place in a new buffer, which includes the following steps:
– App buffer is layered with other elements (wallpaper, mouse cursor, window title bar, taskbar/panels/dock, other windows, etc.) into new buffer
– OS applies color adjustments (e.g., ICC profile)
– The layering may instead be done after color adjustments, or there may be color adjustments done both before and after. IDK. Might depend on the OS
5. Composited buffer is sent to the monitor
There are also other steps relating to things like frame timing, but that’s not super important right now. There may also be some additional changes made by the GPU which I haven’t listed.
It should be possible for an OS to only apply color adjustments *before* layering, in which case it may allow for apps to request that no adjustments be made before being sent to the monitor. I don’t write color critical software, so I haven’t looked into those sorts of features, and I don’t know which operating systems may or may not do this. But even if this is a feature available to developers, it doesn’t mean that their software makes use of it, or that it is enabled by default.
There is another possible solution, where the OS doesn’t include the display in compositing, instead giving it over solely to the application. This may sound like a good idea at first, but in reality, it would involve a lot more work on the application side, and could result in applications fighting over ownership of the hardware. It’s possible, but the OS should really just get its act together in comp as a better solution IMO.
This comment includes a lot of speculation, so if someone who knows more about this can reply, that would be appreciated.
TLDR; Apps don’t generally draw themselves directly to the display, even if they’re doing graphics work on the GPU. It’s not that simple, and it hasn’t been for a long time.
Hi Jonny
First of all I need to thank you not just for this article, but also the dedication you put for the community. I’ve been reading your blog for quiet a while.
My question is if a display is not capable of hardware calibration and it was software calibrated using a X-Rite i1Display Pro, then the calibration data stores in the graphic card instead of the display, right?
Then what is the use of a dedicated IO card since it bypasses every settings including my calibration setting?
Please correct me if I’m wrong. As I understood the best pipeline should be setting the right color management in Davinci Resolve then sending the signal with a dedicated IO card to a properly hardware calibrated display.
By the way is there any notable difference between a software calibration and a hardware calibration? I was going to buy the Asus PA279CV then when I understood that it is not capable of hardware calibration, I changed my mind and I might go with the BenQ SW2700PT since my budget is around $500. Do you think that it is a good choice?
Hi Pedram
So this article from BenQ is helpful on Software vs hardware calibration – https://www.benq.com/en-us/knowledge-center/knowledge/hardware-vs-software-calibration.html
Comparing the two monitors – hopefully this link will work for that: https://www.displayspecifications.com/en/comparison/699515ea96 – there is quite a number of differences between them from the age of the monitor, resolution, panel type,the 3D LUT etc. So depending on your needs either one could be better! It’s tough for me to say.
Awesome article, thanks a lot.
I’m working on an Rec2020 / PQ (wide gamut) project in FCPX using an Apple XDR display. When I export to Vimeo, the video looks desaturated, too dark and has a lack of contrast compared to the source file.
The available HDR video settings for the display are P3 / D65 and there’s a direct feed option in FCPX, so I’m assuming the colors are being translated and displayed accurately.
When I exported I added the corresponding meta tags as follows:
Color primaries : BT.2020
Transfer characteristics : PQ
Matrix coefficients : BT.2020 non-constant
Mastering display color primaries : Display P3
Mastering display luminance : min: 0.0000 cd/m2, max: 1000 cd/m2
Maximum Content Light Level : 1000 cd/m2
Maximum Frame-Average Light Level : 0 cd/m2
However, in the Youtube doc I read:
“In cinema, it’s common to master HDR videos in the DCI P3 color space, with either the DCI (~D50) or D65 white points. Doing so is not a supported format for delivery to consumer electronics. When mastering, choose Rec. 2020 color primaries (the Rec. 2100 standard implies Rec. 2020 color in many apps”
Could this be the issue, meaning that I cannot grade HDR on the Apple XDR display for YouTube export? Or do I need to change the metatags? And do you happen to know, is MaxCLL the screen’s peak brightness (e.g. 1000 nits) or the brightest pixel in the video (e.g. 700 nits).
Thanks so much!
More details here: https://www.reddit.com/r/colorists/comments/n6p5mp/mastering_hdr_in_p3_color_space_for_vimeoyoutube/
Hi Michael
Thanks for checking out the blog and sharing your issue – hopefully others can learn from it too when you find a solution. Sadly this is a bit out of my circle of expertise.
But one thing I would say is how does it look in different browsers because the browser you’re using will itself render the colours slightly differently, I believe.
One person you could try asking is Vincent Teoh of HDTV Test (Youtube) – who exports HDR videos to YT regularly.
https://twitter.com/vincent_teoh
Hope that helps and please do reply here with your fix when you find it!
Jonny
Thanks Jonny, I’ll reach out and see what I can find.
Hi! I have a problem with Premiere gamma.
I’ve noticed that Adobe Premiere Pro (since ever to the latest version) changes the colors and gamma on the videos I try to edit on it, in two ways, by a color bug that Adobe almost solved with a LUT file, and something with the gamma, which makes my videos not only way more darker in a contrasting way and makes the colors be washed out.
The colors get way better when I apply the LUT file that Adobe has provided on their forums, but the reds on the videos look jaggy, just as every non professional video editors and converters out there, like HandBrake and Wondershare Uniconverter, that use 4:2:0 chroma subsampling. And of course, the gamma on Premiere is still way off.
I’ve tried to ask on Adobe forums how could I solve this problem, but for my surprise some old wise guy said that this is the way Premiere works and that there must be a problem with my monitor. But as my monitor is a BenQ PD2700Q with 100% sRGB and Rec709 coverage, I know for a fact that this is not a monitor problem. Even more sure when I can in fact test a OBS captured video in 4:4:4 and compare it to a converted version on XMedia Recode, by using the same chroma subsampling (4:4:4) on the output. So yeah, no problem when using Xmedia Recode and all the colors look pinpoint precise with no jaggyness.
Imagine a thin red line on your MP4 captured video using OBS 4:4:4 setting. On any good enough media player, like Media Player Classic, the red line will have the same exact color, no jagged pixels and no blur. On Xmedia Recode (using 4:4:4) it will show the same result. Now, on Premiere Pro preview window and final output MP4 video, the red line will look jaggy and the darker elements on the image will look way more darker.
To put it simply, Premiere is destroying the quality even though it’s supposed to be a top notch professional program.
Maybe Premiere has some proprietary format that can accept 4:4:4, but it’s useless to me if what I want is MP4.
So, is there a way to fix this? I won’t change the gamma on my monitor, as that would still make Premiere output video look darker than the original one, so such a thing could never be a true fix and the video would still look darker on other monitors. Also, my monitor has a fixed gamma when using its sRGB preset.
Keep in mind that YES, MP4 can use 4:4:4, as the OBS video capture program is using 4:4:4 on MP4 and everybody can confirm this in practice.
Great article I learned a tremendous amount even in the pressured situation I’m currently in. Thank you so much.
I do need some advice still, however.
I had almost no idea about color space before this amazing article so please excuse my silly mistakes.
I color graded in Premiere using a P3 display (2019 iMac), with Display Color Management OFF. Most of my deliveries were H.264 and H.265 to just the web (Vimeo, Google Drive, etc.) for review. Most of those reviews were on laptops most likely.
The exported video files always looked slightly different than what was on the Program monitor in Premiere when viewed in QuickTime, Preview, and mobile. Except for VLC. In VLC, it always looked accurate. EVEN if I CHANGED the display profiles in the Mac’s System Preferences, VLC would reflect accurately how I graded it on Premiere in the aforementioned P3.
And regardless, the reviews went well and I didn’t think much about the color.
However, now I got word that I need to deliver this project to a post house as they will make a DCP and show it in a cinema.
So I exported an Apple ProRes 422 HQ file straight from Adobe Premiere (as I found it to crash less compared to Media Encoder). And when I reviewed it in VLC, it looked great and perfectly accurate to what was in Premiere (keep in mind I’m still using my P3 display here).
Now after delivering, the post house has asked me “what color space and gamma did I grade in?” so they can adjust accordingly if need be. This is where I’m really lost as it seems to me that I ignorantly graded without taking any hardware or software settings into account. Or even the possible viewing of it in a cinema. And if I send them the wrong info, they will compensate incorrectly for the cinema and it will look terrible.
Is it safe to assume that the color space I worked on was P3? Even though Premiere works in Rec. 709?
And how do I know my gamma? I see from some of your links that P3 is native 2.2. Is that correct?
Is the accuracy of VLC something to take note of? Is it a good thing or bad thing that I’m relying solely on VLC to know if my export is accurate?
Basically, I can’t change or grade anything as they already have the ProRes video file. So the crucial part right now is telling them what is the correct color space and gamma I graded in.
In hindsight, if I knew all the info in this article, I would’ve instantly changed my display to Rec. 709 before starting the project and not have to worry about P3.
Do let me know if there’s anything else I can clarify!
Cheers.
Hi,
This topic is an extremely deep rabbit hole. But I’ll do my best to answer with some info:
1. The screen your Mac has a P3 color space, D65 white point, and an sRGB transfer function.
2. VLC is not color managed so it will not transform the file for your screen. So if you view the file, and you like what it looks like in VLC, you’re seeing it in your Mac screens native format, so I’d tell that post house that the file is Apple P3, which as explained above is P3 D65 and an sRGB transfer function.
3. Color management in Premiere Pro is an absolute mess. This is the best they’ve managed to offer: https://community.adobe.com/t5/premiere-pro/quot-why-does-my-footage-look-darker-in-premiere-quot-color-q-amp-a/td-p/4788414?page=1
4. If you plan to keep color grading in Premiere Pro, I’d recommend grading on a calibrated reference monitor via AJA or BMD i/o. And, if that’s not an option for you and you are limited to grading in the GUI on your Mac screen, then I’d recommend doing your color grading in Resolve instead because it can be set up to color manage properly for Mac. In Resolve you can either grade with Mac display color management on or off. If it’s off, you’re viewing the native P3 D65 with sRGB transfer function of the Mac screen. If color management is on, and you set the timeline color space in Davinci YRGB (not ACES, not RCM) to REC709-A, then it will automatically be color managed for ITU REC709 and the output files will get 1-1-1 NCLC tags so that the file should look identical is any color managed application or browser. Some web apps like Frame.io assume 1-1-1 for all files, so it can be useful to work that way when dealing with the web. Just note that a 1-1-1 file will not look correct in VLC because VLC is not color managed. To take that REC709-A color managed setting out to broadcast BT.1886 requires adding a color space transform from gamma REC709-A to gamma 2.4 before export.
5. I highly recommend watching this video to understand how color management of video works on Mac: https://vimeo.com/349868875
But to be absolutely clear — the only reliable way to work if you’re delivering to broadcast, or intending to transform the output to DCP for theaters, is to work on a properly calibrated REC709 display fed via BMD or AJA i/o device.
Thanks Jamie!
Thanks for the explanation of Color management in Premiere and Resolve. SUPER HELPFUL!! And I found the description of apple color management extremely helpful.
One question: in the video you linked to from Filmlight, he points to problems with 1-1-1 output on a mac and to my mind strangely specifies the gamma for Rec709 as 2.6.
So:
1. I think I understand, though not fully, that the apple system requires a work around because it incorrectly assigns the tags on output. I would not think a program like Resolve would have that issue.
2. I have thought for a long time the proper gamma was 2.4 to use on the grading monitor if going to output to DCP. If this is hopelessly muddled, please ignore. If not, I would love to know about which is the proper gamma for Rec709 file being used as the basis for a DCP. Does this mean that the file needs to be tweaked on output to gamma 2.6 so it will show up properly when converted in the creation of a DCP?
Hi Keith,
There is no reliable method to directly adjust an emissive display to make it hit the DCI spec for DCP. What needs to be done in this situation is grade to the spec of the grading monitor, which in most cases will be BT1886 (aka REC709 color space with 2.4 gamma). And then take the mastered files and in the process of making the DCP apply a transform from BT1886 to the DCI spec. Most applications for encoding a DCP will include the correct transform. DCP-o-Matic is one example (and it’s free).
As for your other questions, this video explains it all in full detail:
https://youtu.be/1QlnhlO6Gu8
Thank for the great answer Jamie!
What a tremendously valuable resource for beginners and professionals. Thank you very much for your time in creating it. As a professional commercial still photographer for 30 years I’ve kind of forgotten how much I know about still color and the general workflow. Getting into video a year ago and reading your post has reminded me how fun, and head spinning, learning can be. Who knew doing the video workflow at a high/correct level, would be so complicated? Thank you again.
Thanks Mitch! Glad you found it helpful.
Hi, I’m a beginner filmmaker. When editing for web distribution, do I still need to convert the footage to REC.709 (input LUT) in premiere pro?
Hey Ibrahim, thanks for checking out the blog.
The Premiere Pro timeline is always Rec. 709, so ‘converting’ the footage to rec.709 via an input LUT will only be necessary for footage that’s not already in that colour space, so it partly depends on what you’re editing with?
In Premiere, you should always check under the ‘Master’ clip settings to see if anything has been automatically added – such as with RED or ARRI footage – as it sometimes adds a Lumetri Color effect to these types of footage.
Hi Johnny,
Thank you so much for your response. I shoot log (Cinestyle on Canon 6DMKII) so I am correct to convert to REC709 via input LUT yes?
My current workflow from everything I’ve read the past two days from this article, the resources quoted and other sources is as follows:
Import Cinestyle Log footage – Convert to REC709 – make all adjustments – export using Adobe’s Gamma compensation LUT.
Am I doing the right thing?
PS: Sorry if my question is too basic.
There’s never a question too basic! That sounds right to me. What is the Gamma compensation LUT you’re using? Also presumably you’re using a specific Cinestyle LOG to REC. 709 LUT?
Thank you once again. I hope someone else finds my questions and learn from your answers as I did while reading through the comments.
I use Groundcontrol’s Cinestyle to Rec.709 conversion LUT and this Gamma Compensation LUt by Adobe: https://assets.adobe.com/public/a0b635a3-6bc3-452b-5f7d-c997b9b36cf5
I find videos look darker on iphone screens and it worries me because most of the videos I produce will be consumed on mobile devices. It’s been a rabbit hole for me.
Also, the Rec709 LUT makes the footage too contrasty so I use it in the creative tab and reduce the intensity to about 25.
I’m thinking of just skipping the REC.709 LUT part for all web videos to simplify my process and avoid the hassle.
Would you advise I do that?
PS: Thank you so much for your time and attention, you are greatly appreciated.
So on the whole should you use sRGB 2.2 or 2.4 gamma for web delivery?
I’ve read through this article several times and learnt a lot. There are however two statement that seem to contradict each other. The first is yours:
The crux of post is to set your monitor to the calibrated colour profile that matches the standard you are delivering in. Grade within the spec of the standard and then anyone who sets their monitor/TV to the same standard, should see it as you intended.
This makes sense to me.
The second is from Patrick Inhofer:
The delivery destination makes no difference when I’m color correcting! I set my gamma appropriate to my viewing conditions, not my delivery specification.
Which doesn’t.
I’ve answered my own question by reading Patrick’s article that you referenced. It is important to read the rest of his article. He states:
But what if you’re delivering for a different viewing environment?
There are two common scenarios here:
You’re mastering in a broadcast environment but delivering to digital cinema.
You’re mastering in a broadcast environment but delivering to the internet.
In both scenarios, you color correct using the gamma appropriate for your mastering environment and then do a gamma adjustment when rendering – to transform the image so it looks similar to your image, in those darker or brighter viewing conditions.
In other words, grade for your equipment and setup and subsequently adjust for delivery.
Hi Scott, thanks for taking the time to reply to your own comment! Hopefully this will be helpful for others too.
I’ll go back now and double check the clarity of the original quotation I used. many thanks Jonny
First, thanks to everyone who has shared their deep knowledge of color grading here. In the blog post and beyond.
Now, I have a really dumb question: I’m a beginner with Resolve: if I’m grading a 4K project for dci-p3 color space using Resolve and a Deck link mini for output, how to I set the color of my monitor: the built in DCI P3 setting? a calibrated setting stored in the monitor for dci-p3? Or something else, like Adobe RGB? I understand that Resolve will ignore the icc profiles, but can it muscle past the internal monitor setting. It doesn’t seem to.
I’m concerned color space parameters wd be applied 2x and thus distort the final color space of the output. As I said, I am a beginner with Resolve so this is a dumb question.
The monitor is a Benq SW271.
Further….
Most home TVs are set very bright. Much brighter than the recommendation to set the grading display to 100 nits. So, changing the gamma of the home tv to gamma 2.4 would have the effect, kind of, of normalizing the image to correct for the 200nit typical home TV.
It has been my experience, that grading to gamma 2.2, in a darkened room with some surround lighting, for me, seems to create an image on a bright home TV, set to gamma 2.4 (though many are not!) in a moderately dark room. Unfortunately there are no true standards for home viewing, and people generally prefer their TV’s set with a high white point.
For my own home TV, I have an excellent last model Panasonic plasma with near zero black level. I view the TV in a darkened room, gamma set to 2.4, but the white level (contrast) set a bit higher than 100 nits. Just because I like this effect viewing most programming. It also has the effect that I can still see an ok image, even when some lights are on.
From a colorist perspective, when I deliver REC709 mastered at gamma 2.2, the streaming versions and trailers look much better on most platforms that show streaming material, especially in web browsers. I do notice some slight darkening when I view material I’ve graded and uploaded to vimeo, when viewed on my tv via the vimeo app that is not a web browser however. You can’t win em’ all here!
Bruce, thank you again for taking the time to elaborate on your point, much appreciated.
One thing I haven’t been able to pin down is why you say: “You stated that the reason the “standard” REC709 gamma was changed to gamma 2.4 was that people were now viewing at home in a darkened room.”
I didn’t say that it had changed at all?
Although you’re right that SD Rec. 601 had a gamma of 2.2 and when HD Rec 709 came in it was aligned to 2.4. (or if you wanted to BT1886).
For anyone else reading these comments these two posts should help you out…
https://www.root6.com/support-2/tips/whats-the-best-setting-for-gamma-with-rec-709-video/
https://forums.creativecow.net/docs/forums/post.php?forumid=277&postid=39064&univpostid=39064&pview=t – and the PDF Marc Wielage links to.
But what I hope we land on is one of your nuggets of wisdom:
From a colorist perspective, when I deliver REC709 mastered at gamma 2.2, the streaming versions and trailers look much better on most platforms that show streaming material, especially in web browsers. I do notice some slight darkening when I view material I’ve graded and uploaded to vimeo, when viewed on my tv via the vimeo app that is not a web browser however. You can’t win em’ all here!
Thanks for your reply to my reply!
I was reacting to : ““Whereas broadcast TV standards expect you to be watching TV in the evening in a darkened environment, so the Rec. 709 broadcast standard is Gamma 2.4.”
I don’t understand this. Yes, I’ve seen it many times on the web. I’ve also seen that DCI cinema gamma is 2.6 because it is in an even darker room? Whatever.
My point is that this is kind of “internet old wive’s tales”. DCI cinema gamma could have been set to anything as long as the mastering matched the viewing display tech. Why they really chose gamma 2.6? I don’t know. Maybe just to be different! Why is 2k cinema resolution set to a different standard than HD TV standard (by just a tiny bit)? Just to make us all re-render and scale everything to and from the cinema standard? Or is it just marketing: “It’s 2k!, way better than 1.92K!” They should have matched to make life easier for all the post people, but they don’t.
So my point is that the “standard” gamma of 2.4 is not 2.4 because of dark viewing rooms. Unless, one is assuming that one is watching old 2.2 gamma mastered material in a new environment, ie. in a darker room.
I do not agree with the idea behind the REC1886 gamma approach for color grading. See Steve Shaw’s article at: https://www.lightillusion.com/error.html#bt1886_gamma
Bruce,
I agree with you entirely. Just to clarify, you say ‘It has been my experience, that grading to gamma 2.2, in a darkened room with some surround lighting’… so the grading room is brighter than just having a 5 to 10 nit bias light behind the grading monitor? Can you elaborate on that a little?
My own room has dim lighting behind me, nice and subdued. I try to emulate ‘regular’ home viewing conditions, and this seems to work fine for ‘bright’ computer viewing too.
Do you find your grades look a little ‘richer’ when viewed at 2.4 in a very dark room?
I haven’t measured but I have my bias light behind the display, not behind me! Behind me is dark to avoid any reflections.
So, consider my grading environment as a “darkened room”.
If I’m working at gamma 2.2, then, all things being equal, it will look darker on a 2.4 gamma display. But my point was that, for most viewers I think, all things are not equal and they have their displays set quite a bit brighter than 100 nits. So, I’ve found that if I deliver gamma 2.4 then it usually looks too bright for most people with bright home displays.
As a side note, if you’re grading REC709 but need a DCP made for cinemas, many DCP houses will assume your REC709 original is mastered at gamma 2.2 and not gamma 2.4. So, it’s really vital to tell the DCP house that your REC709 original is gamma 2.4 if that is what you’ve mastered to.
Make sense?
“Whereas broadcast TV standards expect you to be watching TV in the evening in a darkened environment, so the Rec. 709 broadcast standard is Gamma 2.4.”
I think you misunderstand this. If you set your grading display to gamma 2.4, it will look darker, and you will grade lighter to make everything look correct to your eye. Then when you view it on a TV set to gamma 2.4, it will not look darker because you are in a dark viewing environment, as you have already made everything lighter to compensate!
What ever the true reasons for declaring that REC709 is gamma 2.4, by changing the grading display to gamma 2.4 means that the end result will be the same as grading 2.2 for a gamma 2.2 display. In order for the gamma 2.4 tv in a dark environment to look “a little darker” to compensate for the environment, one will need to grade on a gamma 2.2 display 🙂
Hi Bruce thanks for taking the time to check out the blog. I’ve updated the post to make things a little clearer (I hope) on the topic of perceived contrast or the ‘dim surround effect’ as it’s called.
From what I understand of your comment, you are only talking about changing the display’s gamma, but not the surrounding environment as well. But you must change both to make your reference/grading environment match the optimal end-viewing conditions.
So if you only change the display gamma to 2.4 whilst working in a bright environment you would end up “grading lighter to make everything look correct to your eye”. But what you should do is make your gamma setting match your grading environment.
“So if you only change the display gamma to 2.4 whilst working in a bright environment you would end up “grading lighter to make everything look correct to your eye”. But what you should do is make your gamma setting match your grading environment.”
I think you missed my point. You stated that the reason the “standard” REC709 gamma was changed to gamma 2.4 was that people were now viewing at home in a darkened room. That makes some sense, as long as the programming gamma has not changed. But once you change the gamma of the program master, you’re back to where you started, ie. that the gamma of the mastering display matches the gamma of the consumer display and environment.
In the “old days” of gamma 2.2 mastering, I never entered a post house that did not grade in a darkened environment. Certainly in the past 20 years, all mastering has been done in a darkened environment. But, changing both the gamma of the mastering display and the gamma of the viewing display means that NO change in the viewing experience has occurred. And this is why this whole business of changing the “standard” to gamma 2.4 for mastering has me confused. Whatever the reason for this change, it is not because consumers have changed to viewing in a darkened environment. It is something else.
To further complicate this, I’ve seen others post that the gamma of DCI cinema projection is 2.6 because it is in a darkened theater. But, this is also false. It could be any gamma as long as the mastering display/theater matches the standard.
Make sense?
Having just started a job creating video for online exhibition, I was horrified to see that a carefully polished color grade out of Davinci Resolve transformed into an output of slightly green cast, desaturated quality on youtube, facebook, Instagram, etc… and even in QuickTime player on the computer.
This was with all monitors (not output monitors, but working monitors) calibrated to REC 709. That’s when I realized that Premiere and Resolve were displaying something different as I worked, and that I needed to discover the right recipe to have them display what it would end up looking like online.
It seems like quite a complicated chain of possible checkpoints. Bringing the output file into AE shows the same discoloration when the AE project is color managed to Rec709… but turning off color management presents an image that looks exactly as intended (yet is it not going through the monitors ICC profile?).
For a quick fix, getting the contrast back to normal involved re-rendering the Resolve output master movie in AE with an assigned sRGB profile instead of a Rec709 profile. I had to use AE since the other programs couldn’t assign a profile. But that still didn’t fix the apparent drop in the red curve.
But maybe the solution is that I need to keep my monitors calibrated to sRGB? I have to admit, I’m quite confused (being a novice to the technicalities of color space). I need a flowchart illustration of what profiles and color space settings should be active on monitors, AE project settings, AE render settings, Resolve color management, etc.
Thanks Jonny for this interesting article, still its a bit confusing for me…
I am as well on a Mac Pro 2013 with an Eizo 19″ for “grading” and an HP1745 for my timeline.
Working mainly in FCPX.
As you, i would like to get the best out of my equipment and want to understand, thanks to your article its a bit more clear how the different NLE’s handle the color space.
You write “… if you’re grading on a computer monitor, delivering for the web then set and calibrate the monitor to sRGB Gamma 2.2.”…
now, if i calibrate my monitor with the internal mac calibration program, i am not really satisfied, it looks “not correct” to my eyes..
as well i don’t have the option of choosing sRGB in the calibration program…
can you advise me or talk a bit more about which settings are the best using the internal calibration program?
i would appreciate that… thanks for your work and keep it up! all the best!