
DaVinci Resolve 12 Tutorials and Tools
DaVinci Resolve 12 is almost here (shipping in July) and the demonstrations from Blackmagic Design are coming thick and fast. In this first video you can check out a 30 minute presentation from Paul Saccone demonstrating the improved editorial features in Resolve 12 at recent LACPUG meet up.

Colorist Rob Bessette has a nice write up of his top 5 favourite features in Resolve 12, which includes images from his NAB tweets that I gathered together in this previous post. It’s great to hear from a working colorist on the features that will be most useful day-to-day in the grading suite.
YRGB Color Managed. This was kind of a weird feature to demo since it doesn’t really show the power of this new color science implemented by the BMD team, but for some this will be a serious game changer. Basically you can choose an input, timeline, or output colorspace. Depending on your source footage you can put all formats into the same colorspace. So, for example, if you have LogC, Rec709, and other starting points from difference cameras, you can place them all in the same world. I’m thinking of it as a non-destructive LUT. This will save tons of time for colorists and instead of having to balance out all the different colorspaces, most of that work will have already been done.
For double the insights and a lot more questions and answers, Orlando Post Pros shares an hour long demo with Oliver Peters and Jason Druss from Blackmagic Design. Well worth a watch for a deeper dive into the wider feature set. What’s also well worth a read is Oliver Peter’s article on 10 tips to improve you skills.
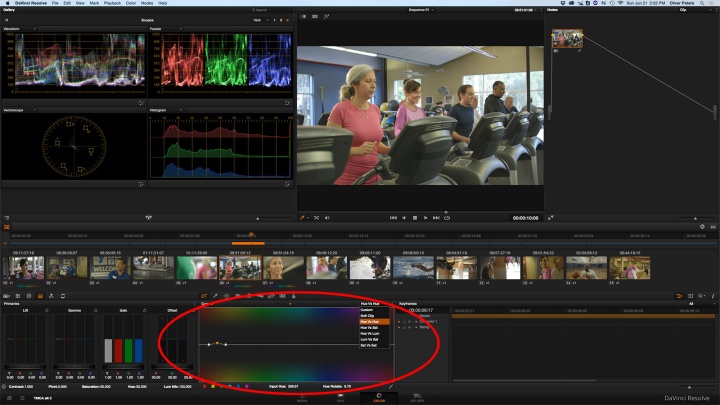
The hue vs. hue curve is beneficial for skin tones. A film that I’m currently grading features a Korean lead actress. Her skin tones normally skew towards yellow or green in many shots. The Caucasian and African American actors in the same shots appear with “normal” skin tones. By selecting the color that matches her flesh tones on the curve, I am able to shift the hues towards a value that is more in keeping with pleasing flesh tone colors. When used in combination with a mask, it’s possible to isolate this correction to just her part of the frame, so as not to affect the coloration of the other actors within the same shot.
Update: Alexis Van Hurkman DaVinci Resolve 12 Demo
Colorist, author and trainer Alexis Van Hurkman demonstrates some of the new features in Resolve 12 at this MoPictive User Group event in NYC. Jump to 43 minutes in to see a very dapper looking Alexis, demo-ing the up-coming release.
There are some really fantastic new features to show, including multicam editing, advanced color management, automatic shot matching, expanded trimming and dynamic trimming, automation recording and audio filter support, improved tracking, a new keyer, and way, way more.
DaVinci Resolve Tutorials
In this excellent tutorial colorist David Torcivia demonstrates how parallel nodes work and how to make use of them for grading a martian landscape, which gives me a good excuse (if tangental!) to include the trailer for The Martian, which looks really cool. If you like David Torcivia’s style then you should check out more tutorials from him in this previous post.
![]()
If you’re taking Avid Media Composer projects into Resolve and back again, and want some expert tips on how to make that a smooth process, Scott Freeman has a detailed step by step guide to doing just that over on Creative Cow.net.
I am about to show you the three bin metadata fields to track for flawless conform in your round-tripping between Avid Media Composer and DaVinci Resolve. Every frame. Every time. Ideally, you will set up these fields correctly before you begin. If something goes wrong because you didn’t, the information in these three fields are where you’ll be able to fix the problems you may have.
Alexis Van Hurkman has a great tutorial for anyone wanting to know how to even begin the basic process of colour grading with this 5 minute tutorial on shot matching with the RGB parade. For a complete playlist of all 10 Resolve in a Rush tutorials from Ripple Training check out this previous post.
Colorist Rob Bessette demonstrates how to use external mattes to fix otherwise ‘unfixable’ shots, which he’s found particularly useful in his commercial grading work.

In this next tip Noam Kroll shares his four step process to perfectly matching skin tones using qualifiers and power windows.
It comes down to your order of operations… you need to start your process by balancing and matching your shots to each other as closely as possible using one or two nodes that are simply dedicated to fixing technical issues. You want to ensure that your white balance/contrast is consistent with other shots in your sequence, and ideally each shot is at a neutral starting point. From there you can start to isolate elements in your image (skintones being the one we are focusing on here of course), and then eventually you will add an overall creative look to your footage.
Tomasz Huczek, maker of the free false colour plugin below, lets you sit over his shoulder as he works on a shot recorded with the Blackmagic Pocket Cinema Camera.
In these next three videos you can get some excerpts from Andrew Balis’ MacProVideo.com’s training series on working with versions and gallery stills to quickly grade your project.
Free False Colour Plugin For Resolve

You can download a free ‘False Colour’ plugin for Resolve (on Mac and Windows) from TimeInPixels.com. What’s a false colour plugin for?
False Color is a technique used in video cameras to map the exposure levels to a specific color ranges. The purpose of the false color is to identify the brightness levels and differences between them easily while still being able to see the source image outline.
False colour helps you see your image’s exposure in a new way so that you can more easily match contrast ratios, compare fill and key light ratios and much more. The plugin is free, although you can support it’s development by donating on the site.
False Color Plugin can be dropped on any node within DaVinci Resolve, which means that the False Color overlay is visible in the main preview window (unlike other scopes built into DaVinci). It also means that the overlay can be zoomed in as well as applied on the timeline nodes to see the results on all the clips at once.
Creating 3D LUTS for Calibration in Resolve
SpectraCal, makers of the CalMAN calibration software, have some great videos on their YouTube channel that might be worth checking out if you’re looking to get deeper into calibration techniques. In this webinar they wade through the topic of 3D LUTS and how to create corrective 3D LUTS for Resolve.
High end grading monitor makers Flanders Scientific also have a quick video on how to use Resolve as test pattern generator when calibrating with the CalMAN studio software.


